


Guide to Double Exposure Photography
Find out the best double exposure photography tips in this must-read guide! Learn how to get started or take your blended shots to the next level.
Learn | Photography Guides | By Ana Mireles
Shotkit may earn a commission on affiliate links. Learn more.
Have you ever seen those images where someone’s hair turns into trees? Or those where a person seems to be talking to their clone?
Those photographs are examples of double exposure photography. Since the final image is so impressive, it looks like it’s complicated to do, but fortunately, it’s not!
You can do double exposures with film photography, digital cameras or in post-production. In this article, I’ll focus on doing them in-camera using digital photography.
That’s because it’s easy and most digital cameras have this feature included – plus, you’ll find it’s especially rewarding.
If you prefer Photoshop though, you’ll also find a quick guide to make double exposures in post-production.
To top it all up, you’ll also find some tips on how to get inspiration and creative ways to use double exposures.
There’s something for everyone, so let’s dive right in!
What is Double Exposure Photography?
Double exposure in photography refers to an amazing technique where you can have two photos in the same image. It comes – like many other cool things – from film photography.
While modern digital cameras make photography double exposure techniques simple (we’ll get into this later), it’s back in the 35mm film days that taking multiple exposures was first introduced.
With film cameras, you could do double exposure photography by reusing the same frame on the film to shoot two images.
This could be done by photographing the entire roll, rewinding it and reshooting all of it. It was a bit difficult to achieve the desired effect – as you can imagine.
Not only was it impossible to see the previously shot image, but you also had to remember which frame it was.
To do this more accurately, you would have to take notes and maybe do some drawings, so it was a bit complicated. Plus it had some randomness involved which lessen the chances of a successful result.
A slightly easier way was to use a camera that didn’t automatically change the frame after the shot. This way, you could immediately do the second image while the first one was still fresh in your memory.
Then you would turn the crank to change the frame and do more double exposures or continue using each frame singularly.
If you want to do some in-camera double exposure using film – second-hand film cameras are easy to find in flea markets or eBay.
Some film rolls are still on the market at fairly good prices. Getting them developed is a little more complicated, but you can still find some places that will develop them for you.
If not, there are some options where you can send them via mail, but the shipping could be expensive, depending on where you live. Of course, you can always try developing at home – which it’s easier to do with a black and white film.
Another fun idea is to use a Lomo camera like Holga. This will give you the flexibility to do double exposure photography with the characteristic looks of toy cameras.
What is multiple exposure photography?
Multiple exposure photography refers to superimposing two or more exposures to create one final image. A double exposure can also be classified as ‘multiple’, although it obviously refers to only two images.
How to Create a Double Exposure In-Camera

Credit: Ana Mireles
Most digital cameras have a built-in feature to do double exposure photography. However, it might be different in each camera.
Since this is not something that you would do in every photoshoot, it’s not necessarily in a visible place or is configured for quick access.
The best way to find out if your camera has a double exposure feature is by checking your owner’s manual. Otherwise, you can do some quick research on Google, and I’m sure you’ll find the answer.
Some Canon, Olympus and Fujifilm cameras offer the unique advantage of being able to choose an image that’s already on your memory card to start. Then you overlay new exposures onto that one.
Other cameras might not give you this choice (unusually, neither Sony nor Nikon currently offer this feature), but they still have a double exposure feature.
Anyway, check on your camera and let’s take some pictures.
Step 1: Plan your image
Double exposure is a technique that opens up a world of possibilities. You can give free rein to your creativity.
The danger with it is to end up with a picture that’s too messy. That’s why, even if you can make a double exposure of anything, it’s better to make a plan.
First, get some inspiration and choose an idea about the theme or the concept that you want to do—for example, music.
Then, decide how you want the elements in both pictures to interact with each other. This is about composition. For example, if you fit your main element on the right, the next one should be on the left and so on.
There are many ways to use this technique. You can do the ever-popular silhouette that contains a scene. Another fun experiment is cloning yourself – or someone else – and make it appear many times in the same scene.
Also, you can think about chronophotography. This is about capturing the same subject over time within the same frame. For example, the images that show a lunar eclipse in many stages.
Of course, you can escape the commonplaces and get some inspiration from the great artists that use double exposures.
Brandon Kidwell has – amongst other projects – explored the body by carefully composing exposures of different parts of the body to create a portrait.
Another artist that got enticed by double exposure was Andres Gallardo. He normally does architectural photography; however, on his personal series Exposures, he used this technique.
One of my favourites is the surreal world of Thomas Barbey. I could go on with the list, but I think you get the idea and you can explore this world on your own.
One last thing, if you’re not particularly inspired for creative work, you can also use in-camera double exposures to compensate for highly contrasted scenes.
Step 2: Set the double exposure feature
Now that you know how your double exposure image is going to look like, it’s time to grab your camera and start shooting.
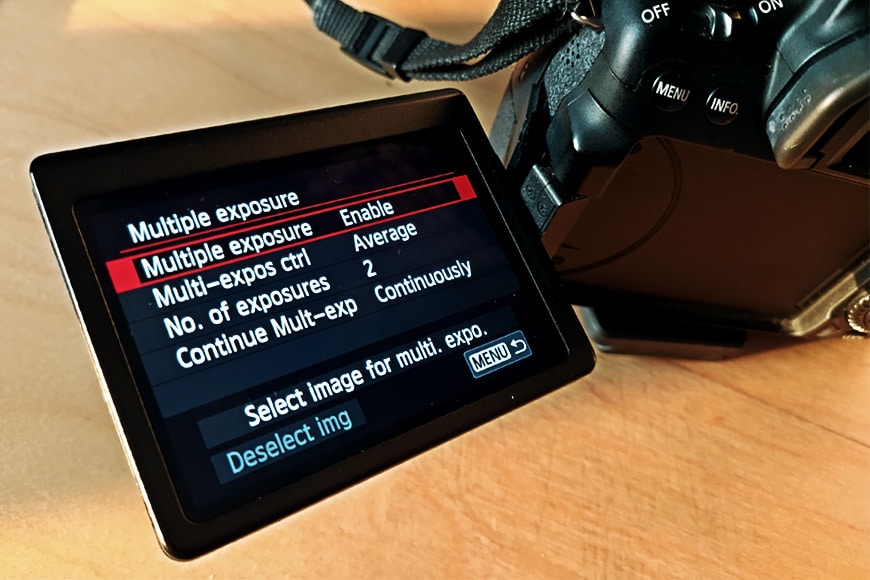
I’m using a Canon camera, so this part could be different from yours. First, navigate your menu until you find Multiple Exposure. In this case, it’s the fourth tab. Then tap on Enable to activate it.
Now you’ll be able to adjust the settings for the double exposure feature. The ‘Multi-expos ctrl.’ allows you to choose how the camera adjusts the exposure priority.
The additive model adds up each exposure. This means that you need to compensate manually to avoid getting an overexposed image.
The average mode calculates the compensation for you. Then, depending on the model of your camera, you might have a third option: Bright / Dark.
Your camera may offer different possibilities. Experiment with them and choose the one that works best for you.
Then, you can decide how many exposures you want to overlap. Canon gives you up to nine exposures. I suggest that you start with two or three while you get the hang of it. Otherwise, your image might be too busy.
‘Continue Mult-exp’ is to decide if the double exposure feature should be enabled or disabled after the first set of images.
If you choose ‘Continuously’, the double exposure will remain enabled. This means that after you take the two photos that compose the image, the next one will become the base for another set and so on.
If you want to get back to single shots after this one, you can choose ‘1 shot only’. This way, you won’t have to go back to the menu to disable it manually.
Finally, there’s the ‘Select image for multi. Expo.’ That’s the option that allows you to choose any image from the memory card as the base for the double exposure effect.
Step 3: Take the first picture
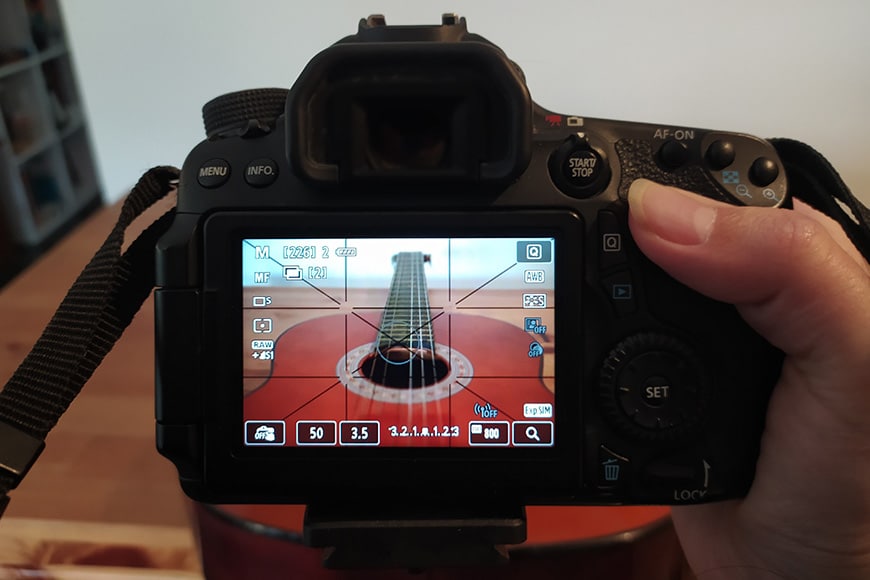
If you’re using a Canon camera – like me – you can either take the first picture or choose the first picture from your sd card.
Let’s assume you’re taking the picture. You can proceed as you normally would for any photograph.
Keep in mind the composition you had planned so that you position the elements in the right place. Remember to underexpose for one or two stops depending on your settings of Multi-expos ctrl.
Alternatively, you can expose to the darkest part of your picture. For this, you need to be familiar with the metering modes of your camera.
Step 4: Take the next photo
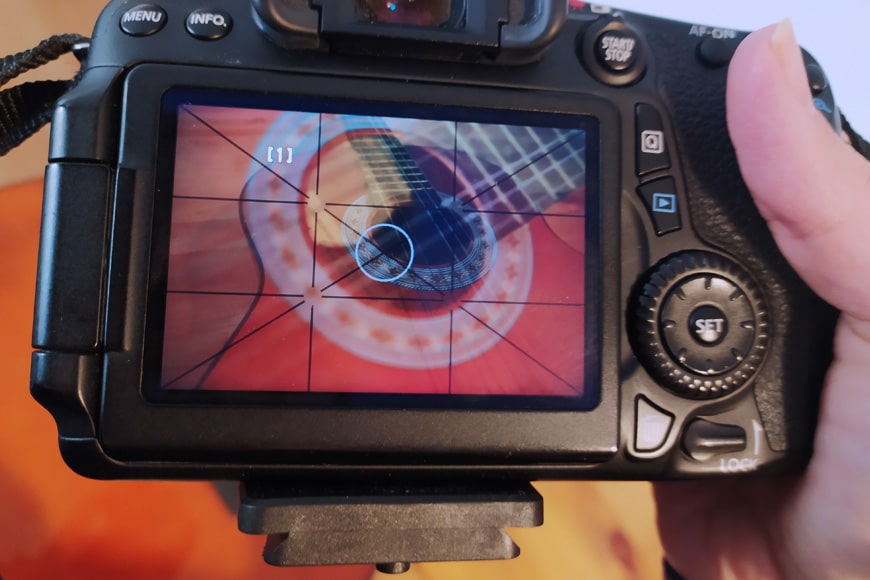
The second photo is easier. You can turn on the Live View so you can see both exposures on the screen.
This way, you will know exactly how to compose the second image. You can check for the correct exposure too. Remember that you can adjust the settings without interfering with the image you already have.
You can make double exposure photography using completely different light conditions for each shot. Then the camera will process both and deliver a double exposure image.
If you’re using more than two images, keep repeating this step for each one.
How to Create a Double Exposure using Photoshop
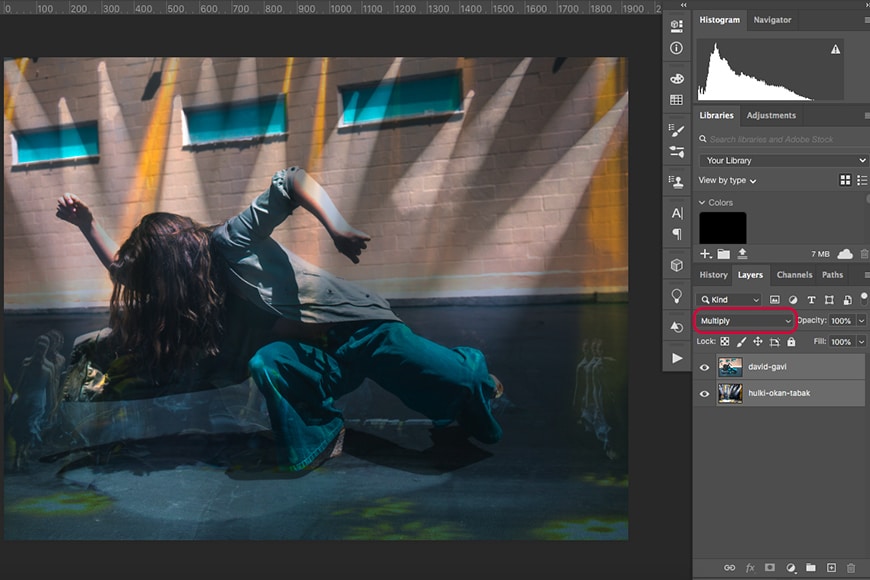
Credits: David Gavi and Huilki Okan Tabak
If you prefer to do double exposure photography in Photoshop, that’s very easy to do.
Open two photos in the same document. You can do this from the menu File, Scripts, Load Files into Stack. This will open a browser window where you can choose which images you want.
Then change the blending mode to Multiply in both layers. This can be done in the drop-down menu you’ll find in the Layers panel.
That’s it. You have a double exposure effect done entirely in Photoshop. Remember that you can experiment with other Blending Modes to achieve different results.
(Check out our guide: How to Blend Layers in Photoshop and how to blend or merge two images for more tips.)
Also, you can change the opacity in one of the layers if the final result is too dark, or one of them is too distracting from the other.
You can also use Layer Masks if you want to hide part of one image that might be interfering with an important part of the second image.
In any case, this is just the basic technique to make double exposure photos in Photoshop. From there, you can use all the editing tools to perfect the effect.
3 Creative Ways to use Multiple Exposures
These tips on double exposure photography are taken from an article written for Shotkit by wedding photographer Carsten Schertzer.
1. Shift White Balance
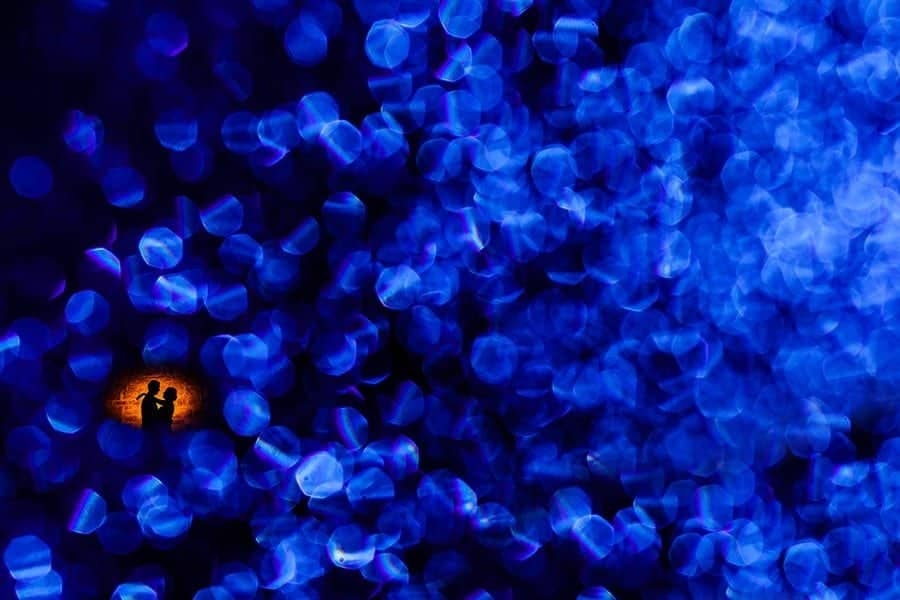
As the name implies, when doing a multiple exposure, you are just combining 2 or more exposures into a single image.
You can add a ton of visual interest to your multiple exposure by using different white balances between each frame to create a strong color that otherwise would not exist.
The image above is made up of two exposures: the first exposure is of the bokeh which was originally just a white color. I shifted my cameras white balance to 2500K, forcing the camera to introduce the blue color into the exposure.
Then the second exposure was the silhouette which I created using the Magmod Creative Orange Gel, I used the orange gel knowing that the orange would contrast nicely with the blue bokeh.
2. Mix Focal Lengths
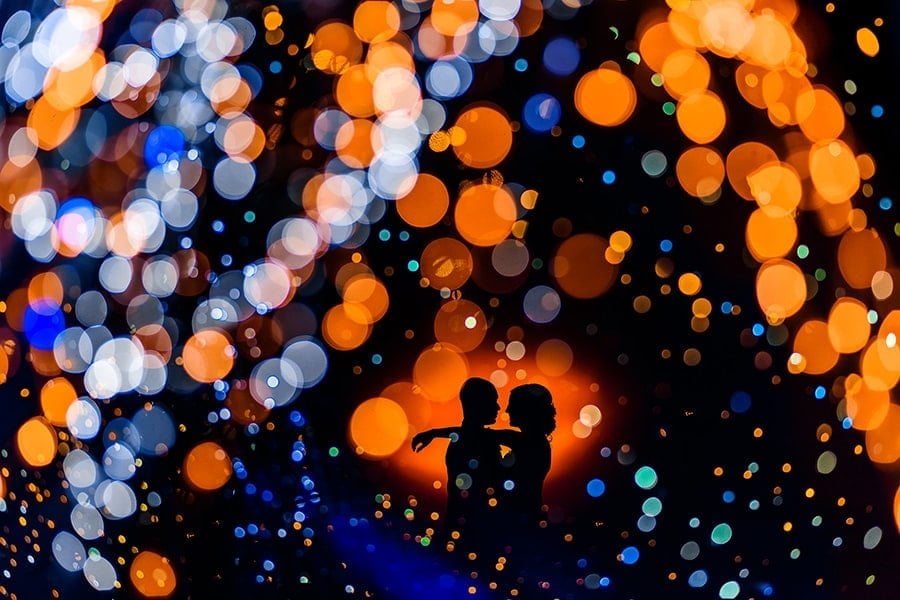
Very similar to shifting while balance to add color, you can also vary your focal lengths between exposures to force perspective in ways that add a ton of visual interest and might otherwise be impossible without the use of multiple exposures.
This photo was actually five exposures combined into one. Four of those exposures were of the bokeh and the fifth exposure was of the couple.
This is an example of both mixing the focal length between exposures and also mixing the white balance between exposures.
The first exposure was with my camera set to 10,000K white balance and zoomed in to 200mm, the second exposure was 10,000K at 70mm; the third exposure was 2,500K white balance at 200mm, and the fourth exposure was 2,500K at 200mm.
3. Tell a Story

Another really cool thing about multiple exposures is that you can use them to your advantage when it comes to telling the story of a wedding day.
You can include multiple visual elements from various scenes and combine them in a way that contributes to the story.
In this photo, I’ve been able to not only create an interesting photo using multiple exposures, but also contribute to the story of the image by including the iconic U.S. Bank Tower building in downtown Los Angeles.
By adding in that element it adds another layer of interest to the image because it allows the viewer to infer not only what is happening in the image, but also where and when the image was taken – also note the white balance differences between each exposure ;-)
Final Words on Multiple Exposure Photography
I hope you find this article useful and decide to try double exposure photography.
It’s surprisingly straightforward to do – as you can see – and the results are amazing. Best of all, it may be a feature sitting on your camera that you’ve never noticed before!
Share your comments, experiences and doubts in the comments section. We would love to hear from you.

Check out these 8 essential tools to help you succeed as a professional photographer.
Includes limited-time discounts.

Ana Mireles is a Mexican researcher that specializes in photography and communications for the arts and culture sector.

👋 WELCOME TO SHOTKIT!
🔥 Popular NOW:
