


Exposure X7 Review
Need a great image editor with NO subscription fee? Check out this in-depth Exposure X7 review for photographers in 2024. (Save $10 with discount code.)
Software | Software Reviews | By Greg Cromie
Shotkit may earn a commission on affiliate links. Learn more.
Are you looking for a pro-level RAW image editor that operates perfectly as a standalone solution, or as a plug-in for Adobe products?
I highly recommend you take a look at the Exposure X7 image editing app by Exposure Software, (previously known as Alien Skin, with their popular Alien Skin Exposure plugin.)
It's an accessible, user-friendly, and extremely powerful addition to any photographer's workflow.

Highly customisable photo editor with excellent image management features and a wide selection of great presets.
Use code SHOTKIT to save 10%
The best bit is that it doesn't require a monthly subscription payment – you can buy this one outright at a reasonable price… unlike other software you may know!
Take the time to read through our extensive review of Exposure X7, to find out why this is one of the best editing platforms on the market here in 2024.
Exposure X7 Review Summary
Exposure is a powerful and intuitive image editor with an extensive range of tools to suit every standard of photographer from beginners through to professionals. The affordable one-time pricing is hugely attractive, and a range of one-click presets make editing an enjoyable and rewarding experience. Highly recommended!
What is Exposure X7?
- Great customization options
- User-friendly
- Efficient DAM
- Beautiful presets & overlays
- Excellent value for money
- Can load slowly on some computers
- No image layer support
Exposure X7 is a RAW image editing software that allows you to take the RAW images shot with your camera and retouch them to look even better.
The software works as a standalone product, meaning that you don't need any other file management or editing software to manage your post-production workflow.
You can also use it as a plug-in within Adobe Photoshop, or as an external editor for Lightroom.
This software is so versatile that it can quickly be picked up by those new to photo editing. Equally, professional photographers will find a fully-fledged editing suite to make their workflow as efficient as possible.
Once you have your files available, Exposure allows you to fully control the editing process with as much or little input as you need.
You can change the way in which the composition is framed, the colour palette, tonal values, and even add creative effects.
With Exposure, you can take dull, flat photos and bring them to life.
If you have never used an editing tool before, you will find it incredibly intuitive and easy to navigate.
If you need some further assistance, there is a huge catalogue of tutorials available on the Exposure Software website.
System Requirements
- Apple Mac: OS X Yosemite (10.10) or newer
- Microsoft Windows: Windows 7 64-bit or newer
- An Intel Core 2 processor with SSE4 support or compatible
- A monitor with 1280×768 resolution or greater
Plug-in requirements
- Adobe Photoshop CS6 or Adobe Photoshop CC 2015 or newer
- Adobe Lightroom 6 or Adobe Lightroom CC 2015 or newer
Supported File Formats
- TIFF, JPEG, DNG, PSD (that have Maximize Compatibility turned on)
- Most in-camera RAW formats are supported
What's New in Exposure X7?
The latest version of Exposure builds upon X6 with a number of key new features:
- An innovative new masking tool that enables you to make selections by quickly drawing a rough border.
- Editing workspaces organize panels needed for a particular task. Use the included culling, editing, and retouching workspaces or create new ones customized for your specific needs.
- Crop and transform have been united in a single easy-to-use interface. Additionally, new composition guides have been added.
- New defective pixel removal is available for raw photos.
- More faithful color reproduction when using custom DCP color profiles
- Improved color fidelity with DNG files
- Fine texture noise can be added to recover detail with aggressive noise reduction.
Out of all these updates, the main ones that will benefit most photographers are the improvements to general UI speed, the new masking tool and the workspaces feature.
Features
Exposure X7 is a complete photo editing and file management package that can also operate seamlessly with Adobe products such as Photoshop and Lightroom.
It's one of the most user-friendly editing tools I have ever used thanks to its easy to follow menu system.
I found inspiration through taking older RAW files and taking a crack at editing them with the creative tools found in X7.
Plus, I was able to streamline my workflow a lot by making some changes to the way in which I interact with the software.
Exposure has a great range of creative and powerful image editing tools, and plenty of awesome presets to save your time in front of the computer.
Let's take a deeper dive into some X7's stand-out features.
Masking Tool
Exposure X7 includes a new masking tool that makes it easy to separate a subject from the background.
You simply draw a rough border around the chosen subject and add in just a few clicks to indicate the selected area and Exposure’s intelligent algorithm creates a precise mask.
The selected area can be refined at any time to adjust the mask, saving minutes if not hours of fine-tuning in Photoshop or other editing software.
This makes it easy and quick to do things like remove backgrounds or locally edit specific sections of your photo.
Customizable Workspace
Editing software can often be overwhelming to those that are new to the process. Or, if you have a need to streamline your workflow, you want the simplest path to completion.
One way to achieve this is to make the most of the fully customizable workspace presented within Exposure. Unlike other editing tools, you can arrange the editing options within the workspace to suit you.
If you have used Lightroom in the past, you will instantly feel comfortable in Exposure X7. The look and feel of the workspace is very similar, making it an easy transition for those moving from Lightroom.
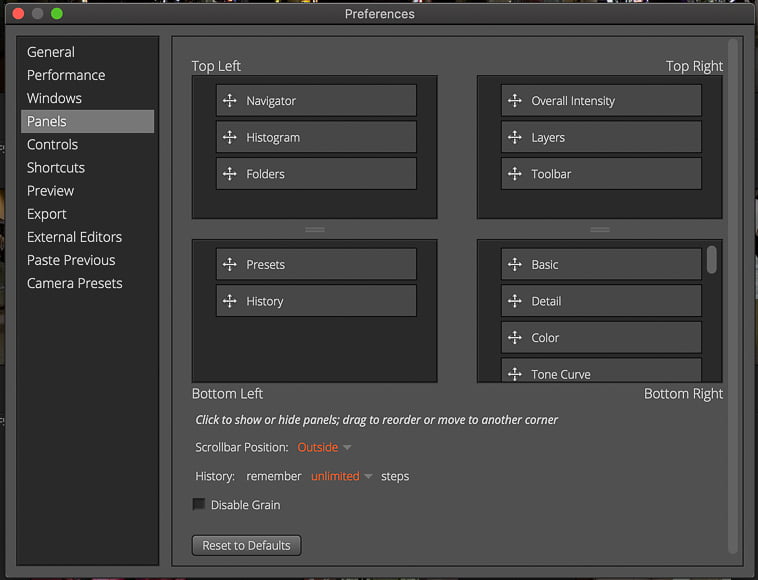
With Exposure, you can customize the workspace panels and editing tools to suit your needs – you can literally drag and drop the tools you want to appear in various sections of your desktop, by using the options in ‘Preferences'.
There are four docks that make the border of the workspace. These can be quickly hidden and shown with keyboard shortcuts to maximize your screen space for the image.
If using multiple monitors, you can have the main layout on one and then the second dedicated to the edited image only.
Plus, unlike other software solutions, there is a single workspace that doesn't require you to jump from a file management tab to a photo editing tab – they are all just in one space.
Overlays
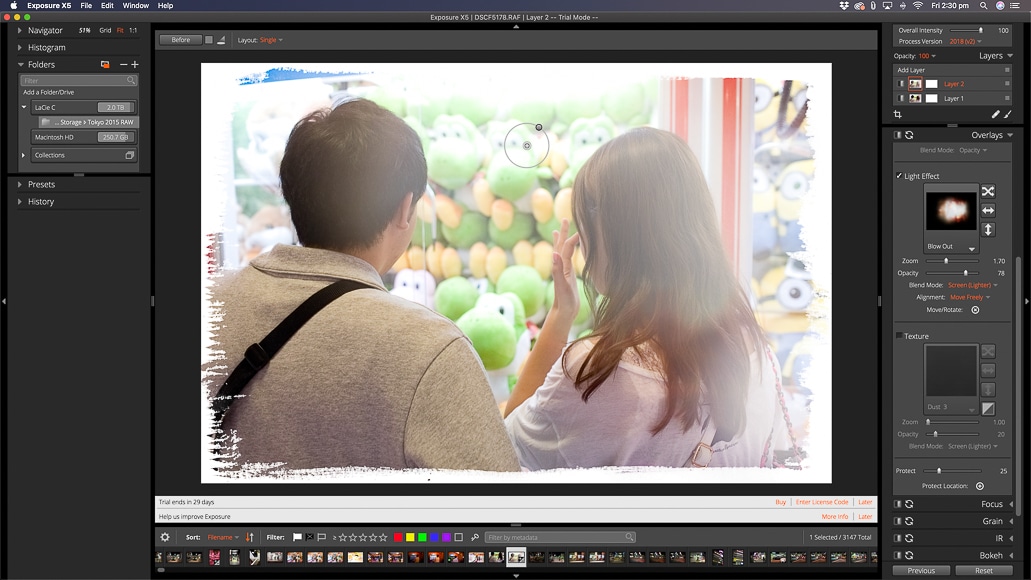
One of the creative editing options within Exposure X7 is the Overlays.
This is a separate editing tool that allows you to apply changes to your image, with the first option being to add a Border. These can vary from borders that create an aged film to a grungy and beat up look.
The overlays give your images an aged and distressed look that can really add to your composition and the story you are telling.
The next Overlay tool enables you to add a Light Effect.
These add areas of filtered highlights to replicate sun flares and light leaks. Adding these bring a lot of drama to a portrait or landscape photo.
The final Overlay tool in Exposure is Textures.
Textures lets you apply different effects to the entire photo – scratch marks and dust, which change the look and feel.
You can even import additional texture packs to expand your library of overlays. These imports can be Tiff or Jpeg images that you have shot and created yourself.
Each of these Overlays come with controls to quickly adjust the intensity and location of the effects. You can also use the Layers tool to add additional Overlays to a single image.
Compatibility
A lot of photographers like to have multiple image editing tools to ensure that they have as much control and choice as possible.
Fortunately, Exposure X7 has been developed to work alongside both Lightroom and Photoshop – arguably the most popular imaging solutions.
You can access and launch it directly within Photoshop to use the software as an additional editing plug-in.
Exposure will handle any Photoshop files with the PSD extension – this is a non-destructive process so you original PSD files are still retained.
Likewise, you can access Photoshop to perform additional tasks from within Exposure.
In doing so, it will create a copy of the image that can be edited in Photoshop so you still retain your original.
You can also use your existing Lightroom catalogues to edit your images.
In doing so, the software can make a copy of the Lightroom file, and then open those copies within Exposure.
From there, you make the necessary edits and then save the files. The files will appear in Lightroom with the Exposure edits applied to the copies, sitting alongside the original Lightroom images.
While some editing tools replicate their keyboard shortcuts from Lightroom, Exposure has developed its own system of shortcuts to suit their tools.
This could be confusing for those either migrating from Lightroom, or wanting to use the two editing tools as described above.
File Management
One of the biggest challenges that photographers face in their workflow is file management. There's nothing worse than knowing you have edited an image only to not have a clue how to find it.
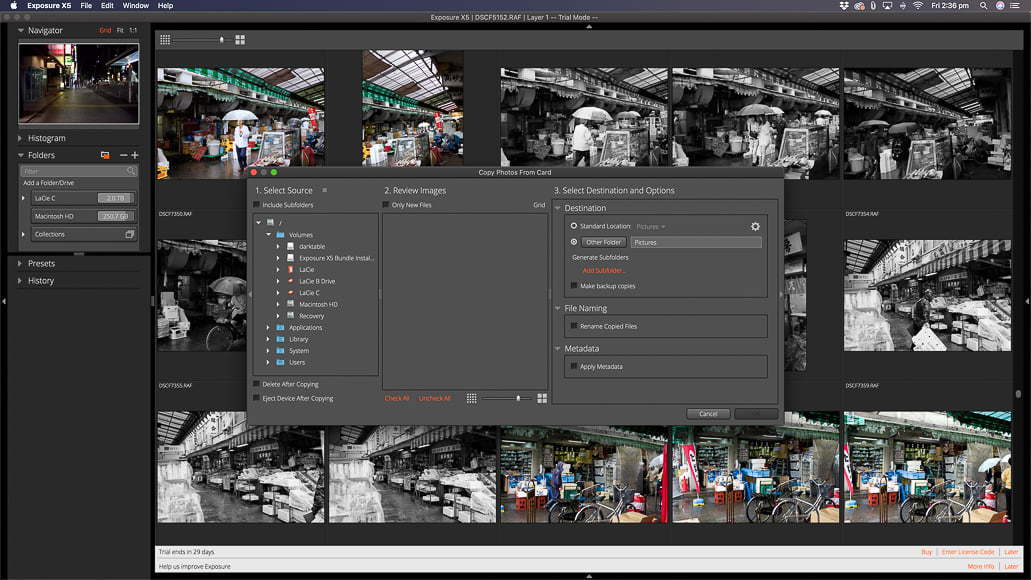
The file management system in Exposure X7 is comprehensive.
A unique feature of X7 is the ability to simply add files directly from your computer's internal storage, or from external drives.
Files are not copied out of these locations – they are just accessed directly from that location.
As a result, there is no cataloguing feature, but there is the ability to create a set of image collections.
Migrating your existing Lightroom catalogue and data into Exposure is easy. You can import both the RAW and a TIFF or JPEG copy of the image with the existing LR edits applied.
Metadata including Lightroom star ranking and flags will also migrate across into Exposure. You can also migrate the Lightroom keyword library so that they are available there too.
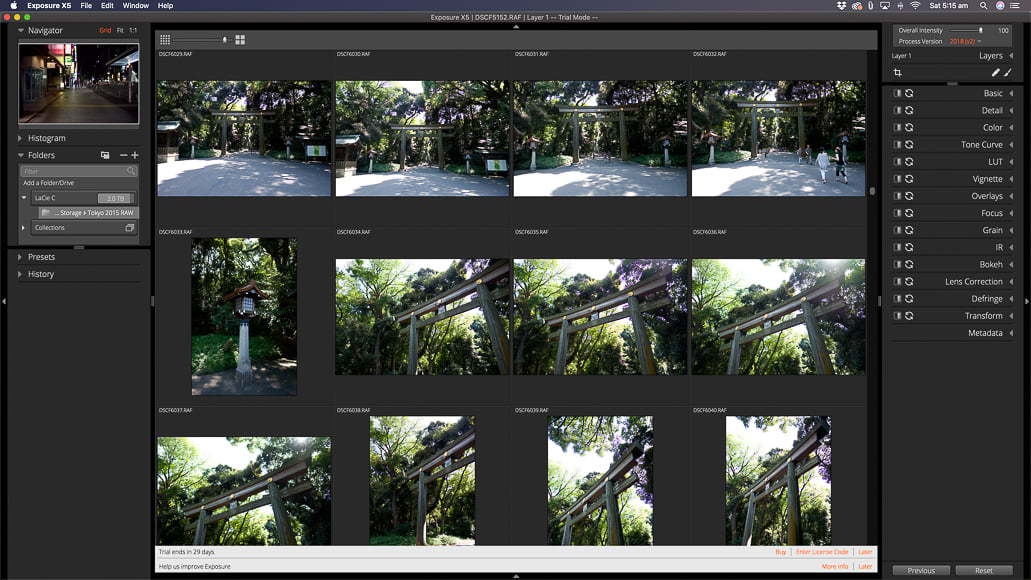
Image management uses keywords, colour, star rankings, flags, and collections to maximize your categorization and ability to effectively file and locate your images.
Also, you can filter files by camera and lens detail or by shooting conditions such as ISO or aperture – this is brilliant!
Another great feature of Exposure X7 is the ability to collaborate on editing images with the use of a cloud-based service such as Dropbox.
This way if you use multiple computers, you can have access to files stored within a folder within your Dropbox to make edits. Or, if you want to work with a team of people on edits, you can apply a similar process over a local network.
As for printing, you can print directly from Exposure.
You can also print a selection of images as a contact sheet which is perfect for checking print quality and for showing clients work.
The print menu provides the option to set print conditions and also allows you to use or save a preset of preferred conditions. With this tool, you can apply margins, select how many images per single print, apply watermarks, and the quality of the print output.
Presets

One of my favourite editing tools within Exposure X7 is the collection of presets.
I seem to somehow lose several hours of my life just applying various presets to my RAW images – I have a sickness when it comes to film simulations!
Presets allow you to quickly apply ‘pre-made' colour and tone profiles to one photo or a collection of images.
Exposure has an extensive range of presets giving you a huge choice of looks and styles for your image collections. I especially like the range of black and white presets.
There are even film simulations from a range of film manufacturers – some are from many years ago.
Plus, with preset auditioning, you can compare various preset looks on the same pic at the same – this is a huge time-saving feature which doesn't exist in Lightroom.

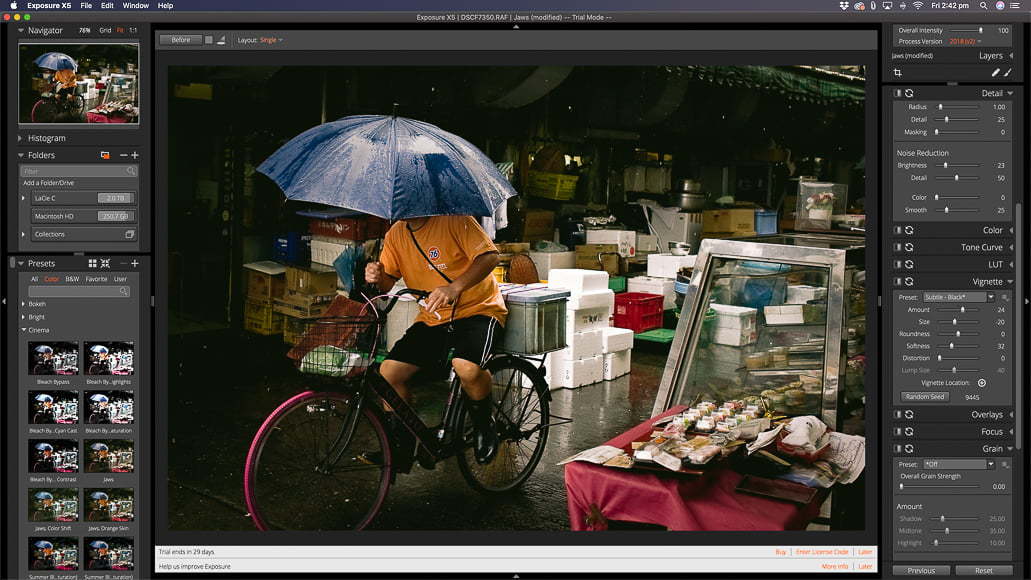
To enhance this Hanami scene, I chose a pink-tone preset to match the cherry blossom.
While in audition mode, you can have up to 6 copies of your photo on the screen each with a different preset.
Then, you can activate the edit panel and make changes that will show up on each of the preset images.
Editing Tools
Exposure X7 has a complete and powerful set of editing tools that will suit any level of photographer.
Thesetools cover everything from dealing with chromatic aberration and lens correction to noise reduction and skin exposure – hence the tool's old brand name, ‘Alien Skin Exposure'… which was admittedly rather confusing!
I have covered some of the tools above but thought I would provide you with a breakdown of some of the other editing options available.
Histogram Editing
Using a histogram allows you to determine if you have the correct exposure across a single image.
You can edit images via the Histogram to achieve the tonal levels and exposure you desire.
Making changes to the histogram is as simple as clicking within a zone and dragging it left or right.
Any changes made in the histogram will also be represented by the movement of the sliders within the basic editing panel on the far right.
Gradient Tools
The Gradient tools include masks and layers.
Masks determine where the layer will be applied and how that layer will blend into the original photo.
This is most commonly used to apply higher or lower exposure to an area where the exposure is not as balanced as the rest of the image.
For example, with a landscape shot, the land portion of the scene may be perfectly exposed but the sky is too bright. By applying a mask, you can select the sky area and reduce the exposure and increase contrast to match the exposure of the ground level – much like an ND filter.
Another way to apply this is to use the brush tool and freeform masked areas to finely control exposure.
With shape-based masking, you can apply a radial mask to a pic and drag its perimeter into a shape that best suits the shape you wish to mask.
For example, making an oval-shaped mask would best suit a portrait shot where you want to change the skin exposure on the face.
Then, by choosing the steepness of the gradient, you can soften how that falls off to blend with the rest of the image.
There are also linear-gradient tools within X7 that allow you to apply masks to flat planes of the image.
Vignetting
Applying a vignette in Exposure allows for various shapes and strengths. You can select round and square vignetting, and also apply irregular shapes that have organic edges and ‘lumps’.
Then, you can control the opacity and edge harshness in greater detail.
There's a range of vignetting presets available out of the box plus you can create your own and then save those as a preset too.
I love how you can apply vignettes in multiple layers and blend these with layers to control high and low light areas of interest within an image.
3D Colour Masking
You can apply ‘3D colour masking' to create and control a mask based on hue, saturation, and vibrance.
Selecting any of these variables means that your masking only impacts those specific areas when making edits to the image.
You can then copy those masking conditions and apply them to multiple images.
This is great if you have a range of images from the same shoot and you wish to ensure that you have consistent colour control throughout.
Bokeh, Focus and IR
Bokeh, Focus, and IR are all fairly unique editing tools included with this software.
The Focus tool has a number of presets already loaded, to add soft and sharp focus effects to an image.
However, while the Focus tool is an interesting option, and something that's not included in other software, it's not super effective.
The Bokeh tool allows you to select an in-focus region with the use of one of three masks. Then you select the style of bokeh you want, including circular, hollow, and other shapes.
You can control the strength of the bokeh, and as the name suggests, it distorts the image to add creamy bokeh-balls outside of the masked area.
While Colour IR presets are included with X7 which can add a unique look to your images, there's also an IR editing tool. The IR editing tool adds the look of IR and provides you with around a dozen additional IR ranges and tools to manage the strength of the look.
Overall Performance
Another impressive aspect of Exposure 6 is just how well it performs.
(You can see an example in the video above, showing a complete portrait editing workflow from start to end.)
As for my own set up for the purposes of this review, I used an iMac with a 3.4 GHz Quad-Core Intel Core i5 processor, 16GB of RAM, and a Radeon Pro 560 4 GB graphics card. My OS is the latest macOS Catalina.
I experienced next to no lag in any of the tasks I performed in Exposure. Everything from importing, applying a string of edits, and using the History tool to revert changes activated immediately.
Exporting images is lightning quick, and I would go so far as to say faster than my experience with Lightroom.
The only drop in performance I experienced was when I first loaded files from an external drive, despite being transferred via USB-C, and normally fast with Lightroom.
In this instance, it took a few moments for each screen of previews to be loaded. However, it must be noted that you can start editing photos immediately, even while the rest of your files have not finished importing. imported
Value for Money

A big advantage of Exposure X7 over its competitors is that it isn't a subscription-based editing solution… but how much does it actually cost?
I recall years back seeing the price of Lightroom and Photoshop in an office supply store and I was shocked at the cost. They used to cost hundreds of dollars to buy outright – as a result, I never invested in those software packages.
When Adobe moved to the subscription system, I was quick to jump on board as I desperately wanted to use Lightroom. Of course, after years of paying for a subscription I might as well have bought it outright – it was just a different way of going about it.
So when it came time to take a look at Exposure and what it cost – I was a little apprehensive. Was this brilliant editing software going to cost hundreds of dollars too?
I was shocked to discover that the standalone Exposure X7 is only $119! That's insane value for money – I'd spend that on my Adobe subscription in just a few months…
What's more, there's a brilliant Bundle that includes Exposure's Snap Art and Blow Up available here for just $149.
An important element when purchasing any form of software is the end-user support available. Exposure is supported as their online presence includes dozens of tutorial videos and blogs – this also includes transcripts of every video. There is also a Support page with FAQ and contact details.
I have listed here for you the breakdown of what each purchasing option includes.
- Exposure X7 non-destructive RAW photo editor
- Integrated Snap Art natural media
- Integrated Blow Up high-quality photo enlargement
- Exposure X7, Snap Art, and Blow Up plug-ins for Lightroom and Photoshop
- Fast technical support
- 30-day money-back guarantee
- Exposure X7 non-destructive RAW photo editor
- Exposure X7 plug-in for Lightroom and Photoshop
- Fast technical support
- 30-day money-back guarantee
For those of you that are interested in experiencing Exposure X7, there's a 30-Day free trial of the software available too.
The download and installation process is quick and simple to follow, and there is no advertising pressure to upgrade to the paid version.
Exposure X7 Discount Code
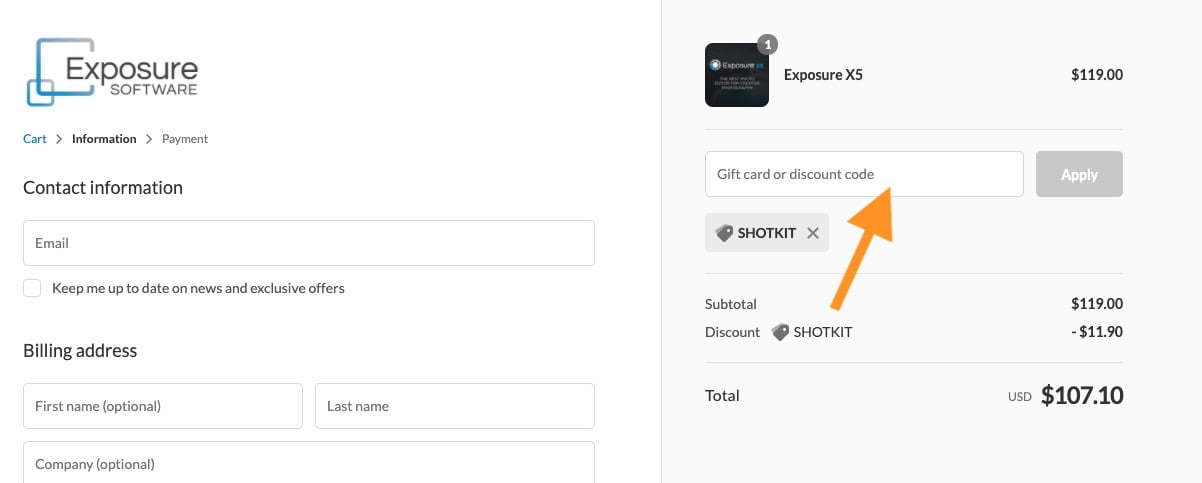
For a limited time, you can use the code SHOTKIT to save 10% off any purchase from the Exposure Software store.
Just follow these steps:
1. Click here to be taken to the store.
2. Click one of the blue Buy buttons under the product you want
3. Click the blue ADD TO CART button
4. Click the blue Check Out button
5. Enter the code SHOTKIT in the field ‘Gift card or discount code', and click the blue Apply button.
Exposure X7 Review | Conclusion
Exposure has got me thinking a lot about my image editing options and whether I should make the move to this brilliant piece of software.
I currently subscribe to Adobe's Photography Plan and use Lightroom Classic as my primary image editing solution. However, I don't use Photoshop at all, and so I'm not really getting the bang for my buck that I had hoped for.
Exposure X7 is a complete package that has an extensive range of editing tools to suit anyone from a beginner to a pro wedding photographer.
The software is very forgiving to those new to the game and is fully-featured and powerful enough for those shooting for a living.
Highly customisable photo editor with excellent image management features and a wide selection of great presets.
Use code SHOTKIT to save 10%

I’m a Melbourne-based street photographer and blogger. I love to travel to Japan to photograph and document its dynamic people and culture.
20 Comments
Leave a Comment
👋 WELCOME TO SHOTKIT!
🔥 Popular NOW:

Thanks for the interesting article. I use Exposure 6 as a plug in for PHOTOSHOP. It works great like this. Mostly I use it for the film look filters – which are excellent. I haven’t upgraded to version 7. So its easy to do some work in photoshop then finish it off with a filter in Exposure. I did find their customer support to be excellent when I had trouble getting it onto my new computer – they sorted me out almost instantly. One thing, it has been a while since the last version. Some people are wondering if it will be updated or if it has reached the end of the line.
Your code isn’t working. 😥
Oh no! I’ll reach out to them and see if it can be reinstated – will let you know, Angeline!
Hi Greg!
Many thanks for your article.
As other photograhers here, I’m going crazy to find my best replacement to LR. I even bought the early bird Luminar Neo last November, which was only released on Feb 17. However I’m asking for my money back because the software does NOT work at all. I’ve been in contact with the Support Team, but nothing’s happened so far.
Anyways, I need to find a software now to replace both – LR and the frustration of Luminar Neo…
In your article you do not mention anything related to HDR merging or panorama stitching. I’d just like to check with you if Exposure 7 does have those tools, which are crucial for my work.
Thank you
I don’t think it supports those yet, Luciana – for HDR merging, try Aurora – there’s a coupon code on this site if you search for it.
I current use LR Classic as a student I am obliged to use the school Software. I will be graduating next year and thinking of transitioning to EXPOSURE 7 how difficult will that be ? Should I do the transition now and ease out of LightRoom and stop the subscription when I graduate. I would appreciate your advise here.
Thank you
It should be fine, Greg – I’m sure there are help articles about this exact transition on the Exposure site.
Hi..
Very interested to read your review on X6,, as you say its a really nice program! I have been using the old LR6, Capture 1, On1, Luminar and at this stage my head is in a spin with the alternatives. My final thoughts are that Exposure X6 is the nicest of all to use EXCEPT for one thing, that is the shadow and highlight slider performance. When you try and bring up the shadows the whole image gets a light mist / fog reducing all clarity and spoiling the image, I really cant understand why this has not been addressed. I would love you to have another look at this issue and let me know what you think.
Many thanks.. Hans
Hi Mark,
After a couple of intense weeks reviewing, comparing and contrasting photo editing software to replace my Adobe Photography monthly subscription, I’m finally leaning towards Exposure X6 in no small part due to the in-depth review here at Shotkit. I am an “enthusiast” photographer who is retired and now focusing my time on my Photography journey with a Ricoh GRII and an Olympus EM-1 Mark II. I had a Nikon d750 whose photo catalogs from Lightroom are stored on external drives. That camera was sold to get the lighter Olympus for my Macro shooting.
A couple of quick questions which I really would like your views on:
1. I assume both of my current cameras (and Olympus M.Zuiko 60mm macro lens) are supported by Exposure X6…is this correct?
2. I shoot in both RAW and JPEG…does Exposure X6 handle editing in both equally well?
3. I am considering also getting Photo Mechanic 6 for trying to build a well tagged, metadata-rich and organized platform moving forward. Is this advised to work with Exposure X6 or can I create a credible and rich photo file system just with Exposure X6?
I hope you get a chance to see this and respond Mark. I really admire the way you write, your unbiased views and expertise. I ended up getting the ThinkTank 10L sling bag based in your review and it has proven to be exactly what I was looking for!!
Thanks David, but I must give credit to Greg who’s this article’s author! I agree you made a good decision choosing Expopsure X6, though – it’s an excellent piece of software. I’m sure Greg will try to answer your questions where possible, but it may be quicker to reach out to the Exposure support team who’ll be able to help. All the best!
Hi David. I have taken a look into your questions and hope I can answer them accordingly for you:
1. Yes the software definitely supports the Olympus cameras however their support page does not say they support Ricoh. However, I did find this advice on their site:
Exposure can read and edit DNG files that have been created in-camera or converted from a proprietary RAW format. If your camera isn’t listed here, see if saving in DNG format is an option. Exposure X6 can convert RAW files to DNG format automatically if you have a supported DNG converter application installed.
2. The same answer applies to question two and yes I found that it handles both RAW and JPEG files exceptionally well. Obviously, RAW files have more to work with in terms of pulling out detail from shadows and pushing back highlights.
3. As for question 3, you have gone well above my area of expertise. I have raised the question with the support team at Exposure and will let you know here the response I receive. As Mark suggested, you can also log a support request for this and any other questions you may have.
Finally, thanks for the feedback regarding the quality of the article. I love writing for Shotkit.com as we work on honest reviews and more importantly education pieces for all levels of photographer.
I will let you know when I get the reply.
Cheers. G
Hi David. I received a prompt reply from the folks over at Exposure. Brilliant customer service and they have provided a more detailed response to all of your questions:
The EM-1 Mk II, D750 and M.Zuiko 60mm Macro are all officially supported. The GRII isn’t officially verified, but as long as you use the DNG raw format it will work great.
Both RAW and JPEG editing will work great. Exposure can read supported raw formats as well as TIFF, JPEG, DNG, and PSD. There is of course the caveat that JPEG files are already compressed and will begin to show artifacts with extreme edits. This is true of all image editors.
People have used both Photo Mechanic and Exposure, but they will not share the same metadata. Photo Mechanic gives you deeper control to manipulate the actual metadata in the file, but for many users the options available in Exposure are very useful for creating a well organized file system. Unless there is some specific control you need in Photo Mechanic, your life will be simpler if you stick to organizing, keywording, ect in Exposure.
I hope that’s helpful. Please let us know if you have any further questions.
Regards,
Nate Zellmer
Exposure Software
Hi G reg,
Many thanks for your great follow-up work to my questions. Overall, good news from your findings. One new “opportunity”…I have discovered Excire Foto which is a DAM with great AI capabilities that has scanned my 12,000+ photos and automatically placed keywords based upon their AI technology. It is awesome. and after my review of its output, Excire was accurate in over 90% of thee data it entered. It also has nice DAM capabilities built-in which means I don’t need Photo Mechanic now at all.
One last question, can Exposure X6 read the XMP sidecar files from Excire Foto and include the metadata into my Exposure X6 post-processing work? I would hate to have to go back and try to manually re-enter all 12,000+ photos metadata by hand!
Again many thanks to you and Mark for your hard work and dependable, enjoyable reviews!
Hi David. Got the answer directly from the horse’s mouth.
The first time Exposure “sees” an image it will look for any corresponding XMP sidecar files and record the available metadata. This means that any existing keywords will be added in Exposure as well.
After that point metadata is stored and referenced only in Exposure’s proprietary sidecar files. This means that if you add a keyword using Excire or another program AFTER it has been edited in Exposure the update will not be seen in Exposure.
I hope that is of benefit.
Cheers
Greg
Is it possible to compare Exposure 6 and DxO Photolab 4. I’m currently trying both as trials and need to make a choice soon. Any help or suggestions would be appreciated.
They’re both excellent software, Mike. My preference is X6, but see what you think after playing with both.
How do you compare x5 to Luminar?
I’ll jump in for Greg here as a long time Luminar user – I think X6 is a much better DAM, and faster for processing multiple RAWS. However, Luminar’s AI features (notably Sky Replacement) make it worth owning too.
Its great that people are catching on to this software. Ive used it for a few years now and in the main im very happy with it. I switch between fuji and canon raw images and its great for both
Did you check to see how it processed Fuji Raw files?