


Lightroom CC Mobile Guide
Confused by the difference between Lightroom Classic CC and Lightroom CC? Why you should pay for the 8 Premium features? This guide explain it all!
Lightroom | Software | By Mark Condon | Last Updated: December 11, 2024
Shotkit may earn a commission on affiliate links. Learn more.
When Adobe split their popular image editing software into Lightroom Classic CC and Lightroom CC (aka Lightroom Mobile), they unleashed a whole world of confusion…
What was once a single desktop app with a confined feature set, is now 2 separate software entities, each with specific, often overlapping functionality.
The worst part is the naming convention – if you're confused about the difference between Lightroom Classic CC and Lightroom CC, you're definitely not the only one!!

✓ Lightroom ✓ Photoshop ✓ ALL Premium Features
In this guide, I want to explain the benefits of Lightroom CC, and why it's such a powerful tool for both amateurs and professional photographers alike here in 2024.
I've also added some bonus tips on editing with Lightroom CC, importing presets and using the Lr CC camera.
What is Lightroom CC for Mobile?

In a nutshell, Adobe Lightroom Classic CC is the offline version and Lightroom CC (mobile) is the online version… and it's also an App for your phone/tablet.
Things start to get more confusing when you subscribe to an Adobe CC plan and both versions of Lr are downloaded to your computer.
One way of thinking about it is that Lightroom CC is not really ‘on your computer' – it's more like a ‘web app', that is displayed on your computer like a web page.
This makes it completely unique when compared to Exposure X5, DXO PhotoLab, Capture One and any of the other various photo editors on the market in 2024.
To keep this guide to Lightroom CC concise, I'll answer all the confusion surrounding the various versions of Lightroom first.
It's important that you understand the difference between Lightroom Classic CC and Lightroom CC, in order to understand why using Lightroom CC in your everyday photography workflow is such a revelation.
Lightroom CC FAQ
What is the difference between Adobe Lightroom CC and Lightroom Classic CC?
The key difference is this:
Adobe Lightroom Classic CC is the offline version, i.e. the one you use on your computer.
Lightroom CC (mobile) is the online version, i.e. the one you can also use on your phone and tablet.
When you subscribe to one of the Adobe Creative Cloud plans that include Lightroom, you download both versions of Lightroom to your computer.
You can download Lightroom CC for free to your mobile device at any time (subscribed or not), but the functionality is limited.
What are the differences in features between Adobe Lightroom CC & Lightroom Classic CC?
Here are 11 key differences:
- Interface and modules – CC: one single window; CCC: various modules.
- Synchronization – CC: full-res files and/or Smart previews; CCC: Smart Previews only
- Storage location – CC: Adobe's cloud; CCC: your computer
- Image Organisation – CC: Albums/virtual collections; CCC: folders/collections
- Filtering/Search – CC: Basic options & Adobe Sensei; CCC: multiple options
- Keywords – slightly different keywording in both apps. CC has Sensei too.
- Culling – currently no ‘auto-advance' when culling in CC
- Quick Actions – On the latest Adobe MAX, Lightroom CC got early access to Quick Actions.
- Batch Editing – currently no ‘batch editing' in CC
- Photomerge – currently no photomerge for panoramas or HDR in CC
- Plugins – currently no ability to use plugins in CC
(Correct as of Feb 2019)
What is the difference between Lightroom CC and Lightroom Mobile?
None – they're the same thing. Calling it ‘Lightroom Mobile' is easier to understand for some people who only use Lightroom on their mobile phone or tablet.
However, strictly speaking, you can use Lightroom Mobile (aka Lightroom CC) on your desktop/laptop computer too – it's just that all the images are actually being stored/edited via Adobe's cloud.
To add to the confusion, Adobe sometimes refers to it as ‘Lightroom CC for mobile'.
Is Adobe Lightroom mobile free?
Yes and no. It's free to download onto a mobile device as an app (just called ‘Lightroom'), but the functionality is limited.
In order to download it to your computer, you need to be an Adobe Creative Cloud subscriber, like on the Photography Plan, which is what I use.
What features are missing from the free version of Lightroom CC?
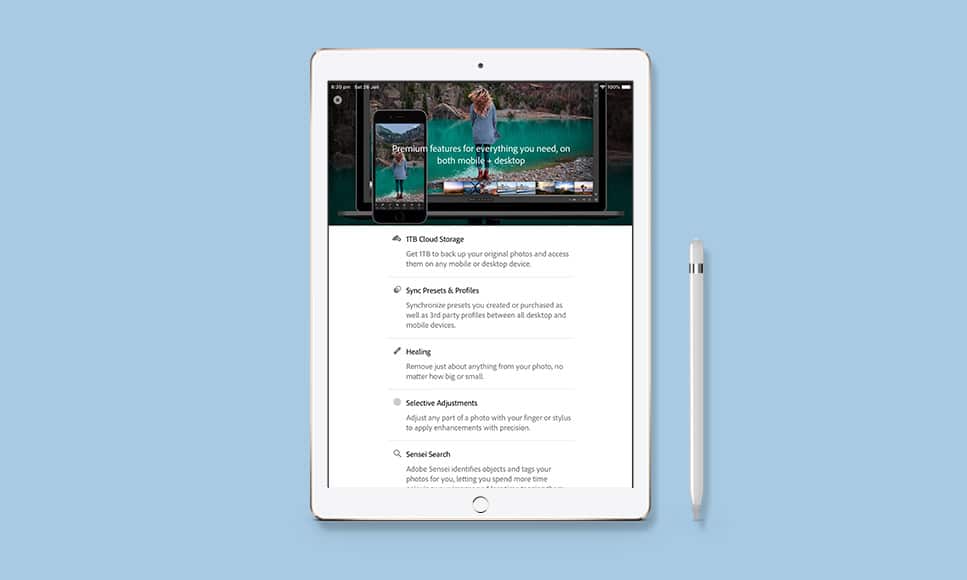
There are certain ‘premium features' that aren't included in the free version of Lightroom CC that you have on your mobile phone or tablet.
These include:
- Cloud Storage
- Sync Presets & profiles
- Healing
- Selective Adjustments
- Sensei Search
- Geometry
- Editing Raw Photos
- Sharing Web Galleries
- People Photo Sorting
For many photographers, paying for an Adobe subscription is worth it for the features above alone.
Being able to import RAW files directly from your camera to your tablet, then use all the powerful editing tools available to you on the desktop version of Lightroom (just using your finger or a stylus), is incredibly liberating.
The Adobe Sensei search functionality is mind-blowing too, and will continue to improve.
How much does Lightroom Classic CC cost?
It varies depending on the option you choose:
- Photography Plan with 1TB of Cloud Storage – (See latest price here)
- Lightroom CC Plan – (See latest price here)
- Creative Cloud Plan – (See discounted price here)
How can I get Adobe Lightroom Classic CC for free?
You can download Lightroom to trial for 7 days, for free (click here to do so). After that, you need to pay each month for a subscription to use it.
Can you use Lightroom without the internet?
Yes, you can use Lightroom without the internet by enabling its offline editing mode before turning off the connection.
Where is image quality in Lightroom mobile?
You can find image quality in Lightroom mobile by accessing the app’s Copy Settings feature.
Why is Lightroom free on mobile but not on PC?
The paid subscription that Lightroom PC requires enables the developer to update its editing tools often. On the other hand, Lightroom mobile is free because its features are limited.
How to buy Lightroom presets on an iPhone?
You can buy Lightroom presets on your iPhone by going to the App Store. You can also buy from other third-party developers by running a quick search on Google.
How to delete Lightroom Cloud storage?
You can delete Lightroom Cloud storage by clicking the ‘LR’ logo and then ‘Account Info.’ Next, go to Actions and then tap ‘Delete Lightroom Library.’ You can delete photos from Lightroom Classic too.
How to backup Lightroom mobile?
You can back up Lightroom mobile by connecting to the internet and clicking the ‘Cloud’ button in the upper right-hand corner of the screen.
How to organize photos in Lightroom CC?
To organize photos, scroll to the Albums section and then click ‘Add an Album.’ Give your new album a name, then select and drag the photos to the album.
How to access Lightroom Cloud storage?
Open the Creative Cloud app for desktops, go to Files, and select ‘Open sync folder.’ After that, tap ‘Your Files’ then ‘Synced Files’ located in the Files section.
Where is the camera calibration in Lightroom mobile?
Unfortunately, Lightroom mobile doesn’t have a camera calibration feature.
How to revert to the original in Lightroom mobile?
Simply tap the ‘Develop’ button followed by the ‘Reset’ button. Then, choose which state you wish to revert the image to.
How to merge two photos in Lightroom mobile?
The Photomerge feature isn’t available in Lightroom mobile.
Where is the develop module in Lightroom mobile?
The develop module is only available in Lightroom Classic.
I hope that clears up a lot of the confusion surrounding this amazing piece of software.
It's unfortunate that Adobe makes things so complicated for us, but regardless, let's get stuck in to the rest of the guide!
Who Should Use Lightroom CC?

Editing images using Lightroom CC on an iPad on the sofa – perfect for my pregnant wife!
This one's easy – everyone should be taking advantages of Lightroom CC – beginners, amateurs, pros. All of you!
To take full advantage of Lightroom you need to pay a monthly subscription, but hopefully by the end of this guide, you'll understand why the subscription is so worthwhile for every photographer.
Lightroom as both an online and an offline software is truly groundbreaking – everyone who owns a camera should take advantage.
Initially I was annoyed to be forced to pay each month for an Adobe subscription, especially after owning the standalone version of Lightroom 6.
However, I soon realised that there are numerous huge benefits of being a subscriber to the Adobe Creative Cloud Photography Plan…
9 Benefits of Paying for Lightroom CC
Lightroom CC features Premium Features, which are unlocked when you subscribe.
Something that Adobe doesn't make very clear is why anyone would want to pay for Lightroom CC.
As a free app for your phone or tablet (named simply ‘Lightroom'), it does a great job as a photo editor and camera.
However, many people don't realise that there are actually 8 premium features which are ‘unlocked' when you become a Creative Cloud subscriber.
The 8 most useful features of Lightroom CC are only available to subscribers. The power of these features alone make the subscription fee worth it.
Adobe calls these ‘Premium Features', and they really do make Lightroom CC 10x more powerful.
Here's a quick run down of the features that appear in Lightroom CC when you start paying for an Adobe Photography Plan subscription:
1 | Cloud Storage
Cloud storage syncs edits across devices, including selections made when culling on a tablet or phone.
This is the key benefit to Lightroom CC – having up to 1TB of online storage with Adobe can literally transform your workflow, whether you're a beginner, amateur or pro photographer.
Once you've decided which photos you want to be synced to the Adobe cloud (you can do this inside Lightroom Classic CC or from within Lightroom CC), all your photos and edits are backed up from accidental erasure.
More excitingly, all your photos are editable on all of your mobile devices, with edits being kept in sync across them all.
You can start culling images on your main computer, then hop onto a bus with your tablet to do some quick edits, then get to work and share the images via your phone.
When you get home, all the edits will be waiting there on your computer, almost like you've been working on that computer all along!
The first time you try this, it's truly mind-blowing. Syncs happen fast over Wifi or 4g, and file transfers are kept small thanks to Lightroom's ingenious Smart Previews.
Trust me, this one's a game-changer. Being able to edit photos on a plane, on your sofa, on the toilet…(!) is a truly liberating experience, and makes the process a lot more fun to boot.
Also, any photo taken with the camera app is automatically stored and backed-up in the Creative Cloud.
2 | RAW Editing

Editing RAW files in Lightroom CC enables maximum dynamic range when editing.
Another huge benefit of paying monthly for a Lightroom subscription is the ability to import and edit RAW files on your mobile or tablet.
This is something many photographers have always dreamed about – a truly mobile workflow, whereby you can import RAW images from your camera direct to your tablet or phone, then edit and finally share them… without touching a computer!
These are wonderful times we are living in as photographers! Lightroom CC allows us to take advantage of a truly mobile workflow, that's affordable, simple and fun.
Importing RAWs from a camera is a cinch – you just need either a card reader specific to your tablet, or a camera that supports a USB-C connection (like the Sony a7III).
Once they're on your mobile device, Lightroom CC works its magic to make them ridiculously fast to load and edit – way faster than any computer I've used.
You can even choose to sync the RAWs over the cloud, back to your main computer.
In addition, with the latest November 2019 update, you're also able to apply batch edits to your photos on mobile too.
Previously this was a feature limited to desktop users, but now iOS and Android users have the ability to apply batch edits to multiple images too – this is a huge time saver!
With the December 2019 update, the Lightroom iOS app now allows users to import images directly into Lightroom.
(Previously, it was an annoying three-step process, where you had to import into your camera roll then import into Lightroom, and then finally into an album or collection.)
In addition, we're now given multiple advanced export options, including control of file type, pixel dimensions, compression, watermarks and more. This all makes your mobile workflow even more intuitive and efficient.
3 | Sync Presets & Profiles
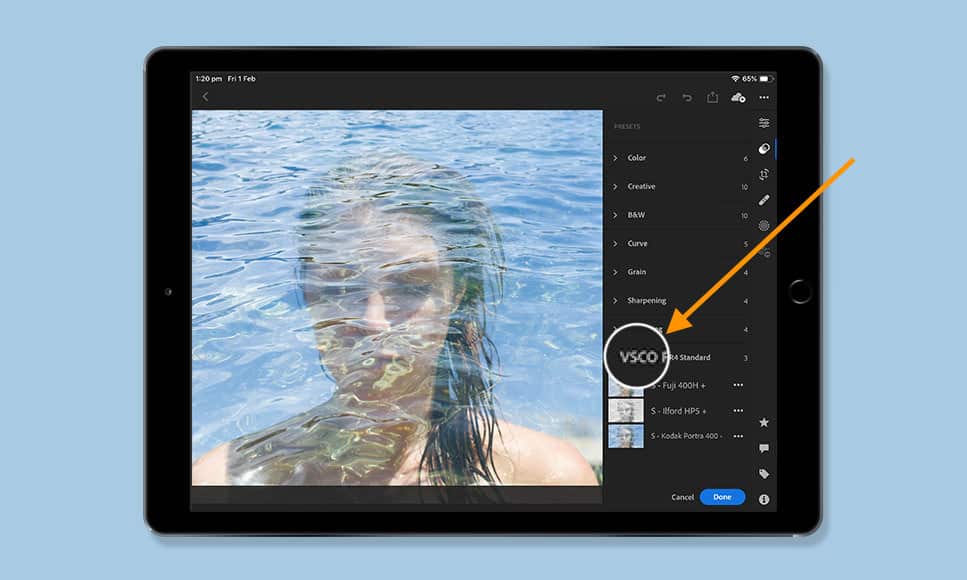
Syncing presets in Lightroom CC is simple – even ones you've purchased, like VSCO.
This one will especially please all the pros…
You're now able to sync across any of the presets in your main Lightroom Classic CC catalog to any of your mobile devices – presets you've purchased, downloaded, or made yourself.
You're even able to create your own presets on your mobile device in Lightroom CC, and have those sync back to your main computer!
If you need some free Lightroom mobile presets to play around with, keep reading…
4 | Healing Brushes
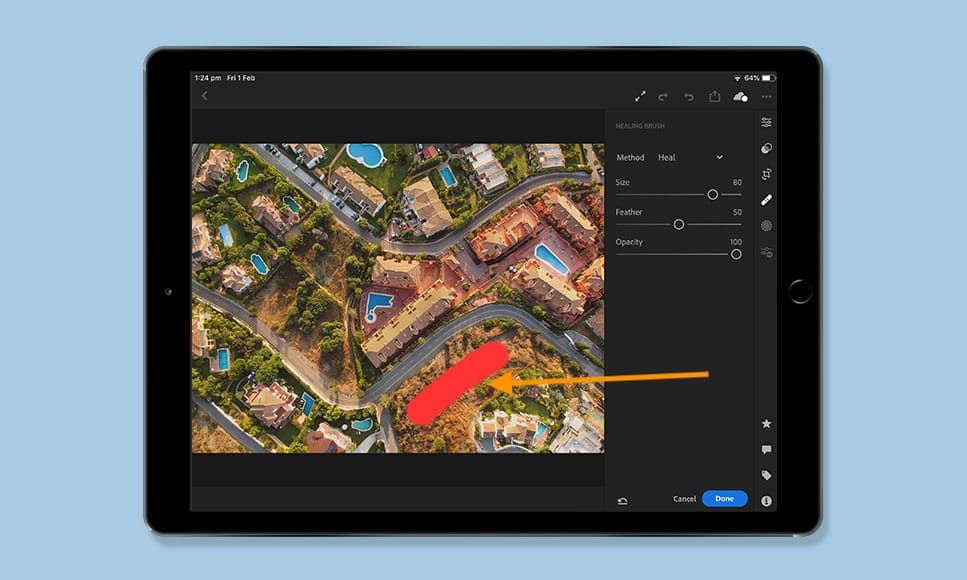
Removing distractions with one tap/drag of the finger is a powerful feature.
Lightroom's healing brush is the easiest way to get rid of unwanted elements in your photos – one click, or a click and drag, and the offending element disappears.
Having the healing brush on your mobile device is great – you just tap your finger over the thing you want removed, and Lightroom CC does the rest in a second.
I use this tool a lot on my main computer, so it's great to have it on my tablet too.
5 | Selective Adjustments
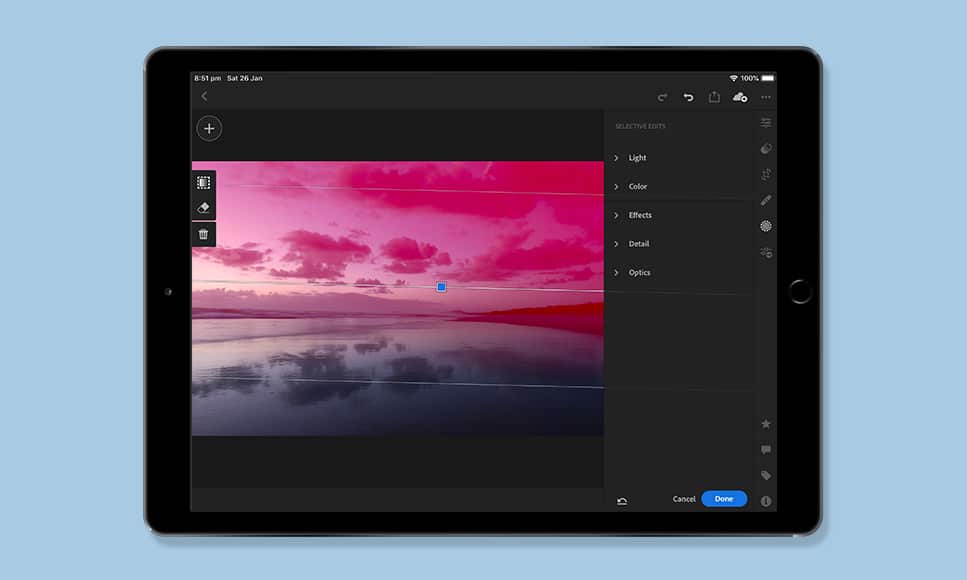
The Gradient Tool is a simple way to selectively adjust an image.
Anyone skilled with Lightroom should be using the Selective Adjustment tools – things like the Gradient Filter, Circular Filter and Adjustment Brushes are all key elements in the editing workflow.
Being able to ‘dodge and burn‘ a photo with your finger tip is like being a kid again, painting with your fingers! It's fun and much more intuitive than using a mouse.
If you're got an Apple Pencil or similar stylus, the whole Selective Adjustment experience is taken to another level of precision.
At the time of writing, these Selective Adjustment tools are only available on mobile devices when you subscribe to a Lightroom Creative Cloud plan.
6 | Sensei Search

Typing a keyword in a huge catalog of images, displays relevant results in a split second.
This impressive feature has huge potential – as it's an Artificial Intelligence feature, the more it learns, the better it gets.
Sensei Search gives you the ability to search through your catalog of photos using a keyword… even if you've never keyworded any of your images!
If you're lazy with keywording like I am (i.e. I've never keyworded a single photo!), this is a god-send – being able to find photos in seconds that are hidden away in an enormous catalog is a real time-saver.
7 | Geometry
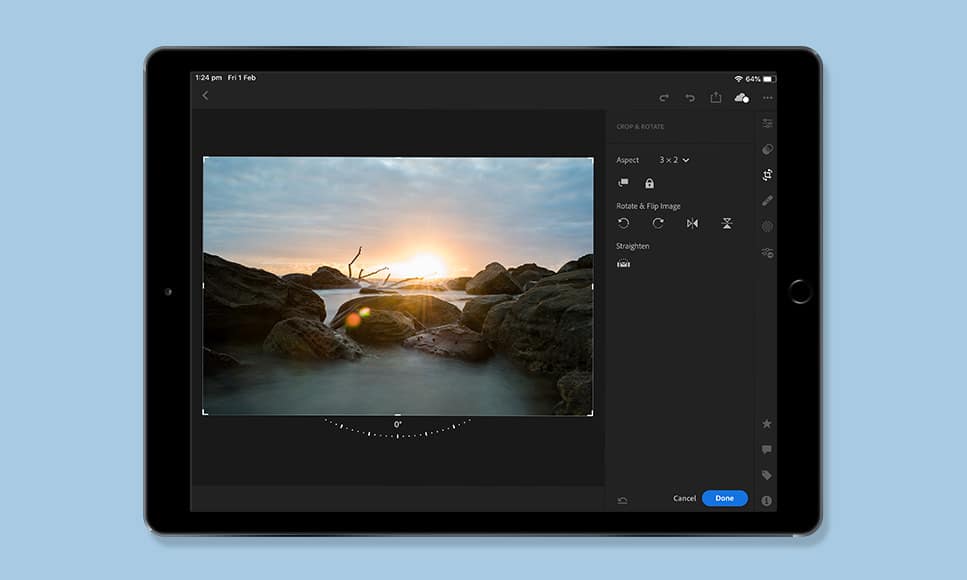
Straightening a horizon is one tap away with the powerful Geometry tool.
The ability to straighten horizons and warped buildings with one tap of the finger can be really useful.
The auto Geometry features are particularly useful – one tap and Lightroom guesses what should be straight… and usually gets it spot on.
If you forget to shoot a landscape with a camera tripod, you can accurately level out your image with one tap of the finger during your edits using the unlocked version of Lightroom CC.
8 | Advanced Web Galleries
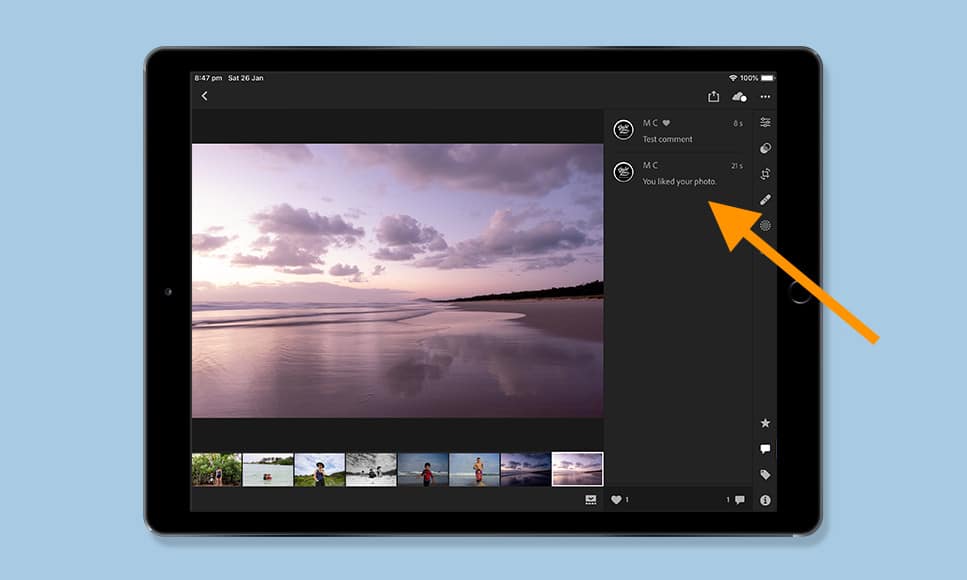
Comments left on web galleries are synced back in to Lightroom CC.
Using the paid version of Lightroom CC, you can create a shareable web gallery of your chosen photos in just a few seconds – much easier than the Gallery feature in Lightroom Classic CC.
When you share your gallery link, viewers can comment on your photos. The best bit is that all those comments appear back in Lightroom on all your devices – you can even reply to the comments directly from Lightroom!
Another really cool feature is that you're able to edit the gallery photos on any computer – even one that doesn't have Lightroom installed!
You can show someone images in a private Lightroom gallery on their computer, then perform edits right there in the gallery, regardless of whether they actually have Lightroom installed!
For pros, this is a great option for client proofing – editing in real time on the client's device is a really impressive (and useful) feature.
9 | Quick Actions
Now, it's possible to ask Lightroom Mobile to analyse your images and suggest edits. You can do this by tapping on the tab Actions.
To make things easier, the image gets separated into subject, background, sky… it will depend on the type of photo. This way, you can tackle one thing at a time.
Then, you can explore each edit and decide wether you want to apply it or not. It's also possible to adjust the intensity of the effect, so, you are still in control.
It basically gives you access to all the tools but guiding you through them for you to obtain the best results in the least amount of time.
This is a huge time-saver for pros and a great way to learn if you're a beginner.
Lightroom CC Editing Tips
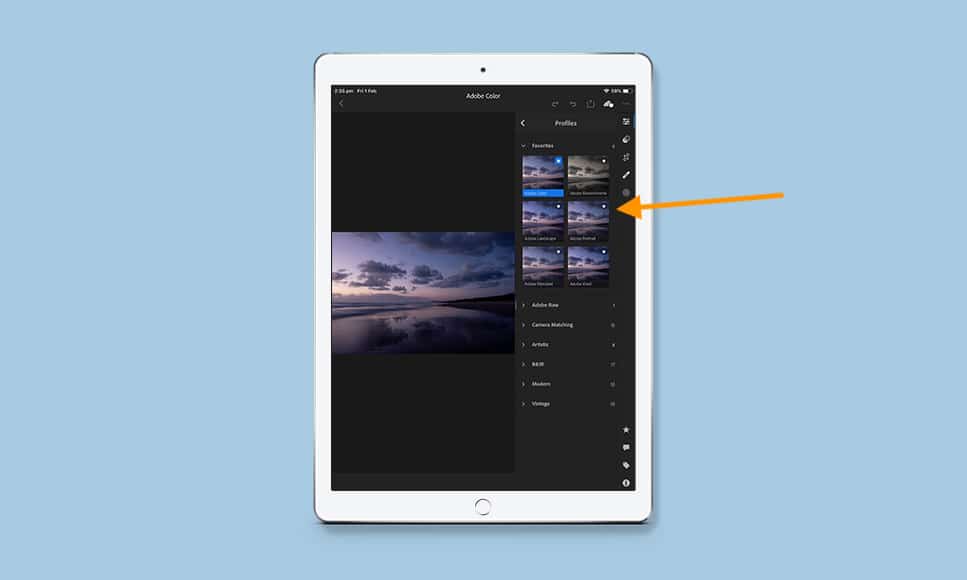
Using the built in Profiles is a quick & easy way to edit in Lightroom CC.
Lightroom CC isn't a complicated app to use, but it does feature some powerful tools to make the most of your images.
Here are some of my favourite editing tips – I'll be adding to this list as more features become available.
(Click to expand the tips:)
- Two finger tap to display photo metadata.
- Tap an picture to edit it.
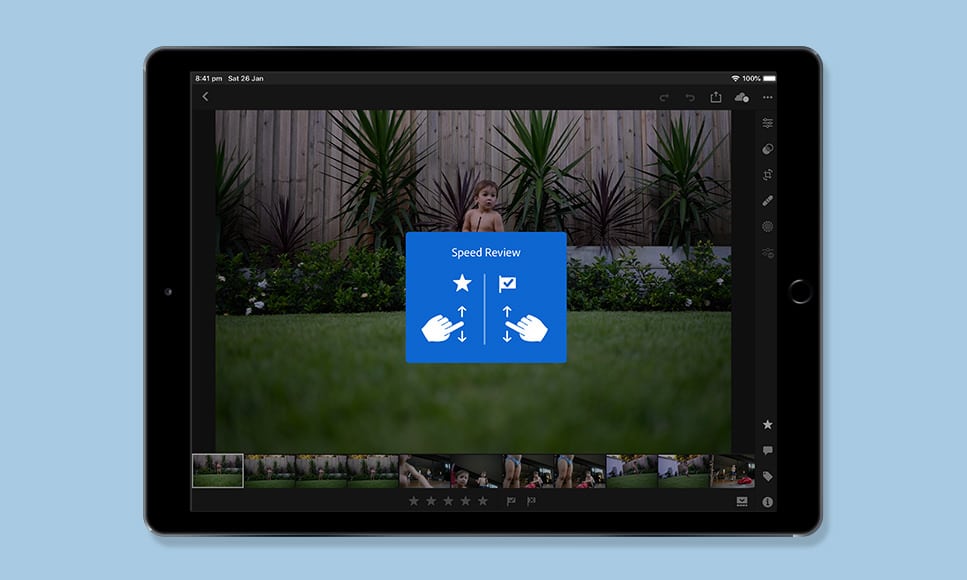
- Click the flag icon with a tick in it (bottom left) to toggle between Stars & Flags for Rating.
- Flick your finger up or down on a photo in the main view to Rate.
- Tap and hold a photo to view a ‘Before' editing version.
- Any time you want to sync your edits with your other devices, tap the cloud icon located at the top right of the screen.
- Double click on a slider's ‘adjustment button to reset it to zero.
- Turn on ‘Offline Editing' to increase the speed – this forces Smart Previews to download to your device. Now you can edit without a Wifi connection.
- Enable ‘Professional' mode from the camera app in Lightroom, then enable DNG as the file format for more dynamic range while editing.
- Log in at lightroom.adobe.com with your Adobe ID to view your own online version of Lightroom CC. You can now organise, edit and share as if you were on your home computer.
- Encourage friends/clients to add comments in your shared albums – these become viewable in the app itself, where you can even post replies.
- Double tap any editing slider to move up or down in small increments.
- Turn on ‘Enable Auto Import' – this means that next time you connect a camera to your mobile device, any photo imported into the Camera Roll will automatically appear in Lightroom CC too.
- When a menu is visible, you can drag it to the left or right to free up more screen space.
- Take advantage of edit-syncing – switch to the photo to which you want to apply eedits, then tap the ‘Previous' button to copy and apply the edits from the previous photo.
As you play around with the sliders and effects in Lightroom CC, you'll come across simple ways to make your photos look even better.
Being able to do all this on a tablet or phone in your free time is a lot more enjoyable than clicking away behind a desk on your main computer. It's a fresh opportunity to have an experiment with your photos.
If you have any other great Lightroom CC editing tips, leave them in the comments below so we can all benefit ;-)
Lightroom Mobile Presets
Importing presets to your phone or tablet is done via Lightroom CC on your computer
Presets are one of the huge advantages to editing photos using Lightroom. Being able to add a ‘look' to your photos with one click is a huge time-saver.
It's easy to create your own presets from within Lightroom CC on your computer or mobile device, but importing your existing presets into your mobile or tablet via Lightroom CC isn't immediaely obvious.
Hopefully this will help (click to expand):
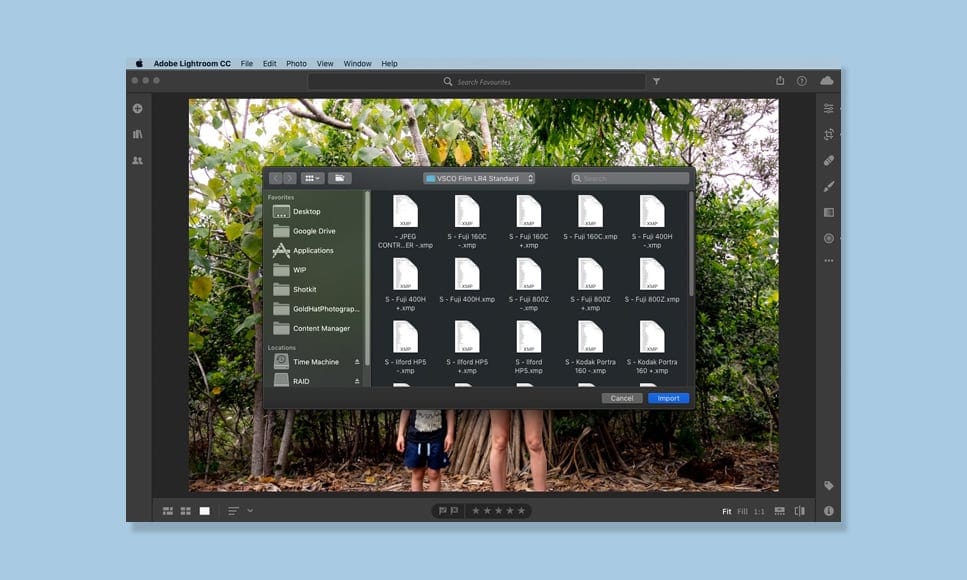
1. From the menu bar in Lightroom CC, choose File > Import Profiles & Presets
2. In the Import dialog that appears, browse to the required path and select profiles or presets that you want to import and click import.
1. Locate your presets in Lightroom Classic CC in the following location:
Mac Finder: Macintosh HD/Users/<username>/Library/Application Support/Adobe/Lightroom/Develop Presets
Windows Explorer: C:\users\<username>\AppData\Roaming\Adobe\Lightroom\Develop Presets
2. Copy your presets to the Lightroom CC presets folder:
Mac Finder: Macintosh HD/Users/<username>/Library/Application Support/Adobe/Lightroom CC/Develop Presets
Windows Explorer: C:\users\<username>\AppData\Roaming\Adobe\Lightroom CC\Develop Presets
Here are some great free Lightroom Classic CC presets that you can use in Lightroom for mobile too.
Presets are a massive time saver, especially when used when importing your photos for the first time into Lightroom
One thing to note: as of Feb 2019, it's currently not possible to import photos directly into a mobile device and have presets automatically applied.
In order to achieve this, you must import all your files to your main computer (with your relevant preset applied on import), then transfer the images to your mobile device.
I'm confident this will change in a forthcoming update.
Lightroom CC Camera

‘Professional' mode enables some amazing features such as focus peaking.
It's a shame that the camera function in Lightroom CC is often overlooked, since it's much better than the default camera found on most phones and tablets.
I must admit, I never really saw the point in using the Lightroom CC camera over my regular iPhone one… until I noticed the Professional shooting mode.
Once enabled, you're able to shoot in DNG format (a RAW format that's far superior to JPEG), use Exposure Compensation, manual focus, focus peaking, and several other features I never thought possible with a mobile phone!
The Lightroom camera is available in the free version of the Lighroom app (available for iOS here and Android here), so I recommend you download it and have a play around.
How to Import Photos into Lightroom CC

USB-C offers exciting new ways to import your photos into Lightroom CC.
There are several ways to import your photo and video files into Lightroom CC – yes, that's right – you can edit video in Lightroom too!
Most exciting for us photographers is the opportunity to import photos directly from your camera to your mobile phone or tablet, for a truly mobile workflow.
This allows us to travel easier, or simply become unchained from our desks when editing, organising and sharing our new photos.
Also, thanks to iOS13, iPad users are now able to import photos direct to Lightroom Mobile from their camera, bypassing the Camera Roll.
(Remember that to be able to import RAW files, you need to be a Lightroom subscriber.)
To save confusion, I've outlined all the ways to import files into Lightroom Mobile below (click to expand):
This is the option I use when I'm on my main computer and want to transfer multiple files to my iPad or iPhone quickly.
Click ‘Get Started With Lightroom CC' in the upper-left corner of the screen, and make sure you're signed in with your Adobe ID.
Make sure that the ‘Sync with Lightroom CC' option is turned on.
Then click the greyed out bi-directional arrow next to any of your existing Collections to make them sync. To stop it from syncing, simply click the arrow again.
Using a Lightening to SD Card Camera Reader, you can import your photos directly to your phone or tablet.
Make sure to turn on the ‘Auto Add from Camera Roll' setting in the Lightroom CC Import settings on your mobile device. Then when you insert your card reader into your phone, you can choose which photos you want to import straight into Lightroom CC.
As long as you have a subscription to Lightroom, you'll be able to import your RAW files for editing.
If you have a camera and a tablet with a USB-C connection, you can use a USB-C to USB-C cable to transfer your photos straight from your camera to Lightroom CC!
Currently, only the iPad Pro and certain mirrorless cameras support USB-C, but we can expect to see the format become more and more widespread in 2024.
Again, as long as you have a subscription to Lightroom, you'll be able to import your RAW files into your mobile device for editing.
As I mentioned before in this guide, we really do live in exciting times as photographers here in 2024.
It's incredible we can now import photos from a camera straight into a phone or tablet, then use all the same powerful editing features as on our main computer.
The premium features of Lightroom CC allow us to take full advantage of this opportunity.
Lightroom CC | Final Words

Being able to view, organise, edit and share all your photos from anywhere is incredibly liberating.
Despite the confusing naming convention, Adobe Lightroom CC has emerged to be an absolute game-changer for all level of photographer.
What was once a somewhat crippled application has been transformed via regular updates into an essential tool for organising, editing and sharing photos, both for amateur and professional photographers alike.
While the free version of the Lightroom App does offer some useful and fun features, I highly recommend you invest in one of the Adobe Creative Cloud plans to unlock the various Premium Features.
After all, it's within the Premium Features where the true power of Lightroom CC lies.
I hope you've found this guide useful – please remember to share it with a photographer friend ;-)
✓ Lightroom ✓ Photoshop ✓ ALL Premium Features

Mark Condon is a British wedding photographer and editor of Shotkit. When he’s not taking photos or reviewing the latest camera gear and software, Mark can be found cycling around the northern rivers.
66 Comments
Leave a Comment
👋 WELCOME TO SHOTKIT!
🔥 Popular NOW:

Hi Mark,
I have been paying for the photographer bundle with 20gb iCloud. my main question is the multi device editing.
I would love to import my all photos to my iMac in my home office and be able to cull the photos from that shoot on my Mac and on the go, how do I set this up? do I have to sync up all the photos I just imported into Lightroom CCC to LR CC?
By following these steps, you should be able to set up multi-device editing with Lightroom Classic CC and Lightroom CC, allowing you to import photos on your iMac and edit them on the go with your MacBook or other devices. Make sure to keep an eye on your Adobe Creative Cloud storage space to ensure you have enough room for all your photos.
Import Photos into Lightroom Classic CC on your iMac:
Import the photos from your shoots into Lightroom Classic CC on your iMac as you normally would.
Ensure that you have enough storage space on your Adobe Creative Cloud account to accommodate the photos you want to sync across devices.
Enable Sync in Lightroom Classic CC:
Once your photos are imported, make sure that sync is enabled in Lightroom Classic CC. You can find the sync status at the top-right corner of the Lightroom interface. If it’s not already enabled, click on it to turn it on.
Lightroom Classic CC will start syncing your photos to Adobe’s Creative Cloud.
Install Lightroom CC on your other devices:
Install Lightroom CC on your other devices such as your MacBook or iPad. You can download Lightroom CC from the App Store or Adobe’s website.
Sign in with the Same Adobe ID:
Sign in to Lightroom CC on your other devices using the same Adobe ID that you used for Lightroom Classic CC on your iMac. This ensures that all your devices are linked to the same Creative Cloud account.
Sync Photos in Lightroom CC:
Once you’re signed in, Lightroom CC will start syncing with your Creative Cloud account.
Your photos imported into Lightroom Classic CC should now appear in Lightroom CC on your other devices.
Edit Photos Across Devices:
You can now edit your photos across all your devices. Any edits you make on one device will sync seamlessly to all other devices linked to your Adobe ID.
You can cull photos, apply edits, and organize your library from any device, and the changes will be reflected across all devices.
Great article. I’ve been using LR Classic on my iMac for years, with occasional LR mobile use on my iPad. I no longer take photos, and a move to sheltered accomodation means I need to get rid of my iMac. Is it possible to use LR mobile without the Classic/desktop? It is worth the cost of the subscription to have my images in the cloud and be able to play with them on the iPad.
Yes, you can use Lr Mobile (as a phone app) without Lr Classic, but it has limited functionality. Thanks for the kind words, John.
I can not sync my files between Lightroom CC on my PC with Lightroom Mobile on an iPhone Pro.
My desktop always reads between 4700 and 4790 photos processing and the iPad shows 2 to 3 syncing. I have both on the same network.
The Dell desktop is an AIO with a 2tb and 3tb SSDs and had 32gb of memory. The iPad is 2 years old so I do not think it is an issue with the equipment.
If I make an album or folder on the mobile it will not show on the DT and vice-versa.
Each shows between 35k and 39k of photos and that varies. I can not find any trouble shooting on the internet.
I know some sync some very rarely. I set the pc and the iPad not to sleep and plugged on the iPad and left it overnight and it did nothing.
As far as I know I do not need to do anything special for it to sync.
Can someone give me the procedure to have the pc, iPad and iPhone to sync. Hopefully I can track down if I missed anything.
Thank you.
Great Article, I’ve been considering switching from Classic LR for a while.
One thing in your workflow (and generally if anyone else wants to speak up)
– How do you handle the limitation of the 1TB cloud storage ?
For specific projects it makes sense but making images available after the project is complete or archived isn’t something that really fits the new Lightroom model ? I wondering how you approach this.
I’ve got roughly 4tb of images archived with a general working project set of about 500gb or so during projects. Any thoughts on an approach. Today I use Lightroom classic and a combination of AWS S3 & local network attached storage for the archive sets. Not ideal but provides solid backup / recovery should the worst happen.
Thanks Robbie. I can’t really comment as I have nowhere near that amount of storage in the Cloud, mostly because upload speeds here in Australia aren’t great. Perhaps someone else can comment…
Great article clarifying Lightroom CC! How well do you think it would run on a Microsoft surface Pro 7 tablet with Windows 10? This one has the i5 processor with 8gb of RAM and a 256gb solid state drive. I would also like to sync it with my main work computer that has LR Classic and all my original RAW files. I would like to use it on my Surface tablet when I’m away from my office.
Thanks Mark! I haven’t tried it on a Surface Pro, but I’ve used it on a more under-powered iPad in the past and it worked fine – so, I don;’t see why not!
Thanks for this. Very helpful.
Um, how do I enable Lightroom camera that you mention in this article on my iPhone X? I can’t see your screenshot of the camera anywhere to turn on “professional” setting.
Thanks
You select the camera icon in the bottom right, then when it’s loaded, the PRO setting is on the left next to the shutter button. LMK if you still can’t find it, Michael!
Hi Mark. Many thanks for an extremely useful article. I sync Collections from LRClassic on my iMac to various mobile devices. When I look at All Photos in the LR Mobile app on my iPad or iPhone there are more images in All Photos than in the sum of the synced Collections. What is the origin of the All Photos images versus the images in the sun he’d Collections?
Hope that question makes sense.
Cliff
Canberra
Hey Cliff, it sounds like the All Photos is also including the photos in your iPad/iPhone that aren’t synced elsewhere.
Hi,
Thanks for your post. It’s the closest thing I have seen to answering my question. Can I shoot with my cell phone using LrMobile and automatically have those images download and sync to my LrClassic catalog on my desktop?
Thanks!
Great to hear that, Elizabeth! Those images you shoot on your phone will automatically sync to Lightroom on your desktop, not LrClassic, but you can move them there if you want. I do this all the time – shoot on my phone, and have everything appear both in Lr on my iPad and my laptop – it’s awesome!
Hi Mark, first I’m glad I run into your article and thank you for taking the time and all the details provided, really helpful and appreciated.
I’m wandering if you have any input with the following
I have both CC and Classic and using IPad Pro more and more for edits on the GO. With classic I’m used to organizing files by event and create a catalog for each event. Than, move the catalog/ original and edited photos on external drive as a backup. I would love to be able to do the same with the iPad but not sure how to handle it.
Any thoughts are welcome
Thank you
Hi Vera, thanks for the kind words. As this time, you’re not able to move the catalog off an ipad. However, you can export your edited photos to an external hard drive, or use the built in Files app to transfer them. Good luck!
I have a question about facial recognition feature in lightroom cc.
Basically, I added some pictures to LR directly through my mobile phone, using the little blue circle with the plus sign in it. The pictures showed up fine in the albums but the facial recognition is all jacked up now. Most of the photos don’t recognize faces. Those that do, recognize a shirt or hand or something NOT a face. I scanned the SAME photo and uploaded to LR and the facial recognition worked with no trouble, so it’s not the pictures, it’s something about adding from the phone.
Questions:
1. Is there a way to “restart” facial recognition to include the new pictures?
2. Is there any way to tag faces in LR CC like there is in Classic?
3. If I tag the faces in Classic and sync with LR CC will the names be kept or erased?
Any help is appreciated! I’ve spent hours googling as well as on the Adobe online chat AND the phone!
Hi Allison, I’ve not had any issues with facial recognition, but I don’t use it all that much to be honest. If you’ve spoken to Adobe and they don’t offer any solutions, I’m afraid you may have to wait until they update the feature.
Bummer. I don’t know why they’d remove the ability to tag people in Lightroom CC when it’s such a good feature. Kinda a bummer. But for the most part it works well, so I guess I’ll just have to make due.
Thanks for getting back to me! I appreciate it.
Hi there Mark, thank you for your awesome post. I’m hoping you’re able to help me, as I cannot find the answer to my questions and I’ve been Googling for hours..! Your post seems to come the closest, and you almost address what I’m specifically looking for help with :)
In my workflow for my headshot clients (I don’t do IPS with them), I need my clients to select their favourite images in the web gallery I share with them. I ‘X’ flag all the images I don’t want them to see (ie blinks, mis-fires) in Lightroom CC on my desktop computer, then share the web gallery with my client. They then Like (Heart symbol), and occasionally Comment, on the photos they want. Back in Lightroom, I select just the images they want, edit and send final images to my client. However, I cannot see the Likes or Comments back in Lightroom CC on my desktop computer.
I used to use Lightroom Classic, but want to move over to the CC version that syncs with online better, as my syncing stopping functioning a few weeks ago, and I cannot get it working again (I have tried sooo many things I’ve given up and accepted I need to move to CC).
Fingers crossed my question makes sense, and you and able to help me :)
Sorry Tabitha – I don’t understand – what’s your question?
Thank you for replying so quickly :) My issue is I cannot see the Likes or Comments back in Lightroom CC on my desktop computer. My question is: how can I ensure a workflow that I can share images with clients online, they select the images they want, and then I can see which images they’ve selected in Lightroom on my desktop computer. It’s the last part of my question that I cannot seem to solve…
Ah I see – hmm, it seems there’s no option for this yet. I’d recommend you try using ShootProof – I use this so that my clients can Like photos in their gallery (they add a star), and this infor can be synced back to Lightroom. You’ll find an in-depth review here on Shotkit. Hope that helps!
Ahh bummer. Thanks so much, Mark. I’ll check out your review!
Hi Mark I’ve just read your great article which explains the Lightroom world very well thanks.
I got one question though –
If I’ve got a Lightroom CC subscription and have installed Lightroom classic without a subscription is it possible to sync collections to Lightroom CC?
Thanks once again
Tony
Hey Tony, thanks for the kind words. I’m not completely sure how you’d manage to have Lr Classic without a subscription…? Whatever the case though, I don’t think this would be possible.
Heya Mark,
Great article, answered some of my questions about lightroom.
I’m still very confused with the whole cloud sync part. I have a large collection of photos that’s around 2tb in size. While it would be nice to set these up on my desktop lightroom CC in nice clean albums, I’ve accepted that any album I add there gets synced to the cloud (and my 100gb space). That’s fine, and the point of cloud storage.
I’m trying to bring my iPad pro and iPhone into the workflow though here and that’s where it becomes incredibly confusing. Every single album I create on my desktop seems to sync to the iPad and iPhone and I’m concerned about the space being wasted here.
I would rather control what albums actually sync to these device – is this possible? I could fill my 100gb cloud allowance easily and that would take too big a chunk of my iPad space (and overfill my iPhone).
In the case of the iPhone, I don’t want any albums to download actually. The way I see it is I can create an album on the iPhone lightroom, and import all the photos I’ve taken into it. That will make it’s way into the cloud and appear on my desktop – great.
I’m used to storing everything on a NAS, I’m not even sure how I can involve that in this workflow anymore.
Regards
Hey Kevin, in this case you should use Lightroom Classic to control the syncing, and only sync the albums you want on your iPad and iPhone by clicking the bi-directional arrows next to the album names. Hope that helps!
Thanks Mark, That seems almost too easy. I didn’t realize that Classic basically allowed you to control the sync – I thought It didn’t have it at all.
That does sound perfect for me!
Will presets still sync from Classic to the iPad?
Good to hear that, Kevin. Re. presets there’s a way to sync them that’s not too complicated – google ‘how to use lightroom presets’ and look for our article on the topic, which should help!
I want to use Lightroom CC as a central repository for all my photos in order to edit and organize them into albums which can be synced back to Apple Photos/iCloud. What is the best way to keep photos synced between Apple Photos/iCloud and Lightroom CC/Adobe Cloud storage and vice versa?
background:
My family and I use iPhones to take pics and iCloud to share/sync pics with Macs and family. In addition, I use a DSLR and a scanner and import into Lightroom CC to organize and edit photos (15k photos/40 years worth).
I think that topic deserves an article in itself, Otto!
Thanks Mark,
Great summary and review of LR CC. The thing that still confuses me is the question of where the actual image files are stored with each of the various workflows.
I personally prefer to have all of my actual image files on my desktop for storage (which I backup regularly) rather than having actual image files exist persistently only in my Lightroom CC cloud storage. I have a very hard time knowing i’ve successfully downloaded the actual image files onto my desktop drive from the LR CC cloud, or if i’ve only gotten smart previews on my LR Classic and haven’t actually successfully downloaded the actual image file to my desktop.
For example, I went to Africa a while back, and tested out using LR CC as a way to backup my images while out of country. So, each day after shooting, I used a cable that enabled me to connect my SD card reader to my iPad Pro and imported the images from the SD card to the iPad. When I got home, I THINK I just used the SD cards again and imported images directly from my SD cards to my desktop storage and LR Classic since I felt this would be faster than sync’ing them from LR CC. However, there is a chance I may have sync’d some images from LR CC to LR CCC desktop.
So, now I have a situation where there are previews for all of my images in my LR CCC catalog. When I open my LR CC app, it states that I have 1,624 images on my LR CC. The problem is that I can’t tell if these 1,624 images on LR CC are the ORIGINAL image files stored on the cloud, or if the files are successfully located on my desktop hard drive as I desire. I don’t need/want these 1,624 images on my LR CC any longer, but i’m afraid to delete them all from LR CC mobile because it says it will delete all 1,624 files permanently from “My Lightroom Photos” and “Your Albums and Shares” (within 60 days). I have this fear that I will lose these 1,624 image files, and no longer have them on my desktop hard drive. Does this make sense? How do I clarify the confusion? Thanks!
Hey Jeff, I agree – it’s confusing. Think of anything you import directly to Lightroom CC as separate to anything that’s in your Lr Classic catalog. Does that help?
Jeff, I have this exact same quandary. Did you ever figure it out? I have deleted the images twice and restored the, fearing the same thing!
hi,Mark,
Thank for the care and time you took in preparing this helpful piece. My particular interest is in using the LR camera for raw capture and using the maximum DR the sensor provides to assure maximum image data quality (S:N). I am used to testing my DSLRs for extra raw-accessible DR, but absence of aperture control and having to contend with the automatic Interplay of exposure compensation, ISO, and shutter duration have me flummoxed. I conclude that changing E.C is accomplished with changes in either ISO or shutter duration, but what determines which will be changed? It would seem logical if shutter or ISO could be “preferenced” but how can I do that? Any help would be appreciated.
Dave Graham
Thanks Dave. Your comment isn’t really related to Lightroom CC, but in short, the camera decides whether to use shutter or ISO in that situation. If your camera has the ability, I recommend shooting in auto ISO, setting a max ISO value depending on your camera’s capabilities and your preferences of noise in images, setting a min shutter speed depending on what you plan to shoot, then using Exposure Compensation. Hope that helps.
Thanks a lot for this article. One thing I am not so sure when you say “Synchronization – CC: full-res files and/or Smart previews; CCC: Smart Previews only”
I’ve Ipad Pro, Subscribed, and use LRCCC as well as LRMCC. If I import raw from LRMCC and edit on iPad, sync to a collection that will get sync to LRCCC will I only get a smart preview on my desktop? This is important because I ask LRCCC to copy images upon import and I back up the same path.
One more question, since I only import a few raw I want to edit right away on iPad but I will do another import on the desktop after I return home. Will I get duplicate copies or LRCCC will be smart enough to avoid importing the same image again?
Thanks in advance!
Hey Murphy, since you’ve already subscribed to LRCCC and have an iPad and desktop, would you be able to try it out and let us know your findings?
Great article. Sorry if this has already been asked. Can I selectively sync collections from my iPad? There will be photos I simply don’t want to send to the cloud. I would prefer to create a collection of favorite selects and only have that sync to the cloud. Or is everything I import to the iPad automatically uploaded to the cloud without a choice?
Thanks Steven. Yes, you can selectively sync by using Collections. I prefer to manage this on my computer via Lightroom CC, but it can also be done on an iPad.
Thanks for your informative article. I am re-new to photography. Last real camera I had was in the late ’70’s…Pentax MX, shot a lot back then. I recently put together a Nikon D5500 package and am intrigued by the seemingly limitless possibilities of the Lightroom platform. My question is would it be best to use Lighroom CCC on my iMac desktop and Lightroom CC on my iPad Pro? Will the desktop (LRCCC) and tablet (LRCC) both sync to the cloud and to each other? If so, doesn’t that make the desktop version of Lightroom CC superfluous?
Sounds easy, but…
Thanks, Ben
Hey Ben, welcome back to photogaphy! Q1: yep could do that. Q2: Yep. Q3: It’s just another option to manage things via the desktop – some may find it more convenient to make changes using the desktop version of LR CC than on their mobile devices. Does that make sense?
Thanks for the article which clarified some questions I was having about what version was what. I am using Lightroom Mobile on a chromebook and am having a very difficult time exporting or understanding where I am exporting photos too. There is a button on my phone (iPhone) version that isn’t on my chromebook version.
Fantastic summary. As a long-time “Classic” user, I’m dipping my toe into CC. This guide is very helpful.
I have one major question that I’m having trouble finding a good answer for… I use Lighroom to manage both my amateur photography but also all our family photography. I’ve started using lightroom Mobile as the IMPORT method to my mobile photos and videos into Lightroom classic. In classic, I do the heavy lifting and sync them back out to CC once in a collection. The problem is the wife.
Before I setup Lightroom CC on her phone and login to my account… I’d love to know what the potential pitfalls are. I’m sure some pepole will understand when I say my wife has no interestest in organizing or culling or remebering to import/export anything from anywhere…. So as soon as I do this, a pentillion photos and video will start flowing into Classic.
As far as I can tell, in Classic, there is no way to set a distinction in the physical storage directory for CC imports BY DEVICE. Is that right? What I Did notice is that Classic creates a Collection “From Ben’s iPhone” where my mobile photos wind up. Will CC/Classic create a separate Collection by device?
Any other concerns with this work flow? I really with there was better integration with iCloud and and LR but getting out of iCloud all together seems to be the best approach.
Thanks Ben, your comment made me smile “the problem is the wife”~! To answer your question, I don’t think there’s a way to assign storage by device. With my wife, I let her use my Lr account info, and only manually sync across select photos from her iPhone’s Photo-roll into Lr Mobile, which then syncs to my Lr catalog, which I can access on my computer. Not sure if that really helps…?
What do you think about replacing google/samsung cloud photos with lightroom? Cause I’ve the photography plan with 20gb, and fit perfects for store all my mobile shoots even from my old iphone in apple photos, and gather all together…
I’d go with Lightroom CC, Roberto, especially as you’re already paying for it.
Hi Mark,
I am new to Lightroom.
I have subscribed to the 20 gb photography plan.
Downloaded LR Classic and PhotoShop on my windows laptop.
Downloaded LR CC from the adobe website on my iPhone XR and IPad Pro.
And I have logged into my adobe account.
Now, request I just have 1 question.
I see the selective edit feature on my iPhone .
I don’t see it on my iPad Pro.
Why ?
Request you to please guide me.
Thanks.
Hmm I don’t own an iPad Pro any more so I can’t be certain – did you have a quick google to see if anyone else has the issues?
Thank you so much for sorting out my confusion between LR CC and LR classic CC. Now I am going to buy a Lightning to SD card reader and see if I can manage to get my RAW photos onto my iPad and then to my desktop. I do prefer to use the LR classic at home and not back up all my RAW files to the cloud because I have a slow internet connection and it just jams up my bandwidth too much. I plan to try a limited number of images not all of them.
Do you think I will be able to have different collections on the iPad and sync the RAW files of one collection (with fewer images) and not sync another collection (with more images)?
The ideal solution for me (but I am not sure if this is possible) would be to
1. import the images from the SD card reader to LR on my iPad when I am away from home.
2. edit and star rate any/all of the images. mark some for deletion.
3. move a smaller number of images to another collection which will sync to the Adobe cloud storage (and back to my LR classic at home) when I connect to mobile data or wifi. I would like to sync all images with 2 or more stars.
4. At this stage if I open LR classic at home it could show the images which have synced (2 or more stars) and for the other images it could say “photo is missing”.
5. Import the same RAW files into LR classic again when I get back home. The import dialog box should exclude the ones which have synced automatically and import all the others (with 0 or 1 stars). the edits previously made on the iPad including the marks for deletion should now appear against all the images.
Glad you found it useful, Derek. You can selectively sync Collections, yes. As for your specific workflow, it would be best to experiment yourself since I haven’t actually tried exactly what you describe, so can’t comment there. Let us know how you go!
First, thank you for this article. It’s a great overview that provides a framework for better understanding the interrelationships of the programs and the hardware.
Now,questions. I have the photography plan with 20 gb of storage from adobe. But also have 2 TB of icloud storage for our iphones. I have not been able to figure out how the iphone photos and the icloud storage relates to the adobe storage and the LR programs. If I delete a photo from my iphone, does it get deleted from everywhere. What if deleted from LR cc. If it’s saved in LR classic cc, can it be deleted from the other locations. Can my available icloud storage be used to preclude filling up the adobe storage.
Thank you in advance for any clarity you can bring to this. (Amateur photographer)
Hi John. Thanks for the kind words – I’m glad you find the article helpful. As for your question, the iCloud storage is unrelated to the Adobe photo storage. Anything in the Photos app of your iPhone is separate to anything in the Lightroom app (on your phone). If you export photos from the Lightroom app on your phone into the Photos app (still on your phone!), this may count against your iCloud storage. Whatever you delete from your Photos app, won’t affect what’s in Lightroom on your phone or on you computer. Does that answer your question?
Mark, thank you so much for your reply. I think that it provides the key for me. I have been approaching the apple world and the adobe world as one big interconnected “blob”, and have not been using the iPhone Lightroom Cc camera function. Your words “unrelated” and”separate” change the approach from “blob” to two separate worlds where I set up and control the interfaces. Sometimes a simple shift in perception can make a big difference in understanding something. Your reply has done that for me. Many thanks.
Ah glad to hear that, John. I agree – it’s not immediately obvious, especially due to the occasional overlap between the Photos app and the Lightroom Mobile app! All the best, and feel free to post any other questions you have here.
Excellent summary on this topic Mark! Agree that the subscription is the way to go and well worth it., Thanks for posting,
Ah thanks for the kind words Dave, and glad you agree with me!
perfect piece. very helpful. thank you. i am normally good with these things. but this lightroom cc, classic thing is really complicated. it took some time for me to find how to stop automatically upload my camera roll. whatever :)
i’ve a question. i usuaaly add photos to CC via classic cc. and it always adds smart priview. then, i edit it via my phone. and save it. it saves small version. is there a way to save full resolution by this way?
thank you in advance.
ozan
Hi Ozan, thanks for the kind words. Since v2.2.0, you are able to output in full resolution, but only on images you’ve captured or added to your device (i.e. images shot on the device or added via a a Card Reader or wireless transfer). Smart Previews are 2560 pixels on the long edge, so you’re limited to this on images synced from Lr CC to your devices. Does that make sense?
it makes sense. thank you. one more question. to get the photos to iphone via card reader, first I add the photos to camera roll. in camera roll it shows me the jpeg however, it also keeps raw as I understand. and then when I open lightroom and add these photos, raw formats are added.
I couldn’t find I way to directly add the photos to lightroom.
There’s a setting in Lightroom mobile that allows for automatic import to Lightroom (bypassing the initial Camera Roll screen). Give that a try!
Hi Mark,
Very recently got an Adobe Subscription with the 20 GB storage. I am a very amateur photographer.
So my question is using Lightroom classic on my PC-have to as I am running Win 7 not the Win 10 needed to run CC Cloud.
So my question is can I run CC Cloud on my IPhone with 12.3 and have it do everything you have talked about with having Classic on my PC?
Or is everything’s dependent upon running CC Cloud on both my PC and my mobile device?
Confused in Denver
Great question – you may be able to help answer it yourself, Steve (if I’ve understood correctly!) – do the premium editing features appear for you in your mobile version of Lightroom? Re. the syncing options, I’m pretty sure you need CC on your computer for the syncing features to work well, but you should be able to check that too – let me know.