


How to use Premiere Pro: Video Editing Software Tutorial
Whether it's your first time trying Adobe Premiere Pro or you need a refresher, this guide will teach you the main features you need to edit a video well.
Premiere Pro | Software | By Ashley Darrow
Shotkit may earn a commission on affiliate links. Learn more.
Many of the photographers I know eventually try their hand at creating videos. I should know—I’m one of them.
I’m going to show you how to use Premiere Pro even if you’ve never opened this impressive video editing software before!
Download the latest version of Adobe Premiere Pro to follow along with this simple tutorial.
Start a free 7-day trial today
Your mirrorless camera is essentially a two-in-one media machine. Not only can It capture stunning photography, but these cameras are also increasingly capable when it comes to video.
I'm one of many photographers who got their start with still images, but today I work with video just as often as I'm working with photographs.
If you've been wondering how you can get started editing videos, this is the guide you've been looking for.
How to use Premiere Pro: Beginner's Guide
Even if you have a lot of experience with Photoshop and Lightroom, Premiere Pro might seem a little confusing when you first open this video editor.
This step-by-step guide is going to walk you through everything you need to know to get started on your first video editing project.
Get Organized for Video Editing

Finding a file organization system that works for you will save you an eternity once you start editing
There are countless ways that you can organize your files before you start your next video project.
I know videographers who take a filmmaking approach to their organizing and keep things arranged by date, shot number, and project.
This formal approach is very precise and will help you when working with more established teams down the road.
Then again, I have my custom file-organizing technique that works great for my needs. This is something that I’m always fine-tuning, so it might look a little different later on as I uncover more tips that work for me.
The important thing here is just to stay organized before you even start working on your footage.
This will help to prevent losing any important footage, audio, or assets after you've gotten hours into your editing.
Here's a quick breakdown of my approach to organizing files for a video editing project.
- Assets—The assets folder is going to contain things like stock footage, motion graphic templating, or client branding for example
- Audio—This folder houses any audio that's not connected to footage which can include voice overs, ambient sound, and music tracks
- Exports—The Exports folder is empty right now, but it's where all of our exported final projects are going to go when we're done editing
- Footage—This folder is going to contain subfolders organized by either the type of footage they contain or by date for longer projects
- Project Files—This is the catch-all and typically contains any documents, contracts, and any other files that don't fit in other folders
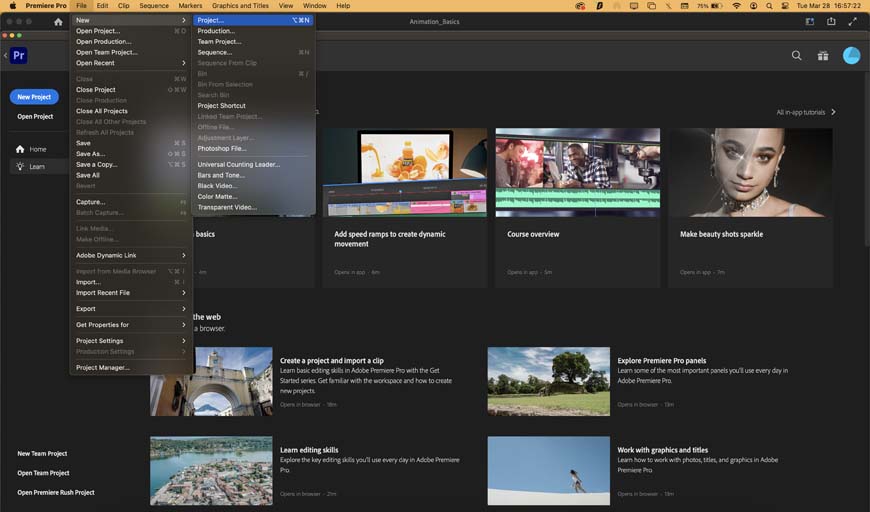
Create Your First Premiere Pro Project
If you don't have your own footage to start with, try one of Adobe's in-app lessons
Things are going to be pretty much identical to starting a new project on an app like Photoshop. you're going to want to click File > New > Project and then you’ll be taken to your first new Adobe Premiere Pro screen.
The new project screen might seem busy, but you'll be using all these features in no time!
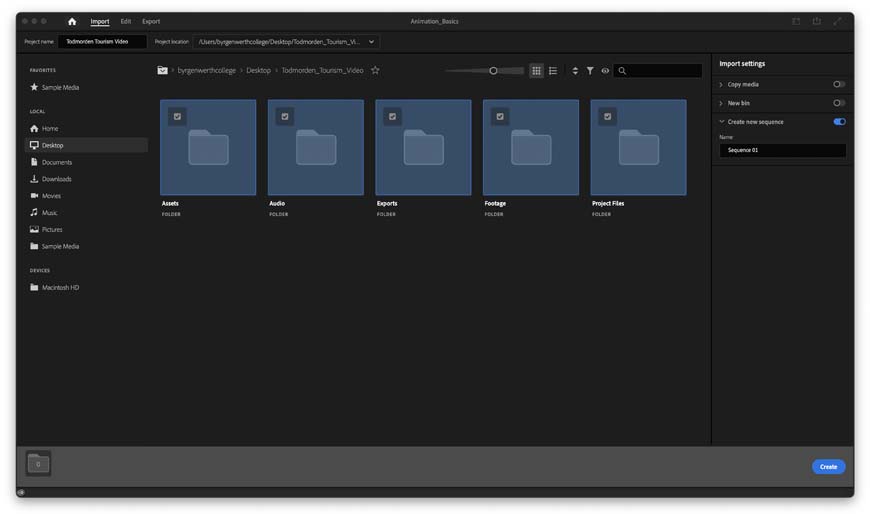
Now, you're going to see a screen that's a little bit new if you haven't worked with Premiere Pro before. This screen lets you set up all of the basics for your new project.
The first thing you're going to want to do is enter a name for your project in the upper left corner. Right next to the name field you can find the Project Location.
It's very important to always make sure that you know where your project is being saved so that you can find it later.
There are dozens of other options you can adjust here, but the last one I’m going to focus on is folder selection.
You can select any number of folders here and the media in those folders will populate into your project so you can get right to editing.
You can also drag media into your project later on.
The last thing you need to do to start your new project is to create your sequence. This is where all of your media will be edited and assembled.
The easiest way to create a sequence is just to drag and drop a clip from your project files right on to the timeline. This will automatically set the timeline to the aspect ratio and resolution of the clip.
You can also hit Command+N on Mac or Control+N on a PC to enter your own custom variables for creating a sequence. However, 99 out of 100 times I simply drop a clip in and hit the ground running.
Choosing Selects and Building Your Stringout
I always try to approach my video editing projects as if I was a sculptor. I start out by working with a rough shape and slowly making changes until I'm left with my refined, finished piece.
If you're working on a larger project with multiple takes, the first thing you want to do is choose your selects. Selects are simply the best takes available.
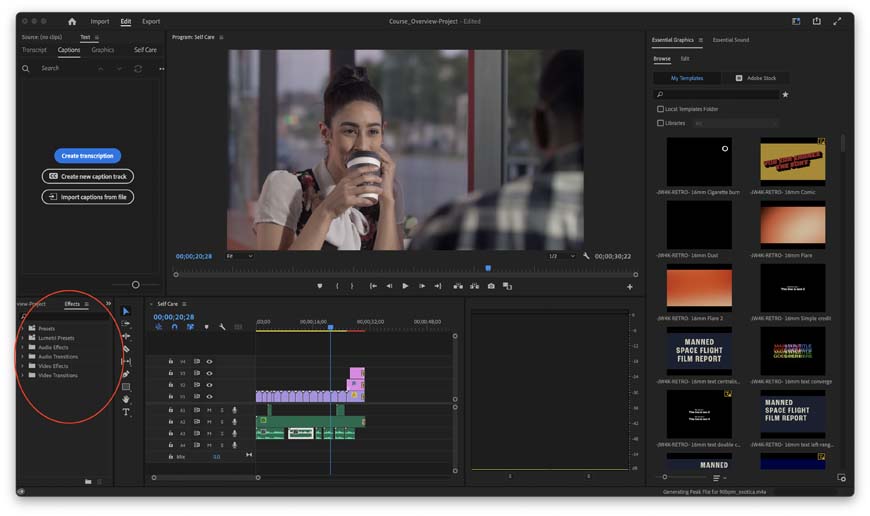
After picking your fav takes, you can start to import things into your timeline panel.

The source monitor is where you'll be seeing all of your edits in real time
Double click a select to send it to the Source Monitor—this is the middle workspace that displays the footage you’re actively working with.
As you watch or scrub through your footage, tap the “i” key to create an in point and the “o” key to create an out point. These will be the start and stop points for that piece of footage once it is sent to your sequence.
Hitting the keyboard shortcut “,” will automatically send source monitor footage to the sequence.
Once all of your footage is in your sequence and in the correct order, you have what filmmakers call a stringout. This simply means that all of the footage is there and in the right order even if there's no special effects yet.
Your string out is a basic edit. You can start to refine your project by trimming your video files, adding in an audio clip, and do some color correction to the footage to finish off your editing.
- Related: How to crop video in Premiere Pro
Sound Editing and Design

If you need more audio editing power, Adobe Audition works alongside Premiere Pro
Adobe Premiere Pro comes with plenty of tools for editing audio clips. Adobe even offers a dynamic connection between Premiere Pro and Audition which gives you a full suite tools for editing audio tracks.
All of your basic sound editing tools are going to be in the essential sound panel on the right side of the workspace.
The sound editing tools available in Premiere Pro cover most of your day-to-day needs including adjusting volume, adding some basic effects, and lightly cleaning up the sound to improve the quality of your video.
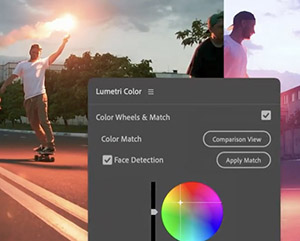
Transitions, Special Effects, and Motion Graphics
Premiere Pro is great with effects, but After Effects is the Adobe app you need if you want to do more with special effects
Now it's time to have a little fun and throw in some special effects. By default, the effects panel is located in the lower left of the Premiere Pro workspace.
This stage of editing encompasses everything from transitions and wipes to motion graphics and CG.
This is the stage where you'll be doing your final pass editing to add in any additional graphics that might be needed to complete your project.
If this is your first time working on a video project, I suggest making use of Adobe's Essential Effects as well as the built-in transitions.
These are more than enough to get your first project off the ground and looking great.
Export and Share

Keep in mind that exporting can take a while especially if you have a larger project
To export your finished project, simply click File > Export > Media or Command + M on Mac or Control + M on PC.
There are exports for everything you would ever want when it comes to editing video. Options like YouTube, Vimeo, and a wide range of formats are just the tip of the exporting iceberg.
I recommend starting with the basics like H.264 for a YouTube video.
- Related: How to export video in Premiere Pro
Is Adobe Premiere Pro Good for Beginners?
Adobe Premiere Pro is a great choice for beginners. Even though it might seem a little intimidating when you first open this video editing software, it's actually very beginner friendly once you get the hang of the basics.
Premiere even comes packed with built-in lessons that can walk you through essential editing tips and tricks.
As long as the price tag doesn't scare you away, this is an ideal program for first time video editors.
Another option is Davinci Resolve, which shares some similarities to Premiere Pro.
Premiere Pro is considered slightly easier than Final Cut, although both have a somewhat steep learning curve.
Adobe Premiere Pro FAQ
How to Customize the Premiere Pro Workspace
Adobe Premiere Pro is made up of individual panels that come together to build a workspace. There are several pre-built workspaces, but you can also toggle individual panels on and off.
You can navigate to the Workspace menu to save a new workspace layout.
How do I teach myself Premiere Pro?
The best way to teach yourself Premiere is to start the application and jump into editing some video. You can start with one of the step-by-step Premiere Pro tutorials or use the information in this guide to start playing around with your own footage.
Adobe MAX 2024 Update
As part of the MAX 2024 Update, Adobe Premier Pro is enhancing its use and application of generative AI technology.
To optimize the outcomes, Adobe Firely seamlessly adds frames to the start or end of a clip while aligning to audio. While it doesn’t sound like much, the effort and time savings will streamline overall workflows.
Generative Extend
Premiere Pro’s Generative Extend is Adobe’s first pro-grade video feature, making the most of generative AI.
The Adobe Firefly Video Model harnesses AI learning and application to deliver commercially safe outcomes.
As part of the MAX Update, Generative Extend lengthens clips to cover gaps in video footage, ensures smooth transitions, and holds shots longer for precision edits.
Content Credentials
One of the most valuable assets in the age of AI image creation and manipulation is content certification.
Adobe Premier Pro introduces a new form of media metadata that identifies if the content has been tampered with. It’s an essential element to confirm the validity of any visual creative’s work.
The Adobe MAX 2024 Updates are now live, and there's never been a better time to optimize your creative output with the Adobe Creative Cloud suite of applications.

Ashley is a photographer, writer, and film critic. When Ashley’s not writing essays on photography, cinema, and theory, he’s out taking pictures with retro film cameras.
👋 WELCOME TO SHOTKIT!
🔥 Popular NOW:
