


How to Invert Colors in Photoshop (Two Options)
There are two quick ways to invert colors in Photoshop. Follow this tutorial to invert the colors of an entire image or invert the colors of just one subject.
Photoshop | Software | By Judyth Satyn
Shotkit may earn a commission on affiliate links. Learn more.
Inverting an image in Photoshop will change every color to its polar opposite.
The resulting image will resemble a darkroom negative: blacks will become white, reds will change to blue, and any green will be turned to purple.

Download a free copy of Adobe Photoshop to follow along with this simple tutorial.
You might want to learn how to invert colors in Photoshop so you can experiment with creative effects on a photo or make color variations on a graphic design.
There are two quick ways to invert colors in Photoshop. Read on and learn how you can invert the colors of an entire image or isolate and invert just one item's colors.
If you don't already have Photoshop, learn how to download it here.
How to Invert Colors in Photoshop (2 Options)
There are two easy options to invert colors in photoshop. One will convert the entire image and the other uses an adjustment layer so the original image is left unedited.
Although they both use a similar process and the result is the same, the second method is the best to use if you want to retain all the image's data.
Method 1 – Image Adjustment
Step 1 – Open
Open the image you wish to invert in Photoshop.
Navigate to the top menu bar and select File > Open, then select the image you want from your computer.
Once the image is open, make sure your image is unlocked by clicking on the unlock icon in the layers panel.
Duplicate your image using Layer> Duplicate.
Step 2 – Adjust
![]()
Navigate to the top menu bar and in the dropdown menu under Image select Adjustment > Invert.
Once you have clicked Invert the inverted colors will be displayed.
Step 3 – Save
Save your image by selecting Edit > Save As.
Select a file name, type, and location, and click OK.

Method 2 -Adjustment Layer
Adding an Adjustment Layer means that your original image will be left untampered.
The Adjustment Layer will hold the edits which can be altered at any stage of the editing process without affecting other edits.
- Learn how to use adjustment layers to change the color of an object in Photoshop.
Step 1 – Open
Open the image you wish to invert in Photoshop.
Navigate to the top menu and select File > Open, then select the image you want to use from your computer.
- Learn how to change the color of a logo in Adobe Photoshop
Step 2 – Create an Adjustment Layer
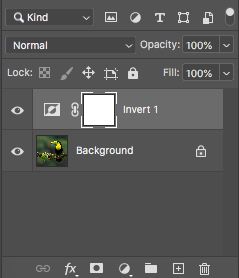
Navigate to the top menu and in the dropdown menu under Layer select New Adjustment Layer > Invert.
After you've clicked Invert, the inverted colors will be displayed in your canvas window.

In the Layers Panel, you'll see the Invert Adjustment Layer.
Click on the Invert Adjustment Layer in the Layers Panel any time you wish to edit or remove the image's inverted colors.
Step 3 – Save
Save your image by selecting Edit > Save As.
Select a file name, type, and location, and click OK.
Invert a Subject
To invert the colors of one part of the image, use a selection tool to create a selection around the subject.
Select the Object Selection Tool from the Toolbar to the left of your canvas window.
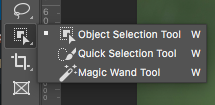
When the Object Selection Tool is active, drag your cursor over the subject to create a box of marching ants around it.
When you release your cursor, the Object Selection Tool will select the subject and surround its edges with marching ants.
Navigate to the top menu and select Image > Adjustment, then in the drop-down menu select Invert.

The subject's colors have successfully been inverted independently of the background.
When you have inverted your subject's colors, make the image even more compelling by adding an outline.
How to Invert Colors on a Picture
Inverting the colors on an entire photo or image will involve a similar editing process.
To place the inversion on top of the picture so as not to change the original image, use the second method mentioned above.
By using an Invert Layer you can invert the colors of the picture and retain all the original color data of the image.
Now you've learned how to invert colors in Photoshop. If you'd like to learn more Photoshop skills try this tutorial: How to Cut Out an Image in Photoshop.

Judyth is an experienced studio photographer and glass artist. When she isn’t Photoshopping comedians into the bellies of sharks, you can find her cooking delicious treats for her guests.
👋 WELCOME TO SHOTKIT!
🔥 Popular NOW:
