


New Photoshop Tool Delivers Eye-Catching Light Gradient Effects
News | By Stephan Jukic | September 1, 2023
Adobe’s tricks for innovative photo editing rarely stop evolving for long. The latest tool is a useful example.
The popular YouTube channel Photoshop Café has posted a tutorial by instructor and image editing professional Colin Smith in which he explains how Photoshop recently replaced a lighting effects filter with a new Gradients feature.
Smith then goes on to explain how to use the Gradients tool for even better lighting effects through the software platform. The video of him doing this is worth a look:
So far, this new feature from Adobe is only available in Photoshop’s most recent Beta version, but Smith explains how to download that PS edition if you’re curious.
In the video, Smith then gets to work on a darker version of a photo of old barrels that he’s using, and he creates this by using Photoshop’s Adjustment Layers panel and moving the Exposure slider.
Having done this, he explains in the video how he wants to add a spotlight effect and some new texture.
To achieve this, he uses a Layer mask by first setting the photo’s background to black so that the mask will stay hidden as he paints across a barrel in the image where he wants the light to shine through.
Then, using a Radial Gradient, he chooses the Foreground to Background option which is black to white.
The video quickly demonstrates how Smith’s methodology for the above is distinct from the workflow with the Lighting Effect filter that Adobe recently retired.
With the new method that Smith demonstrates, it’s possible to drag the gradient around an image and see how different areas of the image have their light effect change until you get what you prefer.
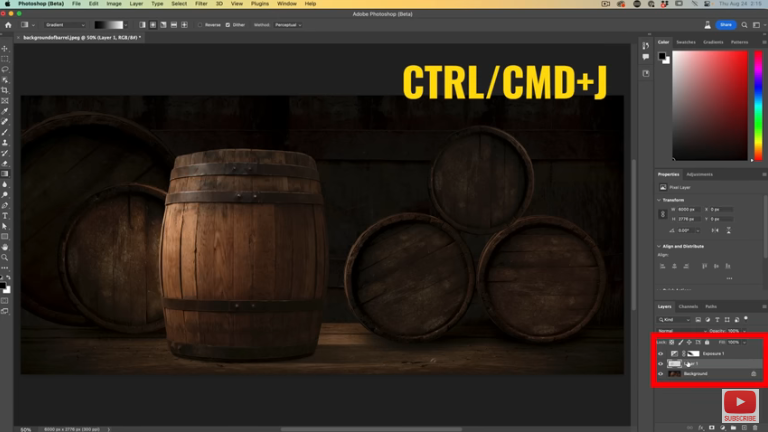
Even more importantly, the new feature has a little red dot to it which according to Smith “changes everything”. With this small dot, a user can pull the gradient along to generate sophisticated directional lighting in a way that wasn’t previously possible.
These tools can also be used to grab the midpoint and modify light falloff as desired. Adding texture is easy too. Smith goes to the Channels panel and selects the red channel to create a very specific effect along the barrel that he’d painted across earlier.
All of these channel effects can also be reset through the RGB tab in Photoshop’s Channels panel.
Smith then goes on to demonstrate other tricks for further accentuating textures in his photo and tweaking the lighting selectively.
Overall, his tutorial and the before/after shots of his edited work are impressive for the ease with which he transforms his sample photo. The rest of his tutorials on his channel are also worth watching.

Check out these 8 essential tools to help you succeed as a professional photographer.
Includes limited-time discounts.
 Best Free Photoshop Actions for Photographers
 53 Best Photography Youtube Channels in 2024
 What’s The Best Way to Buy Photoshop in 2024?
 How to use MidJourney to Create Amazing AI Images
 43 Famous British Photographers You Should Know
 How to Create a Rainbow Gradient in Photoshop (& Save as a Preset)
Stephan Jukic is a technology and photography journalist and experimental photographer who spends his time living in both Canada and Mexico. He loves cross-cultural street photo exploration and creating fine art photo compositions.

