


How to Use the Paint Bucket Tool in Photoshop
Learn how to quickly fill selected areas of your images with vibrant colors or interesting patterns in this simple guide to the Photoshop Paint Bucket Tool.
Photoshop | Software | By Judyth Satyn
Shotkit may earn a commission on affiliate links. Learn more.
If you want to learn all there is to know about Photoshop’s Paint Bucket Tool, this is the tutorial for you.
You can use the Paint Bucket Tool to adjust colors in a small portion of an image or change the entire background of a picture.
Dive into this Photoshop tutorial and learn how to fill selected areas of your images with vibrant colors or preset patterns.

Download a free copy of Adobe Photoshop to follow along with this simple tutorial.
How to Use the Paint Bucket Tool in Photoshop
There’s more to the Paint Bucket Tool than first meets the eye, so let’s get started.
Step 1 – Select Paint Bucket Tool
From the Tool Bar to the left of your canvas window select the Paint Bucket Tool or for the Keyboard shortcut press G.
The Paint Bucket Tool is positioned underneath the Eraser Tool.
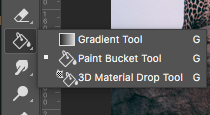
If you can’t find the Paint Bucket Tool icon it could be hidden under the Gradient Tool. Press the Gradient Tool in the tool menu bar to access the tool’s drop-down menu and select the Paint Bucket Tool.
Related: How to create a rainbow gradient preset in Photoshop
Step 2 – Choose Your Settings
When you’ve selected the Paint Bucket Tool, a Tool Options Bar will open above your canvas window.

Here you can adjust the settings of the Paint Bucket Tool before you use it.
A. Foreground or Pattern
The first setting allows you to select Foreground or Pattern. The Paint Bucket Tool can fill an area with a block of color or a pattern.
When you select Pattern you will be given the option to choose from Photoshop’s Preset Patterns, grouped into folders under Trees, Grass, and more.
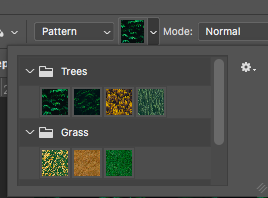
Choose the Pattern you wish to use from the folders or select Foreground if you wish to fill your chosen area with a color.
If you have selected Foreground, you’ll need to select the Fill Color from the Swatches Panel above the Layer Panel.
Learn how to create your own pattern in Photoshop >>
B. Mode
The next option will determine the Blending Mode of the paint fill.
Normal mode will set the paint fill pixels to normal opacity, with no blending or algorithm attached. The color or pattern chosen as a fill will simply be placed on top of the background.
Alternatively, in the drop-down menu beside Mode, you can choose from a list of blending modes such as Darken and Luminosity. These will incorporate a set algorithm into the fill.
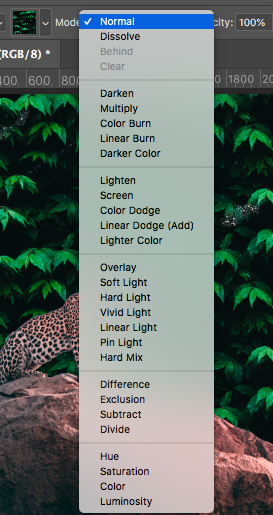
For example, the Darken mode will blend the colors of the blending layer and bottom layers, keeping the darker tones, and Luminosity will blend the top blending layer and base layers keeping the luminous tones.
C. Opacity
The Paint Bucket Tool Opacity can be adjusted to set the transparency of the paint fill.
Set the Opacity Value to 100% and there will be no transparency between the fill and base layer. Set the opacity value to 5% and the base layers will be revealed through the fill.
Below is an image where the Fill is set to an Opacity of 43%, the background layer is evident through the translucent pattern.

D. Tolerance
Tolerance is used to determine the area the Paint Bucket Tool will fill.
If the Tolerance is set to 1, the Paint Bucket Tool will only fill that one exact shade of color.
How much of the canvas the Paint Bucket Tool will fill will be dependent on how much of the area is the same color – it could fill the entire document or only one pixel.
Increase the Tolerance Value if the area you wish to fill is a combination of different tones.
E. Anti-Alias
Tick the box beside Anti-Alias and Photoshop will smooth the jagged edges that can occur between the fill area and the remaining unfilled area.
Photoshop will soften the fill edge and background edges by combining colors from both edges.
If you want no smoothing untick the Anti-Alias box.
Learn how to Feather Edges in Photoshop >>
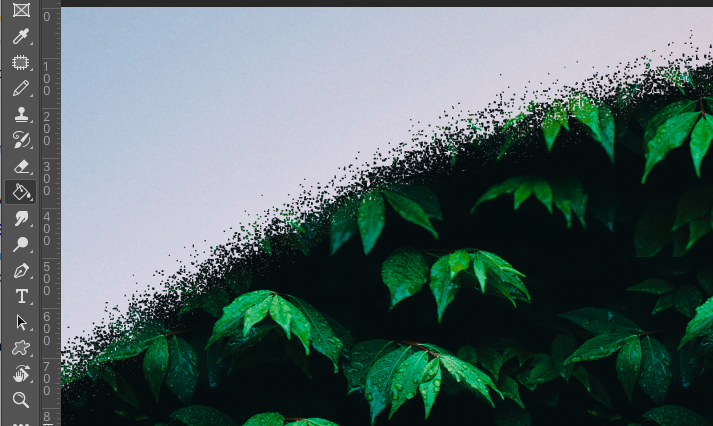
F. Contagious
Tick the box beside Contagious to increase the seepage of the fill area into areas of similar color.
Here are some examples of when the Contagious box is ticked and unticked.
Below shows the fill area when the Contagious box was left Unticked.
Below shows the fill area when the Contagious box was Ticked.
As you can see from the above images, the unticked Contagious box results in less seepage of Paint Fill than the ticked box.
Step 3 – Fill
When you’ve set your choice of Paint Bucket Tool options, you are now ready to fill the desired area of your image.
With the Paint Bucket Tool Icon selected, hover your cursor over the area you wish to fill and click on it.

The area will now be filled with your chosen Pattern or Color.
Paint Bucket Tool Not Working – Trouble Shooting
It’s not uncommon for a Photoshop tool to be obstinate and refuse to work.
Usually, it’s simple to fix, so if you’re having issues and your Paint Bucket Tool in Photoshop isn’t working, here are some troubleshooting ideas.
Solution 1. Check the Layer Panels to see if your chosen layer is selected. If the Layer is not active you will not be able to use the Paint Bucket Tool.
Activate the Layer by selecting it and see if you can now use the Paint Bucket Tool.
Solution 2. Check the Paint Bucket Tool Options Bar above the canvas workspace to see if the Tolerance, Opacity, or Contagion settings are low. It’s possible that the Paint Bucket Tool is working but you can’t see the result because the Fill is too translucent or too small to see.
Solution 3. Check the Blending Mode. If the blending mode is set to a translucent mode it’s possible that you’re not seeing the results of the Fill.
Solution 4. Check that the layer you are working on is a Rastor Layer and not a Vector Layer. The Paint Bucket Tool will only work on Rastor Layers.
Solution 5. Make sure the layer you’re working on is not locked. If the Layer is locked no tool will be able to work on it until it is unlocked.
If you enjoyed this tutorial on how to use the Paint Bucket Tool in Photoshop, we have another you might like – How to Use Vanishing Point in Photoshop.

Judyth is an experienced studio photographer and glass artist. When she isn’t Photoshopping comedians into the bellies of sharks, you can find her cooking delicious treats for her guests.

👋 WELCOME TO SHOTKIT!
🔥 Popular NOW:
