


How to Feather Edges in Adobe Photoshop in 4 Simple Steps
Learn how to Feather Edges in Photoshop to give a cutout subject with soft (rather than harsh) edges, helping to blend items into new backgrounds.
Photoshop | Software | By Judyth Satyn
Shotkit may earn a commission on affiliate links. Learn more.
Feather Edges is a Photoshop action that gives a cutout subject soft edges, helping to blend the item into new backgrounds.
When a selection has hard edges instead of smooth edges, the new layer won't be successfully blended into a composite image.
With feathering, the slightly blurred smooth edges of the outline will naturally blend layers.
This is a handy editing trick to use when you're creating photo composites or collages.
Read on to learn how to feather edges using Photoshop's Feather Edges Action.

Download the latest version of Adobe Photoshop to follow along with this simple tutorial.
Start a free 7-day trial today
Learn which Photoshop plan to subscribe to here.
How to use the Photoshop Feather Edges tool in 4 Steps
Step 1 – Open your Image
Select the image you wish to edit and open it in Photoshop.
Step 2 – Selection Tool
Use a Selection Tool to select the area you wish to cut out with Feather Edges.
For this editing job, we are going to use the Elliptical Marquee Tool to produce a Feather Effect on a circular cut-out.
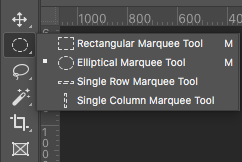
If you prefer a rectangle-shaped selection for your feather effect, use the Rectangle Marquee Tool instead.
Click on the canvas and drag the Marquee Tool over the area you wish to select. Release the cursor to create the selection.

Once selected, your selection area will be surrounded by marching ants.
Step 3 – Feather Effect
To feather your selection, navigate to the top menu bar and click on Select in the drop-down menu. Then, choose Select and Mask.
Alternatively, click on Select and Mask in the Marquee Tool Options bar in the upper right corner above the canvas window.
When you have clicked Select and Mask, a Properties Dialog Box will appear.
Scroll down the Properties Tab. Under Global Refinements, you will locate the Feather Dial – this is the only dial you need to adjust to create a feathered edge.
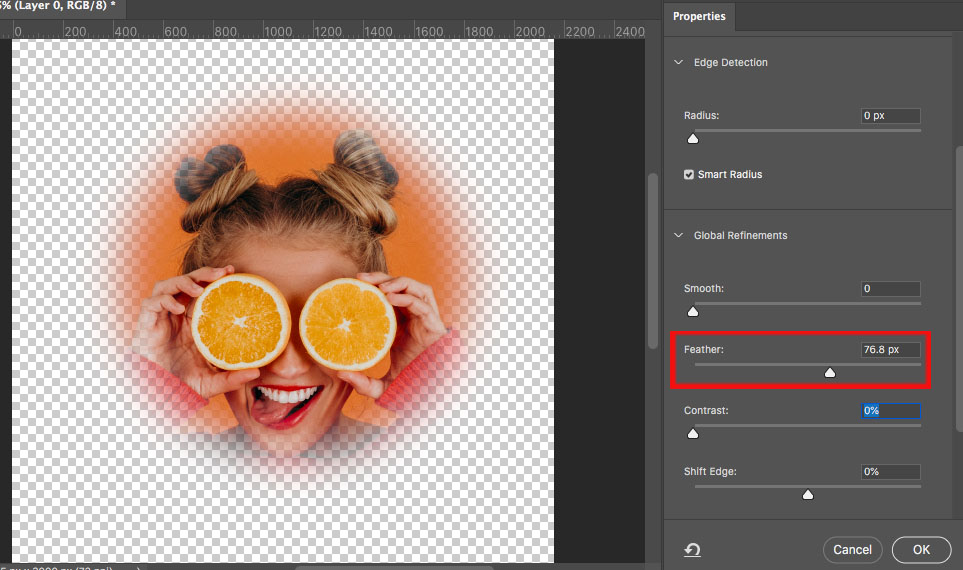
Slide the Feather Dial bar left or right to increase or decrease the feather radius. You will be able to view the adjustments as you make them in the Select and Mask canvas window.
Once you have the desired feather radius click OK in the bottom right-hand corner of the Properties tab.
Step 4 – Copy and Paste
You might be surprised to see all your Feather Edges edits disappear once you click OK, but don’t fret – they're still there.
To locate and use the cut-out selection with feathered edges, we will need to Copy and Paste from the main image.
Navigate to Edit in the top menu bar, click on Edit > Copy, then Edit > Paste.
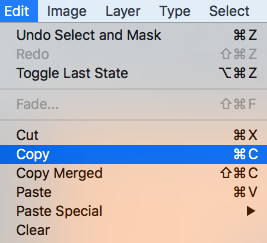
Alternatively, use the keyboard shortcuts: to Copy hold the Command key and press C (for Mac) or hold Ctl and press C (for Windows).
To Paste hold Command and press P (for Mac) or hold Ctl and press P (for Windows).
Your feathered selection will now be pasted into a new layer, visible in the layers panel, ready for you to use in photo composites.

You now have your subject ready with feathered edges to copy and paste into new compositions or collages.
Now you can use Feather Edges in Photoshop anytime you need to allow for a smoother transition of a subject from one background to another.
When you're ready to merge the layers of your compositions together, use this Photoshop tutorial: How to Merge/Blend Layers in Photoshop.
How do you Refine Edges in Photoshop?
With your image open, navigate to the top menu bar, click Select > Select, and Mask
Alternatively, click the Select and Mask option in the Options Menu bar of the Marquee Tool or Lasso Tool.
Once clicked, the Select and Mask Properties tab will open, with options to adjust the edges of your selection.
In the drop-down menu of Global Refinements, you will find options to Refine Edges.
Use the slide bars to Smooth, Feather, Contrast and/or Shift Edge.
You can view the adjustments in the Select and Mask canvas window.
Make the required adjustments to your image’s edges and click OK to apply.
Want to learn more Photoshop tips? Check out this Photoshop tutorial teaching you how to Use the Liquify Tool in Photoshop.

Judyth is an experienced studio photographer and glass artist. When she isn’t Photoshopping comedians into the bellies of sharks, you can find her cooking delicious treats for her guests.
1 Comment
Leave a Comment

👋 WELCOME TO SHOTKIT!
🔥 Popular NOW:

I appreciated this, but for the life of me, could never, over the course of 5 hours, get it to just select the oval image I had. The “smart” tried to get the head, the arm, remove the background… I could never get it to just select the oval copy paste I’d done without trying to select parts out of it – so I could never ‘feather edges’ without it just making the image ghoulish. What happened to a dumb selection tool where an oval copy paste image on transparent background could just be selected? just that? why is that so impossible? I am so frustrated, I thank you for your info but I never got to try it.
I’m extra frustrated because I’m trying to design something for my dad’s funeral in 5 days, but seriously, all of the ‘smart selection’ should also just allow for selecting a goddamn oval shape of image.