


Photo Editing With GIMP: 10 Popular Techniques
Learn the most common and useful editing techniques in the popular free photo editor GIMP, with simple step-by-step instructions. Level up your edits!
GIMP | Learn | Photography Guides | By Ana Mireles
Shotkit may earn a commission on affiliate links. Learn more.
Editing photos with GIMP is simple, fun, and free. You can get great results in no time at all – it's easy to see why GIMP is so popular!
Much like Photoshop, GIMP offers a multitude of tools to do everything from simple photo edits to complex image manipulation.
In this guide, we'll teach you 10 of the most common techniques that you can use in your own photo editing process.
Just remember that GIMP doesn't support non-destructive editing like some alternative image editors, which means any edits to your pictures will be permanent.
(We recommend working on a duplicate copy of the file just in case you make an irreversible mistake.)
So here's everything beginners need to learn to use GIMP for photo editing.
How to Edit a Photo in GIMP: 10 Popular Techniques
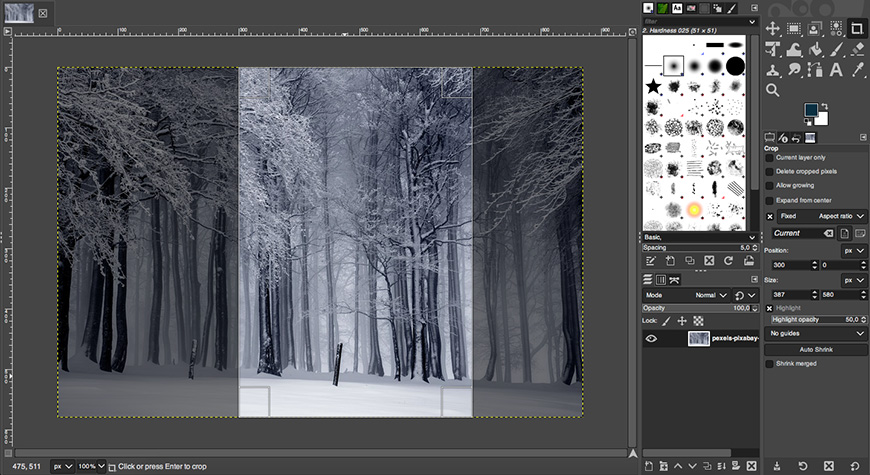
1. How to Crop Photos in GIMP
Cropping is one of the most common edits people do to their photos. You can crop because you want to change the image size or aspect ratio, improve the composition, etc.
Whatever the reason, Gimps's got you covered with its crop tool. Grab the crop tool from the toolbox or use the keyboard shortcut Shift + C.
You'll notice the cursor pointer changes to a knife icon. Also, the properties panel changes – here, you'll be able to adjust the tool's settings.
Let's see how you can use it for some specific edits. Keep in mind that when you crop, you lose resolution.
- Free crop

Photo credit: Pixabay
When the cropping tool is active, you can simply click and drag over the area you want to keep. When you release the button, you'll see an overlay that darkens the area that will be cropped out.
If you're happy with the crop, simply hit Enter to apply it.
Otherwise, you can modify the cropping area by hovering over an edge or a corner. Then, you'll see a yellow square or rectangle that indicates the area or corner you'll be adjusting. When any of these areas are active, click and drag it.
When you move the left or right edge, you'll be changing the width. Instead, if you move the top or bottom edges, you'll be changing the height. However, if you click and drag one of the corners, both height and width change together.
If you want to start a new crop, simply click outside of the image. You can use the free crop tool to cut out unwanted elements on the edge, zoom in, or fit a specific size. You can maintain the original ratio or change it.
- Crop to change the photo orientation
A common reason to crop an image is to change its orientation from portrait to landscape or vice-versa. To do this in an easy and precise way, go to the tool options.
Then, check the option Fixed and choose Aspect Ratio from the drop-down menu. Underneath, you'll see the icons for portrait and landscape orientation – click on the one you want.
Now you can click and drag on the photo to select your crop. When you're happy with it, click Enter to apply.
- Crop to improve the composition

While the crop is active, go to the bottom of the options panel. The last drop-down menu, by default, is set to “No guides”. Open the menu and choose the composition overlay that you prefer.
Then, when you click on the image and start dragging the cursor, you'll see the guidelines that will help you to improve the composition.
Once you're happy with the crop and composition, hit Enter.
2. How to Straighten the Horizon in GIMP

Photo credit: Igor Krpov
Many photo editing programs have a rotating feature inside the cropping tool that allows you to straighten the horizon on your photos. This isn't the case with GIMP.
Here, you'll need the Measure tool, which you can find in the toolbox.
If you can't see it, just right-click on the Color Picker to open the menu and grab the Measure tool. Alternatively, use the keyboard shortcut by pressing the Shift key and the M key.
Now, click on one end of the horizon and drag the cursor over it, drawing a line. It doesn't have to go across to the other end – just a bit will do.
Now release and go to the tool options. Open the menu Clipping and choose Crop to Result. Finally, click on the button Straighten that's directly under it.
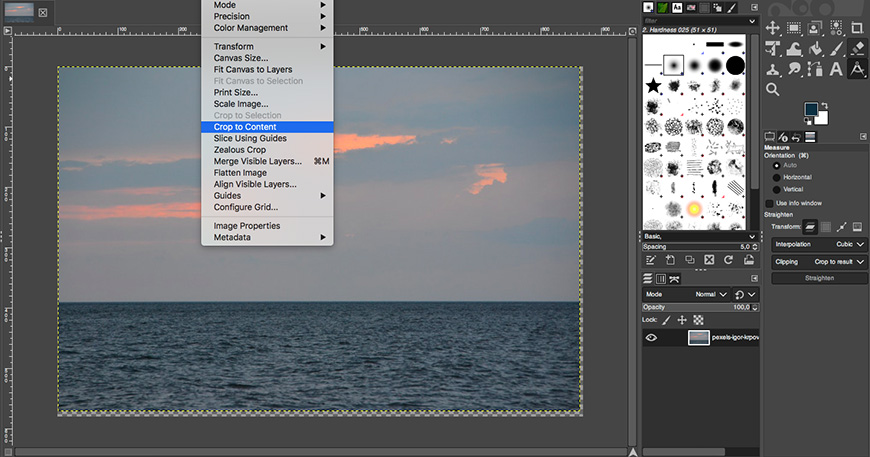
You'll notice there are transparent edges now on your photo. To fix that, go to the menu Image > Crop to Content.
3. How to Correct White Balance in GIMP
Correcting white balance is one of the editing basics. That's why GIMP has an automatic tool to do it. Alternatively, you can do it manually. Here's how to do each of these methods.
- Correct White Balance automatically
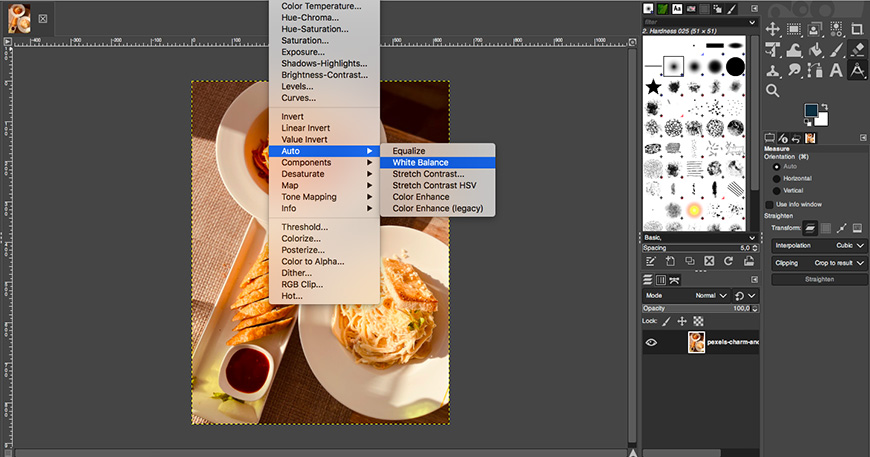
Photo credit Charm Andaya
With your photo open in GIMP, go to the menu Colors > Auto > White Balance. That's it, a one-click solution.
However, it's not always perfect, or you might want to keep some of the tonings to create an atmosphere. In that case, undo the adjustment by pressing Ctrl + Z.
- Correct White Balance Manually

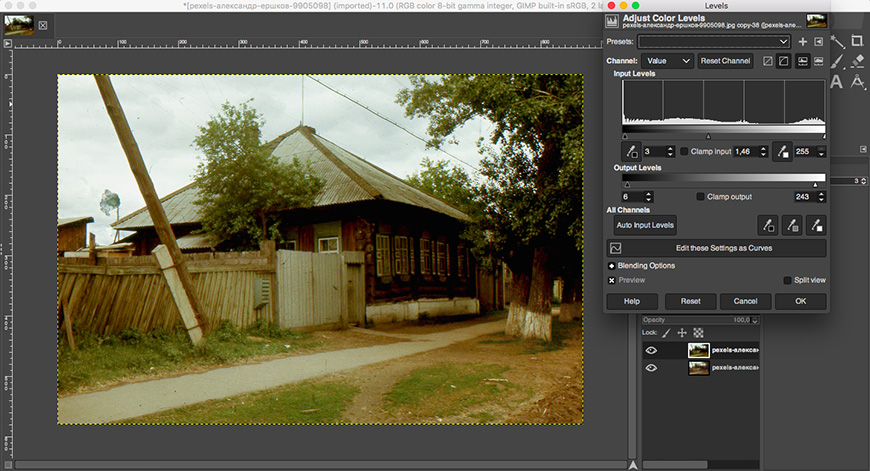
If you don't like the results of the automatic correction, you can fix the White Balance manually. Go to the menu Colors > Levels.
This will open a pop-up window. Here, look for the eyedropper tool with the grey square next to it. Select it and click on an area of your image that should be neutral.
This will set a gray point that determines the colors of the entire image, fixing the color cast. If you're not convinced, click again on the eyedropper and choose a different reference point in your photo.
When you're satisfied, click OK to apply the correction. Alternatively, you can also input the Kelvin degrees by going to Colors > Color Temperature.
4. How to Improve a Photo with GIMP

Photo credit: александр ершков
Start by duplicating the layer so that you can preserve the original image in case you don't like the edit.

Then, go to Color > Color Balance. What you'll need to adjust will be different in each photo, but usually, the mid-tones are a good place to start.
I like to change the blending mode to Soft Light if the image looks washed out, but you can leave it to Replace. You can also do it using the Hue-Saturation feature.
You must have the Preview option checked so you can see the adjustments in real time. With some images, you only need to adjust the Color Balance here in the mid-tones – if this is your case, just hit OK. Otherwise, move on to the Shadows and Highlights.
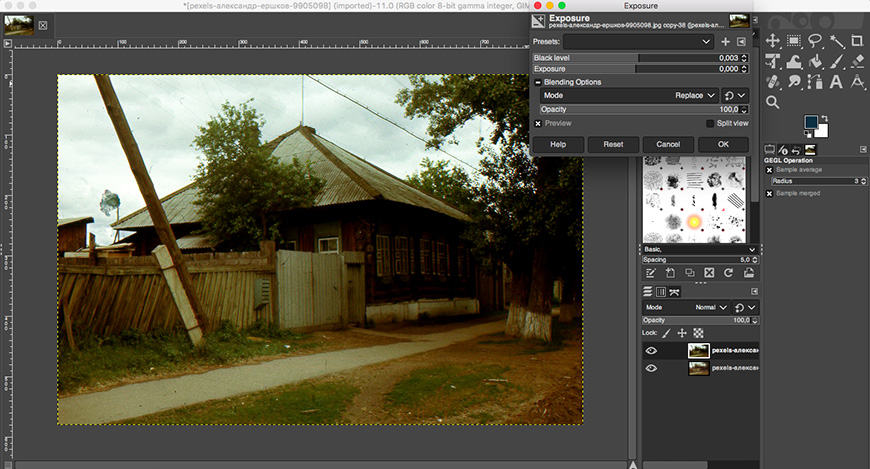
The best way to enhance photos is by fixing the light. To do so, you can go to the menu Colors > Exposure. Depending on the version of GIMP that you're using, you might not have this feature. I'm working with GIMP 2.10.
Here, you can use the Black level slider to adjust the contrast and the Exposure slider to make it brighter or lighter. You can also do this using the Brightness-Contrast feature.
Now, you can fine-tune the adjustments with the Levels tool. Using the Input Levels slider, you can adjust the mid-tones, shadows, and highlights. Then, with the Output Levels, you can determine the pure white and the black.
If you slide the levels inwards, you'll have less contrast. You can make these adjustments on the overall photo when you set the Channel to Value or do them on each color channel separately.

You can also adjust the color temperature by going to Colors > Color Temperature. This works with Kelvin degrees, so you should move the sliders to achieve the value that you want.
If you don't know the value, simply move the sliders until you're comfortable with how the photo looks.
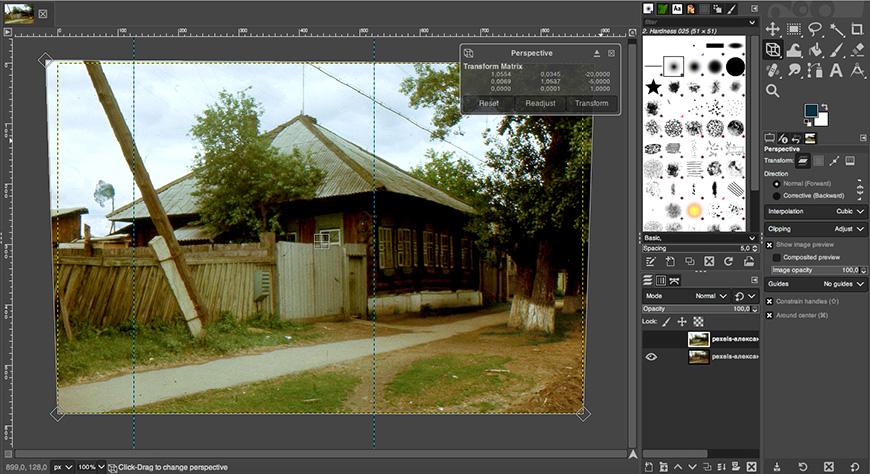
If there's a house, a building, or trees in your photo, you may need to correct the perspective of the image.
To do this in GIMP, you can use the Perspective tool. Once it's active, you can click and drag the image from the corners. To help you, you can pull guidelines from the rules. When you're satisfied, click Transform.
Now, you can remove any blemishes or unwanted objects using the Heal tool or the Clone tool. To do so, choose the desired one and click on a source point while holding the Cmd or Ctrl key. Then, click on top of what you want to remove. Repeat as many times as you need to clean up the photo.
5. How to Edit Portraits in GIMP
Start by editing your portrait in the same way that you edit photos in general.
As the previous section explains, you can enhance a photo by adjusting the colors, exposure, white balance, and perspective.
Now you can proceed with some edits specific to portraits.
For example, if your subject has red eyes, you can fix them by going to the menu Filters > Enhance > Red Eye Removal. Now let's see some of the most common portrait edits.
- Whiten teeth

Start by making a selection of the teeth. You can do this using the selecting tool of your choice – Fuzzy Selection Tool, Select by Color, Free Select Tool, Scissors Select, or Paths Tool.
Now, open the menu Colors > Hue /Saturation. This will open a pop-up window. Here, select yellow from the primary color choices. Then, lower the saturation and increase the luminosity.

There are no ideal values for this – it will differ from one picture to the next. So, simply drag the sliders until you find a point where you like the result. Make sure you don't overdo it because it won't look natural.
It's a similar process for whitening teeth in Photoshop.
- Remove blemishes
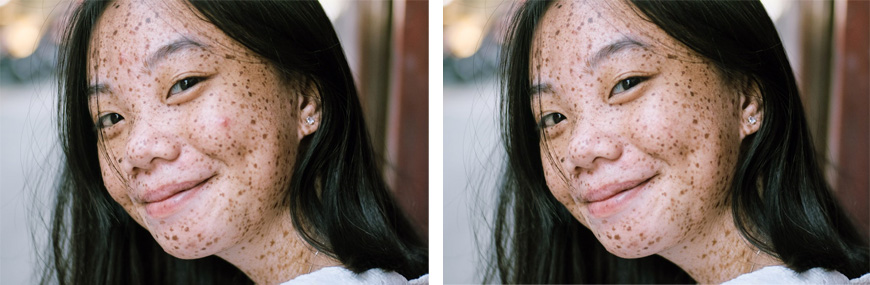
Photo credit: Ike Louie Natividad
Start by activating the Healing tool. Then, hover over the image, and you'll notice that the cursor is a circle with a cross in the middle – this is because you have to select a source. You can change the size in the tool's options panel if it's too big.
Find an area close to the blemish that's similar. Hold the Cmd key on Mac and click in this area to indicate to GIMP that it should take these pixels as a source.
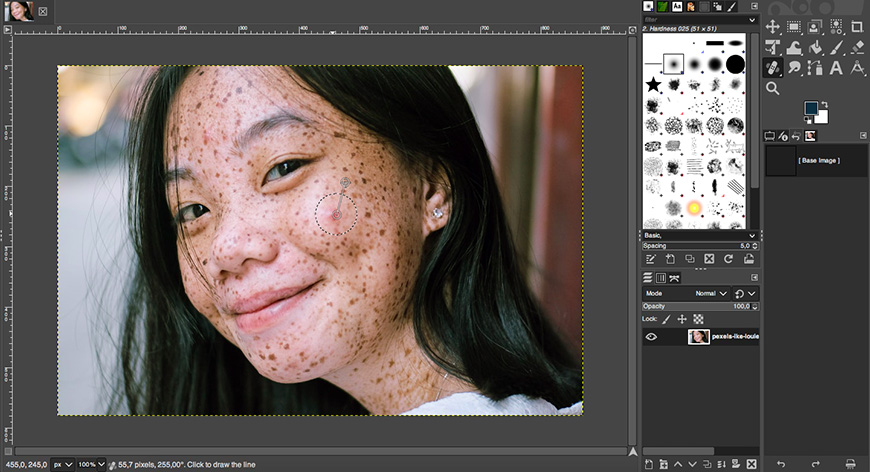
Then, hover over the blemish and click on it. It will automatically remove the blemish. Repeat the process for each blemish that you want to remove.
Here's how to remove blemishes in Photoshop.
- Smooth skin

To easily smooth the skin on a portrait, start by duplicating the background layer. You can do this in the menu Layer > Duplicate Layer or by right-clicking on the layer directly on the Layers panel and finding Duplicate Layer in the menu.
Then, change the Blending Mode to HSV Saturation. Now, go to the menu Filters > Blur > Gaussian Blur.
When the tool's control panel opens, move the sliders of Size X and Size Y – make sure you have the Preview option checked so you can see the changes as you do them.
You can also use the Split View option to see the Before and After before you apply the changes.
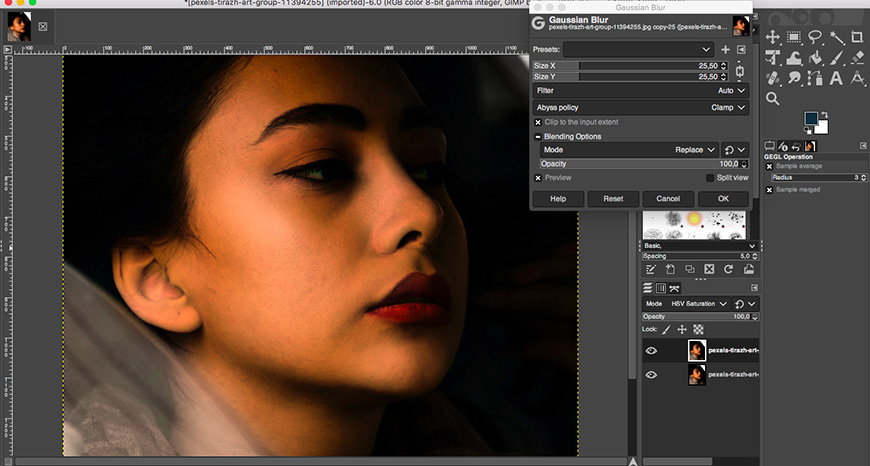
Once you're satisfied, click OK.
Here's how to smooth skin in Photoshop.
6. How to Change an Image to Black and White in GIMP

GIMP has different methods that you can use to change your image from color to black and white. Each one will give you different levels of control to adjust the tones, contrast, etc. Ultimately, you'll get different results depending on which one you use. This is the one that I find easiest.
You can access this command by going to the menu Colors > Desaturate > Desaturate. The easiest one to use is Desaturate because you simply need to choose the Mode and Blending Mode to get astonishing results.
You can try out the other choices from the Desaturate menu. Mono mixer allows you to control each color channel. With Color to Gray, you can also control the noise and texture, and the Sepia will, of course, give you a sepia tone.
7. How To Edit Raw Photos in GIMP
GIMP doesn't support raw formats natively. To edit them, you need to install some of the GIMP plugins available for this specific task. Some of the most popular are RawTherapee and Darktable.
Both of these are free software, and they also work as stand-alone programs. So, if you're not so good at installing plug-ins or you simply prefer to keep this workflow separate, you can install them to process your raw files and later move on to GIMP for further editing.
8. How To Fix the Perspective in GIMP
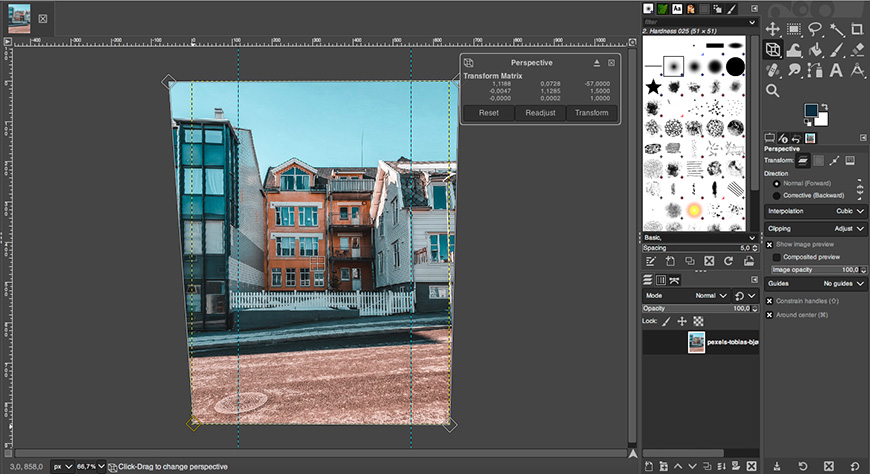
Photo credit: Tobias Bjørkli
GIMP has a perspective tool that's called just that – Perspective. It looks like a 3D cube, and you'll find it in the toolbox.
You can just eyeball the correction, but using some guidelines is better. Simply click on the rulers you'll find on the top and left side of the canvas and drag them into the photo.
Now, click on the corners of the photo and start pulling until the perspective looks right. Once you're done, click Transform.
9. How To Replace the Sky in GIMP
Start by opening the photo that you want to change the sky in. Then, go to File > Open as Layers and select the image of the sky that you want. This way, both the foreground and the background will be in the same document as separate layers.
Turn off the visibility of the sky picture for a moment by clicking on the eye icon next to it. Now, select the background image.
Here, you'll need to select the sky you want to replace. You can use any of the selecting tools that GIMP has – usually Fuzzy Selection Tool does a good job when selecting clear skies.
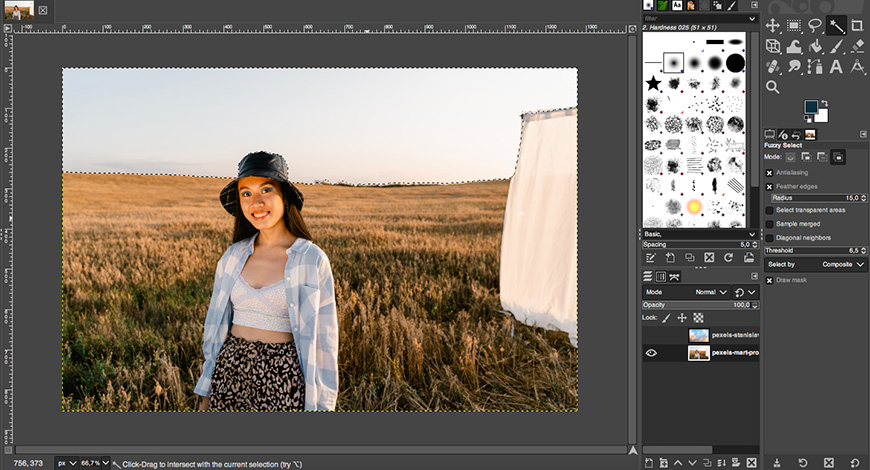
Photo credit: Mart Production
You can turn back on the visibility of the layer with the sky and select it by clicking on it. Then, go to the menu Layers> Mask > Add Layer Mask. In the pop-up window, choose Selection and click Add.

See also: how to remove image background in GIMP
10. How to Use GIMP on iPhone
GIMP (which, by the way, stands for gnu image manipulation program) is a free photo editor designed to run on a computer. Since so many GIMP users were asking for a mobile version, in 2018, XGimp was released.
XGimp is an app that allows you to run GIMP remotely. Unfortunately, it hasn't received good ratings. You'll probably be better off with other apps specifically designed to work on a smartphone.
Depending on what you want, you can find many free and paid options for iPhone. One of the most popular apps for straightforward photo editing is Snapseed, which also supports raw photos.
Another great option that also allows for non-destructive editing is Adobe Photoshop. The mobile version is completely free – you just need to set up an Adobe account.
Photo Editing with GIMP: Final Words
As you can see, GIMP is a powerful photo editing tool you can use with any computer – regardless of the operating system.
Keep in mind that after you edit your images, you need to export them to JPEG or any other file type if you want to share them or be able to open them with another photo editor. This is because in GIMP – if you click Save – it will only give you the possibility to save as an XCF file.
If you want to learn GIMP photo editing more in-depth, you can check out any of the articles we've published here at Shotkit. You can also check out the tutorials from the GIMP team published on their website.
I hope you found this quick guide helpful. Please let us know in the comments if there's a specific edit you'd like to learn about that we haven't covered.

Check out these 8 essential tools to help you succeed as a professional photographer.
Includes limited-time discounts.

Ana Mireles is a Mexican researcher that specializes in photography and communications for the arts and culture sector.
👋 WELCOME TO SHOTKIT!
🔥 Popular NOW:
