


How to Use the Refine Edge Tool in Photoshop
Cutting around objects in Photoshop is messy... Until you learn this trick! Master how to use the Refine Edge tool for amazing results.
Photoshop | Software | By Usnea Lebendig
Shotkit may earn a commission on affiliate links. Learn more.
Ever tried to change the background color or remove something in Photoshop, only to have the edges come out grayed out or sloppy?
Maybe it was a person's hair or the branches of a tree, but whatever it was, Photoshop's selection tools just didn't cut it.
That's where the Refine Edge tool in Photoshop comes in. It was made just with these complex edges in mind – edges that no other selection tool gets quite right.
Let's take a look at what it is and how to use it.

Download the latest version of Adobe Photoshop to follow along with this simple tutorial.
Start a free 7-day trial today
What is the Photoshop Refine Edge tool?
No matter how simple the background, the automatic selection tools in Photoshop rarely get everything perfect. This is especially true of fine details such as hair, blemishes, fur, branches, feathers, or anything with a similar edge complexity.
The Refine Edge tool is a brush that can fix that, choosing hard-to-select areas while effectively masking the background. All you have to do is paint with it, allowing you to make complex selections and do things like whiten teeth in a matter of seconds.
Refine edge in Photoshop also works fantastically when you manually blend exposures – especially those with hard edges. It can make the difference between a subtle, professional-looking image and an obviously Photoshopped image.
In Photoshop CC, the Refine Edge tool can be found in the “Select and Mask” area. In PS 6 it can be found in the top toolbar of any selection tool.
See also: How to feather edges in Adobe Photoshop
How to Refine Edges in Photoshop CC 2020
If this is your first time working with the Refine Edge tool, start on something with a solid background.
This will make the selection process a lot easier and you’ll be able to see more clearly how the Refine Edge brush works.
- See also: How to blur edges in Photoshop
Step 1: Duplicate Layer (optional)
In Photoshop CC, the easiest way to make a duplicate layer is to press Command-j. You can also right-click the background layer and then select Duplicate Layer from the menu.
In addition, there's also a “Duplicate Layer” option in the top menu under “Layer”.
While not strictly necessary, creating a duplicate layer ensures that you always have the original to go back to if you make a mistake.
Step 2: Select Your Subject
Photoshop has a number of excellent selection tools, including the Magic Wand tool, the Quick Selection tool, the Lasso tool, and now, with Photoshop 2020, the Object Selection tool.
There's even a fantastic new Subject Selection tool up in the toolbar next to “Select and Mask.”
Any of these will get you started. Just make sure you're working on your duplicate layer.

If you've chosen a subject with a solid background, the selection part should be easy. Once you've made your selection, check the subject's edges and fix any areas your tool might not have gotten right.
You can easily add to your selection (by holding the Shift key down) or subtract from it (by holding the Option key down) while using your selection tool of choice.
(Just don't worry about the hair or other complex edges. Those will come later with the Refine Edge tool.)
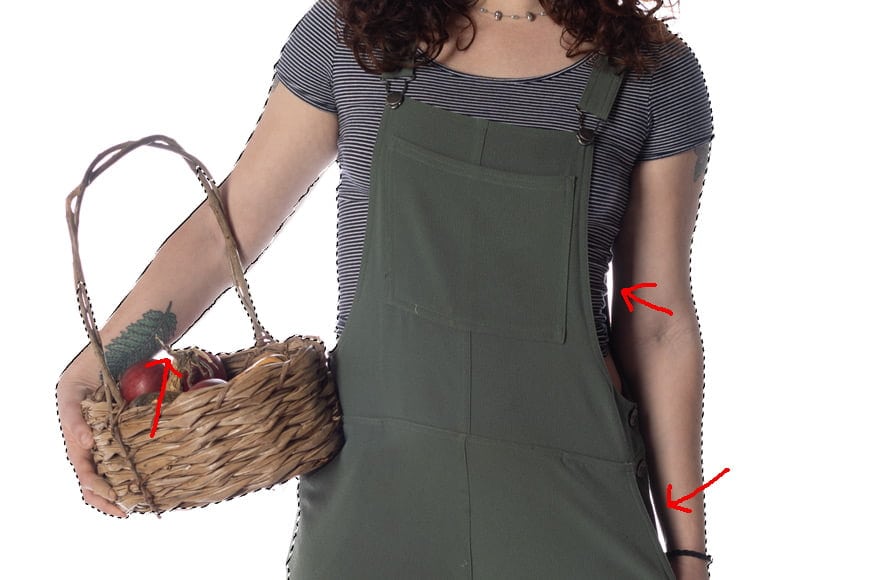
It takes just moments to remove these areas from the selection with the Magic Wand tool + the Option/Alt key.
In the photo above, you can see some areas between the subject's arm and body that were missed. Since my background is all white, I'm using the Magic Wand tool to subtract those areas from the selection. I've also gone around the rest of the body adding or subtracting where necessary to clean up the edges.
Single-color backgrounds are pretty easy to work on and Photoshop CC has a number of advanced methods for singling out colors. But if you're not in a hurry, the basic selection tools do just fine – at least in this case.
Now your selection should be surrounded by “marching ants” (unless you have that feature turned off).
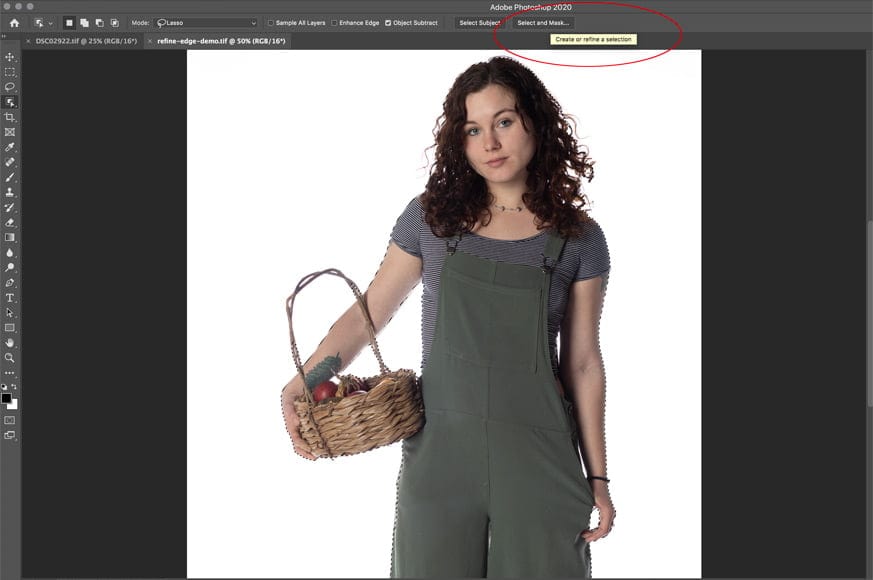
Step 3: Select and Mask
At the top right of any selection tool will be the Select and Mask option in the toolbar. Click on this.
From there, choose a View Mode. You'll find it on the right. I prefer the red Overlay (V) option.
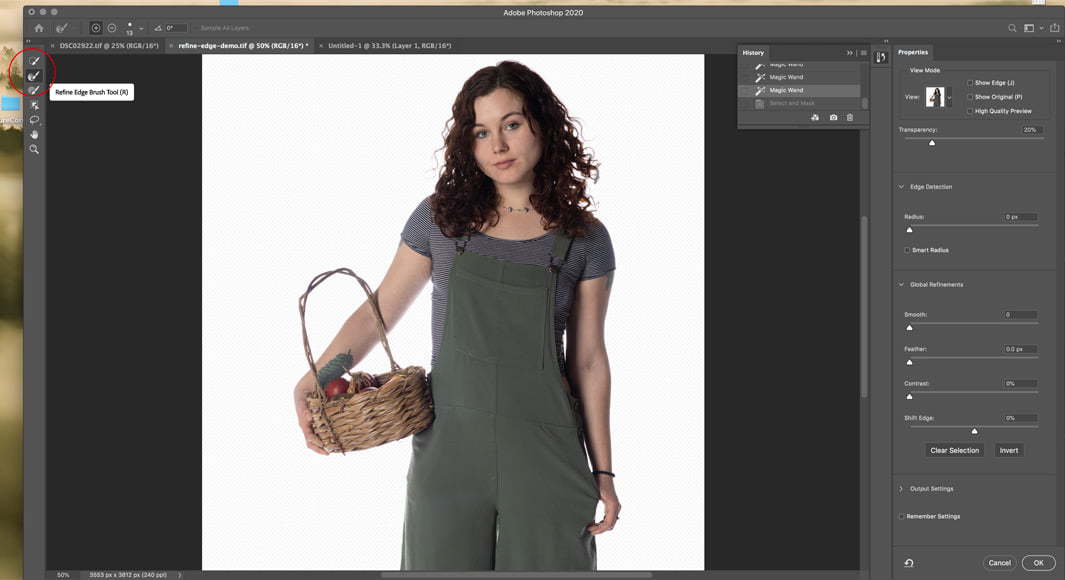
The Refine Edge tool is second from the top in the Select and Mask mode. Note: this image was taken before changing the View Mode to “Overlay.”
Once you're in Select and Mask mode, you'll see the Refine Edge Brush tool on the left side along with a few other options. It will be second from the top.
See also: How to change your brush size in Photoshop
Step 4: Using Refine Edge in Photoshop CC
Once you've chosen the Refine Edge tool, take a look at the Properties Tab on the right. It will have a few different sliders you can work with.
- The Radius slider is the main adjustment you need to know about to get started. It determines how far from the subject's edges Photoshop should refine the mask. For now, all you need to know is to keep the radius as low as possible.
- For exposure blending high contrast images, start by setting the Radius slider somewhere between 1-3. For hair and other more complex edges, you may have to widen out some more. If you're not sure where it should be, click the “Show Radius” box next to the View Mode.
- Smart Radius is helpful when you have a variety of edges, some fairly straight and others particularly messy. Turn on Smart Radius and the Refine Edge tool will automatically use a smaller radius where there's a simple edge and a larger radius where things get messy.
The global adjustments don't tend to be used as much in photography, but they do have some helpful features.
- The Smooth slider is great for smoothing edges in Photoshop.
- Feather will soften the edge – it's great for collages.
- Contrast will do the opposite and harden the edge.
- Shift Edge will move the edge either inwards or outwards.
Output Settings
In the Output Settings area, you'll find two important options:
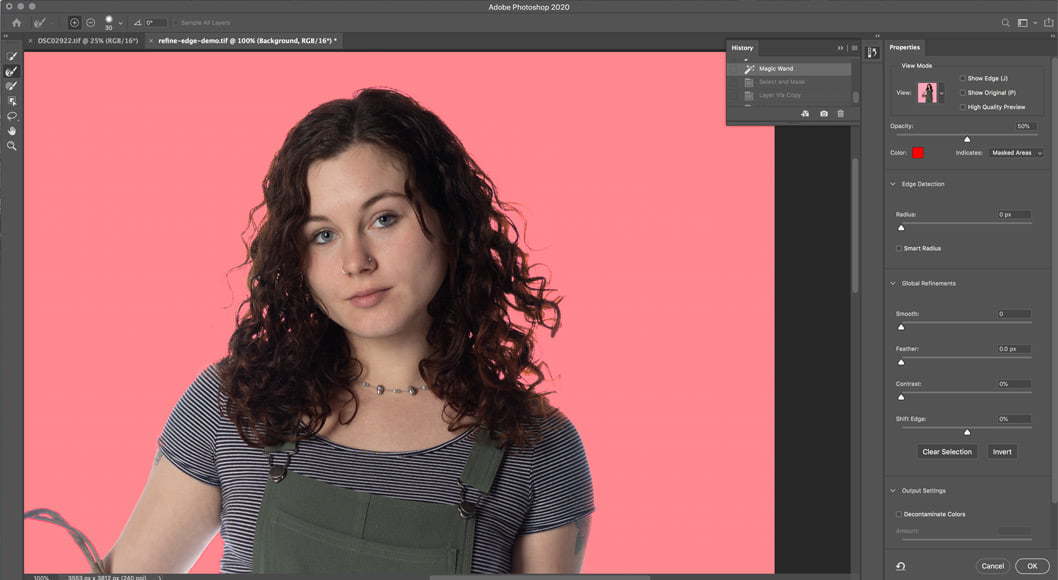
- Choose Decontaminate Colors when you want to get rid of a color cast that a colored background has cast on your subject. This is especially useful when using studio images where the background has spilled some onto the subject. In my image, you can see a bit on the subject's arms.
- The Output To option allows you to choose what will happen to your image when you finish with the Refine Edge Brush. I prefer “new layer with a layer mask,” but many just leave it on “layer mask.” (Note, if you have the Decontaminate Colors box checked, there won't be a “layer mask” output option.)
Using the Brush

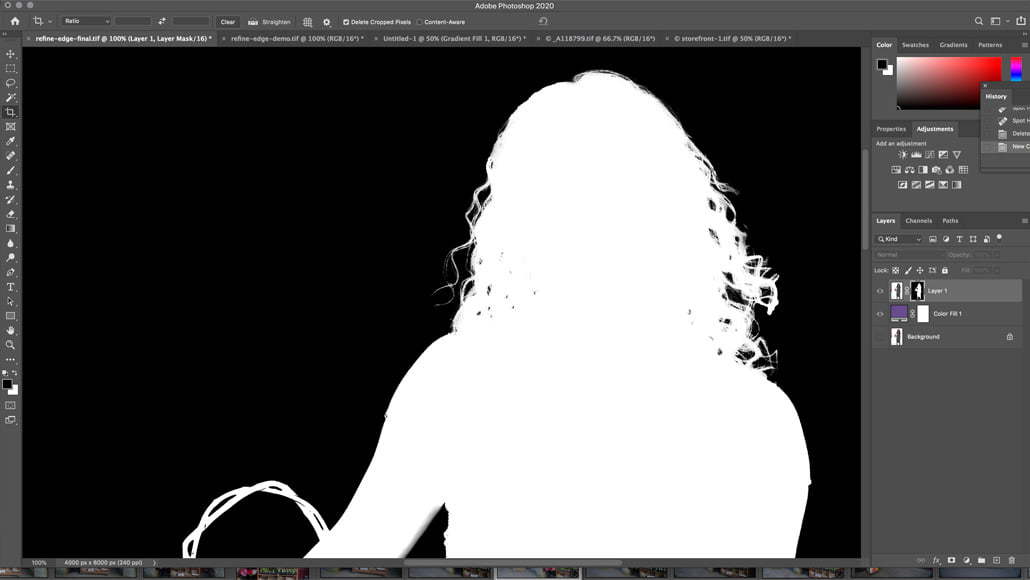
Paint over the edges, starting from the subject out. Focus on masked areas that should be unmasked and vice versa. Here you can see locks of hair that should be unmasked and white areas that should be masked.
Now, start painting. Click somewhere inside the subject near the edge and move outwards just into the background. Starting on the subject side is important: the refine edge brush works by sampling the texture and color of the pixels you click on and then deciding what pixels are most similar to it.
With people, try not to go inside the hairline. The goal is to give the brush as much to go on as possible, and that means not giving it too much of a diversity of pixels to filter through.
As with all Photoshop brushes, you can always adjust the size and type of brush in the brush drop-down menu.

More edges that need the refine edge tool.
When you're finished, your image should have all of the background masked out and the edges of the subject completely unmasked. In this case, all of the subject's hair is now part of the selection – even stray strands.
Once you're finished, hit OK.
Step 5: Cleaning Up
As with any automatic selection tool – even the new cool ones in Photoshop CC – the refine edge tool isn't perfect. For best results, you'll need to check your edges. Here are a couple of ways to do this.
Checking the Layer Mask
Hold down alt or option while clicking on the layer mask that was made for you through “Select and Mask.”
Hold down Alt/Option while clicking on the layer mask to get a closer look at your edges.
To fix any problems, select the Brush tool and change the paint color to black or white, depending on what kind of fix you need. (Black adds to the mask, white adds to the selection.)
When doing this it's important to change your Brush mode to Overlay – and remember to turn it back when you're done.
Checking Against Another Background
Another way to check your edges is to create a new solid color fill layer. Place that layer directly underneath the layer you're working with.
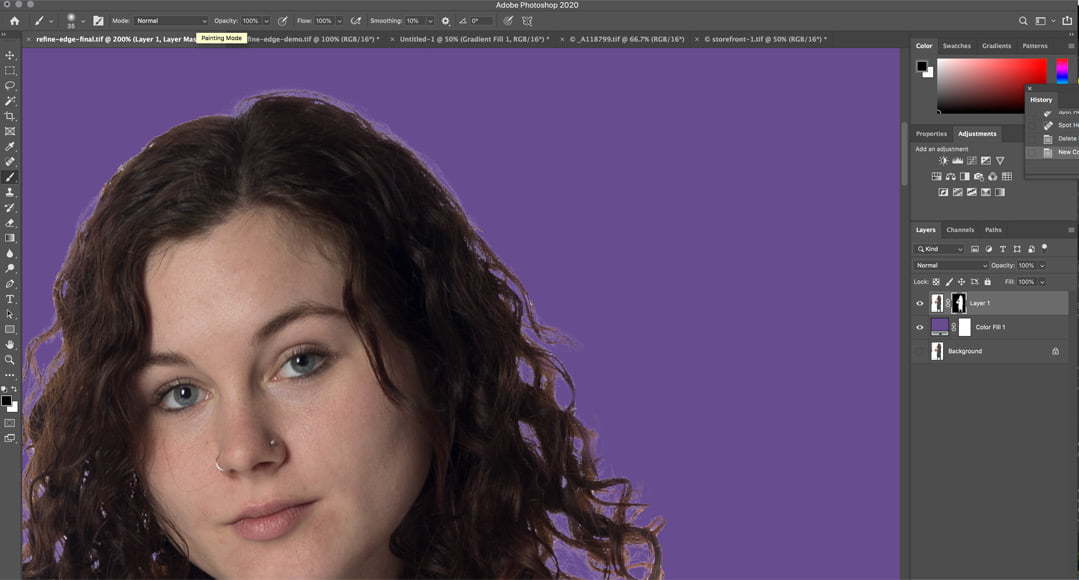
You can see a halo of sorts around the hair of my subject. This might have been taken care of if I'd had the “decontaminate colors” option checked. It's easily fixed either way.
You can fix it the same way you would in the option above, by using a brush in “overlay” mode on the layer mask.
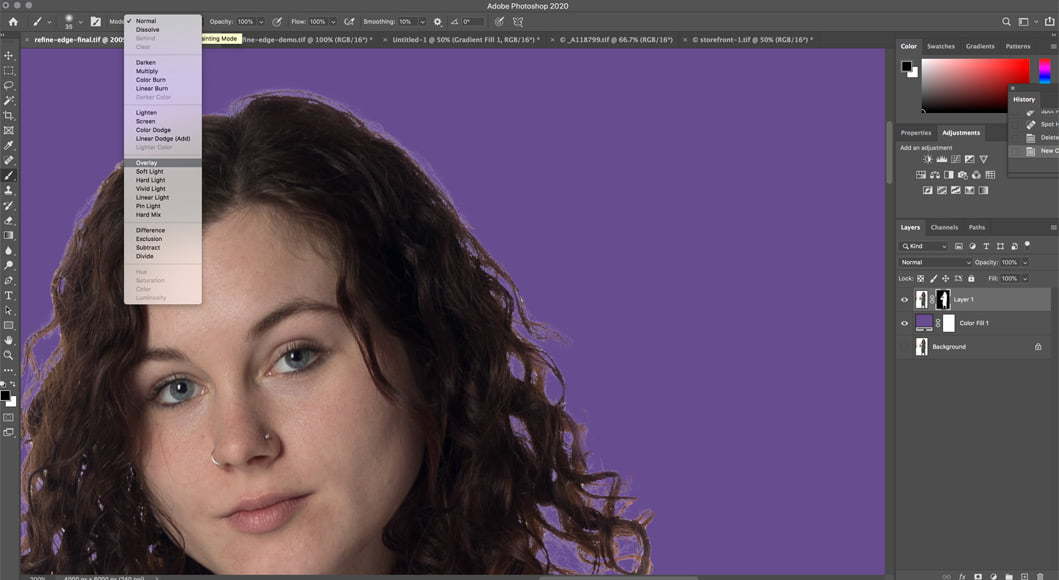
Make sure to change your brush mode to “overlay” when working on the layer mask. Make doubly sure to change it back when finished!
Here's what it looks like once I cleaned it up:

That's it. Once the edges are clean, you're done.
If you're just wanting a different solid color background, change your fill layer to whatever color you like. Or, you can cut out your subject and place them onto an entirely different background:

Adobe MAX Update 2024
Photoshop is the ultimate tool for photographers, graphic designers, and visual creatives looking to take complete creative control of their workflow.
The Adobe MAX Update 2024 introduces several enhancements and new features to simplify core tasks.
With the assistance of Generative AI, these tasks include the ability to remove distracting elements from an image and streamlined processes for placing 3D elements in a 2D design.
Removal Tool – The key updates include an enhanced Remove Tool to effectively remove unwanted or distracting objects from an image without deteriorating the overall composition.
Distraction Removal – The automated Distraction Removal feature identifies people, objects, and overhead wires that may distract from the image.
Generative Fill – Powered by Adobe Firefly AI, Generative Fill allows you to build a composition with photo-realistic 3D elements, including correctly placed shadows, highlights, and perspective.
Generative Expand – Photoshop’s Generative Expland allows you to resize the canvas and use Adobe Firefly Image Mode to fill in photorealistic elements.
The Adobe MAX 2024 Updates are now live, and there's never been a better time to optimize your creative output with the Adobe Creative Cloud suite of applications.
Final Words
Having the option to use Refine Edge in Photoshop CC is a big deal for those of us who like to do composites or exposure blending. I can't imagine being able to select around hair or feathers or multiple exposures where the masks don't line up without it.
Just like everything in Photoshop, the Refine Edge tool will take some practice to really master. In the end, though, you'll have a far better ability to cut out even the most complex of subjects.
What do you think? Got any tips for using Photoshop's Refine Edge tool that I didn't cover? Let me know in the comments.
Download the latest version of Adobe Photoshop to follow along with this simple tutorial.
Start a free 7-day trial today

Usnea Lebendig is an experienced photographer and reviewer who loves to photograph professionally and in moments where the world’s beauty and/or strangeness leaps in front of the lens.
1 Comment
Leave a Comment
👋 WELCOME TO SHOTKIT!
🔥 Popular NOW:

thanks for your tutorial. while many tutorials are ok, many do not have a response feature. i’m grateful for yours.
while most of the tools in Refine Edge are explained, i don’t see anyone explaining the options in “output to selection” in detail. there are five options and i would like to know more, and which you would recommend. Thanks much. Looking fwd to hearing from you.
btw. while i’m not much of a trekker, i do use my photography for social activism