


How to Remove a Color Cast in Luminar Neo
Discover several effective ways to remove a color cast in Luminar Neo, from AI-powered corrections to precise manual color adjustments.
Luminar | Software | Paid Partnership | By Ana Mireles | Last Updated: June 22, 2026
Shotkit may earn a commission on affiliate links. Learn more.
Color casts are one of those issues that can be very distracting, but they can also be very subtle… until you start noticing them. Then, it's impossible to ignore them.
A photo can seem too warm, or blue, or slightly green, even if the scene looked perfectly natural in real life.
The good news is that color casts are fixable in photo editing, in many cases, the process is surprisingly easy. Luminar Neo even has a ‘Remove Color Cast' tool, which I'll show you how to use in this guide.

Create eye-catching photos faster with Luminar's AI-powered editing tools — now up to 70% off.
I'll also show you other features you can use for more complex images or to achieve a specific creative style.
In this article, you'll learn three methods for removing color casts from your photos, along with the advantages and limitations of each one and the situations where each one works best.
If you're ready to take control of color editing, keep reading.
What is a Color Cast in Photography?
As you probably know, light has color. It’s not always obvious, but different light sources carry different tones. Most of the time, we don’t notice this with our naked eye. That’s because our brain automatically corrects it through a process called color constancy.
So, even if the lighting changes, a white wall still looks white to us, and skin tones still appear natural. A camera, however, doesn’t process color in the same way we do.
Despite the ‘Auto’ white balance mode, cameras can sometimes pick up these colors. When this happens, the photo might not match what you remember seeing, and that makes it feel ‘off’ and unnatural.
This mismatch is what we call a color cast.
In other words, a color cast is an unwanted tint that affects the entire image or parts of it. It distorts true colors, reduces contrast, and diminishes the overall image quality.
Some of the most common color casts you’ll encounter in photography are:
- Yellow/orange tones from indoor lighting
- Blue tones from cloudy weather
- Green tones from fluorescent light
Why Do Photos Have Color Casts?
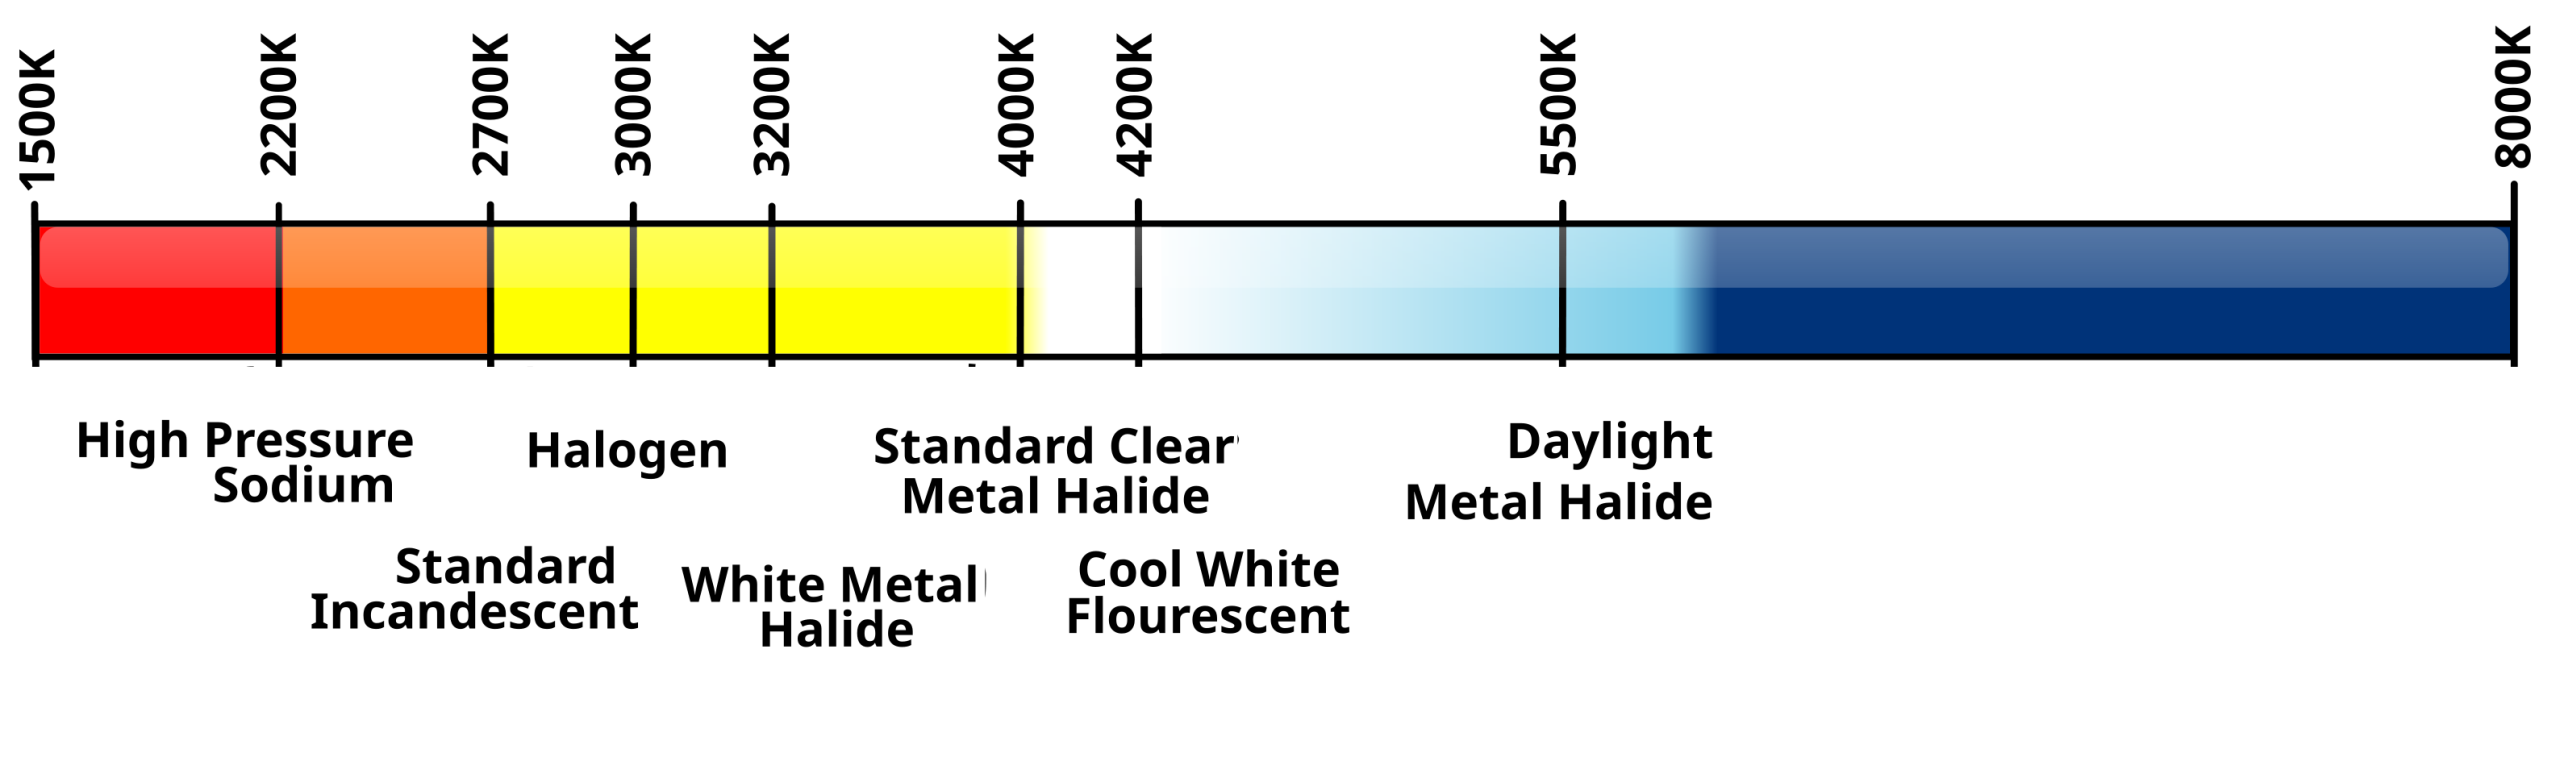
Horizontal adaptation of the Kelvin Temperature Chart by Mifsud26, CC0, via Wikimedia Commons
Once you start noticing color casts, you’ll realize how often they show up in your photographs, and they can happen for many reasons.
The first one is mixed lighting. As I was saying, cameras have an automatic white balance by default.
However, having multiple light sources in the same scene can confuse the camera if they have different tones. For example, daylight coming through the window (cooler) when the indoor lamps (warmer) are turned on.
This takes me to the second issue: an incorrect white balance setting. If your camera chooses the wrong ‘neutral’ color, the colors of the entire camera will shift, creating a color cast.
This can happen because the Auto WB misreads the scene, because you set it manually but the lighting changed, or because you left the one from the previous session and forgot to update it.
Lastly, you can get color casts not from the light source itself, but from light bouncing around the environment. That’s right, nearby surfaces can ‘spill’ color onto your subject or the entire scene.
How to Remove a Color Cast with Luminar Neo?
As we’ve seen, color casts can come from different sources and don’t always affect an image in the same way. Sometimes the tint is evenly distributed across the photo, while other times it appears in certain areas or blends with different light sources.
Because of that, there isn’t just one way to tackle color casts. The approach depends on the image itself, but also on your skill level and how precise you want the result to be.
The good news is that Lumina Neo gives you options for every situation – from quick, automatic corrections to more refined, hands-on adjustments. Let’s start simple and build from there.
Method 1 – ‘Remove Color Cast' tool
If you’re looking for the fastest and easiest way to fix a color cast, this is it.
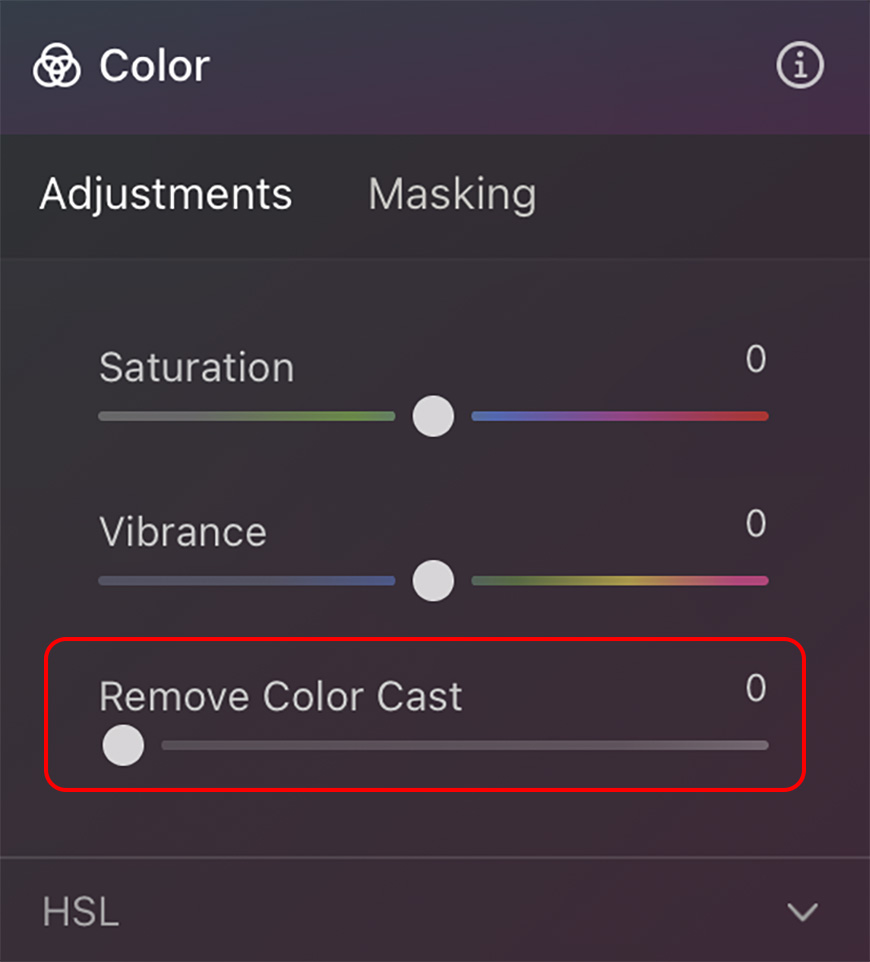
Luminar Neo has a dedicated tool called Remove Color Cast designed to do exactly what it says: neutralize unwanted color tints.
This tool works best when lighting is consistent across the entire image, meaning the same color casts affect everything more or less equally.
Here’s the step-by-step guide:
- Step 1. Open your image in the Edit workspace
- Step 2. Go to the Essentials tool panel
- Step 3. Open the Color settings
- Step 4. Move the Remove Color Cast slider


Pro tip: Use the masking tool if the color cast is restricted to a specific area
Method 2 – Color Balance


As you can see in the above example, the Remove Color Cast did a decent job, but I'd like to go further. So, whenever the first method isn't fixing the problem, or you simply prefer more control over the result, this is a better approach.
The Color Balance panel gives you further control because it adjusts colors separately on each tonal range.
This means you no longer need to apply a global correction, nor are you required to use multiple masks. Instead, you’re easily adjusting the color locally.
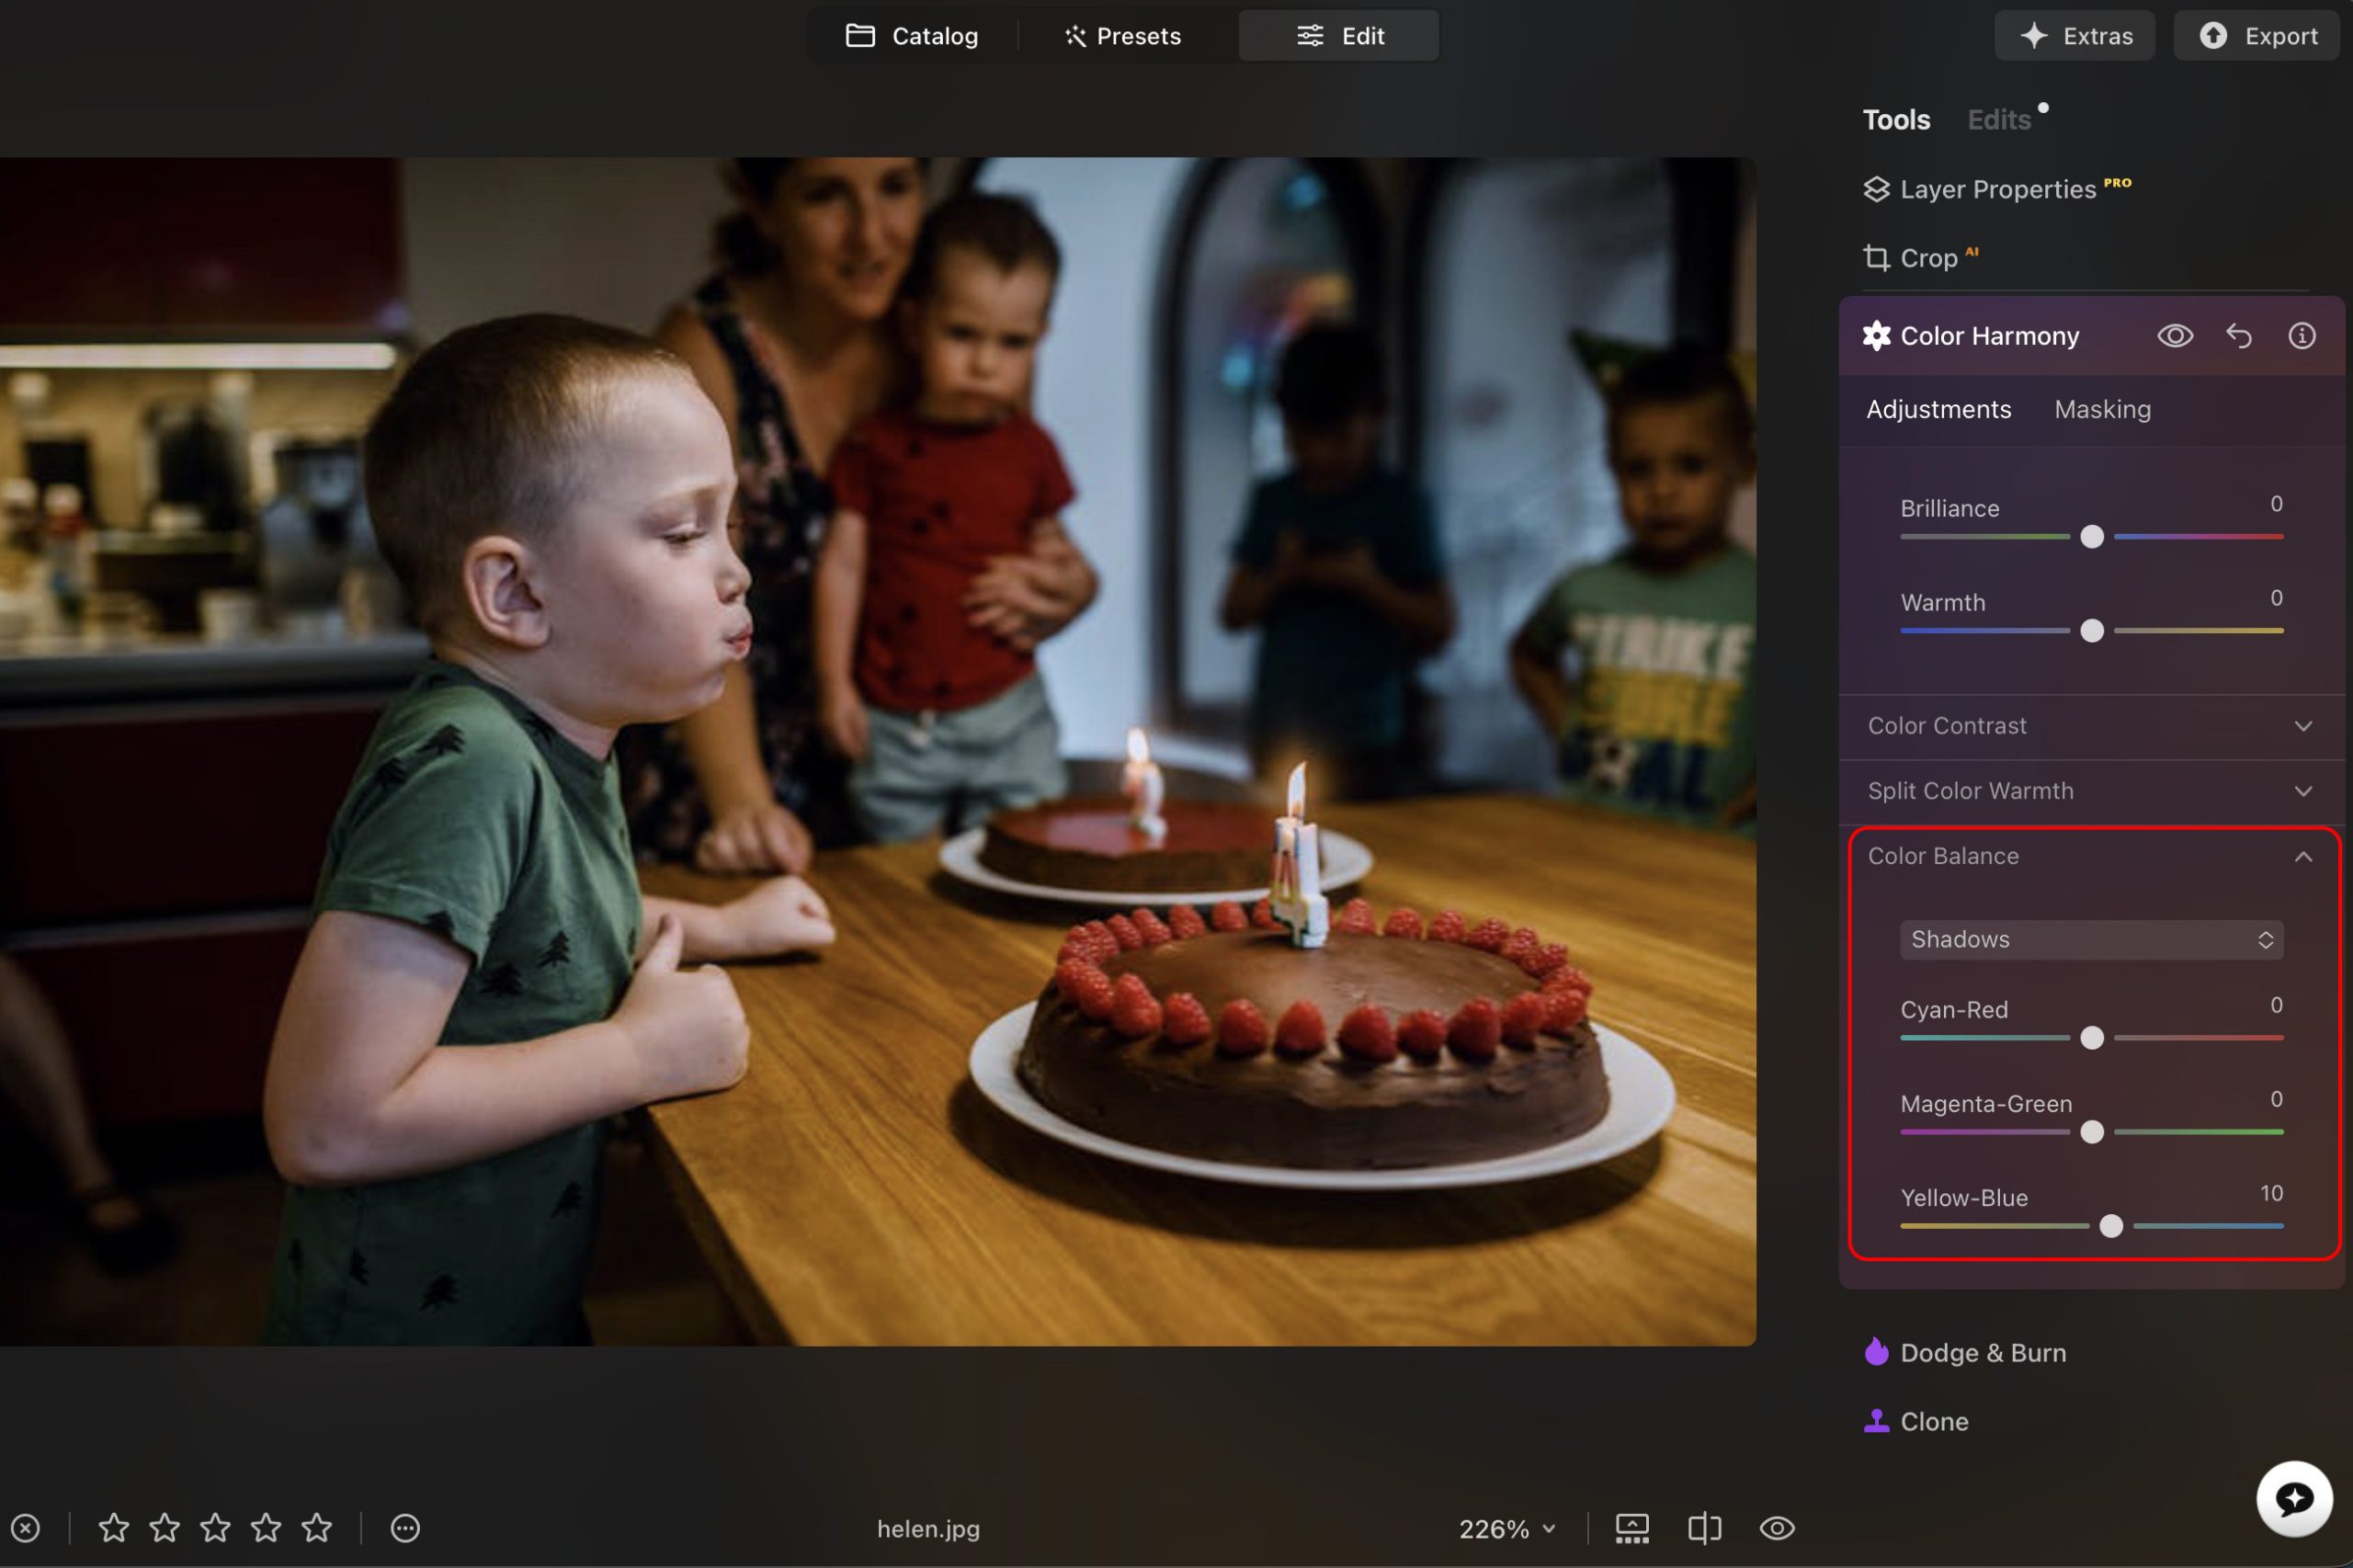
This is useful when different areas of the photo have different color tones, or when the intensity is different in each zone. One of the advantages of this method is that you’re not flattening everything with one correction; you can preserve the natural variation while still fixing the problem.
To use this method, follow these steps:
- Step 1. Open your image in Luminar Neo and go into the editor as usual.
- Step 2. On the right side of the screen, scroll down the panel tools until you reach the Professional section.
- Step 3. Now, open Color Harmony and find Color Balance.
- Step 4. Use the drop-down menu and select the tonal range you want to adjust between shadows, midtones, and highlights.
- Step 5. Move the color sliders to balance opposing colors.
- Step 6. Now change the tonal range and repeat the process. Each area may need a slightly different correction.
Pro tip: Start adjusting the midtones. They usually carry most of the visual information, especially in portraits – small adjustments can make a big difference.
Method 3 – Advanced editing
For complex images, a single tool won’t be enough. This is where you combine multiple adjustments with masking to remove color casts in a more precise, targeted way.
At this level, there isn’t a single formula you can follow. Every photo needs a different approach depending on the light, colors, and most importantly, your creative decisions.
So, instead of giving you a step-by-step, it makes more sense to walk you through a real example.
The most important thing to remember here is that I made all the creative decisions. So, you might edit it in a completely different way because this method gives you full control.

- Overall correction in the Develop panel
- Masked the subject and corrected the color temperature
- Used Remove Color Cast on the subject only
- Fine-tuned with the HSL tool
- Light Depth tool to lighten the subject
- Added the Kodak Chrome 3 LUT
- Used Magic Light on the lamps
- Applied Structure AI to sharpen the face
- Used Face AI > Face light
- Fine-tuned using Color Balance
How to Remove Color Casts in Luminar Neo – Final Thoughts
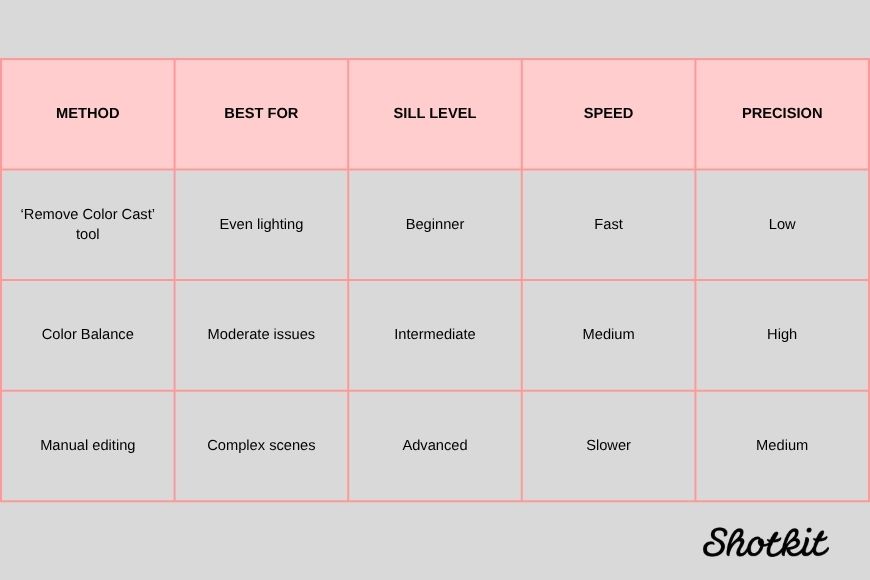
Choosing the right method to remove a color cast in Luminar Neo really comes down to how complex the lighting is and how much control you need.
Use the Remove Color Cast feature if you’re dealing with a simple case of a uniform color tint with consistent lighting. It’s fast, automatic, and gets you most of the way in seconds.
The Color Balance panel is ideal when you have different tonal ranges that need separate adjustments. It helps you retain depth thanks to the natural, well-balanced results you can achieve by targeting shadows, midtones, and highlights differently.
Lastly, make use of the entire array of color tools offered by Luminar Neo and its smart masking tools to make precise color corrections that will give you professional results that only come with having full control and dedicating more time to your editing workflow.

Ana Mireles is a Mexican researcher that specializes in photography and communications for the arts and culture sector.
👋 WELCOME TO SHOTKIT!
🔥 Popular NOW:
