


Guide to white balance
Learn all about White Balance, when to use AWB and how to set it manually in this easy to understand guide. Discover how to get accurate colors and more!
Learn | Photography Guides | By Andy Day
Shotkit may earn a commission on affiliate links. Learn more.
If you’ve ever taken a photograph and wondered why the colors look completely different from what’s in front of you, you might have stumbled upon the limitations of your camera’s auto white balance (AWB).
The color of light — its color temperature — can change without our brains realising, and there are times when camera might not be able to keep up.
Understanding how your camera attempts to use white balance is crucial for getting colors to look how you want, as well as getting a grasp of how you can change the white balance when you come to edit your photographs.
If you’re asking yourself “How does white balance affect a photo?” this article will give you a good foundation and set you up for taking control of the color temperature of your images.
In this guide, we’ll take a closer look at how adjusting white balance on your digital camera can affect your images, as well as explaining the various white balance settings.
Let’s dive in!
What Is Color Temperature?
Before discovering what white balance is and how you can use it to control the appearance of your photographs, it’s first necessary to understand color temperature.
White balance and color temperature are very close in meaning and photographers often use them interchangeably. Despite this, there is a subtle but important difference between the two.
Every source — whether it’s the sun, a candle, a lightbulb, or a strobe — emits light that is at a specific temperature. This color temperature is a measure of how warm (orange/yellow) or cold (blue) the light is.
You might have noticed this when buying lightbulbs with the manufacturers marking a blub as warm or cool on the packaging. A cool bulb will give a blue, clinical feel while a warm bulb will be orange and cosier.
Similar to heat temperature, color temperature is measured in degrees Kelvin. Typically, the point of comparison around the middle of the scale sunlight at midday which is between 5,200 K and 6,000 K.
Daylight is what our brains are most used to seeing, and it also sits close to the middle of all of the color temperatures that we tend to experience.
The scale can be slightly confusing as you might expect warmer colors to be higher in temperature. It’s actually the opposite: The warmer the light, the lower the temperature. The cooler the light, the higher the temperature.
If that doesn’t sound right, you might remember from school that the coldest (or least hot) part of a flame is red, then orange, then yellow, then white. The hottest part of the flame is actually blue.
So even though blue is a cold color, it is actually a high temperature.
The chart below gives you a rough guide of how different light sources have different color temperatures.
Notice the symbols on the left-hand side — you might recognise them from your camera’s settings and we’ll discuss these further later.
White Balance Chart
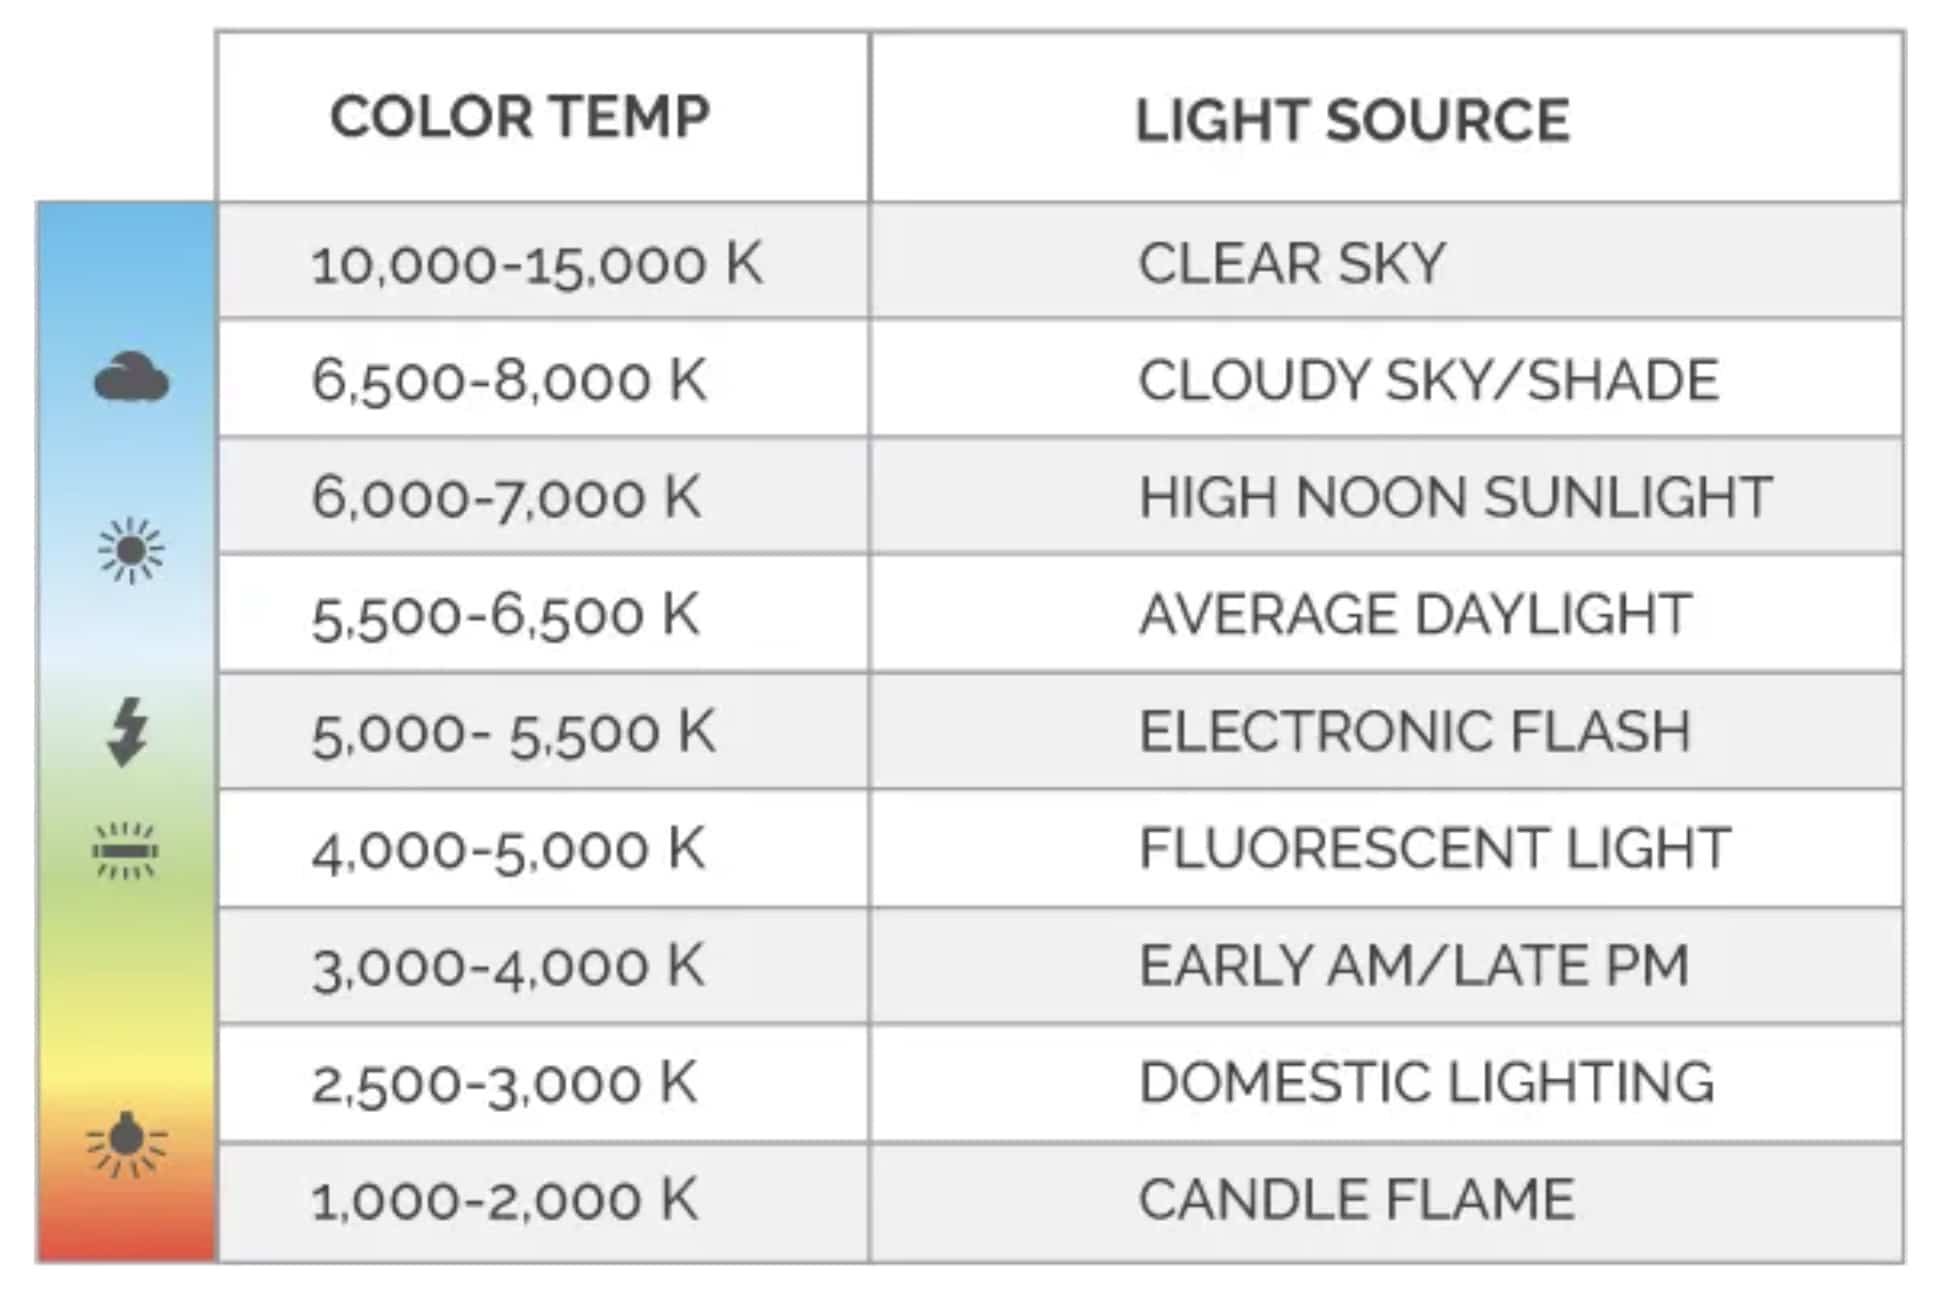
Color Temp / White Balance chart | Credit: Moment
Notice also that there is a big difference between two of the light sources that we experience the most often: average daylight and domestic lighting.
Also, note how different times of the day have different color temperatures.
Our brains are excellent at tweaking what we see to make it appear normal. This is why you may never have felt a the difference between domestic lighting and daylight as your eyes can adjust within a matter of seconds.
However, you might notice it the moment you move from one light source to another. If you move from daylight to a dark room that is lit only by candles, a wall that you know to be white might suddenly seem very yellow.
By contrast, if you move from a candlelit room to full daylight, a white wall may almost feel much more blue than it should.
When photographing, we tend to notice color temperature most when we’re shooting under indoor lighting or under street lamps. Photos can appear much more orange than we remember but at the time of shooting, our brain had normalised what we were seeing.
Digital cameras do not have this ability. They only have the option to capture an image with a fixed color temperature, though there is some flexibility to change this when you come to edit your photos — see below.
As we will discover, the digital camera makes a decision on how it captures color temperature by changing its white balance.
What Is White Balance?

© Andy Day
Whether it’s in a camera’s settings or in your editing software, white balance is how we control color temperature.
If you’re wondering “how does white balance affect a photo?” the answer is that we can use it to change the apparent color temperature within a photograph.
You can change your digital camera’s settings yourself but normally it is set to Auto White Balance by default.
In Auto mode, your camera works in a similar way to our eyes: it looks at a scene and makes adjustments automatically to make an image appear as close as possible to what it thinks is normal.
When set to Auto White Balance, a camera will try to judge the scene by finding something that is completely white, or at the very least, neutral grey. A neutral surface has no other colors in it and will give the camera a fairly accurate indication of the color temperature of the light source that is illuminating it.
Digital cameras judge the color temperature of the light reflecting from this white or neutral grey surface, and then applies a white balance in order to make the photograph look normal.
For example, imagine that you are photographing a scene indoors, lit only by incandescent bulbs. The camera knows that the color temperature is very orange and warm.
To address this, it applies a white balance that makes the scene colder and more blue in order to create a balance.
Have a look at the following example. In the first image, the camera is using a white balance of 5,500 Kelvin which is similar to daylight. However, the bulbs produce light with a very warm color temperature.
As a result, the image is very orange and the skin looks unnatural.

In the second photograph, the camera uses a white balance of 3,400 Kelvin because it is taking into account how warm the light is.
Because white balance (WB) is balancing, it can feel like it is the opposite of color temperature — you reduce the white balance to make an image colder, and increase the white balance to make an image warmer.
You might already have experienced this when you edit your photos and adjust white balance: you slide the WB slider to the right to make an image warmer, and to the left to make it cooler.
Notice how all of the colors in the photograph have changed. The t-shirt is more white, and the skin tones are completely different.
The camera might try to use a white or neutral grey color when it makes a judgement, but the temperature of the light affects every color within your photograph.
Just as your camera’s automatic modes can be fooled when it comes to exposure, it can also be fooled when it comes to its internal white balance setting.
If there is no white or grey surface available, the camera’s efforts to automatically judge the color temperature might end up being confused – this is why Auto white balance can frequently result in poor images.
In addition, a camera’s auto white balance settings can struggle if there are different light sources with different color temperatures illuminating the scene.
These two photographs below show the same subject photographed at different white balances. The teddy bear is lit by a window letting in daylight from the left, and a bedside lamp from the right.
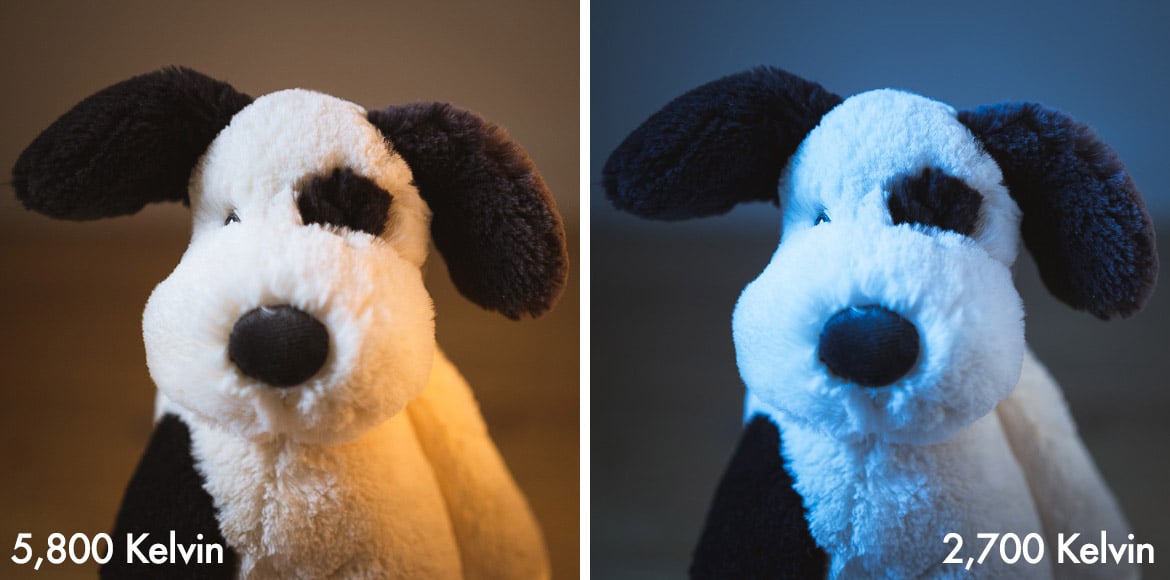
In the first photograph, the camera’s WB has been set according to the daylight coming in through the window. Notice how one side of the bear shoulder is orange (warm light) because of the light coming from the lamp.
In the second photograph, the camera’s WB has been set according to the lamp. Notice how the shoulder looks a normal shade of white but the rest of the bear is very cold (a cooler color temperature) and has a blue color cast.
(A color cast refers to a visible color tint in an image, usually one that’s unwanted. Color casts occur when WB is inaccurate or light is somehow contaminated with color, often via the use of bounce flash or natural light bouncing back to the subject.)
Remember: the light from the lamp is warm and therefore has a low color temperature. To make it look correct, the camera used a low WB of 2,700 Kelvin to make this light look normal, introducing lots of blue in order to create this balance, and therefore making other parts of the image look cold.
Notice how the background of the photograph has changed in color as well. As mentioned, adjusting your camera’s white balance affects every color in a photograph — not just the white areas.
How Do I Set My Camera’s White Balance?
Changing the white balance setting on your camera will depend on the manufacturer, and even the model of camera.
Fortunately, although access to the settings and menu items might differ, the principles are the same.
Some cameras will feature a dedicated White Balance setting button. Others will require you to go through the menu system in order to make changes.
However you reach the white balance setting, you will find that your camera has a series of pre-determined custom white balance options suitable for a range of different shooting conditions.
You’ll probably find that the white balance presets are indicated by logos that are similar to those seen in the color temperature chart shown above.
By default, the camera will be set to Auto White Balance, sometimes listed as AWB. In addition, you might see the following symbols:

From left to right, these are cloudy or shady conditions, daylight and direct sunlight, flash, fluorescent light, and incandescent bulb.
When you choose one of these options, you are setting a custom white balance and telling the camera your shooting conditions.
The specific temperature will vary, but the camera will choose a WB: say, 6,800 Kelvin for shade, 5,800 Kelvin for daylight, 2,000 Kelvin for incandescent bulbs, etc.
For even more control over the custom white balance settings, you also have the option to dial in the Kelvin setting manually, dialling in a number yourself to achieve a manual white balance setting
Cameras often have even more complex settings, allowing you to modify what the camera perceives as normal when you set it to Auto.
Some digital cameras will allow you to set or adjust white balance by referring to a photograph that you have already taken. Others will allow you to set it by pointing the camera at something within your scene that is a neutral color.
Photographers who need colors to be as accurate as possible — often in a studio — might use a white balance card in order to set a very precise custom white balance.
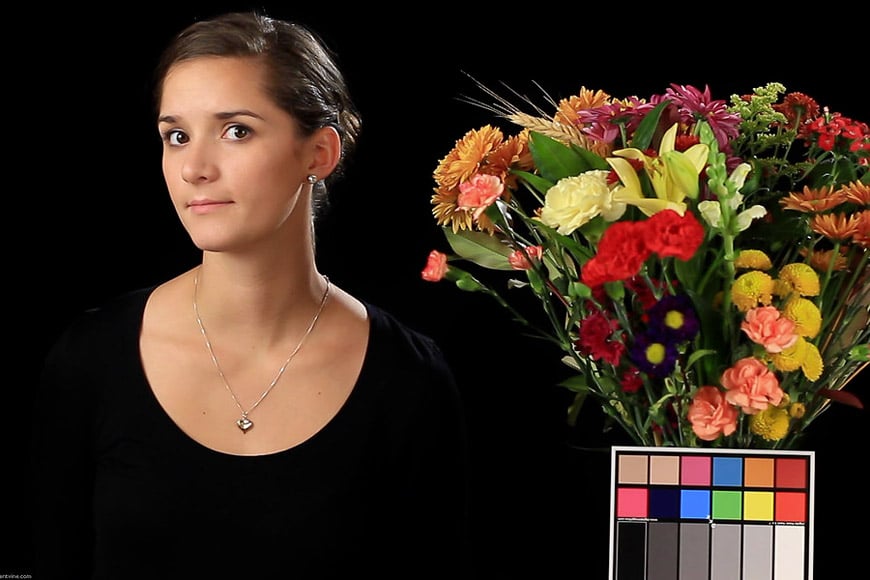
‘Canon T2i 550D Color Chart Test’ © Dave Dugdale, used under CC BY-SA 2.0.
This card is a neutral gray color (although other colors might be included for more complicated calibrations between different images).
The photographer either tells their camera to use it as a reference for calculating the white balance before they start shooting, or they use a photograph of the grey card when they come to edit their photographs later.
Photographers using this method have to set the white balance each time the lighting changes.
Jpegs, Raw Files, and Post Processing Your Photos
© Andy Day
One of the advantages of shooting raw files instead of jpegs is that raw files give you full control over the white balance when you come to post processing your photographs.
When you take a photograph, your camera’s sensor captures a huge amount of color information. When an image is converted to jpeg, the white balance becomes fixed and cannot be changed.
If you shoot jpeg, your camera is doing this conversion an instant after you have pressed the shutter button and the white balance is baked permanently into the file — whether that’s the auto white balance chosen by the camera, or the custom white balance that you have decided to use (cloudy, daylight, fluorescent light etc).
It is possible to make some changes to jpegs, but there is far less control as a lot of the color information has been lost.
Notice how editing software gives you Kelvin when you edit a raw file (left) but only a scale of 0 to 100 when editing a jpeg:

This is one of the reasons that it is better to shoot raw: you can make creative decisions about the colors in your image, and you don’t have to worry about setting the white balance when you are taking your photographs.
While shooting in natural light may not pose any complications, photographing under fluorescent lights, incandescent light or any kind of mixed lighting scenario can make it hard to make a decision of what white balance setting to use – this is when shooting in raw is particularly helpful.
Remember: even if you are shooting in raw, what you see on the back of your camera is an image that has been converted. Your camera is applying a white balance because this is required for you to see a preview.
However, you can correct white balance when you edit your photograph in software such as Lightroom.
You’ll notice that editing software often has the same white balance presets as cameras: daylight, cloudy, incandescent bulb, etc. You can use these presets or set the temperature yourself.
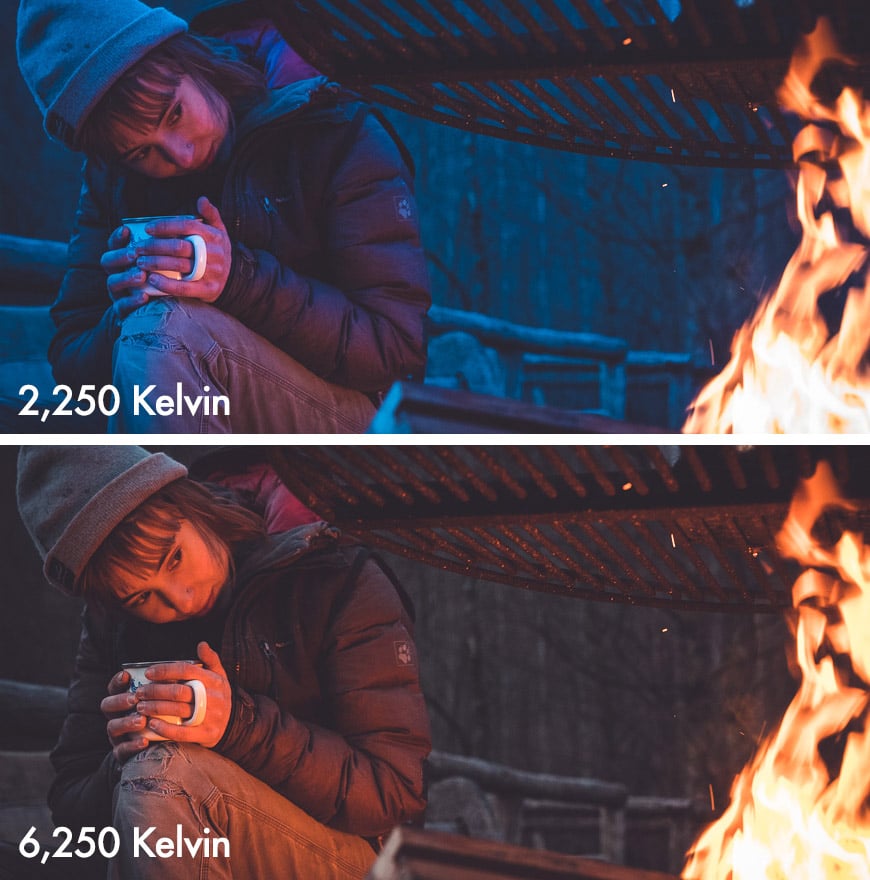
In the photograph above of the woman sitting next to the fire, the camera chose a white balance of 2,250 Kelvin in order to balance out the warm orange hue being cast by the flames.
However, the fire no longer feels cosy and the areas of the photograph not lit by the fire look very blue as a result.
To make the photograph feel warmer, I increased the WB to 6,250 Kelvin when I edited the image.
If the fire weren’t in the photograph, the subject’s skin would be far too orange to look natural, but because the fire is there, our eyes understand that there is a warm glow that is changing her appearance and the photograph looks much more natural as a result.
More advanced editing software will have an eyedropper tool that allows you to click on a part of your image which is grey or white — i.e., neutral in color — and tell the software to use that point to set the WB.
This is how photographers use a white balance card when they edit their photos.
Should You Use Auto White Balance?
If you’re asking yourself if you should use your camera’s Auto White Balance, the answer is probably yes.
If you’re shooting in jpeg, this will probably give you the best results as today’s digital cameras are generally very good at calculating the color temperature.
Also, it means that you don’t constantly have to remember to adjust white balance every time the lighting changes.
If you’re shooting in raw, your choice of camera setting doesn’t really matter as you can change the white balance freely when you come to edit your photographs.
That said, you might want to leave it on Auto White Balance so that you can see what your camera thought looked normal.
Modern digital cameras usually do a god job with auto white balance settings when there’s natural light across the entire scene, usually when shooting outdoors.
However, when fluorescent lights, incandescent light or other scenes with multiple light sources or mixed lighting enter the equation, Auto white balance mode will usually struggle.
I recommend you experiment with the Auto white balance setting on your digital camera – adjust the white balance yourself to what looks natural, take a photo, then switch to AWB, take a shot and compare the difference.
White Balance FAQs
How do you fix white balance?
White balance can be fixed by setting a custom white balance on your camera. A quick way to do this is to choose a symbol from the camera’s menu that matches your shooting conditions — eg, cloudy, fluorescent light, etc. You can also fix white balance when you edit your photographs but note that you have much more flexibility if your photograph is a raw file and not a jpeg.
Can white balance affect exposure?
White balance can affect exposure, particularly if you are photographing in jpeg. The process of converting the image data to jpeg applies a white balance irreversibly and this setting can determine how bright certain colors appear. When shooting in raw, there is much more flexibility but the white balance might affect how you are perceiving the exposure, potentially losing color information that appeared to be present in camera but is lost when the white balance is changed later on.
Does white balance matter in raw?
The vast majority of the time, the white balance determined by your camera will not have any bearing on your image as you can change it later when you edit your photograph. However, if you are photographing a high contrast scene, correcting the white balance when editing might introduce colors that are darker or brighter into certain parts of the image, and information in the edited image might be lost.
Does white balance affect noise?
White balance can affect noise but only in more extreme circumstances. Some noise may become more prominent as you change the white balance as changes to its hue might make it more visible.
What is a white balance card?
This is a grey piece of card that is included in a photograph so that it can be used as a reference for the white balance when editing (raw) photographs. Alternatively, it can be used to set a camera’s custom white balance by telling the camera to use it as a reference point. If the lighting changes, the process must be repeated.
How often should you white balance your camera?
If you set a custom white balance on your camera, you should change it every time you are shooting in different lighting conditions.
How do I fix the white balance on my iPhone?
The native camera app on the iPhone does not allow you to set a custom white balance. However, there are various third-party apps that provide this functionality.
What is a white balance filter?
This is an alternative to using a white balance card and is a semi-translucent filter that sits on the front of your lens. Once attached, you position yourself in your scene so that the light falling on your subject is also falling onto your filter, take a photograph, and then tell your camera to use that photograph to set a custom white balance.
Final Words
Understanding your white balance can bring a new level of control to your photography, allowing you to avoid mistakes that can make colors look strange, and give you creative control over the final appearance of your images.
Mastering it can give you confidence when shooting in a variety of lighting situations, from fluorescent lighting to scenes with a tungsten bulb.
If you’ve ever been confused why your image appears too ‘warm’ or ‘cool’, or why there’s an odd color cast that’s affecting your subject’s skin tines, it’s time to start experimenting with manual white balance.
Hopefully, this guide gives you a good foundation from which to work but if you have any questions, don’t hesitate to get in touch via the comments below.

Check out these 8 essential tools to help you succeed as a professional photographer.
Includes limited-time discounts.

Andy Day is a British photographer and writing, living and working in France, specialising in adventure, travel, architectural and landscape photography.
7 Comments
Leave a Comment

👋 WELCOME TO SHOTKIT!
🔥 Popular NOW:

This description is great! Your wording is accessible for multiple levels of photography. I linked to it over on my new blog at https://www.photofoxedits.com/post/4-small-camera-adjustments-save-time-in-post-editing. Thanks for this detailed look at white balance.
I’m surprised that even the new, expensive cameras don’t have an LED setting in the presets. Is it similar to florescent setting? And in most wedding halls, there are 2-3 or even four different types of bulbs (spots, chandelier bulbs, LED strips etc.)
This may be a stupid question, but from the WB chart it appears (to me) that applying increased temperature (more k’s) in processing would make the image colder (in line with the associate colour on the left).
But I know from my very limited experience this isn’t true. Is the relationship inverse? I’m a little confused on this.
The best way to understand this is to have a play around with the temperature slider in Lightroom (or similar), Ben – then you can see how increasing the Kelvins affects your image.
Great, thank you! I will have a play around to figure it out!
Amazing guide! I found this so helpful in breaking down what white balance is, and how it relates to the shots I’m taking. Thanks so much for for your insight.
Let us know if you have any questions. 😊