


How to Automatically Select People to Edit in Lightroom
Gone are the days of manually masking people in photos. Lightroom now gives you the ability to automatically select people in a couple of clicks. Here's how.
Lightroom | Software | By Brenda Bergreen
Shotkit may earn a commission on affiliate links. Learn more.
Learning how to automatically select people to edit in Lightroom is a big gain for my editing workflow.
Lightroom‘s local editing tools keep getting more precise, which makes the editing process not only faster but more capable.
In the recent Adobe MAX 2024 Update, Lightroom received a significant update to the Generative Remove function.
Generative Remove harnesses the power of Adobe's AI learning to identify unwanted distractions and elements in a composition.
The tool then highlights these elements, allowing you to remove or retain them. Generative Remove will cleanly remove the selected elements and fill the void without any hint of messy artefacts.
It's another example of Adobe fine-tuning and streamlining the editing process.
Popular course reveals the simple tricks to getting incredible results with Lightroom in record time. Give Your Photos The Look They Deserve!
![]()
I still use radial gradient masks and the brush tool, but now I can edit individual people with precision and speed.
This is especially useful if you're doing a batch edit of portraits and want to copy adjustments across a series of images.
This feature is such a huge time saver! Let's learn a little more about how to use it below.
Automatically Select and Edit People in Lightroom

Masking tools allow you to adjust specific areas of photos independently from the rest of the photos.
For years I've used radial and linear gradient filters to achieve certain objectives when balancing my images, making them stronger, and drawing the viewer's eye.
Now, instead of using radial or linear gradient masks creatively for things it's not perfectly suited to, Lightroom can select the sky, background, and subject for me more precisely. These AI-powered masking tools are very powerful and precise.
Even more impressive, Lightroom can select specific individual people to be edited as well as their features (face skin, teeth, iris, etc).
Gone are the days when you had to finely brush an area of an image. Now you can quickly select a subject to make local adjustments.
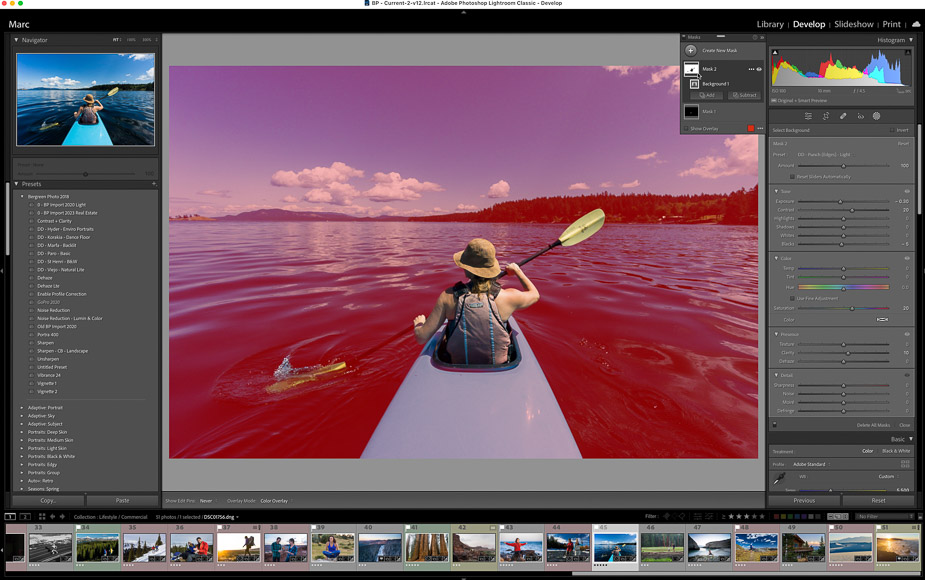
Select People
There are a number of ways to select people in Lightroom. Once you open the masking tool (shaded circle with dotted outline) above the basic panel in the develop module, you'll have the choice to add a mask.
To select people, you can either choose Select Subject or Select People. The Select Subject tool will allow you to quickly select al the people in the image and create a mask.
The Select People tool is more refined and detailed. Once you choose this option, it will give you a choice to select each individual person in the image as well as the different features of their body you would like to mask.
Select Mask Options

Options for selectable features include face skin, body skin, parts of the eye, teeth, lips, and hair. You can check multiple boxes at once or create individual masks for each feature of the body.
If you are making localized adjustments to specific features like teeth and eyes, you may have presets for each of these so creating separate masks will allow you to apply those specific settings.
I find this feature especially useful if you are editing a series of portraits and want to whiten teeth, soften skin, and brighten eyes. With a preset for each, you'll be able to quickly make these adjustments.
My most common adjustments are to soften face skin, whiten teeth, and make the subject a little darker than the background.
Adding and Subtracting from Mask
Once you have a mask created you can add or subtract from it and further refine your images. This allows you to use the AI power to select the subject but if it makes a mistake, you can simply brush in/out the other areas to apply your adjustments too.
Another helpful feature is the invert selection checkbox. This will allow you to quickly flip the selection to the opposite area.
If you accidentally choose select subject instead of select background, you can check the invert selection to get the right area for your chosen adjustment.
Can you batch auto edit in Lightoom?

It is possible to batch auto edit in Lightroom including applying the select people masks to multiple photos by simply copying the masking settings and pasting them. This works especially well with portraits that are getting a consistent set of edits.
Depending on your computer speed, copying AI powered masks to a large number of images can take some time but I've been impressed with the speed & accuracy of this feature.
Be aware that if you have a bunch of masks to copy from a group portrait, it may not apply the same masks to the same people. i.e. if you are softening only the bride's face, it might apply the mask to the groom instead if you do a batch auto edit.
The batch auto edit feature in lightroom is extremely powerful and makes applying global edits to an image set so fast! Gone are the days of individually applying radial gradient masks for each image.
How to apply the same settings from one photo to another in Lightroom?
If you are interested in using the powerful batch editing features, there are a couple ways to apply them. My favorite is to use the sync feature.
If you have one edit complete, select that image and all the images you want to copy to and click the sync button. It will bring up the synchronize settings box, where you'll have the option to choose which setting to copy.
I usually choose all the settings except for cropping because it is so specific to each image. Once the edits are synced, you'll be able to flip through the set and check to make sure the edits match your vision.
Another option for copy settings is to press Cmd+Shift+C then Cmd+V. This will give you the same control as the sync settings button.
Lastly, I often use the Previous button which copies all the settings from the previous image to the current image. If you choose an image to source the edits, you can select any image in the timeline (meaning the images don't have to be next to each other in the set).
How do I make selective edits in Lightroom?
As described above, you can use the AI powered masks in Lightroom to make local adjustments to specific parts of the image. Simply choose the masking tool above the basic editing panel and choose a selection type.
One useful tool, if you want to choose something other than people, is the “select object” tool. If you brush over an object, the AI will detect the object within the boundaries of your selection.
This is great for objects like chairs or anything with a defined border.
How do I apply a preset to a batch of photos in Lightroom?
Once you have your settings and masks created, you can create a preset by clicking the plus button on the left panel of the develop module. AI powered masks for selecting people can be added to presets. This powerful new feature is especially efficient for bulk editing
After creating the preset, simply select a series of images and choose the preset from the user presets panel. Then click the sync button and the preset will be applied to all the selected images.
On the sync button, you'll notice the auto sync switch, which allows you to enable auto-sync to all the selected images. If you choose the auto-sync option, it will automatically copy each of your adjustments to the selected images.
Automatically Select and Edit People in Lightroom | Conclusion
I hope you find this new automatic selection tool in Lightroom helpful. I love how you can quickly batch edit masks that previously took hours to make.
Time-saving features like the ability to automatically select people in Lightroom are the type of improvements I hope Adobe will continue to make!
If you have a unique way of using the AI powered selections tools in Lightroom or a question about best practices, I'd love to hear it in the comments below!
Brenda Bergreen is a photographer, videographer, writer, and storyteller based in Colorado. She specializes in Colorado wedding photography and adventurous storytelling. When she’s not behind the camera or the keyboard, you can find her adventuring with her family.

👋 WELCOME TO SHOTKIT!
🔥 Popular NOW:
