


Using Gradients in Lightroom for More Dramatic Images
Often, it's the simplest edits that produce the most dramatic results. With the Lightroom gradients tool, you can transform a dull image. Here's how.
Lightroom | Software | By Brenda Bergreen
Shotkit may earn a commission on affiliate links. Learn more.
After over a decade as a professional photographer learning how to use gradients in Lightroom is a clear time saver and a worthy investment.
Landscape photography is a big part of what I shoot whether it’s weddings or commercial work that takes place in the great outdoors.
That often means shooting at sunrise or sunset and needing to balance the exposure of a dramatic sky with the foreground.
With the Lightroom gradients tool, I can help you do that and more. Read on!
Popular course reveals the simple tricks to getting incredible results with Lightroom in record time. Give Your Photos The Look They Deserve!
![]()
Using Gradients in Lightroom for More Dramatic Images
Sometimes as photographers, we have to make choices when it comes to exposure. Perhaps you’ve heard the saying to expose for the highlights.
The reason we say this is that we want to expose for the subject while not completely overexposing the sky or other bright areas.
We want to have enough detail in the data that we can balance the image in post-production and it’s easier to draw out data from a dark foreground than recover something from a completely blown-out background.
Back when I used a Canon 5d, I regularly used a graduated neutral-density (GND) filter to balance the exposure in my image. Now, I often rely on the dynamic range of modern mirrorless cameras combined with the gradient tool in Lightroom.
gradients are powerful editing tools that allow us to decide how to balance our images in post-production and decide how things will look in the final photo.
If you’re a purist landscape photographer and you want to get everything perfect in camera, use a GND filter. Most people don’t want to hassle with mounting a large filter in front of their lens. It’s cumbersome and a hassle, especially if you’re using wide-angle lenses.
Wide-angle lenses require the biggest filters because of their broad field of view. With that in mind, I suggest getting proficient at using the gradient tool in Lightroom.
As I mentioned above, you’ll want to make sure you expose your images properly to get the most dynamic range out of your camera.
Typically, you’ll want to shoot at the lowest ISO possible. If you look up a dynamic range vs ISO chart, you’ll see that the dynamic range decreases as ISO increases.
Reasons to use the Gradient Tool
One of the main uses of the gradient tool is to make skies darker. Once properly exposed as described above, you’ll be able to pull down the exposure of the sky to make it match what your saw in person.
Because our eyes quickly adjust to different areas of brightness, we see landscapes in vivid colors that sometimes only come through after editing a photograph. The gradient Tool does a great job of creating this balance.
Another great use for the gradient tool is darkening areas of the image in order to draw the viewer’s eye to the subject. This can be done with foreground elements that are too bright and distracting or areas of the scene that are less important.
Additionally, you can create a series of gradients that will draw the viewer’s eye toward the subject. It is similar to a vignette but by using multiple gradients, you have much more control on the final look.
Although I most commonly use gradients to balance exposure, they can also be used to adjust other things like white balance, sharpness, or saturation. These settings will allow you to further control the look of the edit.
Decreasing the sharpness of an area of a scene is a great way to decrease its impact on the photograph. As viewers, our eye is drawn to the brightest, sharpest, and most colorful areas of photographs.
With this knowledge, you can edit your images in a way that will guide the viewer’s eye through the frame to take in the most important subject(s).
Types of Gradients

The most common gradient I use is the linear gradient. This is just as it sounds, a linear gradual adjustment of whatever settings are adjusted.
However, you can also use radial gradients which can be adjusted around a subject. They can be round or oval-shaped and have variation in how gradually the effect is applied.
I might use a radial gradient around a subject as a quick way to draw attention there versus multiple linear gradients to create the same effect. I use a lot of subtle radial gradients in my editing workflow to draw in the viewer’s attention.
When I know I want to darken all the areas around a subject, I know that a radial gradient will be much faster than four linear gradients.
When neither option works, you can use a brush tool to paint in your adjustments to select areas of the image. While the brush tool might seem more exact and precise, it can also look more obvious so it’s always best to avoid making your photos look overedited or fake.
To avoid making your gradients look obvious, make sure you don’t make overly aggressive adjustments and make sure that you give the adjustment enough feather so the transition is smooth across the frame.
Lightroom now also incorporates powerful AI editing tools that will allow you to select the sky, background, subject, specific people, or objects.
These are great ways to apply an adjustment that has fine edges and won’t look good if edited with a broader tool like a gradient.
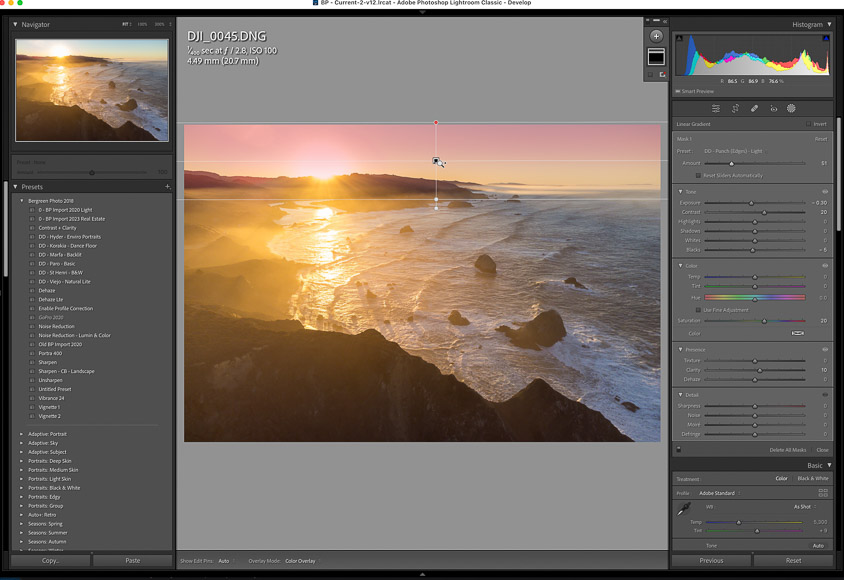
Steps for Using the Gradient Tool
First, go to the develop module and look for the masking tool. It should be on the top and look like a shaded circle outlined with a dotted line. From there, you’ll be able to choose a linear or radial gradient as well as many other ways to mask a certain area of the image.
Once you’ve selected the tool, click and drag it across your photo to create the gradient. There are three lines indicating where the mask is at 100% through 0%. and you can adjust how close or far the lines are.
Making the lines further apart will make your adjustment nice and gradual. Additionally, you can rotate the gradient in case you need it to be at a slight angle.
From there you can use the controls to adjust your effects such as exposure, color, or sharpness. It can be helpful to check the “show edit pins” box as well as the “overlay mode” selection to see how your gradient is applied.
Drag the pin and lines around to create the desired effect. I often get the rough location of the gradient before I start moving sliders to create the effect I’m looking for.
Where is the Gradient Tool in Lightroom?
The gradient tool in Lightroom is located right above the basic adjustment panel in the develop module of Lightroom. You’ll see the dotted circle with a shaded interior indicating the masking tool.
Once open, the masking tool will give you options to create a linear or radial gradient depending on what you’re looking to adjust on your image.
What is the Shortcut for Linear Gradient in Lightroom?
We all love a good shortcut, press the M key to quickly access the Linear gradient tool. To quickly add an adjustment, select a preset from the dropdown menu at the top.
My last tip for quickly adding gradients is to use the percent slider after creating your gradient. This will lessen the effect of the selected preset making the adjustment a little less obvious.
How do you use Gradient Presets?

Like many tools in Lightroom, gradients can be used with a preset. Just click the plus button on the Presets window on the left side of your develop module.
Select your gradient mask in the dialog box that pops up and you’ll be able to save the setting as a preset. gradients can also be copied from image to image by pressing Cmd+Shift+C and Cmd+V.
Gradients can also be stacked on top of each other but you’ll have to add them manually as you can only paste a preset once. I often find it’s better to turn of the amount slider of a gradient rather than stacking a bunch on top because it can get too confusing with a bunch of stacked gradients.
Adobe MAX 2024 Update
The Adobe MAX Update 2024 further enhances Lightroom Mobile’s powerful editing and workflow management toolkit.
The 2024 MAX update adds the new Quick Actions feature and significantly improves the Generative Remove function.
Quick Actions automatically creates masks to best suit an image’s subject matter. It also suggests ways to optimize your workflow further and reduce time spent editing on the go.
Generative Remove is the second standout feature of Adobe MAX Update 2024 for Lightroom.
It’s simpler than ever to identify an unwanted distraction, circle it, and Generate Remove cleanly remove the item and correctly render the vacant space.
How to Use Gradients in Lightroom | Final Words
I find gradients to be one of my favorite tools in Lightroom for adjusting the brightness or sharpness of an image. They are versatile and can be great at making an image compelling for the viewer.
If you’ve thought of any creative ways to use gradients, I’d love to hear them in the comments below!
Brenda Bergreen is a photographer, videographer, writer, and storyteller based in Colorado. She specializes in Colorado wedding photography and adventurous storytelling. When she’s not behind the camera or the keyboard, you can find her adventuring with her family.

👋 WELCOME TO SHOTKIT!
🔥 Popular NOW:
