


How to Make a Contact Sheet in Lightroom
Master the simple steps to generate a contact sheet in Adobe Lightroom Classic, making your photography workflow more efficient and organised.
Lightroom | Software | By Judyth Satyn
Shotkit may earn a commission on affiliate links. Learn more.
This guide will give you the easiest ways to create contact sheets in Lightroom.
I’ve been using Adobe Lightroom for many years, and I need to create contact sheets several times a week.
Making contact sheets helps you to easily view your photographs before selecting which ones you wish to print.
Let’s dive into the tutorial.

Popular course reveals the simple tricks to getting incredible results with Lightroom in record time.
Give Your Photos The Look They Deserve!
How to Make a Contact Sheet in Lightroom
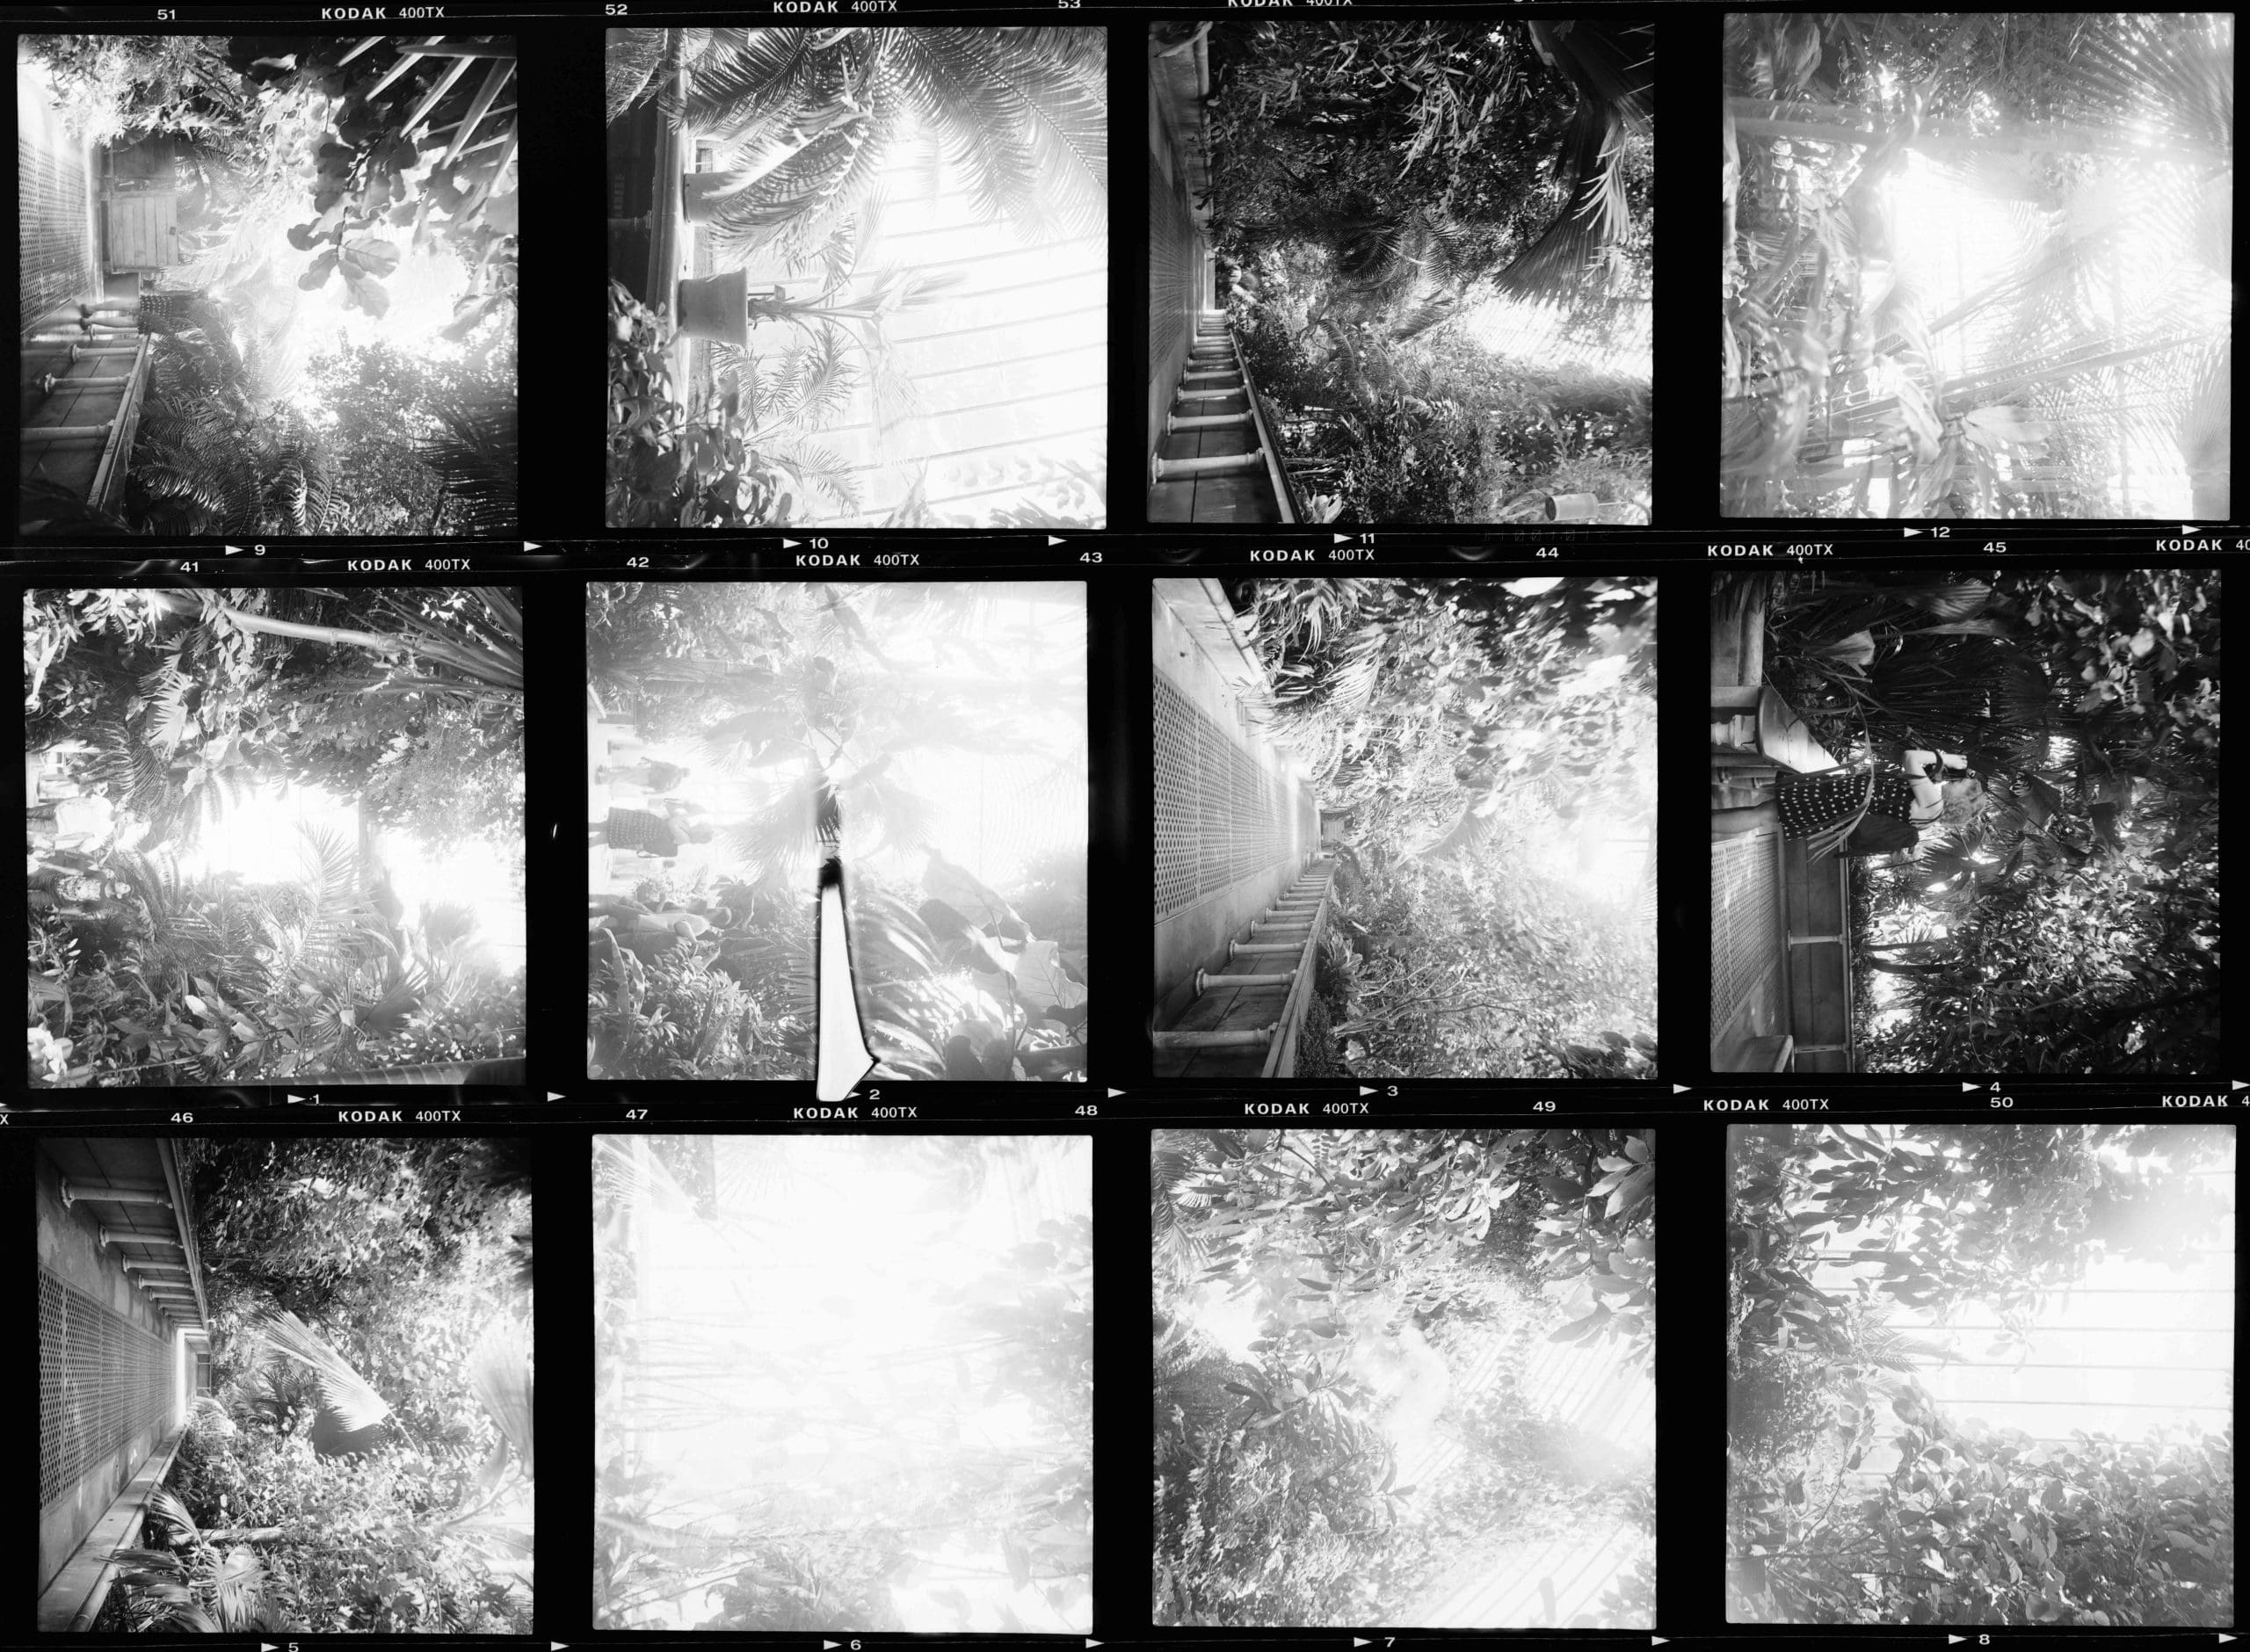
Contact sheets are a physical print of a collection of photographs.
Contact sheets are your best friend when you need to view photographs to find the precise gems worthy of printing.
You will be familiar with negative strips if you have worked with analog cameras and printed film.
Once developed, negatives are stored in folders in transparency sheets.
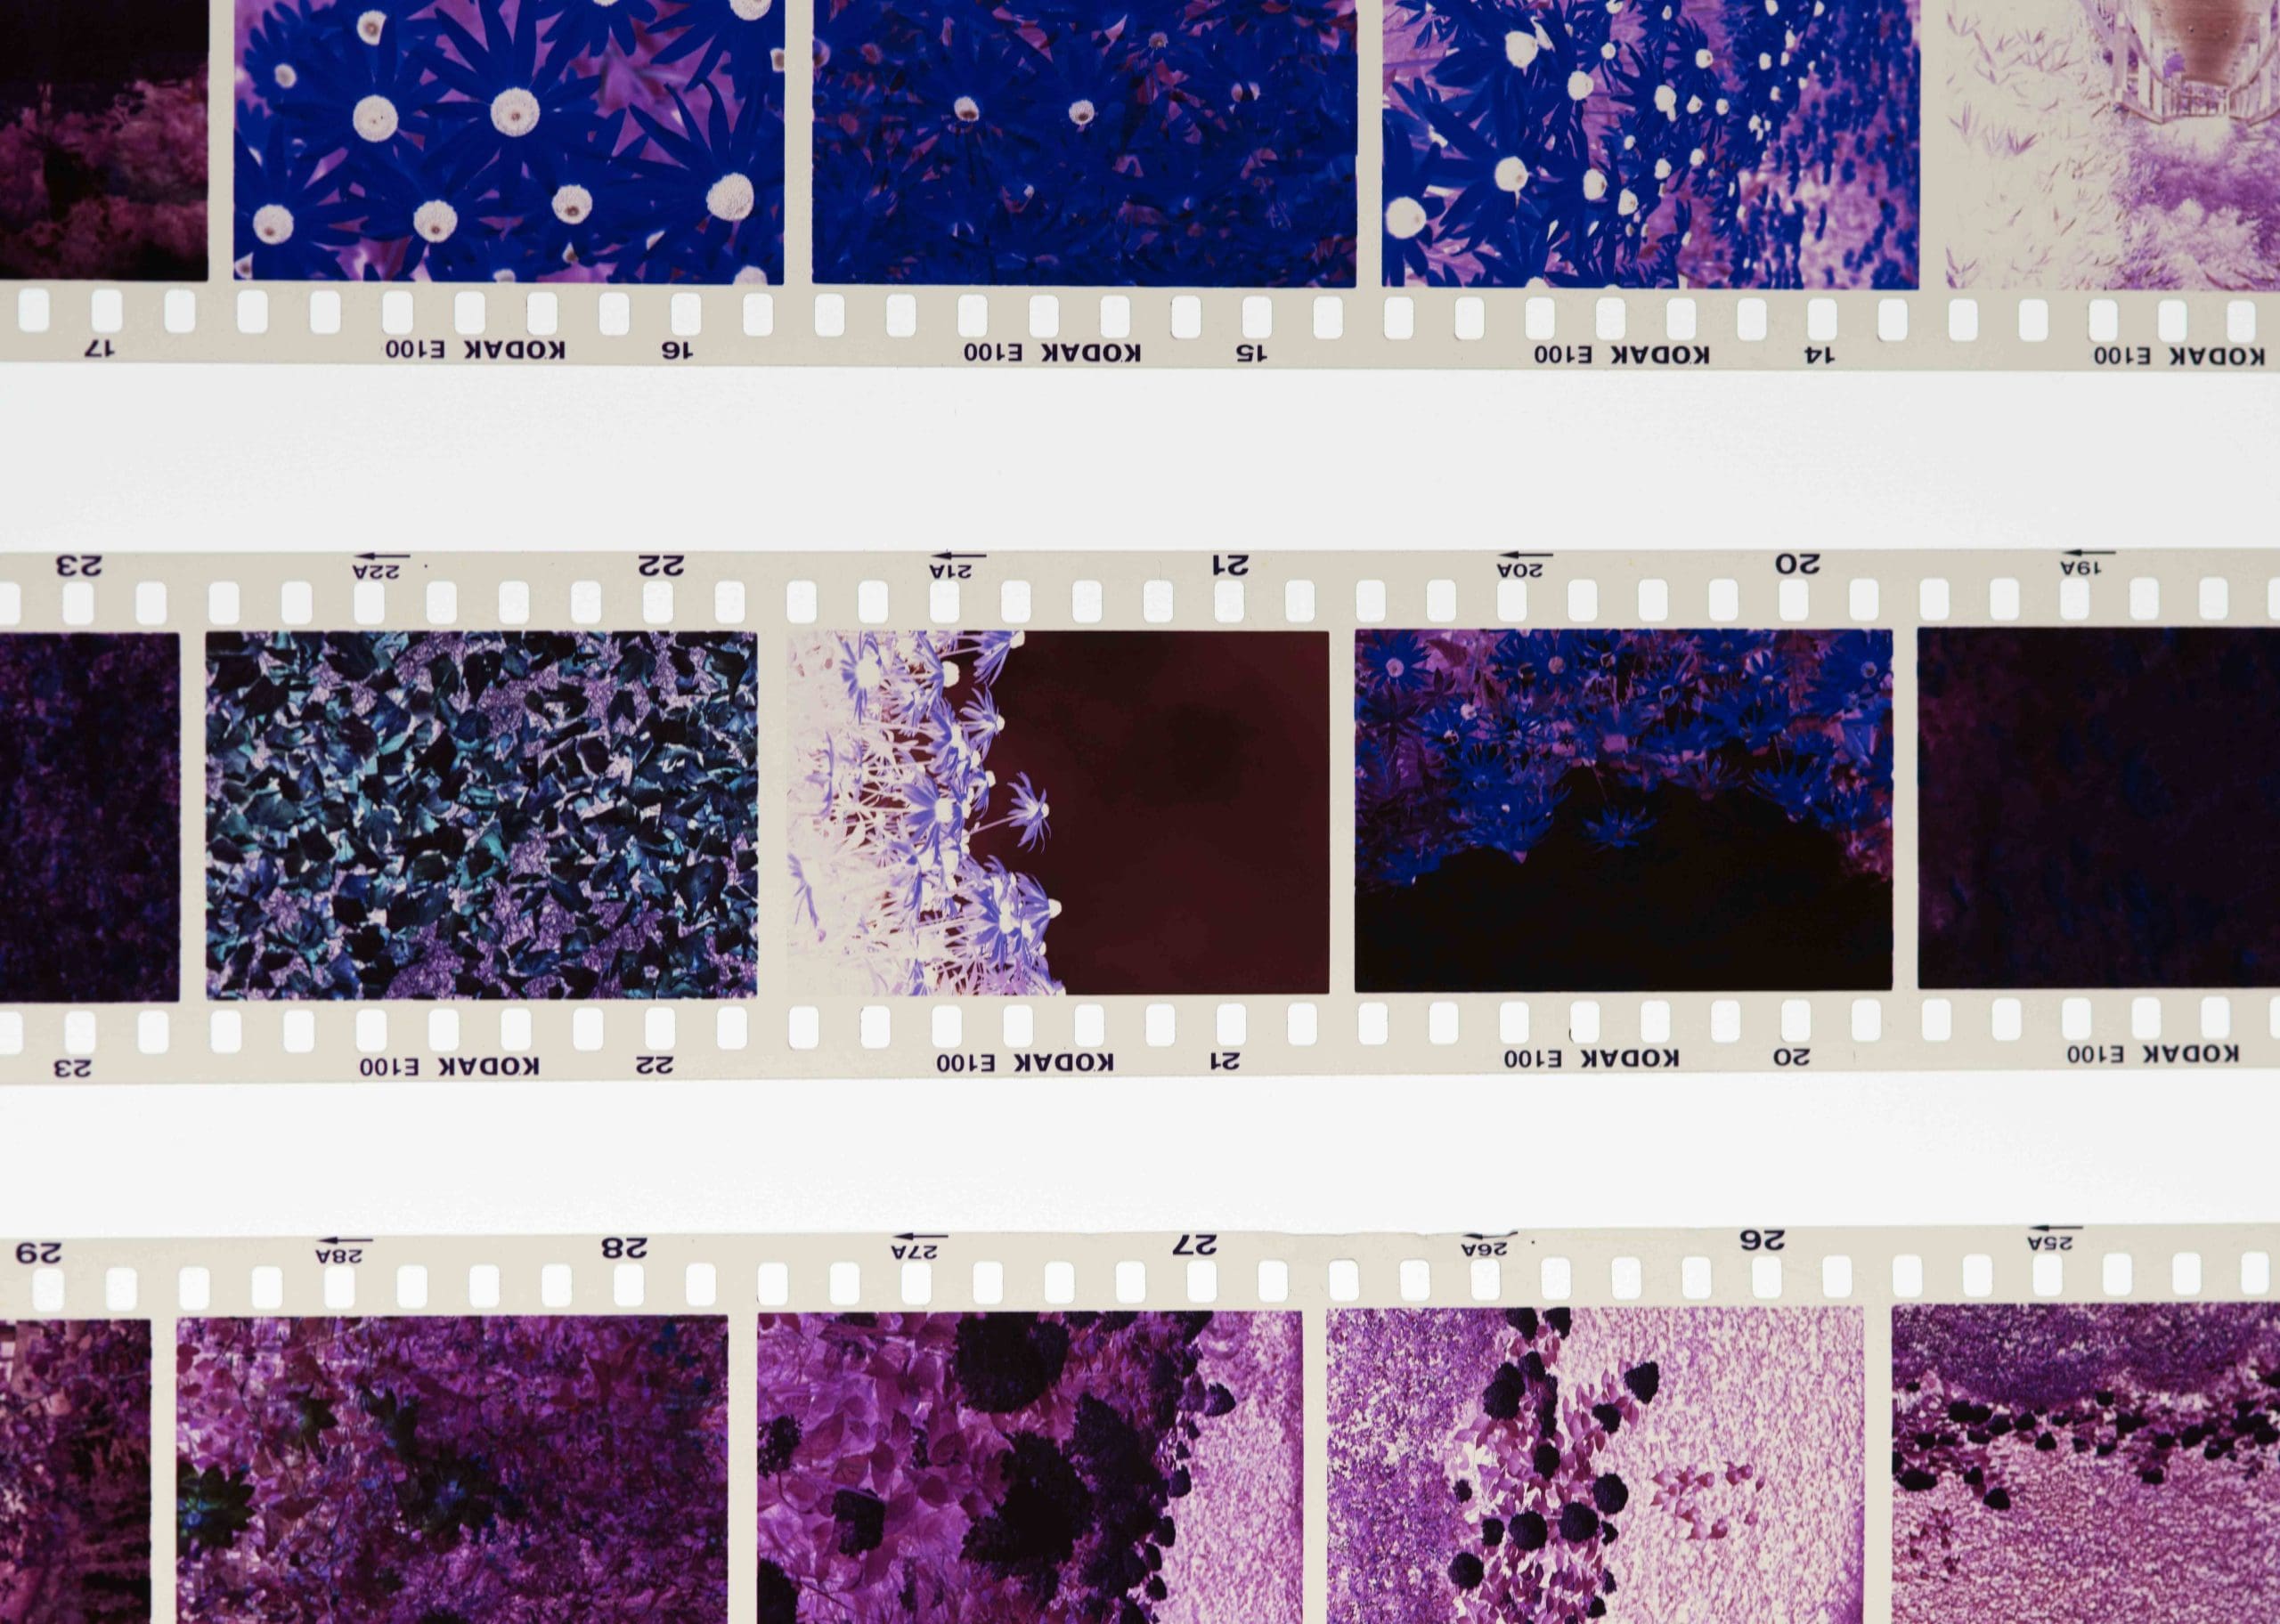
At the best of times, negatives are hard to view. Not only are they, well, negative images, but they are delicate and dust and scratch-prone.
Photographers solved this problem by printing a positive of the entire roll of negative strips.
These were the first contact sheets, known as contact print or contact proof.
A contact sheet gives you a thumb-sized image of all photographs taken. This means that at a glance, you can see which are worth editing or printing.
Normally, about 30-40 miniature images will fit on a contact sheet.
Making contact proofs, small positive prints from a roll of film makes sense. It makes it easy for a photographer to ponder the tiny images before committing to printing them.
But in a digital world, how can contact sheets still be relevant? There are now so many digital ways to view images, with the added bonus of being able to enlarge or alter them.
However, surprisingly, contact sheets haven’t lost their relevance, even in a digital world.
Some wedding and product photographers prefer the printed contact sheet as a way to share and discuss results with clients.
For one, having a printed proof helps to focus photographers and their clients on the collection.
Instead of succumbing to the temptation to ‘quickly’ alter images, to view the difference a crop or a filter could make.
It is well known in sales that when someone physically touches a product, such as the contact sheet, they are more likely to buy it.
The technical restrictions of the darkroom required that contact sheet images be the same size as the negative.
Lightroom makes it possible for photographers to print contact sheet images in various sizes.
Things to consider before you make a contact sheet
What selection of photos are you going to arrange?
In what order do you want to store them?
Is there a specific order you would like them to be viewed in?
Do you want to print or store them as a JPG or PDF?
Reasons for Making a Contact Sheet
There are different reasons for making a contact sheet, but essentially, contact sheets are used to view and compare many images at a glance.
They can be used for record-keeping or to share images with clients or co-workers.
Photographers might create contact sheets to decide which images are worth editing, which are worth printing, and which are fit to exhibit.
So, let’s take open Lightroom and make a contact sheet.
Step 1 – Reason for the Contact Sheet
Before you start, consider the purpose of the contact sheet. Is it a way to keep records of photographs, or is it to share with clients?
Nobody in their right mind will want contact sheets of their entire collection of photos.
No matter what type of photographer you are, you will more than likely have enough work to fill at least five bookshelves with contact sheets.
If there is a specific reason for the contact sheet, selecting and organizing photos into collections is smart.
Remember, you don’t have to show a client the entire shot. There might be a few accidents or total write-offs that your client doesn’t need to see.
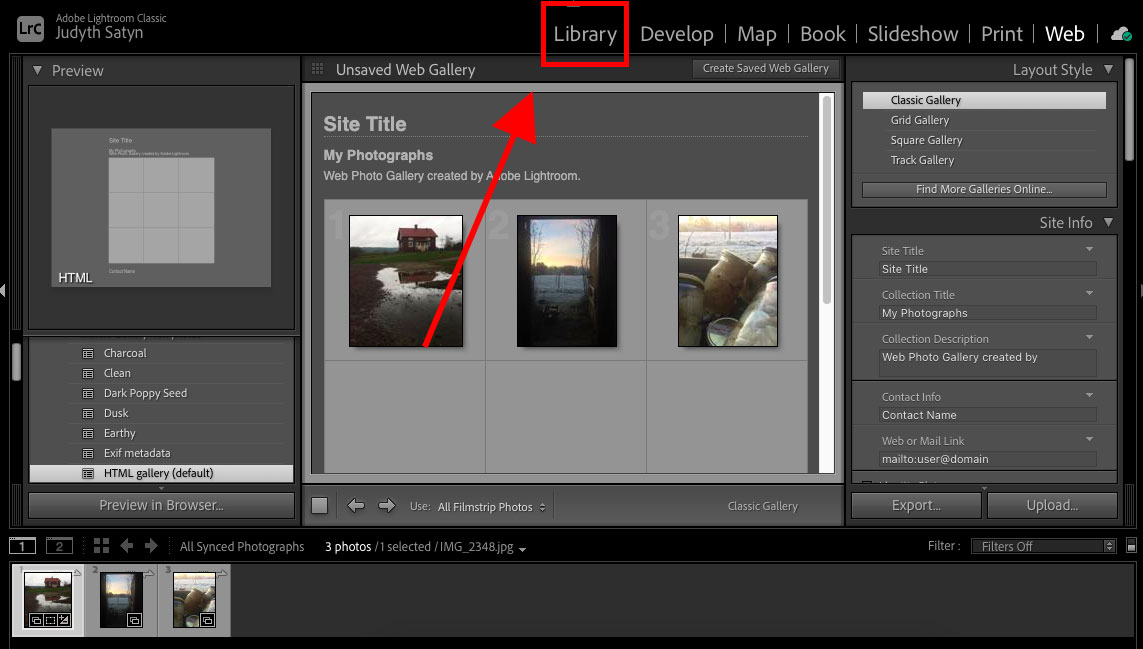
Step 2 – Open Library Module
Hit the Library tab at the top of Lightroom’s workspace to open the library.
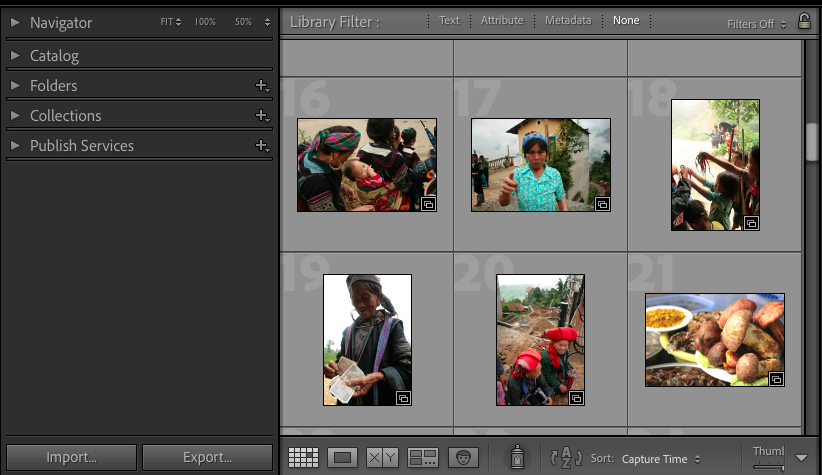
Step 3 – Select Images
When Library mode is open, select the images you wish to add to the contact sheet.
You can select images by clicking on the photo’s thumbnails in the catalog display.
It can be worth creating a smart collection of the images you wish to add instead of trawling through your entire catalog.
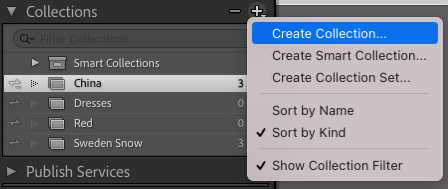
You can create a collection by heading to the collections tab, which is on the left side of the workspace.
Click the Plus symbol on the Collections tab, and a drop-down menu will appear.
Select the first option, Create Collection.
 he
he
Once clicked, the Create Collection dialogue window will appear.
Enter a name for the collection, and tick the box beside Sync with Lightroom.
If you have already selected some or all of the photos for the contact sheet in the library, tick the box beside Include selected photos.
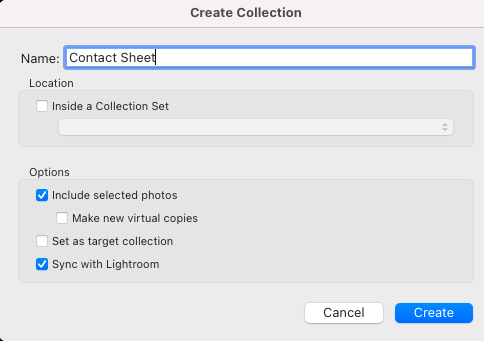
Then click Create at the bottom of the window.
All highlighted images will be added to the new collection.
Open the new collection by clicking on its folder in the Collections tab.
You can add new photos by dragging them into the library folder.
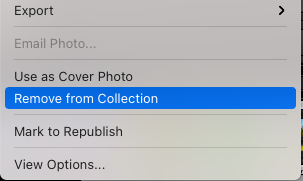
Delete any doubles or unwanted photos by right-clicking on their thumbnail.
A drop-down menu will appear; scroll down the menu until you form Remove from Collection; click this.
Once clicked, a dialogue window will open; click Yes.
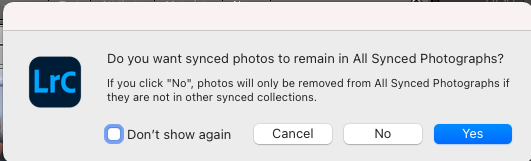
The photo or photos will be removed from the collection.
Step 4 – Open Print Module
Now that you have a collection of images, you can head to Lightroom’s Print module.
At the top of the canvas workspace, click Print.
The Print module will open. Lightroom’s default setting is to open the image in the first template.
You will find the Template Browser under the left-hand side of the workspace under the Preview box.
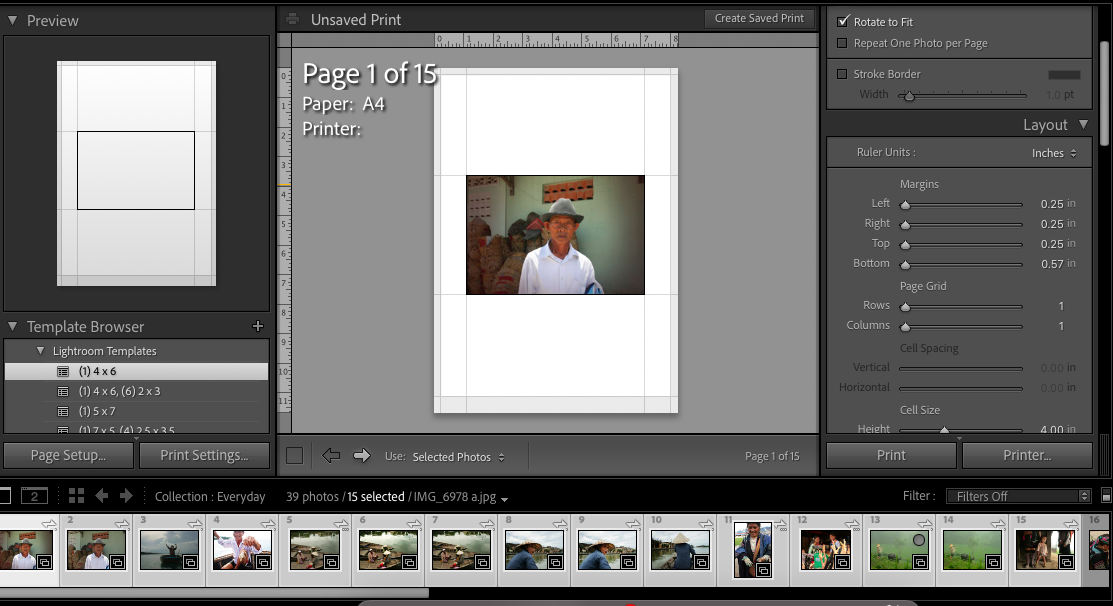
Scroll down the Template Browser to find the contact sheet templates.
Click on one of the contact sheet templates to select it.
A preview of the chosen contact sheet layout will be displayed in the Preview tab.
The Print module’s canvas workspace will display how the contact sheet will look.
As you can see below, only one of the images from the collection has been added to the template.
To add images to the contact sheet, click on the drop-down menu beside “Use” in the toolbar.
From here, you can choose ” All Filmstrip Photos,” ” Selected Photos,” or Flagged Photos.”
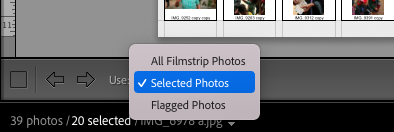
You can also select individual images by clicking on their thumbnail in the filmstrip gallery below the canvas workspace.
To do this, first make sure “Selected Photos” is chosen.
To select more than one in a line, hold down the Shift key and click the thumbnail of the last image.
To add or subtract images from the contact sheet, hold down the Command key and click on the image you wish to add or deselect.
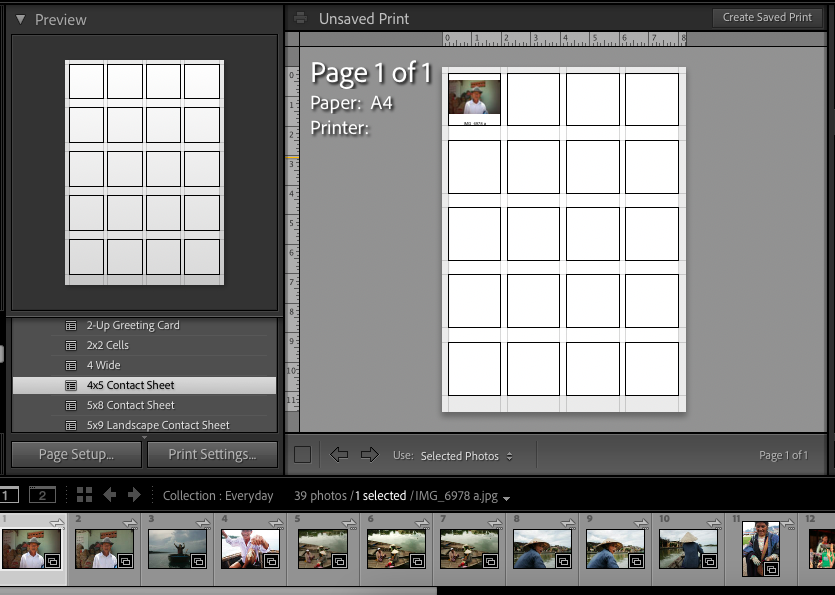
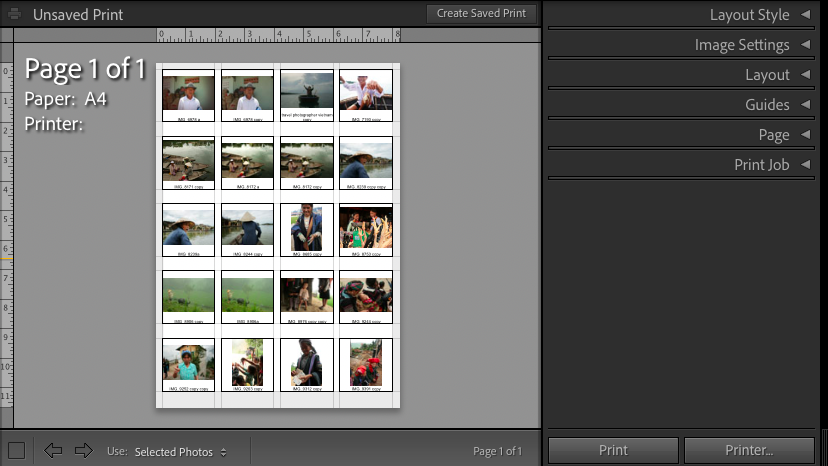
The first contact sheet template is the 4 x 5 Contact Sheet.
The layout of the sheet is four across by five down.
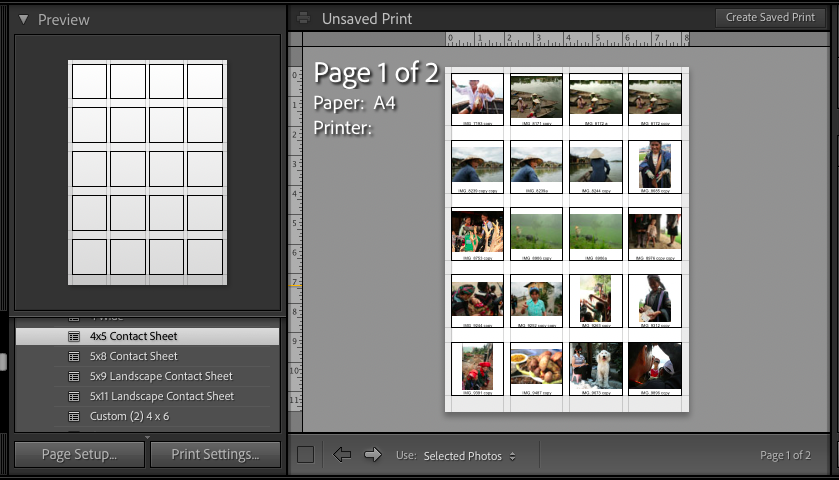
Lightroom will create two contact sheets if there are too many photos to fit on one sheet.
As you can see, below is page 2 of 2.
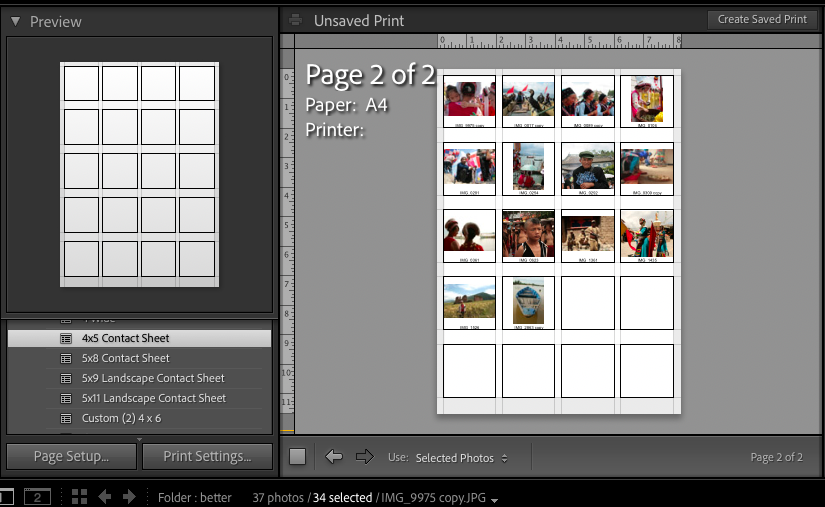
The next contact sheet template is the 5 x 8 Contact sheet.
If you want to fill all the spaces on the contact sheet, you will need 40 for the 5 x 8 sheet.
As you can see below, the 4 x 5 and the 5 x 8 contact sheets are divided into squares.
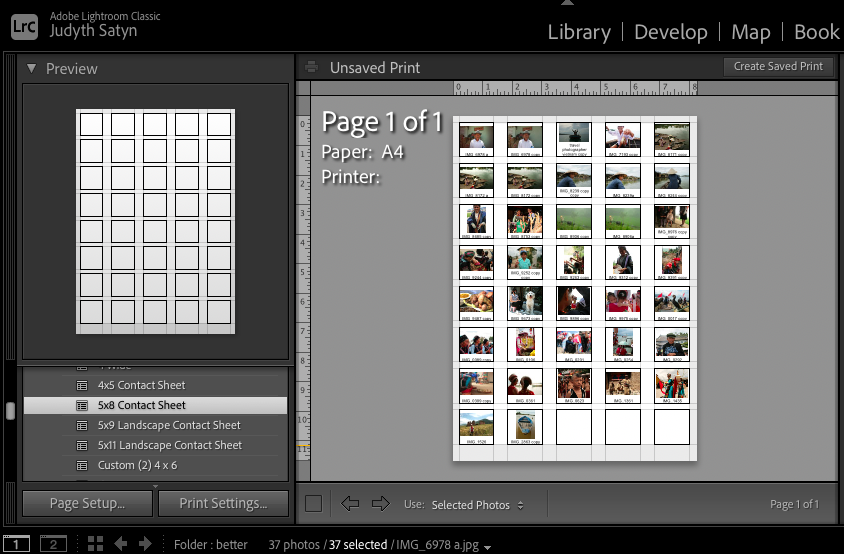
This makes them good for a combination of landscape and portrait photos.
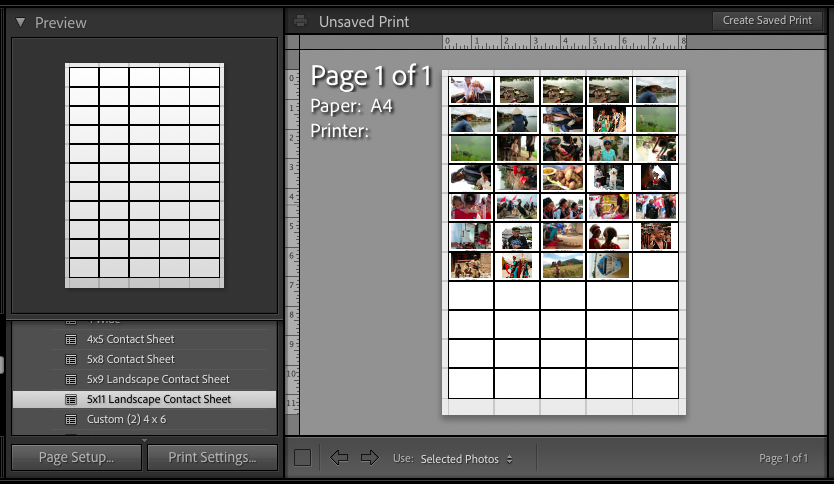
There are two landscape contact sheet templates, the 5 x 9 and the 5 x 11.
When using a landscape contact sheet, you can flip the portrait images on their side using the Image Settings (we’ll get to that in the next step.)
When you select a new template, your selection of images will automatically be added to it.
Lightroom only has four Contact Sheet templates, which are perfect for most projects.
However, if you want to create a custom contact sheet, you can also do this using the Layout tab (we will show you how in the next step).
When you are in Lightroom’s Print module, it is worth noting that you can access all folders in Collections.
As you can see below.
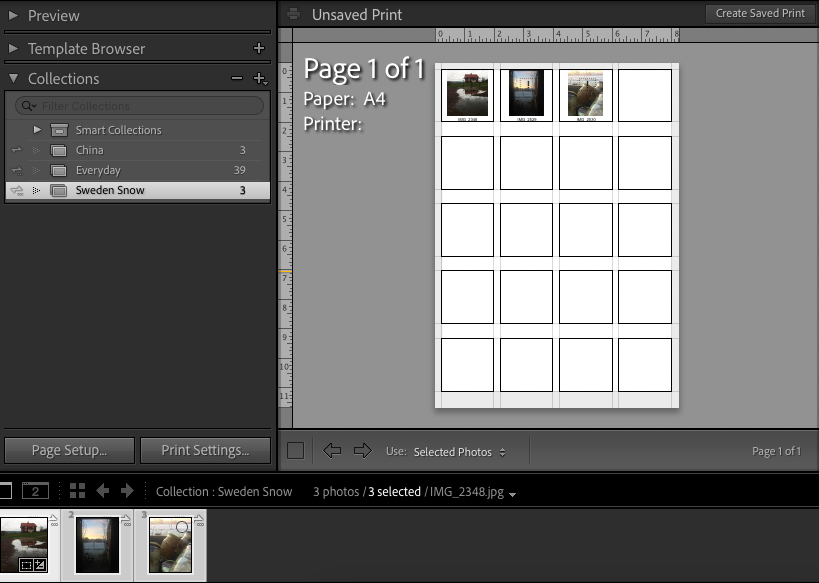
Click on the downward arrow beside the Collections tab to access all the Collections folders.
Click on a folder; its contents will be displayed in the filmstrip gallery at the bottom of the workspace.
Contact sheets can only be made from the contents of one folder, not a combination of two.
So, always have the images you wish to add to a contact sheet together in one collection folder.
Step 4 – Image Layout
To adjust the image’s layout, use the panel on the right-hand side of the canvas workspace.
Here, you will find Layout Style, Image Settings, Layout, Guides, Page, and Print Job.
Click on the triangle beside Layer Style, and the Layer Style tab will open.
In Layer Style tab, select Single Image / Contact Sheet.
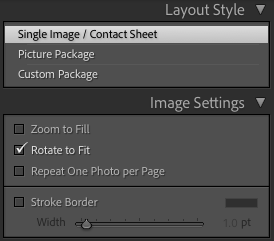
Under Layer Style, you will find the Image Settings tab. Here, tick the box beside Zoom to fill it out if you wish the image to fill the entire box.
But be warned, this can result in some cropping of the image. You can drag the image with your cursor to reposition it within the square when the image is cropped.
Tick the box beside Rotate to Fit if you wish to change the orientation of portrait images in the landscape templates.
Tick the box beside Stroke Border if you wish to add a border around the edges of each image.
Drag the slider to the right to increase the size of the border. As the border increases, the image will shrink.
As you can see in the image below, the images have decreased in size to accommodate a thick border.

The next option is the Layout tab. This is where you can edit the spacing between cells and their size or adjust the width of the margins.
For the most part, Lightroom’s default settings will be perfect, but adjust the settings if you wish by sliding the appropriate sliders.
As you do this, Lightroom will generate a print preview in the canvas workspace.
Adjust the Cell Spacing sliders to alter the spacing between cells.
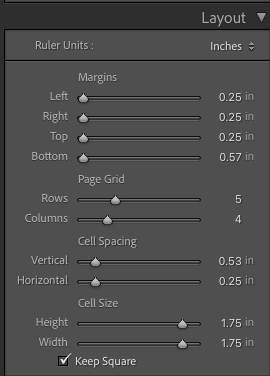
Using Layout, you can create a custom contact sheet.
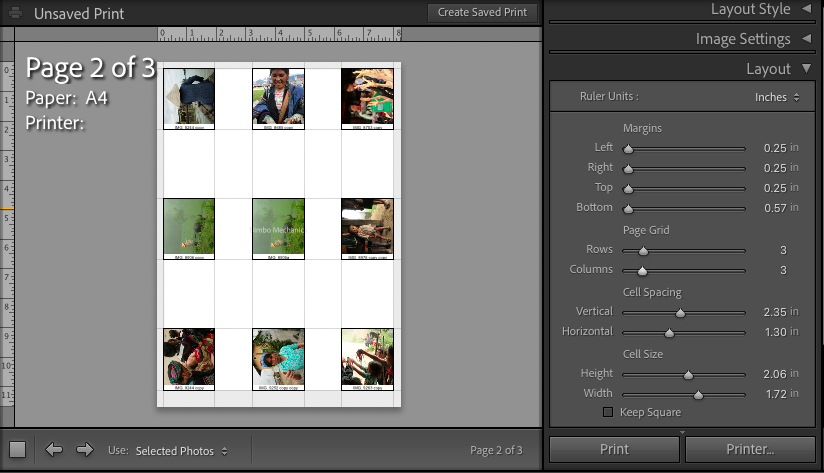
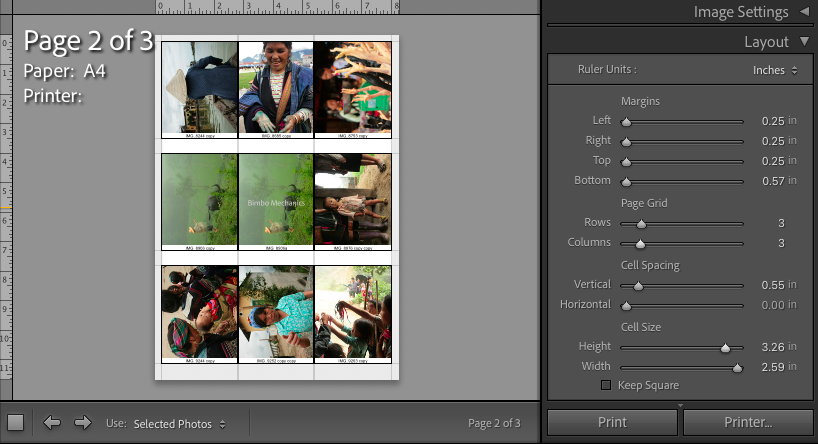
Sliding the Page Grid Sliders allows you to change the number of cells in a row or column.
The Rows and Columns sliders in the image below are set to 3, and the contact sheet has been adjusted.
But as you can see, the cell size has remained unchanged.
The size of the cell can be increased to make it easier to view the images.
You will find the Cell Size sliders at the bottom of the Layout panel.
Adjust the sliders to adjust the size of the cell.
At the very bottom of the Layout panel is a box beside Keep Square.
Tick this box if you wish the cells to remain square.
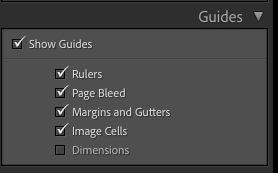
The next tab is the Guides tab.
The guides will not appear in the contact sheet when printed.
They are merely there as an aid when preparing the print.
Here, set your preferences for guides by ticking or unticking the appropriate boxes.
Open the Page options to add watermarks and identity plates.
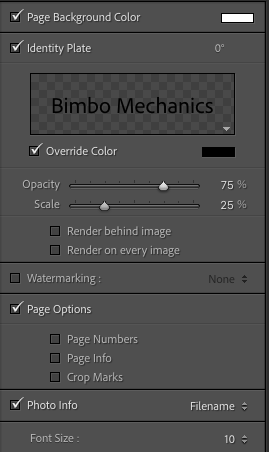
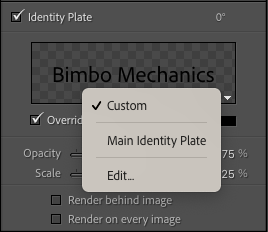
If you wish to change the Identity Plate, click inside the Identity Plate window.
This will open a drop-down menu, select Edit.
Once clicked, the Identity Plate Editor dialogue window will open.
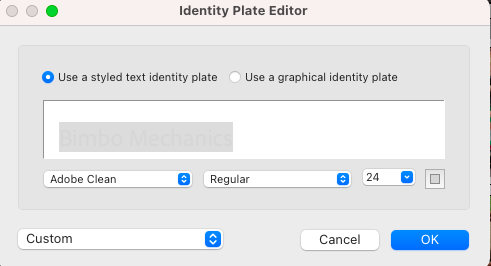
Select “Use a styled text identity plate” if you wish to enter text.
Enter the text inside the rectangle box, and select a font style and size from the drop-down menus.
When you have finished, click OK to save the identity plate.
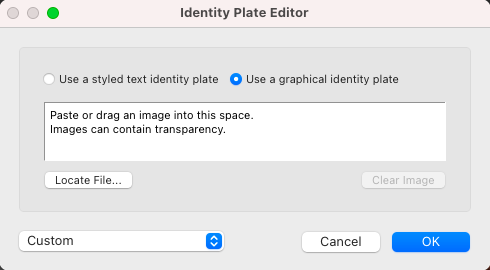
Alternatively, you can upload a design or logo as a graphic to use as an identity plate.
Tick the box beside “Use a graphic identity plate,” and you will be presented with new options.
You can drag the graphic onto the dialogue box or click locate a file to upload.
Click Ok, when you have finished to save the graphic.
When the identity plate is in place, you can alter its transparency and scale by adjusting the Scale and Opacity sliders.
Tick the box beside Watermarking if you wish to add a Watermark.
You can create a text watermark or upload a graphic by clicking the drop-down box in the Watermarking tab.
Select Edit Watermarks. This will open the Watermark Editor dialogue box.
Like the Identity Plate Editor, there is the option to use text or graphics.
Type your watermark text in the box below the preview if you wish to use text.
Use the right-hand panel to change the font, style, anchor point, and more.
Alternatively, you can use an image as a watermark. Simply click “Choose” in the Image Options box to locate and upload an image.
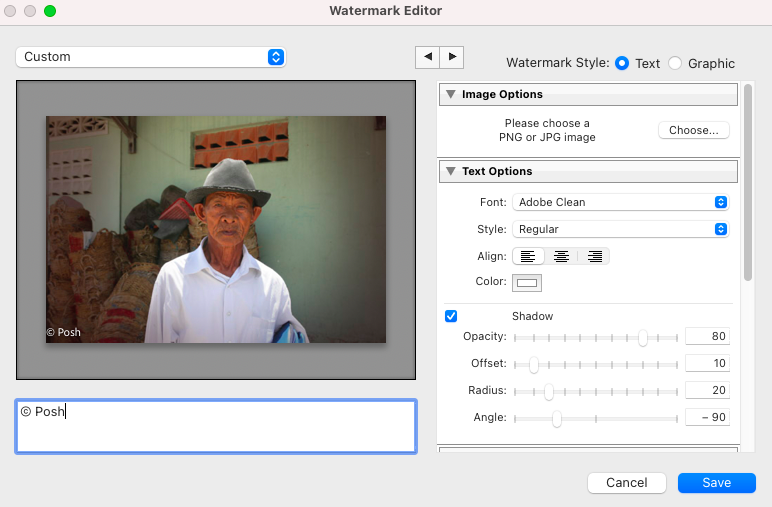
To use a logo or design as a watermark, tick the box beside Graphics at the top right of the panel.
When you have finished, click Save.
Your watermark will be added to the contact sheet.
In the Page Options tab, tick the box beside Page Numbers to add page numbers to your contact sheets.
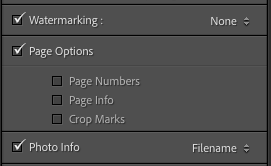
When the box beside Photo Info is ticked, stored photo data, such as the date or file name, will be added under each image.
Step 5 – Print the Contact Sheet
Now, your contact sheet will be ready to print.
The last tab in the left-hand panel is Print Job. Click on the triangle button to open the Print Job tab.
Untick the box beside Draft Mode Printing to activate and change the printer options.
I prefer to leave it on Lightroom’s default settings.
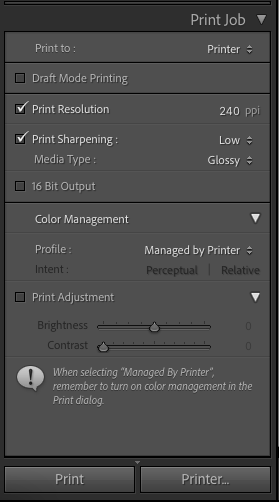
Click on Printer in the top right of the panel to select Print or JPEG.
Select JPEG and click “Print to File” at the bottom of the Print Job tab.
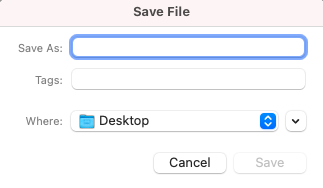
The Save File dialogue window will pop up.
Enter a name for the contact sheet beside Save As, and select a location beside Where.
Then click Save.
If you wish to save it as a PDF, Select Printer instead of JPEG.

Now, click Print at the bottom of the Print Job tab.
The Print dialogue window will open.
It will appear as if the only option available is to send the PDF to a printer.
However, if you click the box in the bottom left corner of the dialogue window, you can select Save as PDF.
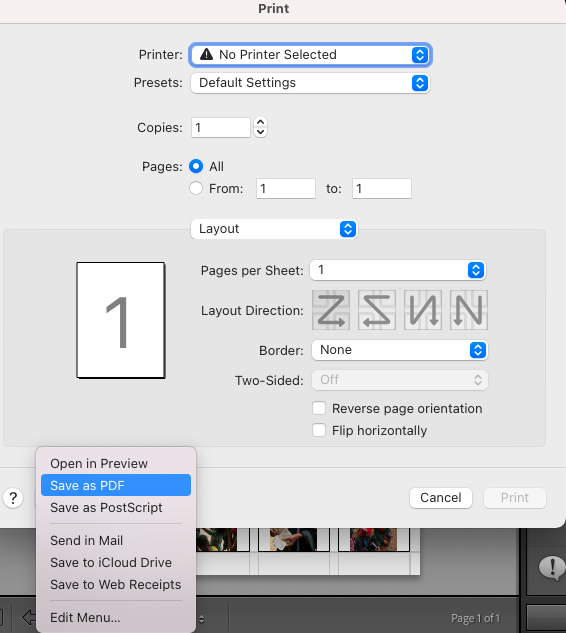
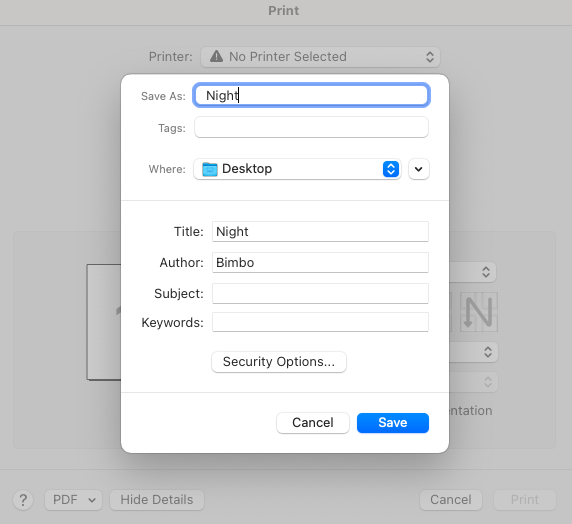
Once Save as PDF is clicked, a new window will open.
Here, you can enter a name for the contact sheet, select a location, and hit Save.
Your contact sheet will now be saved as a PDF or JPEG on your desktop.
Of course, you can skip these steps and send the file to be printed; the choice is yours.
We hope you enjoyed this tutorial and will find using contact sheets beneficial.
If you liked this tutorial and want to learn more about Lightroom techniques, check out – How to Use Lightroom Classic, a beginner’s guide.
FAQ
Can I create a contact sheet in Lightroom?
Yes, you can easily make contact sheets in Lightroom to view on your desktop, share, or print.
How do I make a photo contact sheet?
To make a contact sheet from film in the darkroom, first cut the roll of film into strips.
The strips should be no longer than the length of the darkroom photography paper.
Place the film strips onto the photography paper. Place a clean glass sheet on top to hold them in place.
Expose the paper and negatives to light, then develop. Now you have a photo contact sheet.
How do I save a contact sheet in Lightroom as a JPEG?
To save a contact sheet in Lightroom as a JPEG, first make a contact sheet.
When saving the contact sheet, change the Output format’s print option to JPEG file.
In which Lightroom module will you be able to make a contact sheet?
The Lightroom module you will need to be able to make a contact sheet is the Print module.
Lightroom’s Print module contains premade templates to design and organize contact sheets.
What size is a contact sheet photo?
The traditional photo contact sheet is 8 x 10 inches.
This was the size of the darkroom photography paper used to make a standard contact sheet.

Judyth is an experienced studio photographer and glass artist. When she isn’t Photoshopping comedians into the bellies of sharks, you can find her cooking delicious treats for her guests.

👋 WELCOME TO SHOTKIT!
🔥 Popular NOW:
