What is Lens Diffraction in Photography & How Can You Limit It?
Lens diffraction occurs when you stop down your lens to smaller apertures. It can make details appear blurry, but can you control or avoid it altogether?
Learn | Photography Guides | By Ana Mireles
Lens diffraction occurs when you stop down your lens to smaller apertures – as a result, your images grow progressively less sharp.
No matter how many megapixels your camera has or how good a photographer you are, the effects of diffraction in photography can’t be controlled.
This happens because light begins to disperse (diffract) when it passes through a small opening.
By closing your aperture, this opening becomes smaller, causing the light waves to spread out and overlap, which in turn makes the details in your photos blur.
There’s always some degree of diffraction at every aperture in your lens, but this doesn’t mean it’s a bad thing.
In this article, we’ll look more at diffraction in photography, how it can be limited, and some examples.
What is light diffraction?

Credit: Lookang, Fu-Kwun Hwang and Francisco Esquembre, CC BY-SA, via Wikimedia Commons
Light waves travel in a straight line. Although, if they reach an obstacle or an aperture, they will bend around the edges. This optical effect is called light diffraction.
This characteristic is not exclusive to visible light – it happens to all waves. Water waves make it easier for us to see with the naked eye.
What is lens diffraction?
As you may know, all camera lenses have a small opening inside them. The light needs to pass through this hole before it reaches the sensor and creates a photograph.
You can control the size of the aperture with the camera’s diaphragm. To do so, you can close the diaphragm blades (also known as aperture blades) to make the aperture smaller.
Using a smaller aperture, you get in less light. If you open the blades, the aperture gets bigger and you let in more light. It works in the same way as the pupils of your eyes.
Lens diffraction happens when the aperture is too small. This is because the lightwaves have to bend as they pass through. As a result, your images are less sharp.
The diffraction effects are more or less noticeable in different cameras and lenses – this is partly because of the airy disks in relation to the pixel pitch. I’ll explain this more in-depth later in the next sections.
What is an airy disk, and how does it create diffraction?

Sakurambo at English Wikipedia 桜ん坊, Public domain, via Wikimedia Commons
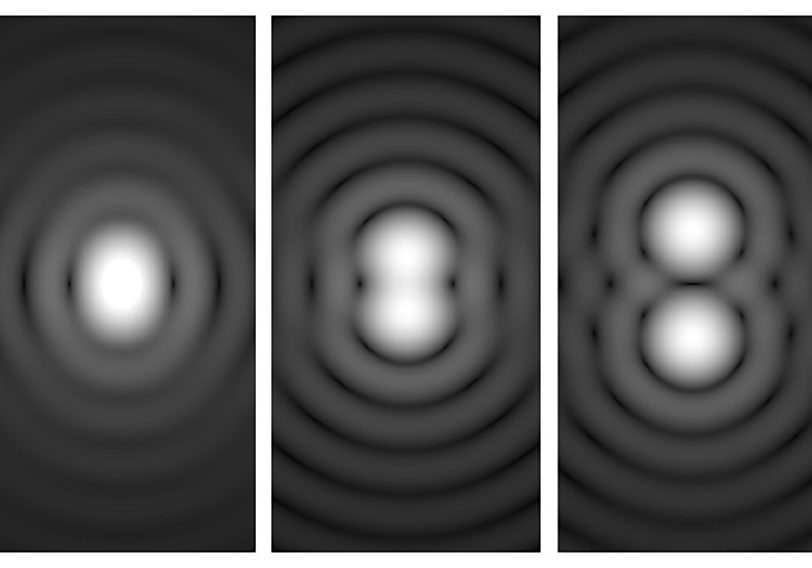
An airy disk is a best-focused spot created by a lens limited by diffraction. The airy disks have two parts – a bright, well-defined spot in the center, and halo rings surrounding it. Together they form an airy pattern.
John Herschel discovered this phenomenon, but it’s named after George Bidell Airy. This is because he was the one who first wrote about the airy disk and airy pattern. “On the Diffraction of an Object-glass with Circular Aperture” was published in 1835.
Airy explained the three factors that determine the diffraction pattern. The factors are the different wavelengths, the size of the aperture opening, and the sensibility of the eye.
This diffraction impacts your photographs because airy disks can cause blurriness. This happens when an airy disk overlaps with another. When this happens, it’s difficult to differentiate where each point of light starts.
A smaller aperture creates a bigger airy disk than a larger aperture. This makes it easier for the halos to touch, and that’s why the effect is more visible as you step down the f/number.
What is Pixel Pitch, and what does it have to do with lens diffraction?
If you zoom in on a digital photo, you’ll start to see small colored squares. These are pixels, and they are the smallest units that form an image. Each pixel comes from the information gathered by a photo site on the camera’s sensor. To simplify things, many people also refer to photo sites as pixels.
Now, the pixel pitch is the distance between the centers of two adjacent photo sites (or pixels). This measurement is usually expressed in micrometers (µm).
How Much Do You REALLY Know About Photography?! 🤔
Test your photography knowledge with this quick quiz!
See how much you really know about photography...

This has to do with the physical size of the sensor area as well as the pixel size. A wider pixel pitch allows for an airy disk to fit inside a pixel. At the very least, it’s less fragmented than it would be in sensors with tighter pixel pitch.
This is because one airy disk may fall in more than one pixel. This causes each one to interpret the information in a different way.
As a result, it’s more difficult to see where the edges begin and end, creating a blurry image.
How to limit lens diffraction?

CelinaTH, CC BY-SA 3.0, via Wikimedia Commons
All photographers must deal with diffracted light. This is regardless of their camera and optical system. Although, there are ways to limit the effects on your final image.
Be aware of the DLA
DLA stands for Diffraction Limited Aperture. This is the f/stop that indicates when the lens diffractions start to affect the quality of your image. In most cases, manufacturers provide the DLA as part of the lens information.
Keep in mind that DLA is when you start to get visible diffraction when you display your images at full-size. It doesn’t mean that using this aperture, your pictures are going to be unusable. In any case, it’s important to know this diffraction limit.
Use your camera in Manual Mode
The best way to control the camera aperture is by using the manual mode. This allows you to set the aperture and compensate with the ISO and shutter speed for correct exposure.
If you’re not yet comfortable using your camera in manual mode, try using the aperture priority mode (AV or A). This is a semi-automatic mode where you can set the aperture, and the camera will take care of the rest.
Use larger apertures
As we’ve seen through this article, lens diffraction happens with small apertures. That is why you need to use wider apertures.
If opening the aperture lets in too much light, you can use a faster shutter speed or a lower ISO value. Although, if you’re at your limit on all exposure settings, you can always use a neutral density (ND) filter.
The aperture also plays a role in the depth of field. Using large apertures, you might have less of your picture in focus. If this is a problem for you, there are ways to get around it. You can change the focal length or adjust the distance between the focal plane and the camera sensor. To make things easier, you can use a DOF calculator.
Find the sweet spot of your lens
While small apertures create lens diffraction, wide apertures can create problems too. That’s why you need to find the lens aperture where the image quality is at its best.
Most lenses have this sharpest aperture at some point between f/8 and f/11. Although, this might be different depending on the largest aperture of your lens.
You can determine which aperture works best on your lens with an easy exercise. Start by choosing a subject with many details. Then, take many photos of it changing the aperture. Don’t forget to compensate for the exposure, though.
Then, open the images on your computer and zoom in to 200% and see where you start to lose sharpness.
Be careful not to confuse the sharpness with the focus. The focus refers to the depth of field, and it will, in fact, diminish as you open the aperture. That’s why you should be looking at your focal point. This should always be sharp regardless of the depth of field. The moment it starts to look blurry, that’s when you’re seeing the effects of diffraction.
Use a camera with a bigger sensor
Usually, when buying a digital camera, most people consider the image resolution. This refers to the megapixel count and not to the pixel sizes.
The size of the sensor definitely plays a role. Larger sensors can fit more photo sites which translates to a higher resolution. A crop sensor camera has fewer pixels but also a tighter pixel pitch.
When the sensor has large pixels, it doesn’t have to break down the diffraction pattern. As a result, you’ll have more defined edges and colors.
Final Words
If you notice some blurriness in your images, it might be because of lens diffraction.
I know that talking about light rays, diffraction, and other terminology can be intimidating, but, it’s important that you have a basic understanding of certain concepts.
Moreover, it’s crucial to understand how they affect your everyday photography practice.
I’m not a physicist, nor do I claim to be an expert on the subject. Nonetheless, I hope I was able to clear some of your doubts about lens diffraction.
Let us know in the comments if you’ve noticed an improvement in the sharpness of your photos. If so, which one of the tips did you find the most useful?
Otherwise, the problem might be slow shutter speeds, high ISO, or missed focus.
In any case, don’t just throw away your blurry images. There might be salvageable. In post-production, there are different ways to increase the sharpness in post-production. You can do it with generic photo editing programs such as Photoshop or with specialized software like Sharpen AI by Topaz.

Check out these 8 essential tools to help you succeed as a professional photographer.
Includes limited-time discounts.


