


Topaz Sharpen AI Review
The claims make in this Topaz Sharpen AI review seem rather far-fetched. Can this software really sharpen a blurry photo? Yes and no, actually - read on.
Shotkit may earn a commission on affiliate links. Learn more.
Have you ever taken a photo that looks sharp on your camera's rear LCD, but when you get home and look at it on a bigger screen, you realise it's slightly out of focus?
Even as a professional photographer, it's happened to me way too often than I dare to admit!
Finding a blurry or out of focus image when editing usually means hitting the delete button.
You can fix most things with Photoshop and other photo editing tools, but you can't fix blur… or so I thought.

Invaluable tool to sharpen images due to camera shake, low light or shallow depth of field.
Artificial intelligence which can tell the difference between real detail and noise, then sharpen a blurry image, sounds as lot like science fiction.
This is the claim made by Topaz Labs with their hugely popular Topaz Sharpen AI tool.
Let's have a closer look to see if it can work miracles on those ‘oh-so-close' images here in 2024…
What is Topaz Sharpen AI?
- Excellent sharpening
- Good masking tool for fine edits
- Can be used as a Photoshop filter
- Simple user-interface
- Easy to use
- Need to try various modes for best results
- Slow exports
Topaz Sharpen AI is a sharpening and shake reduction photo retouching software, which can help make blurry or out-of-focus areas of your photos sharper.
It's available as a standalone app or a plugin for Adobe Photoshop, Lightroom or Topaz Studio.
Topaz offer a range of photo editing tools which can be bought separately, or as part of a Utility bundle, which includes Sharpen AI, as well as DeNoise AI, Gigapixel AI and JPEG to RAW AI.
The Utility Bundle is currently on discount, and great value for money for photographers wishing to save time fixing and enhancing their images.
Topaz Sharpen AI Systems Requirements
- Processor: Intel multi-core or better, Xeon or AMD equivalent.
- Operating system: Windows 7, 8, 10 (64-bit only); macOS version 10.12 (Sierra) and above
- RAM: 8 GB of RAM (16 GB recommended, 32 GB Optimal)
- Hard disk space: 4 GB pr more recommended
- Monitor resolution: 1024 x 768 display
- Graphics Drivers and OpenGL version 3.3 or later
- Intel: i5 or equivalent (3.0GHz and above). Intel i7 or greater (4GHz and above) is recommended.
- AMD: Ryzen 5 or equivalent (3.0GHz and above). Ryzen 7 or greater (4GHz and above) is recommended.
- NVIDIA: Minimum requirement of 2GB of dedicated VRAM (GT 740 or greater); A recommended requirement of 4GB of dedicated VRAM (GTX 970 or greater); An optimal requirement of 8GB of dedicated VRAM (GTX 1080 or greater)
You can also get Topaz Sharpen as part of the new Topaz Photo AI editing software.
Interface
The interface is uncluttered and simple to navigate.
As with all Topaz Labs products, the Sharpen AI interface is very minimal, making it simple to understand and use.
When launching the software for the first time, you're greeted with a four-slide user guide. There are also plenty of support videos and tutorials on the Topaz website, and a lively user forum too.
In the middle of the screen is an Open icon, which allows you to start importing either single or multiple images – thankfully the tool supports batch processing.
If you're an Adobe Lightroom Classic user like me, you can open your image using the Photo > Edit In menu option, which launches the Sharpen AI interface with your chosen photo pre-optimised.
For those of us ingrained in Lightroom or Photoshop image editing workflows, the Sharpen AI plugin keeps file movements simple and efficient. You don't even need to install the plugin – it just appears in your Lightroom menu automatically.
If you're loading a RAW file (or an enormous JPEG), the software will take a few seconds to render the image. All subsequent adjustments will also take more time.
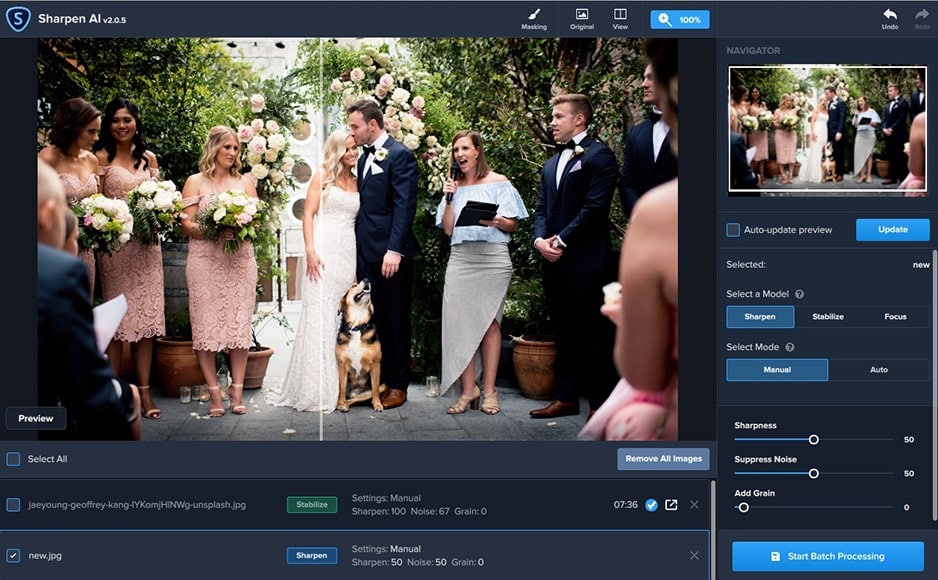
The main portion of the screen shows a zoomed portion of your photo with the default sharpening and noise suppression already applied.
Each time you drag to move the placement of the zoomed area, the software needs to generate the preview again, which can take a few seconds.
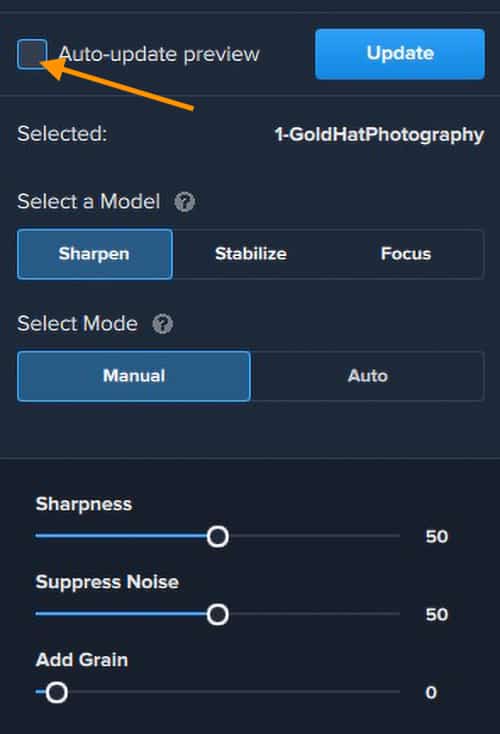
One tip to make things run a bit faster is to turn off ‘Auto-update preview':
In order to compare the Before/After versions of your image, you can choose Single View, Split View or Side-by-Side view. Changing views requires the preview to regenerate.
(A small niggle is that the mouse cursor only ‘drags' the image on the ‘Original' side of the Side-by-Side view. You can also the Navigator to drag the image.)
There's a useful option to paint a ‘Mask' on to your image, effectively telling the software what to ignore when making its processing adjustments.
When you toggle the Masking button, another option panel appears, allowing you to select further features such as using Edge-aware or an Overlay.
I found the Masking feature most useful when trying to control depth of field adjustments in the photo – sometimes AI Sharpen would add sharpening to areas which should remain out of focus (i.e. the bokeh areas), and masking helped control this.
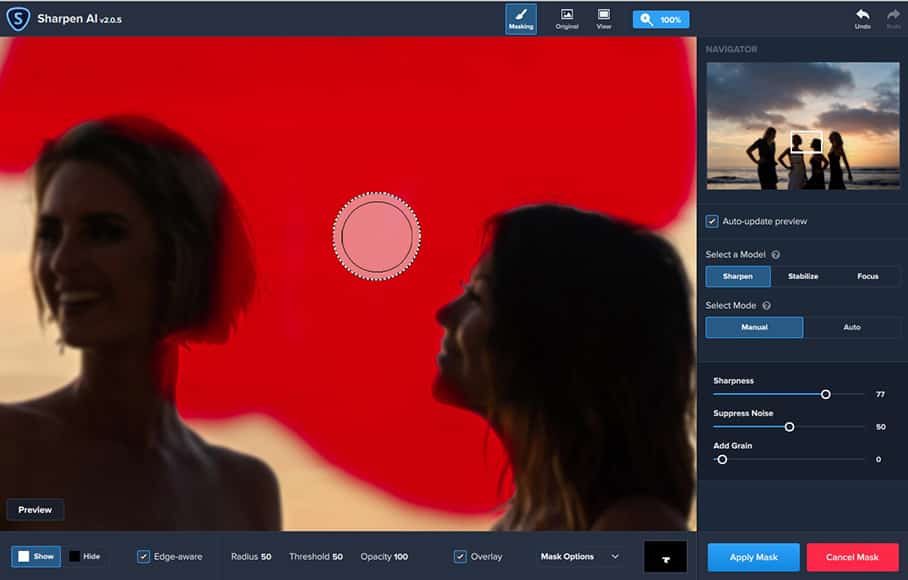
Masking is a simple and effective way of limiting the effects of the chosen tool.
The right side is home to all of your control options: un-toggling the ‘Auto-update preview' reveals an Update button.
Under that, you can choose between 3 different AI Correction Models to enhance your image:
- Sharpen – for general sharpening
- Stabilize – for shake correction
- Focus – to correct minor focal blur
It's good to play around with each of the settings since often, it's not clear which one best applies to the photo you shot.
(If you want to learn more about each of the 3 options above, I recommend you look here at the product page, which gives some great example before/afters explaining each concept.)
You can also choose between Manual and Auto mode, with the latter choosing image specific settings based on the software's artificial intelligence detection.
Manual mode allows you to tweak Sharpness, Suppress Noise and Add Grain to your heart's content.
If you don't have ‘Auto-update preview' toggled off, you'll need to wait whenever you make a change to any of the options in the right side panel, which can get rather tedious.
Finally, there's the Save image button, to get your newly fixed photo out of Topaz Sharpen, and either back into Lightroom/Photoshop via the plugin integration, or to your designated output folder.
If you used the plugin, the image will simply save as whatever file type you selected initially – PSD, TIF or JPEG.
If you're using the standalone software, you can choose between JPEG, TIFF, DNG or PNG, as well as choosing a colour profile: ProPhoto RGB, sRGB, Apple RGB, Adobe RGB or Wide-Gamut RGB.
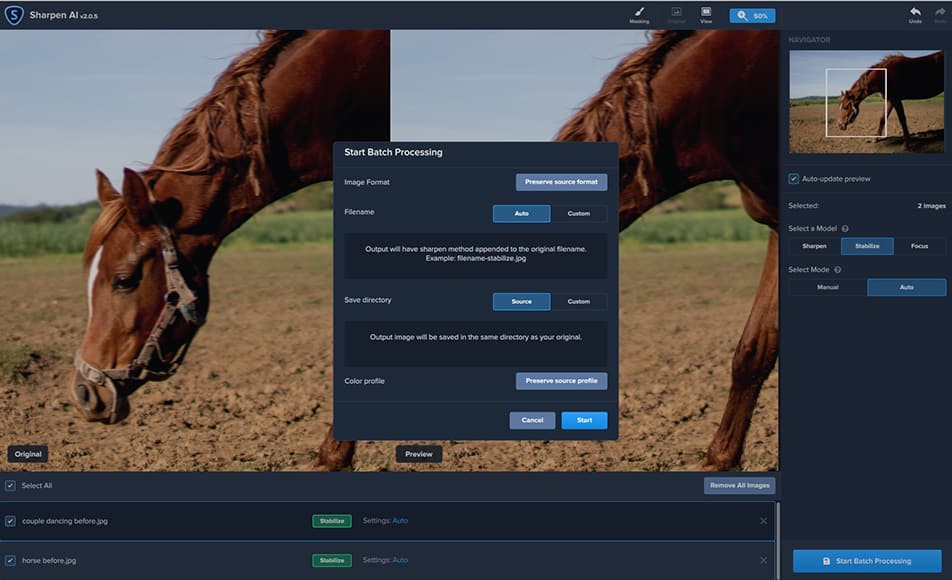
You can export multiple images at once with the batch processing feature.
Once you have made your choices, you hit the save button to create the final edited version of your image(s).
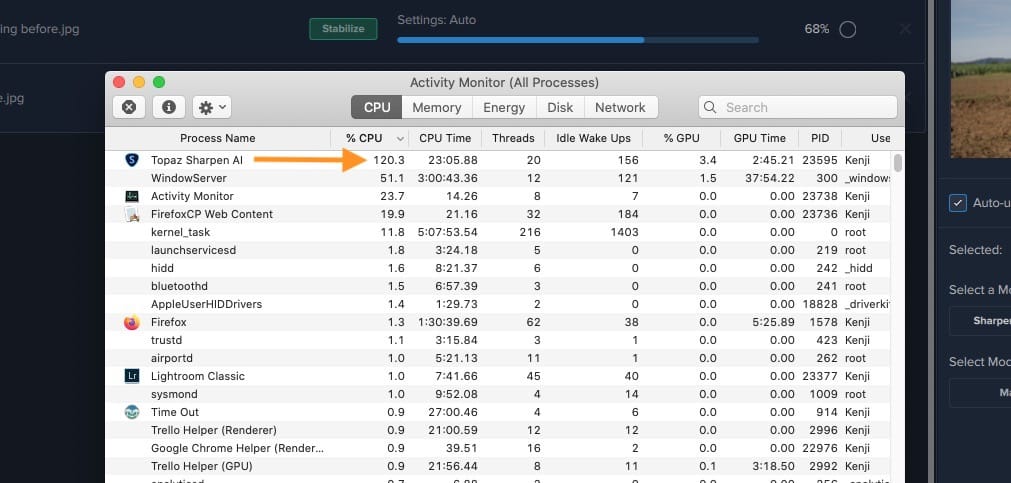
While this occurs, there is a percentage count to show you the progress… which is often painfully slow, even if you use a high-powered laptop or computer – see our article: what laptop do most photographers use?
All in all, it's a simple process to enhance the details and/or suppress the noise of your images, but you do need to be patient.
Performance
Exporting multiple images tends to use a lot of processing power.
Overall, the performance of Topaz Labs Sharpen AI is nice and smooth. I experienced no stalling or freezing, no matter how many images were being batch processed.
The speed at which previews are generated depends largely on both the size of your image file and the performance of your computer.
As mentioned previously, every change you make to settings within the software will cause the preview to regenerate, and this time does tend to add up a bit, especially when using RAWs or very large files.
Testing with 2800 x 1867px JPEGs was faster, although I still found myself twiddling my thumbs a bit…
The time you're required to wait also depends on which ‘AI Correction Model' you choose from the menu – Stabilize and Focus can take 3-4 times as long as Sharpen.
For reference, I was testing with a 2015 13″ 3.1 GHz Dual-Core Intel Core i7 MacBook Pro with 16GB RAM and ample SSD storage space – i.e. it's definitely not the best computer for photo editing.
I imagine that with a more powerful computer, the software would run much faster.
Exporting images takes a rather long time – over 10 minutes per image on my laptop, and the whole process caused the fan in my ageing Macbook Pro to spin like crazy – you can see the CPU usage in the screenshot above.
To be fair, it's the same situation when exporting images from Lightroom Classic – the process renders my computer largely unusable – much worse so than a batch export from Sharpen AI.
If you have a multi-core computer with plenty of RAM, this issue should be much alleviated.
All in all, Topaz Sharpen AI is a simple and easy to use software that any complete photo editing novice could pick up in seconds.
Editing the photo can be painfully slow (depending on which options you choose and the power of your computer), but I imagine that with future updates, this will be improved.
Tests
I picked out 1 image from a wedding I shot last year, one from a recent portrait session, and one random one of a horse in motion.
The image of the boy was slightly out of focus as I was attempting to manually focus my lens. The one of the couple is slightly blurred since I was using too slow of a shutter speed, and the same with the image of the horse.
It's hard to show real-world before/afters when uploading compressed JPGs – if you want a closer look at the results, all before and after images can be downloaded here.
Static Portrait Test #1
Before: Slightly out of focus eyes.
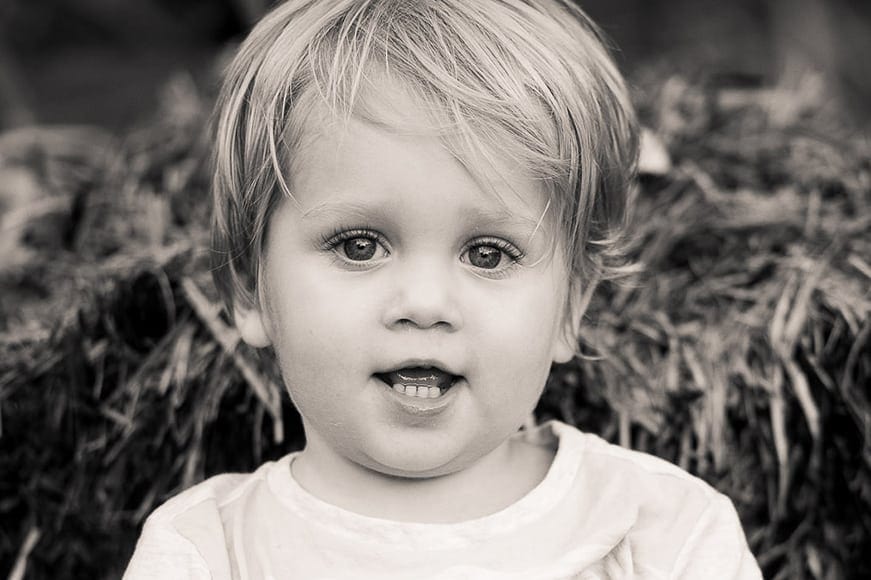
After: Using Auto settings, the results are impressive.
This was a one-click-wonder, using only the Auto button in Sharpen AI!
I'm most impressed by the fact that the software has somehow recognised what details to enhance in the image (i.e the boy), and what to ignore (i.e. the background haystack.)
A similar result could be achieved using Photoshop, but you'd definitely need to do some layer masking to preserve the out of focus background areas.
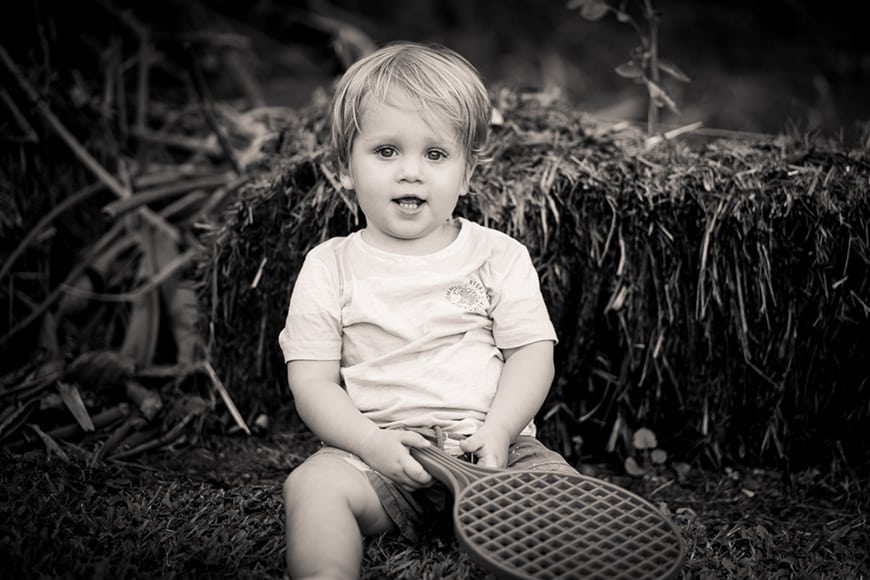
Animal in Motion Test #2
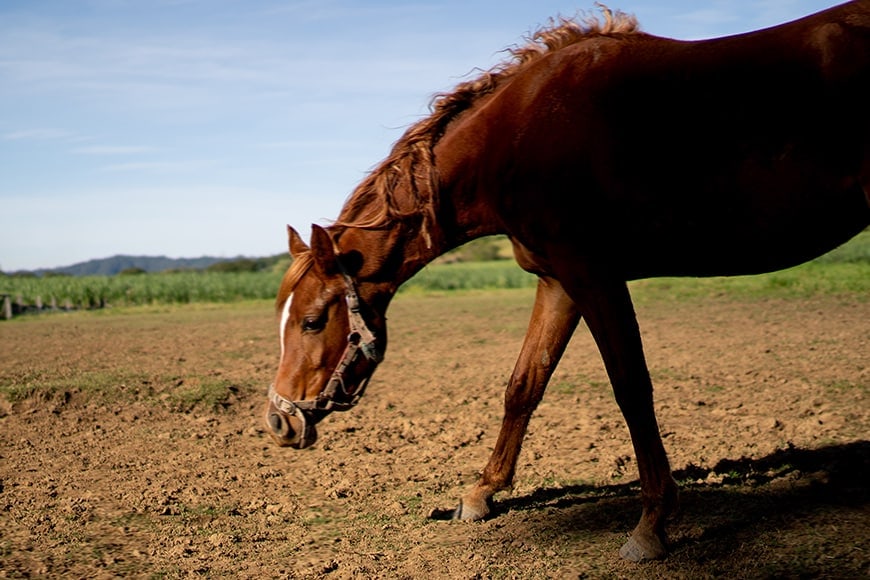
Before: the horse's head, neck and mane are slightly blurred due to movement.
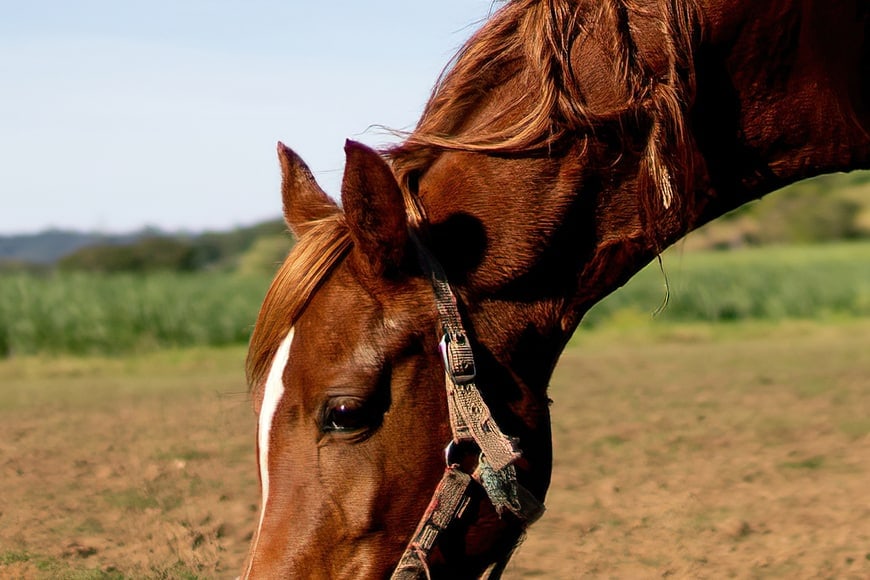
After: Using Stabilize mode and 100% manual sharpness
In this image, I found that the Sharpen Mode didn't work and neither did Focus, so I switched to Stabilize.
I'm still not 100% sure of the difference between the 3 modes, but as you can see from the results above, Stabilize did a great job at sharpening the horse's facial details.
It's also interesting to see that the hair on the horse's head is sharp, whereas some of the hair on its neck has remained soft, while other strands are sharp.
If I'd used the masking tool I could have adjusted this, but I actually quite like the effect.
Again, Topaz Sharpen AI has recognised that the background fields are deliberately out of focus, and hasn't applied any sharpening there – very impressive, considering no masking was applied.
People in Motion Test #3
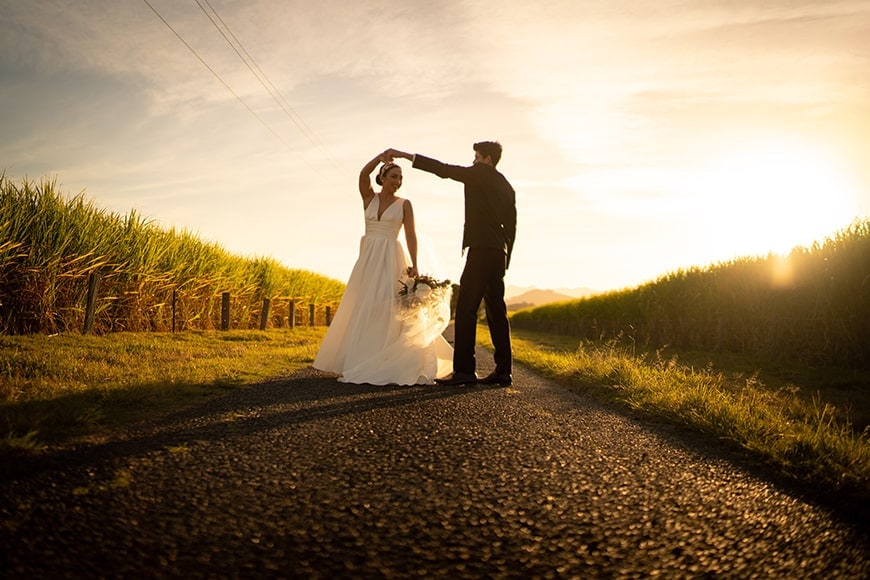
Before: my shutter speed wasn't quite fast enough to freeze the couple.
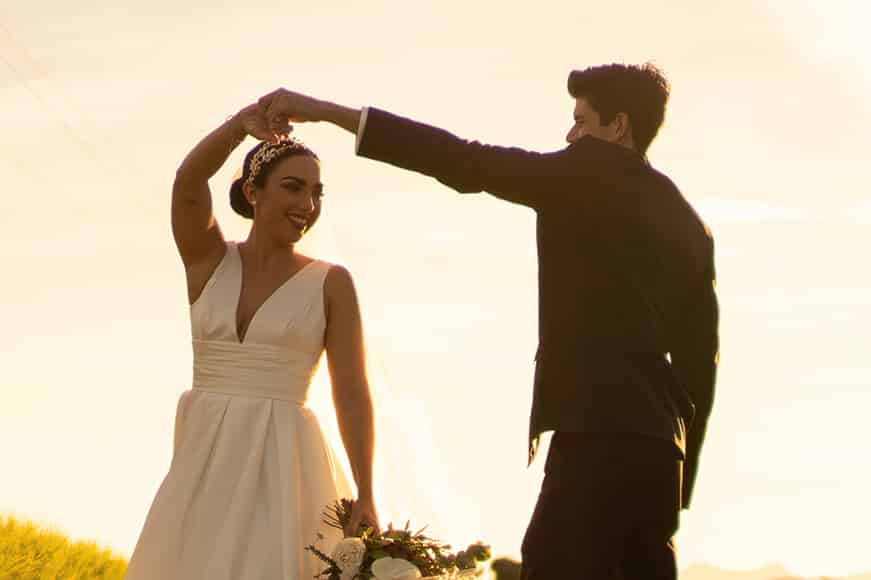
After: Increased sharpness on the bride's face.
This one didn't fare quite as well at 100%, but if you download the full-size export from here, you'll see that the results when viewed at ‘normal size' are actually quite decent.
I'd definitely be able to deliver this image to the client, and would even be confident to enlarge it for a wall print (perhaps in conjunction with Topaz Gigapixel AI, to help me enlarge the image without loss of quality).
Overall, the performance of Sharpen AI is very impressive… although it obviously depends on your original image.
It's important to remain realistic about what Topaz Sharpen AI can and can't do. Obviously if you have a photo which is too blurred, or too noisy, there's nothing that can help you make it a clearer, sharper image.
However, for those just-missed opportunities, this tool provides a helping hand, with results that can be a real eye-opener.
Sharpen AI vs Photoshop

It's good to see other photographers having success with this tool.
The most obvious alternative is Adobe Photoshop, which offers several ways to make a photo appear sharper.
(Adobe Lightroom also has some basic sharpening/masking tools.)
Adept Photoshoppers could achieve similar results using a High Pass filter, Unsharp Mask, Shake Reduction Filter, or a combination of other editing tools.
I'm not great with Photoshop, nor do I like experimenting with multiple masks and layers in order to achieve good results on each individual image.
Sharpen AI doesn't do anything that Photoshop can't do – it just does it in a much more simple way. For the most part, you just click the Auto button and the job's done.
It's hard to compare exact results out of these two editing tools, but one thing's for sure – Photoshop hasn't got artificial intelligence working for it.
Another deal-breaker is the fact that while you can buy Sharpen AI (i.e. as a one-off purchase), you can't buy Photoshop in a similar way – you need to enter in to an Adobe Creative Cloud subscription plan, which means paying every month for the privilege of using it.
Whether you own a copy of Photoshop or not, my recommendation is to download Sharpen AI and have a play around yourself.
Who is Topaz Sharpen AI for?

Sometimes using a slower shutter speed is unavoidable – it's nice to know there's a fix.
I've come up with a few usage cases for this powerful software, which apply to most photographers here in 2024:
- Wildlife, sports or any other photographer who uses long lenses prone to vibration/shake
- Wedding or event photographers who shoot in low light without flash, and have to resort to slower shutter speeds
- Owners of APS-C sensor (or smaller) cameras without decent high ISO capabilities, who need to resort to a slower shutter speed
- Macro photographers without sufficient light to choose a small enough aperture to get the entire shot in sharp focus
- Any photographer who wants even sharper images than his/her current editing software can create
- Any photographer who doesn't own/forgets to use a tripod to steady the camera
- Any photographer who simply made a mistake, and got a blurry photo!
Clearly, there are many more valid uses for AI Sharpen, no matter your skills as a photographer.
If you're a professional who needs to deliver tack-sharp images, you can save your bacon using a tool such as this.
If you're an amateur photographer, there are plenty of opportunities to salvage otherwise unusable photos.
Remember though, it's definitely not a miracle solution. If your photo is too blurry or too noisy, no editing app will be able to help you!
Pricing

Buying Sharpen AI as part of the Utility Bundle is the best value for money.
This is what I love about Topaz products – they concentrate on one particular issue that many photographers face, create a single software to help out, then charge a reasonable price.
At the time of writing, you can download Sharpen AI for around $80.
In this world of subscription payments and 3-figure software price tags, it's certainly refreshing to be able to unleash the power of AI for such an affordable sum.
My recommendation is that you check out the Topaz Utility Bundle, which includes Sharpen AI and 3 other great standalone editing tools, which I actually think are even more useful than the one reviewed here.
At the time of writing, there's a great discount on the Utility Bundle – check here if it's still available.
Topaz provides helpful support for all its products and offers a 30-day refund policy if you're not satisfied.
Frequently Asked Questions
- What is Topaz Labs?
It's a photo editing software company that makes standalone photo retouching tools and plugins.
- How do I update Topaz Sharpen AI?
Manually uninstall the current version from your computer and reinstall the latest version using the appropriate installer, available on the Topaz Labs website.
- Is Topaz AI worth it?
Whether Topaz AI is worth the price tag or not depends on your budget and use of it.
When thinking about it, Topaz AI doesn’t do things other programs can't. However, what’s great about it is how simple it is to use, especially for those who aren’t experienced with Photoshop and other apps.
Topaz AI also specializes in a specific issue and creates a program to address it, so you don’t have to go through all the complicated filtering processes. Plus, it provides impressive results when it comes to photo sharpening and denoising.
Final Words
The term ‘artificial intelligence' gets thrown around lot these days, and I must admit at rolling my eyes at the claims of Topaz Labs Sharpen AI.
However, having tested it for a few days, I must say I'm impressed.
It doesn't work on every photo, but for the majority of images I tested, it did a great job – even better than inPixio Photo Maximiser (review).
If you're a professional re-toucher, or someone who has time to experiment with Photoshop layers/masks, you can probably achieve the same results as this tool.
For everyone else, it's a great way to finish off those ‘almost-perfect' images, where perhaps you weren't able to get the sharpest results possible straight out of camera.
All photographers occasionally make the mistake of using the wrong shutter speed or focus mode for a situation, and it's nice to know there's a simple solution… as long as you're prepared to wait!
10 Comments
Leave a Comment

👋 WELCOME TO SHOTKIT!
🔥 Popular NOW:

I have Paint Shop Pro, the “Other one” :) I also have several plugins for it. None of them has recovered blurred photos, either focus blur or motion blur, like Sharpen can. I think the main thing for me is that even at maximum sharpen, there are so few artefacts compared to anything I have tried.
And then there is the simplicity.
The option to Auto the AI Mode fails too often for me to simply use it. You are right, you have to try each Mode to get the best result, although having used other stuff, I am pretty good at “guessing” which one to use.
That’s great to hear, Nick! Thanks for the feedback.
Am on the free trial (don’t have any other editing software apart from ‘Photos’ which came with my macbook air).
My main interest is sharpening up old photos but so far this software seems to have little effect.
Perhaps it is not suitable for this purpose. What do you think and can you provide any tips or/or recommendations for alternative software?
If this doesn’t work, I don’t think the old photos are sharpenable, Robert.
Would it help to also put them through Adjust AI and Denoise AI as well do you think, Mark?
It’s worth a try, Robert, but it really depends on the quality of the initial photos.
I have all 3 of these and IMO Denoise may help, but again IMO mostly because it also sharpens.
When you say old photos, what do you mean? Slide scans, print scans? Either of these can have significant grain, which can make them look soft. Film had nothing like the resolution of digital stuff that is around now and often not even the same as higher quality point and shoot cameras. I can remember trying to magnify perfectly sharp film images, on quite slow film, and being amazed at how little you could.
I also have the Mega pixel product from Topaz. It upshifts the pixel count by 2-6 times and uses claimed AI (and it works) to interpolate the pixels to provide a most amazing likeness of a shot with twice and even four times the size in pixels. If you zoom both images so they look the same size on screen (so, say, 50% zoom for the new one and 100% for the old) you really can see the difference. Even if you do 100% for both, I reckon the new image can look better. I have not tried it in your situation, but it could work.
Thank you for your review. You don’t work for Topaz Labs, do you? I started today with my free trial period and in first instance I was very pleased with what I saw and wanted to buy the software, but then I had encountered some problems. From Lightroom I used Topaz Sharpen and after waiting for more than 10 min the program closed itself and all the waiting was wasted. Then I tried to sharpen a picture which I imported from Lightroom and saved both pictures. To my surprise the picture from Lightroom was sharper than the one from Topaz. On the other hand a picture saved from Lightroom and using Topaz Sharpen as a stand alone, gave me a great sharp imagine.
I am not shure if Topaz Sharpen will be my first choice to sharpen my pictures.
I was hoping to see more examples where the photo missed focus. Maybe you focused on the nose instead of the eye. Most of these were trying to fix motion blur, which I wouldn’t expect it to be able to do that well.
We’ll try and add some for you in the next update of this review, David.