


How to Dodge and Burn Your Photos
Dodging and Burning is a highly effective photo editing technique that can take your images to the next level. It's also simple & fun! This guide shows you how.
Learn | Photography Guides | By Teryani Riggs
Dodging and burning are two of the oldest artist post-processing techniques in the history of photo editing and photography.
In the days of film photography, they were both necessary for creating striking and well-balanced shots.
Ansel Adams was particularly known for his fantastic use of dodging and burning. They’re a key element of his landscape photos – so much so that the techniques feature prominently in his book ‘The Print’.
In the digital age, these techniques are still important for highlighting different areas of your photo, adding depth and perspective, and drawing your viewers’ eyes through the image.
That’s why it’s important to learn what they are and how to use them.
There are a number of ways to dodge and burn in post-processing software, though some methods work better than others.
This tutorial will take a look at just what exactly dodging and burning is, and will teach you the basics of how to do it in 3 popular editing apps: Photoshop, Lightroom, and Luminar AI.
Let’s get stuck in!
What does Dodge and Burn do?
In the simplest terms, dodging increases the brightness of a selected area of an image and burning decreases the brightness.
In the darkroom, a photographer would expose (or not expose) different areas of a film negative to light.
Since they were working with a film negative, ‘holding back’ light would lighten parts of a photo (dodging) and adding light would darken other parts (burning).
The reason dodging and burning is needed is because camera sensors – even large ones – cannot capture the actual dynamic range (ratio of light to dark) of a natural scene.
When making prints, the dynamic range is compressed even further, so to make an image look like it did to the eye, dodging and/or burning is necessary.
In the digital world, this is more often referred to as tone mapping, but the concept is still the same.
To achieve the look and tonal contrast of the original scene with a single exposure, you’ll likely need to lighten some areas and/or darken others. One of the key tools for this is dodging and burning.
Why Is It Important to Dodge and Burn Your Photos?
While not strictly necessary, dodging and burning can definitively improve many images.
On the most basic level, it can be used when you want to correct the exposure in selected areas of an image while not affecting the rest of the photo.
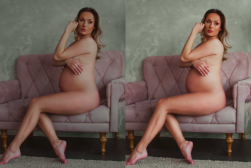
Dodge and burn techniques are also frequently used to highlight a subject, add depth to images, and/or take the eye of the viewer on a journey through the image.
Photographers also use dodge and burn to add a number of creative effects, especially in black and white photography or when creating a digital stencil.
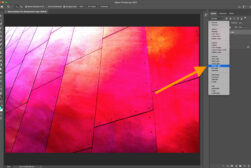
How to Dodge and Burn in Photoshop
Like many things in Adobe Photoshop, dodging and burning can be done in many different ways.
Here are a few of the most popular techniques used by photographers.
Using Photoshop’s Dodge and Burn Tools
One of the simpler methods is using the dodge and burn tools that Photoshop provides.
How Much Do You REALLY Know About Photography?! 🤔
Test your photography knowledge with this quick quiz!
See how much you really know about photography...

The Dodge tool looks like a lollipop (it’s meant to look like the masking tape on a wire loop that was used in the darkroom). The Burn tool looks like an open-handed fist, since this was what was used to direct the light while burning.
If you’re not seeing either of these in the vertical toolbar and are wondering where the dodge and burn tool is in Photoshop, you can find them nested within the Sponge tool. You can either right-click on the Sponge or press ‘O’.
Before going any further, make a new duplicate layer. While you can use the history panel to go back a number of steps and undo mistakes, making adjustments to the background layer will permanently change the image.
- Select either the Dodge or the Burn tool.
- Set the brush tool size, tip, and softness. A standard soft, round brush is the best choice for both dodging and burning. The strokes need to blend in well with the surrounding pixels.
- Choose the Range. The Dodge and Burn tools in Photoshop allow you to choose between the Highlights, Midtones, or Shadows in a photo. If you’re not sure where to start, begin in the midtone range, as that’s where most changes are needed.
- Set the Exposure. Because dodging and burning is fine work, you’ll want to set your exposure quite low – somewhere between 5-10% is generally more than enough.
- Create a Layer Mask. For this effect, it’s best to mask out any areas you don’t want to be affected. This can help to prevent haloing.
- Begin Painting. Keep in mind that using these particular tools is more like coloring with crayons than anything else. The strokes are cumulative and you can easily go too far too fast. Try not to stay in one spot too long (maybe 3-5 seconds) and keep zooming out to get a sense of how well you’re blending into the rest of the scene.
Photoshop’s Dodge and Burn tools are simple to use but don’t always provide the most accurate results. Even with the most careful masking, haloing can still occur.
If you’re looking for a more nuanced effect, try one of the other Photoshop techniques below. They have a higher learning curve but are well worth the effort – especially if you photograph in black and white.
Using a Curves Adjustment Layer
The curves adjustment layer allows you to make areas of your image lighter or darker, all in a non-destructive way.
You don’t even need to create a new base layer. It will also blend the effects with your image.
Here’s how to do it:
To Dodge
- In Photoshop, go to Layer > New Adjustment Layer > Curves.
- To dodge, move the mid-point of the curve upward. This will brighten the whole image.
- Next, press Ctrl/Cmd + I to invert the layer mask. This will block out the effects until you paint them back on.
- Now, select a soft brush tool and paint over the areas of your image you want to dodge with white.
- To blend the effect into the image as a whole, select the layer mask and go to Image > Apply Image. A dialog box will pop up. In this case, you can use the default settings and simply press OK. (Make sure the invert box is not checked.)
To Burn
- To burn, create another curves adjustment layer.
- Pull the midpoint of the curve downward, darkening the image.
- Invert the layer mask (see above).
- Use the brush tool to paint in the areas you want to burn.
- Once you’re done painting, click on the layer mask and go to Image > Apply Image. This time when the dialogue box pops up check the Invert box to select the darker tones of the image.
Using a 50% Gray Layer
Another easy means of dodging and burning in Photoshop is by creating a new layer, filling it with 50% gray, setting the blend mode to “overlay,” and then painting on it in white or black.
Painting in white on this layer will dodge the image, painting in black will burn.
If you need finer control, you can always use a layer mask, or even better, luminosity masks in tandem with the technique.
Using Luminosity Masks
If you want refined control of the dodge and burn technique, especially for avoiding haloing, luminosity masks are the way to go.
They take a bit of learning and practice, but your images may very well come out looking spectacular – check the video tutorial above to learn more about them.
How to Dodge and Burn in Lightroom
Dodging and burning in Lightroom isn’t as easy or as accurate as in Photoshop, but if you don’t have Photoshop, there are still several dodge/burn options in Lightroom.
The primary tools are the Adjustment Brush, the Radial Filter, and the Graduated Filter. Each one of these has a dodge or burn option built-in.
Of these, the Adjustment Brush tool will give you the most selective control.
Dodging with the Adjustment Brush
- Do as much as you can with global adjustments (i.e. exposure, shadows, and the like)
- Go to the Adjustment Brush tool and double-click Effect. This will zero all the sliders.
- Click on Custom and then select Dodge from the drop-down menu.
- In the Brush panel, choose a brush size that’s just smaller than the area you’ll be painting.
- Make sure the Feather, Flow, and Density is set to 100.
- Paint over the area of the image you wish to dodge. (Here it’s best to only work on one area at a time.) Depending on your settings, a red mask will appear over the area you’ve painted. To see the effect without the mask, click again on the Adjustment Brush icon. You can adjust the effect by clicking on the Adjustment Brush again and then clicking on the pin that represents the area you just adjusted.
- To dodge another area of the image, click the Adjustment Brush again and repeat the steps explained above.
Burning with the Adjustment Brush
To burn various areas of your image, follow the same steps as with dodging except you’ll need to choose Burn in the Custom menu. The rest of the steps are the same.
If you’ve seen any impressive Lightroom before/after images, it’s likely that the photographer has used one of the techniques above to make the subject really stand out from the background.
How to Dodge and Burn in Luminar AI
If you’re not into paying a subscription for either Photoshop or Lightroom, but still want to be able to Dodge and Burn your photos, Luminar is a popular alternative (see our review here).
It comes with Dodge and Burn tools and is extremely beginner-friendly.
Here’s how to dodge and burn with both Luminar AI and Luminar 4.
- Click on the Pro Tools icon and choose Dodge and Burn from the menu.
- In the top toolbar, choose either Lighten or Darken.
- Next, adjust the size and feathering of the brush (also in the top toolbar). Remember, a soft brush is best when dodging and burning.
- For finer control, adjust the Strength Slider to something below 50%. This will require more strokes but will give many more gradations to choose from.
- Begin painting. If you make a mistake, you can always use the Erase option in the top menu bar.
- Once you’re finished painting, use the Overall Amount slider on the right to fine-tune your work.
- Once you’re finished, click Done in the top toolbar or simply exit the tool.
7 General Tips for Dodging and Burning
- Start global, then go local – Since global adjustments affect the entire image, they’ll affect your local adjustments as well (unless you mask them out). That’s why it’s important to do them first. Global adjustments are also much easier to undo – especially when you’re using Lightroom.
- Make sure that your brush size is just smaller than the area you want to adjust – Expect to be changing your brush size frequently as you move from element to element.
- Go slow – Dodging and burning is sensitive work. You want to make sure that the changes you make look natural and blend in well with the overall picture. Less is often more here.
- Have an idea of what you want the final image to look like before you start – Dodging and burning can be quite time-consuming and can add a lot of time to your workflow. Knowing the look you’re going after will greatly speed things along (and be a lot less frustrating).
- Make sure your brush size is smaller than the area you’re painting – This will help prevent you from painting outside the areas you intend to adjust, one of the key causes of haloing.
- Check your work frequently – While you’ll likely need to zoom in pretty far to paint accurately, make sure you zoom back out frequently as well, so you can see how well the selective changes are blending in with the overall feel of the photo.
- For advanced work, learn how to use luminosity masks – The best way to prevent haloing is to restrict your tool to a very narrow luminosity bandwidth, and that’s best done through the use of luminosity masks.
Final Words
From correcting exposure to making a truly stunning black and white photo to leading the eye through the frame, dodge and burn are two of the more essential skills many photographers use to bring their images to the forefront.
Whether you use Photoshop, Lightroom, Luminar AI or any of the other photo editing apps available here in 2024, make sure you have an experiment with your photography today.
What about you? Do you dodge and burn? What’s your favorite way to do it? Let us know your questions and comments below.

Check out these 8 essential tools to help you succeed as a professional photographer.
Includes limited-time discounts.


Teryani Riggs (they/them) is an adventure, who loves all things wild and free. Teryani can often be found in the midst of a social/eco-justice campaign, hiking through wild backcountry, or hitchhiking around the world listening to other people’s stories. While their focus has historically centered on landscape, travel, and wilderness photography, they’ve also been hired to shoot genres as varied as historical fiction reenactments in the studio to product and food photography.


