


Inspirational Lightroom Before and After Photo Editing Examples
Improve your photo editing! 10 professional photographers share their Lightroom before and after examples, with step-by-step instructions, tips & tricks.
Lightroom | Software | By Tania Braukamper
Shotkit may earn a commission on affiliate links. Learn more.
Even with digital cameras, the process of taking a photo doesn't end when you take your finger off the shutter button. There's still post-processing to attend to – a crucial step that takes a bit of know-how to get right.
At a minimum, post-processing can bring a photo closer to the reality it was working to capture. Beyond that, it can bring a photographer's more fantastical vision to life.
The difficult part? Mastering the art of the edit.

✓ Great features ✓ Regular Updates ✓ Affordable
Whether you're still navigating the initial learning curve or looking to take your editing skills up a notch, getting an inside peek at how other photographers work can be a really useful tool.
That's why we asked 10 skilled professional photographers to step us through how they use Adobe Lightroom to post-process and edit a photo.
For each Lightroom before and after example, you can see the straight-out-of-camera RAW image alongside the final edit, as well as detailed steps of what each photographer did to get from A to B.
With any luck, this will inspire you to try out some new tips, tricks and techniques within your own Lightroom workflow.
Popular course reveals the simple tricks to getting incredible results with Lightroom in record time. Give Your Photos The Look They Deserve!
![]()
10 Lightroom Before and After Images
1. Benjamin Brette | Wedding Photographer
The Story
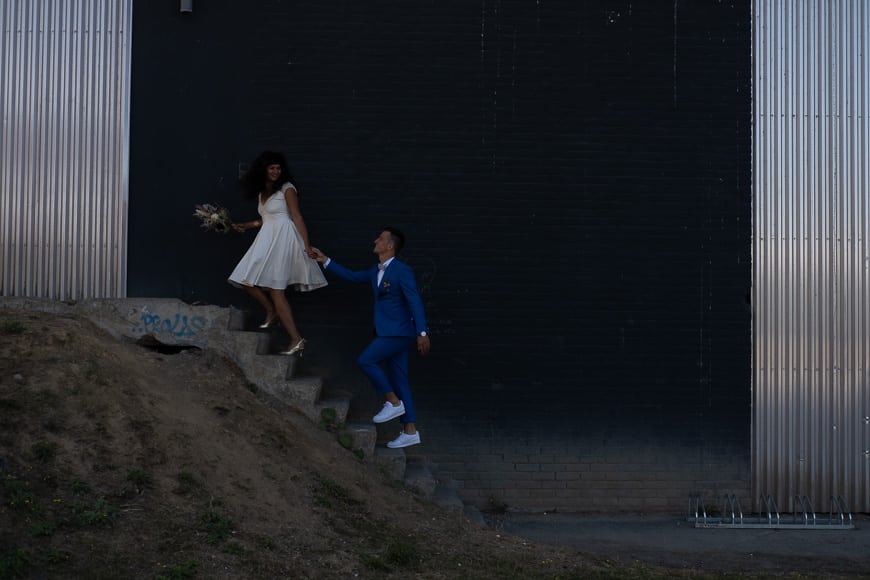
“I took this picture during the couple session on the day of the wedding. We're at the groom's office! He works for a sportswear brand and we had the session in the company's garden. The place is amazing; it looks like an urbex spot. I really like this kind of unusual situation.”
The Editing Process
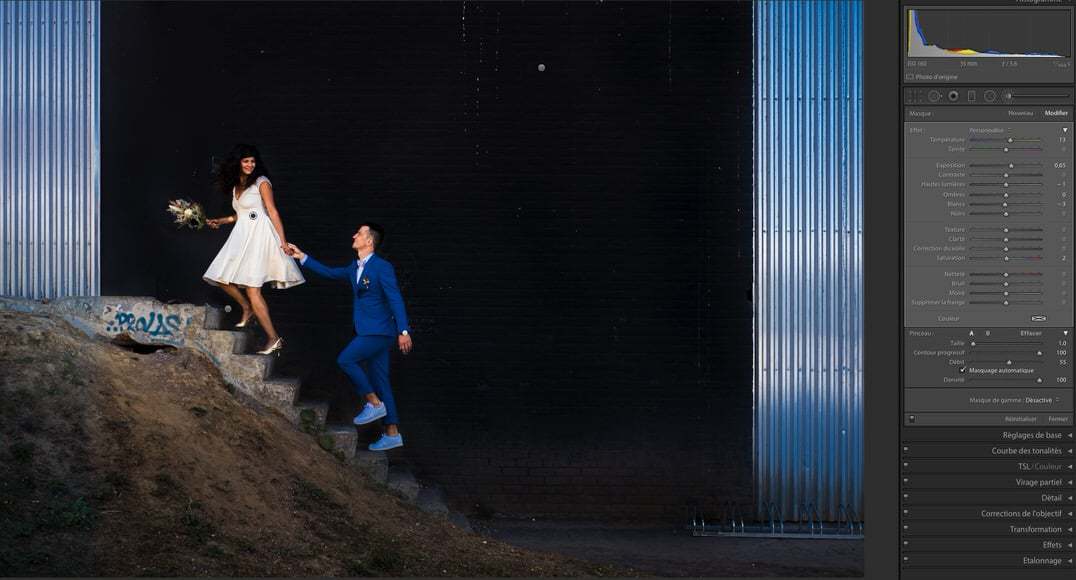
The image was taken in the shade of this large wall. I love contrast and catchy colors. I knew I had to tweak the image in Lightroom to match the result I expected.
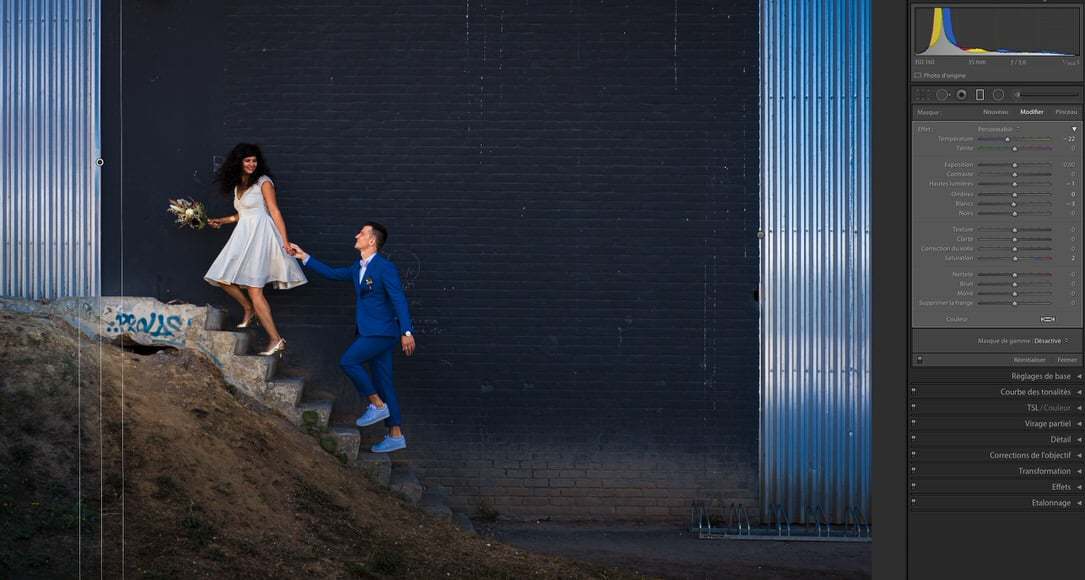
Step 1: I cropped and fixed the perspective so the vertical lines are really vertical and the composition is symmetric.

Step 2: I set my exposure, contrast, color and temperature as I liked. Now the fun begins!

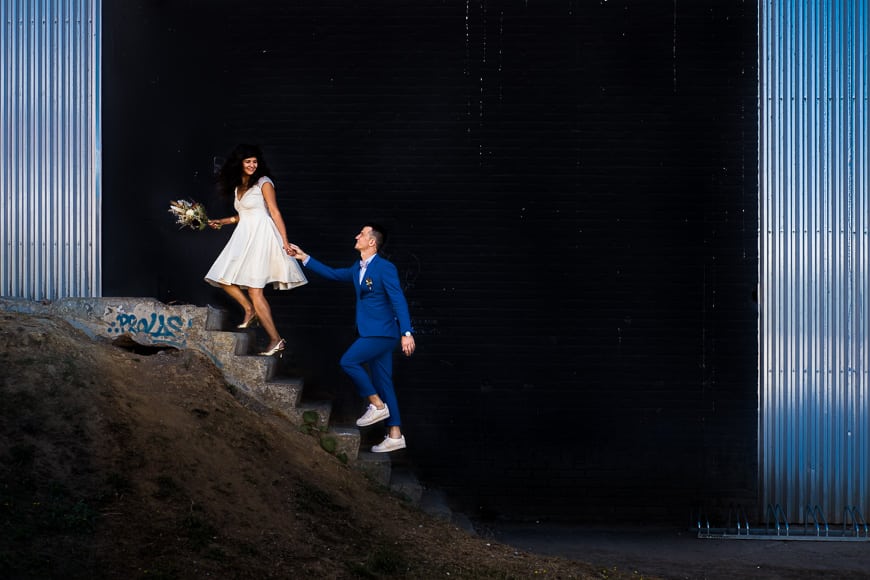
Steps 3 and 4: As I like catchy colors, I wanted to have the two metal walls on the sides cold blue to match the color of the groom's suit. Two graduated filters set to a cold color temperature did the job.

Step 5: The wall had to be dark so the couple could pop from the background. I used a brush to decrease the wall's exposure.
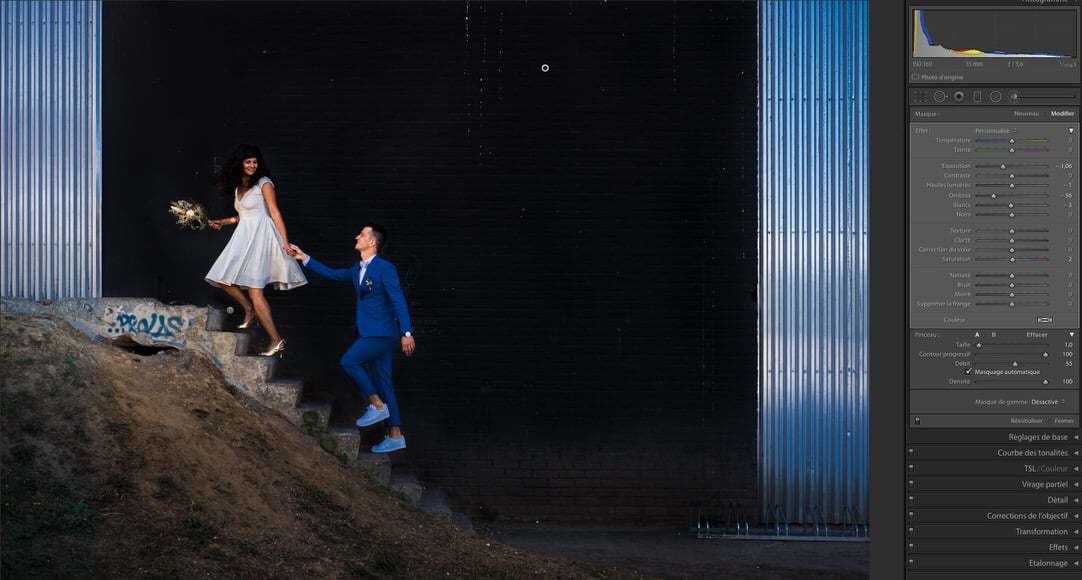
Step 6: I used the same trick to “push” the white of the bride’s dress.
Step 7: The ground was too light, so I set a graduated filter to darken it.
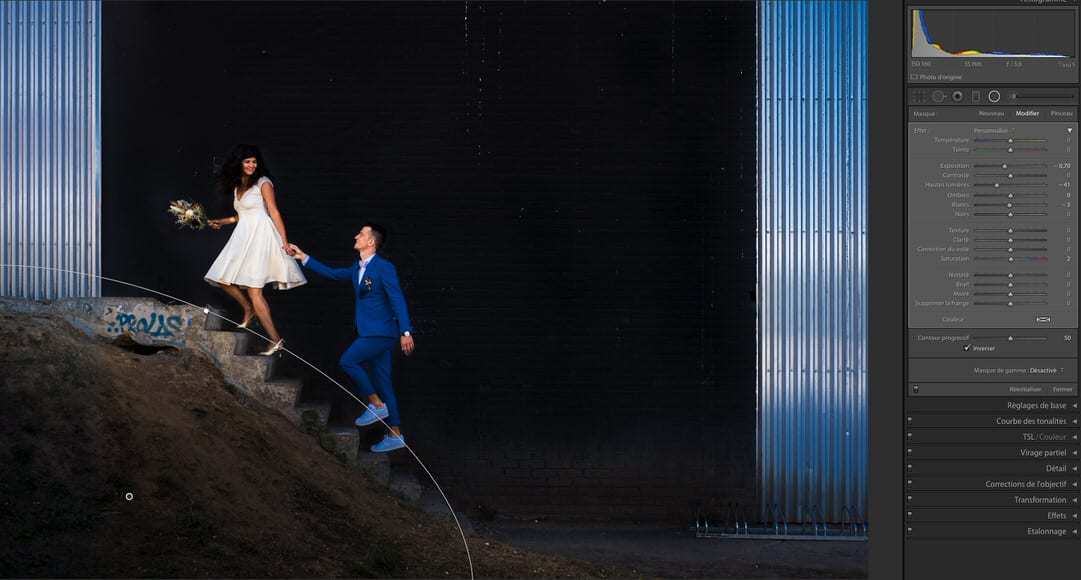
Step 8: The bottom part of the wall wasn’t dark enough so I darkened it with a radial filter.
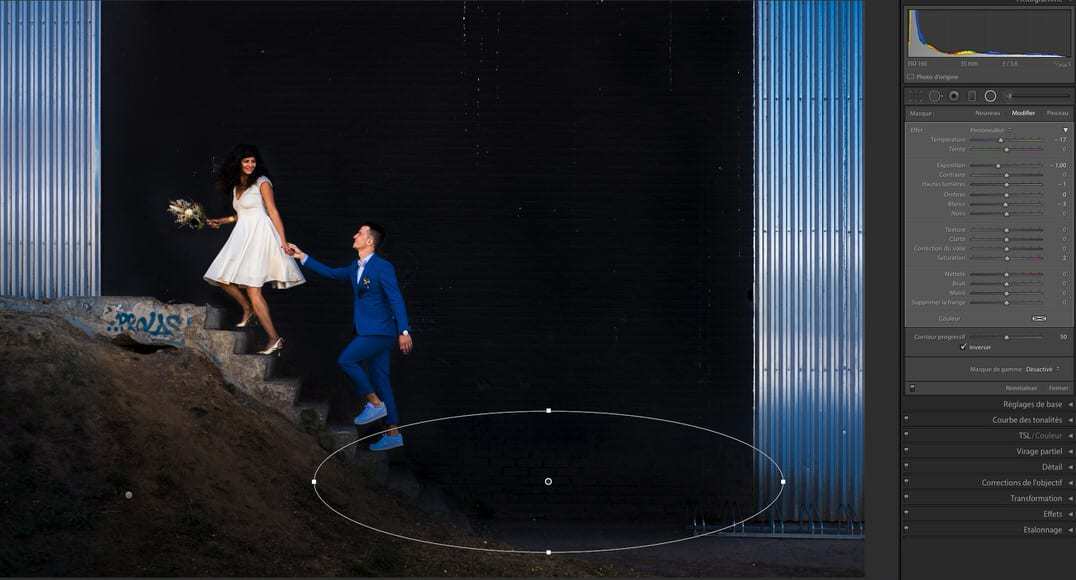
Step 9: The stairs are now too dark, let’s push it with a radial filter.

Step 10: I fixed the color of the shoes that became blue from the second step. A radial filter with temperature adjustment did it.
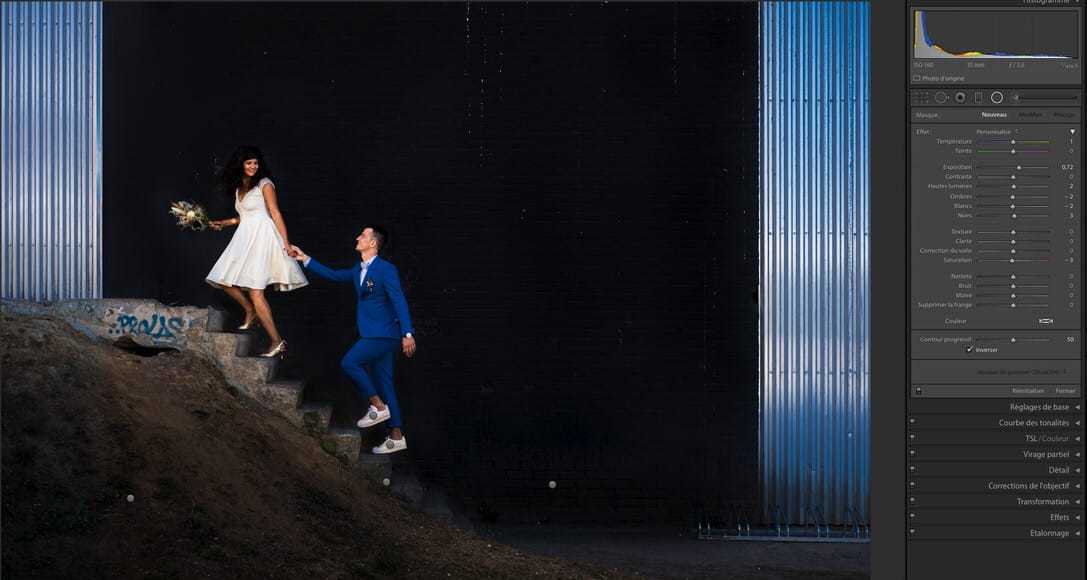
Step 11: Lastly I made a few tiny exposure adjustments with some radial filters on parts of skin that were too dark. And that’s it!

2. Alex Nirta | Landscape Photographer
The Story
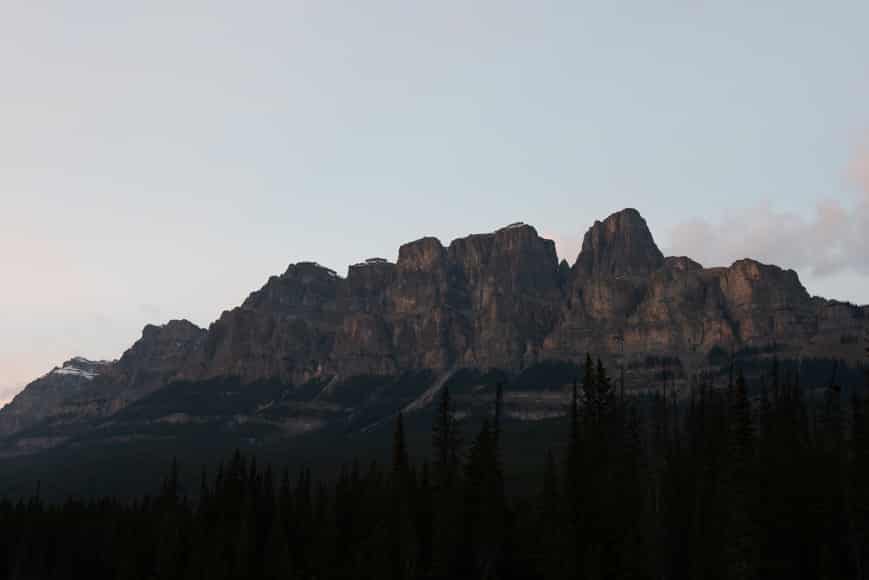
“This place is called Castle Mountain. It's located just north of Banff, Alberta. I was driving up highway 1 when I noticed this beautiful golden mountain. I knew I had to photograph it but had to act fast as the sun was setting and I was losing light.
I quickly pulled off to the side of the road, parked the car and had to scout the area as fast as I could and start shooting.”
The Editing Process
Before I get into my process, I want to mention that coming from a film background, I try to do EVERYTHING in-camera (filters, multiple exposures, etc.) before I bring it into post-production.
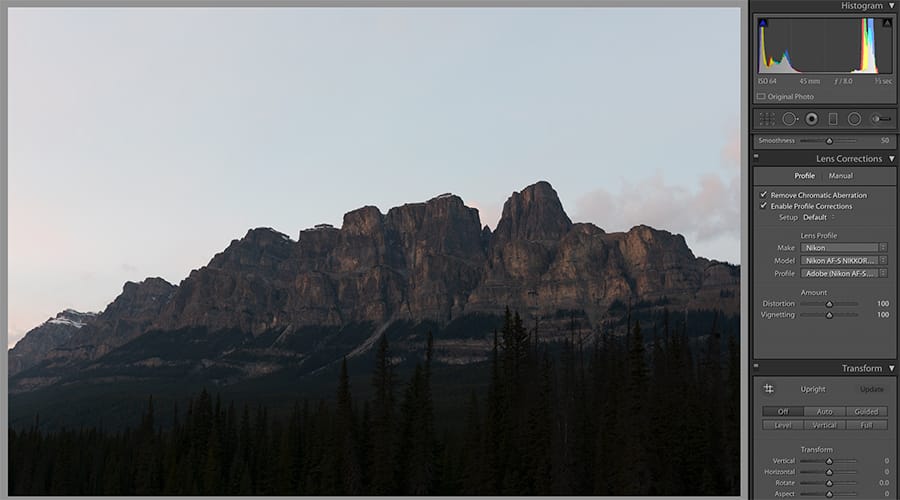
Step 1: Once I import my image into Lightroom, the first thing I do is to adjust the ‘Lens Correction' and ‘Transform' (depending on if it works with the image or not).
Step 2: The next step I do is adjust the ‘White Balance'. It really is a personal process, but I usually start with ‘Auto' and tweak if I need to. For this particular image, I was happy with Auto.
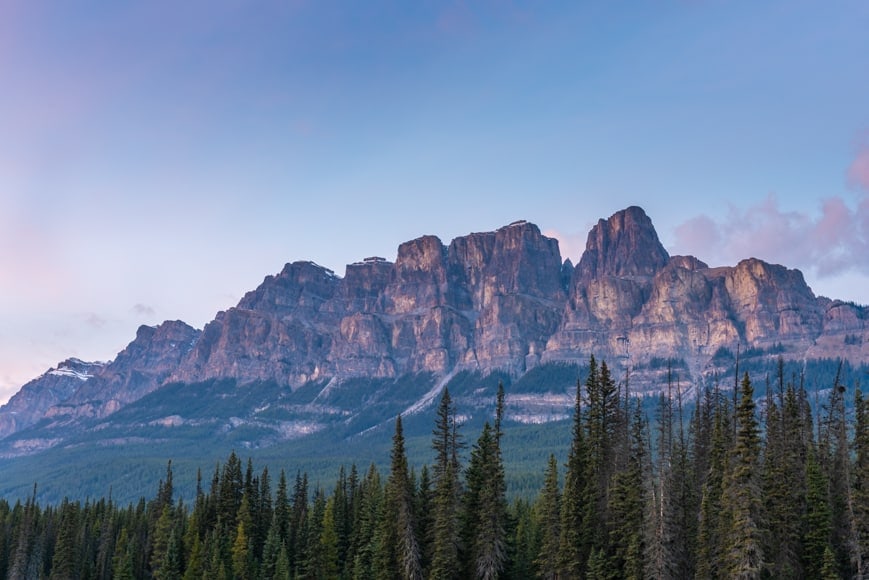
Step 3: The next thing I like to adjust is the ‘Tone' section. I first start off with ‘Shadow' and ‘Highlights'. I knew I wanted to focus on the mountain and sky for this image and didn't care for the pine trees as I could adjust that in post-production.
I usually use grad ND filters, but in this case, time wasn't on my side, so I focused on the subject matter.
Once I adjust what I like, the next step is to tweak ‘Exposure' and ‘Contrast'.
I rarely touch ‘White' and ‘Black' but for this particular image, I wanted the mountain to have more pop and I wanted to showcase the “gold” on the mountainside and the ‘White' slider helped with that.

Step 4: The next phase of my editing process is the ‘Presence' features. I see a lot of photographers using too much of the ‘Clarity' tool and I feel that it ruins most images.
I rarely use it myself and, if I do, its usually no more than 10. But for this image, it really helped with making the mountain stand out more between the blacks and whites.
With the light fading fast and the colours dwindling, I had to boost up the ‘Vibrance' a little more to make the sky stand out because there were still lots of blues and pinks in there.
This is all a personal preference, but this is what I like to do. Sometimes less is more!

Step 5: My final step to processing my images is moving onto the ‘Sharpening' tool. This is a tool I rarely use, but I always check it. 9/10 times, if I adjust it, it's very, very minimal. I can't stand it when photographers increase the sharpening to 100%. I find you don't need to.
The one crucial step that some people forget to do when they play with the sharpening tool is playing with the ‘Mask'. I find this helps a lot in adding the sharpness to the more important areas, rather than the whole image.

And that's pretty much it!
Every image is different of course, but these are my main focuses when I sit down and decide to touch up the images. It's basic, but sometimes that's all you need.
Lightroom Tip from Alex:
While adjusting the ‘Mask' for the sharpening tool, press and hold ALT-OPTION while moving the slider. It will show you your sharpening areas. Very helpful. You can also do that for the ‘White' and ‘Black' slider as well.
Pushing the “L” key twice allows you to view your image on the screen without any distraction. I use this quite often.
3. Craig Parry | Nature Photographer

The Story
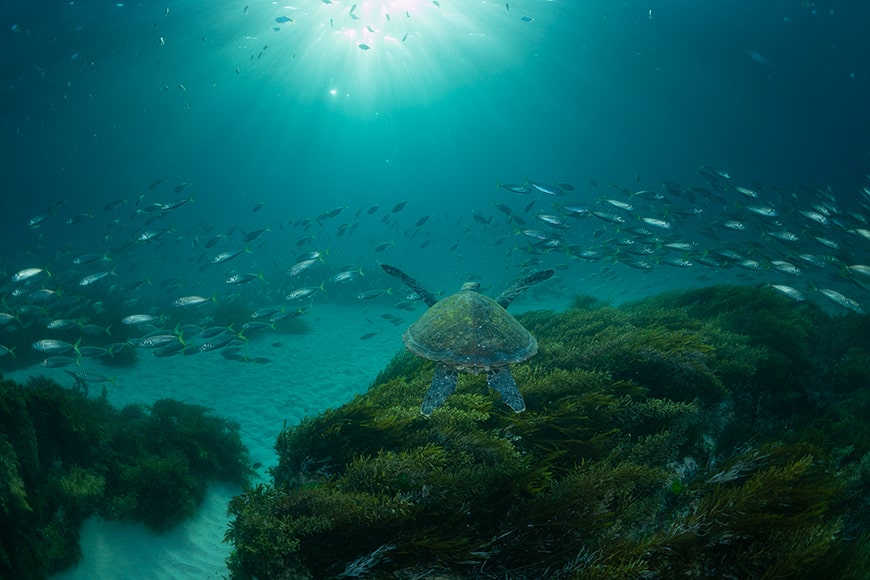
“This image was captured using strobes to balance the background and foreground. The image was taken on a Sony A7R II at 1/200 sec – f/6.3 – ISO 640. This is one of my favourite underwater images.”
The Editing Process
Step 1: Using the colour balance dropper tool, I get a sample from the water's surface (which should be almost white). You'll notice the water's surface will turn magenta – to counteract this you will need to go to Step 2.


Step 2: Using the brush tool, I make a localised adjustment on the water's surface with high levels of green tint to absorb the magenta. I also drop exposure with the same localised brush tool to get more detail in the water's surface.

Step 3: Using the clone tool I delete any artifacts such as sand particles.
Step 4: Using the curves tool, I create an “S” curve by dropping the shadows and lifting the mid-tones, remembering shadows are at the bottom left of the curves tool.

Step 5: Then I export to Photoshop where I dodge and burn the Highlights and Midtones. This makes the image pop!

Step 6: Finally, I export the file as a TIFF at 300DPI for stable archiving and future printing.

4. Dario Dusio | Wedding Photographer


The Story
“This photo was taken outside in the late evening; dark clouds were approaching. I used my flashes to illuminate the couple while I used a long exposure to try to catch the lightning bolts.”
The Editing Process
Step 1: First I adjusted the general image: saturation, contrast, clarity, lights, and shadows.
Step 2: Next I took out some dust in the sky.
Step 3: Then I used the graduated filter to darken the whole blacks in the clouds while pumping out the temperature color around the lighting bolt.

Step 4: With the radial filter, I changed the exposition of the part of the blue sky in the right of the frame.
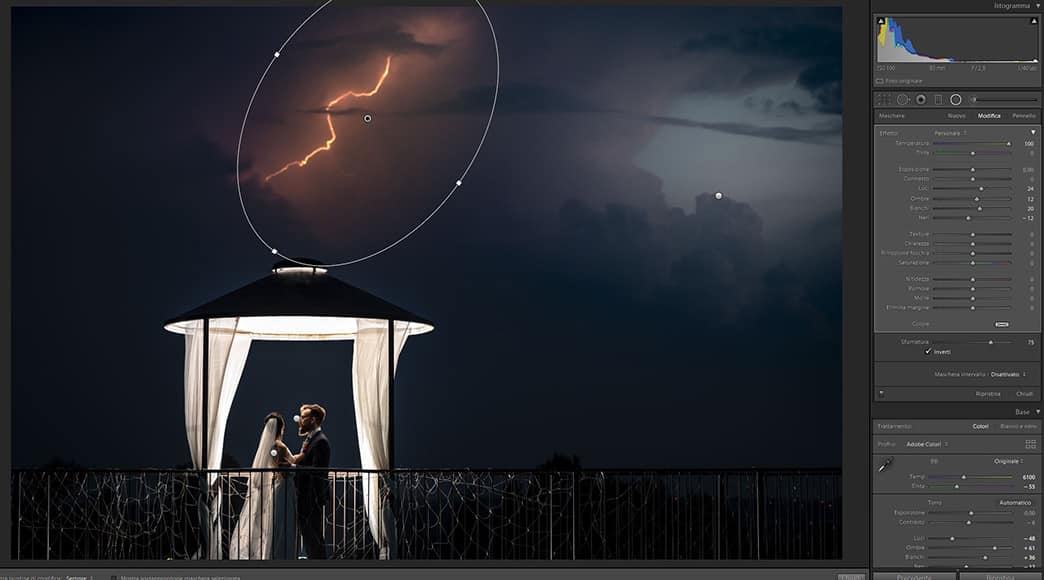
Step 5: Then with the radial filter, I managed to change the temperature color around the couple and let the tattoo of the bride come out of the shadows.
Lightroom Tip from Dario:
I like to work on a photo using a radial filter to pump out different zones in different ways instead of working on the whole lotta frame.
5. Kelsey Goodwin | Sports Photographer

The Story
“I took this photo during a recent photoshoot for Lululemon. I had chosen an underground mall parkade which contained a couple of these unusual little concrete rooms that served well as a little studio.
It was a little dark down there and the white balance was pretty orange. I attempted some OCF with a Profoto but there wasn't enough space in the room to diffuse it properly.
I knew that I could get the look I wanted in Lightroom after the fact.”
The Editing Process
Step 1: I always start by fixing my lens corrections and transforming my vertical and horizontal lines to be nice and straight. It makes a huge difference to minimize distortion and I can always bring back a little vignette darkening around the corners if I want to.
- In the Lens Corrections menu: check both “Remove Chromatic Aberration” and “Enable Profile Corrections”.
- I will click on the “Full” button in the Transform menu or straighten my lines manually if I don't like what it does. I always click “constrain to crop”.
Step 2: Next, basic adjustments – in this case bumping my exposure and taking my temperature into the cool zone.
Step 3: Now the fun stuff! I adjust my levels for all channels in “Tone Curve“. I have a preset for this but it's pretty easy to do manually for the first time.
Basically, I adjust the RGB as well as the separate Red, Green and Blue channels with the same “S” curve. The focus here is on crushing blacks and highlights for that hipster film look.
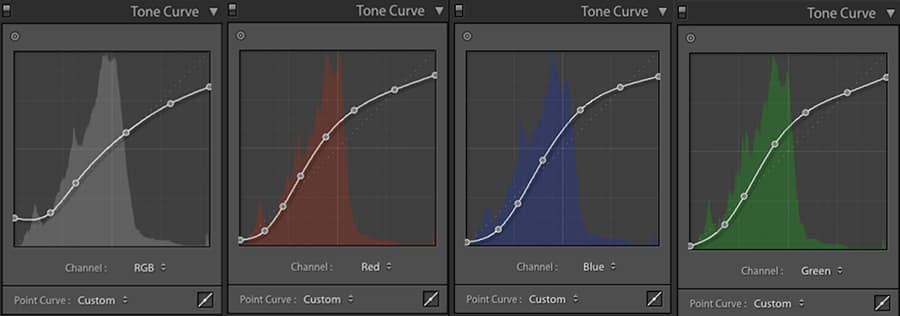
Within the Tone Curve menu, click on the little box on the lower right to access the separate colour channels.
Step 4: After doing this, skin tones sometimes become pretty orange but everything else looks awesome. To fix this, I do a combination of:
- Lowering the overall saturation in the Basic menu.
- Using the colour picker tool in the “Luminance” section of the “HSL” menu to click on the skin tone and drag up or down to make someone look more or less tanned (you're welcome).

Step 5: The next step for this image was to use the spot removal tool to clean up the concrete wall and floor.
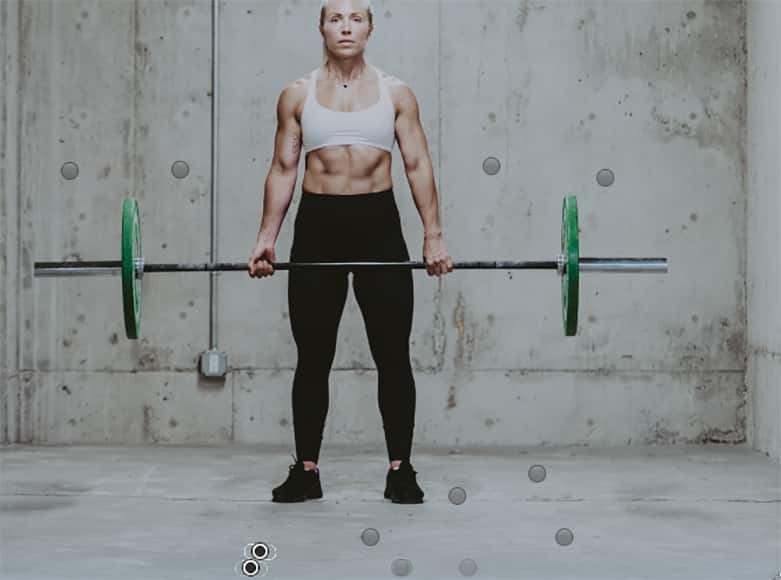
Step 6: Finally, I used the radial and localized adjustments for some creative effects (I have toggled “O” to show a red mask so you can see where I have applied the effects). The tools I used were:
- Gradient to blur out the top portion of the image (drag your “Clarity” and “Sharpness” all the way down).
- Radial to add flares to the overhead lights (drag “Dehaze” down to actually add haze, adjust for a cooler or warmer temperature and make sure your feather is really diffused).

Done! 6 steps to the final result. :)
Lightroom Tips from Kelsey:
Use the colour picker to make HSL adjustments – especially for skin! You may think it's orange or yellow but often it's something else like magenta so let the picker do the work for you!
Watching a Profoto tutorial recently, I was amazed to learn about the powers of “auto mask” in the localized adjustments brush in Lightroom! This has helped me tremendously, especially with headshots and other neutral backgrounds. I'm nerding out on this because I thought I would always have to bring it into photoshop or have a big obvious feather on a radial filter.
Troubleshooting tips:
- Once I could not figure out why there was a red mask on all of my adjustments and it would not go away. I had hit “O” on my keyboard by accident. Toggle it to turn the mask indicator off and on.
- I could not for the life of me get my rating/flagging/colour labels back in my filter section in the lower right above my film strip. After way too many hours looking this up, the answer is simple: Click on the word “filter” to bring it back.
6. Keith Acedera | Wedding Photographer
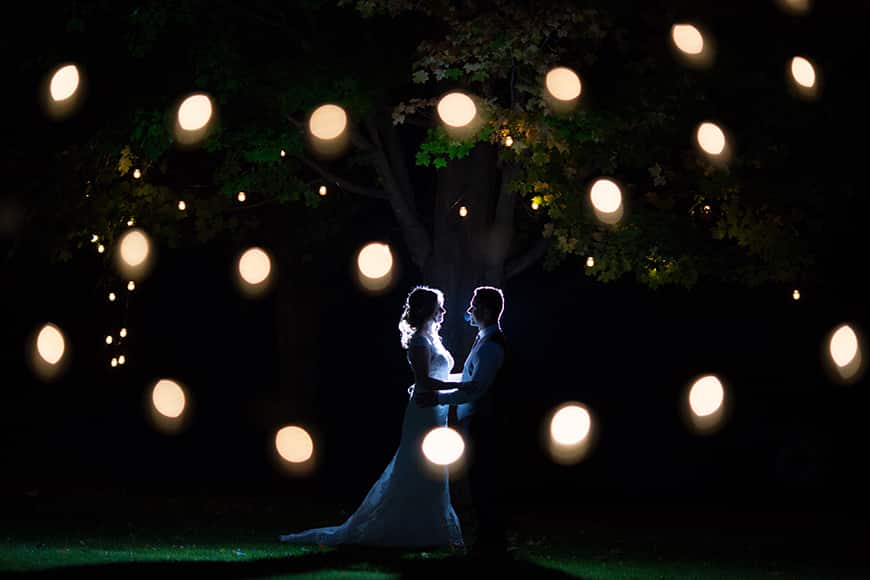

The Story
“While I was really happy with how this final edit turned out, the reality is that there were a lot of technical problems with the original photo.
At the end of the day, it is really all about problem-solving through the issues. Thankfully, we have Lightroom to help aid us in solving those problems! And hopefully, I can share my thought process and showcase how one can approach editing a challenging photo like this!
To give it some concept, I usually love taking some night portraits with my couples, so in the middle of their dinner during the reception, I normally sneak my couples out somewhere closeby in and around their venue grounds and try to find a spot for a few quick snaps.
Needless to say, the problem is always TIME. During this part, you have to think quick on your feet (since my couples usually can’t go missing too long from their party) and I have almost no time to fuss about the perfect camera settings, so I really just focus all my energy on the whole composition and concept as a whole — and most importantly, on capturing the feelings and emotions my couple portrays.
With only 5 minutes to work with, I found a set of Edison string lights hung just outside the couple’s reception and I thought it would be cool to use these lights to frame my couple.
I quickly set an off-camera flash to light them up against that big maple tree and tried to underexpose them a bit to make those lights pop.
Unfortunately, amongst other problems that night, I didn’t have time to slide a warm gel in my flash to match the warm lights around and even managed to over-expose the bride by a touch! The flash should have been slightly further towards the right on the groom’s side.
Nonetheless, here I am faced with a dilemma with this RAW file! Here’s how I attacked the problem…”
The Editing Process
Step 1: Over the years I’ve developed my own presets, but the base tones of my edits mostly came from VSCO film presets. I fell in love with these from day one when they were first released and have used them ever since.
That said, I must admit that I’m never happy with just one click! I often find myself tweaking them to my liking. In this case, I used the C – Fuji 160C preset which is part of the original VSCO Film 01 pack.
So before doing anything else, for the very first step, I applied this very cool film preset as the base of my edit.

Step 2: Next, I tweaked the exposure, contrast, highlights, shadows, whites and blacks. For the exposure, I temporarily set it pretty high (+1.90) just so I could see the entire scene and what details I was dealing with.

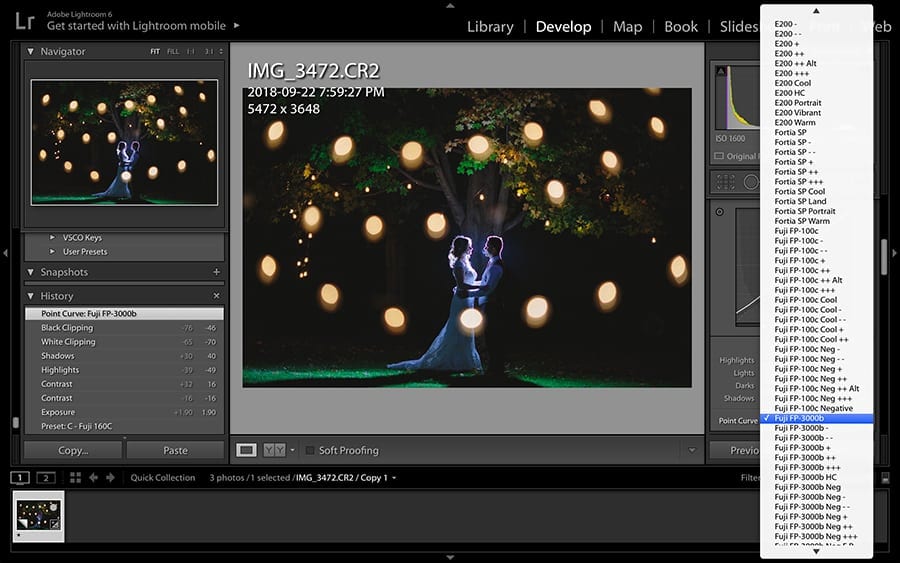
Step 3: Even though I used the C – Fuji 160C preset, I felt that it needed a bit of a matte look, so I decided to change the “Point Curve” under Tone Curve.
Of course, I also wanted it to be consistent, so I selected a tone from the same Fuji family — Fuji FP-300b.
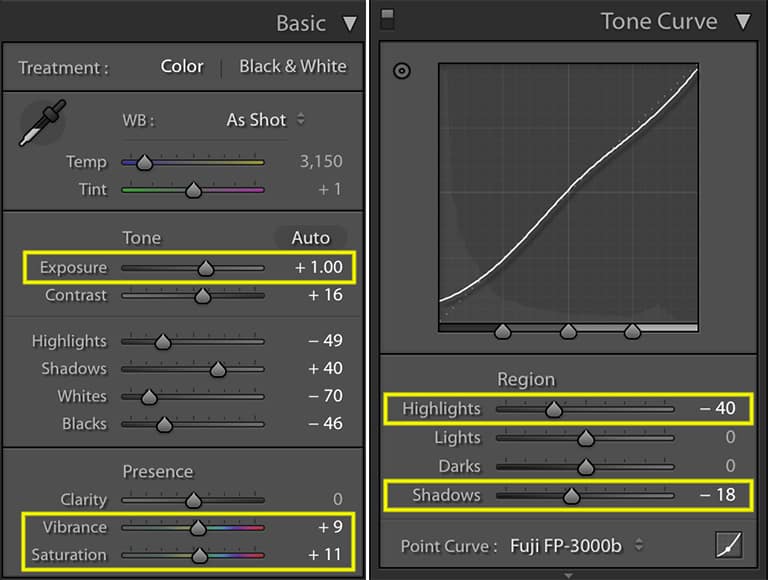
Step 4: Next, I adjusted the tone curve, adjusting only the highlights and shadows (for now).
I also decided to drop the exposure back down to +1.00 stop. (As mentioned in Step 2, I initially set it at +1.90 just to see the entire scene and what details I was dealing with.)
It also needed a bit of a color punch, so I bumped up Vibrance and Saturation as well.
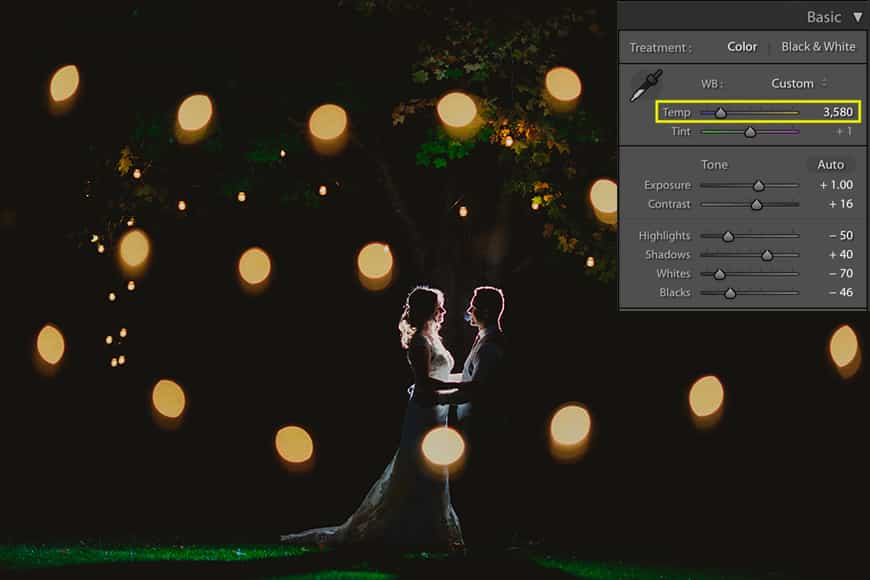
Step 5: Time to warm things up a bit! Quite noticeably, the bride’s dress and highlights are very cool and have a blue tinge to them. I would have really loved to use a warming gel on my flash to get things right in-camera, but with time constraints, I had to work with what I had. So this is something I needed to fix in post-production.
So the first thing I did was to warm up the overall photo. I raised the temperature a bit to accentuate the warm lights around.
Then using the Adjustment Brush tool inside Lightroom, I painted a mask around the bride’s dress area as well as any highlights that were blue. Touching only the Temperature and Tint part, I adjusted the sliders to taste and ended up with much better skin and fabric tones to match the warm lighting.

Step 6: It was time to bump up the shadows around the tree and grass areas, so using the Radial Filter tool in Lightroom, I made a little circle around the couple’s faces to ensure I didn't touch the exposure there… because, at this point, I was happy with it!
I then cranked up the shadows to about 47%, ensuring the ‘Invert Mask’ checkbox was unchecked. This ensures everything outside the circle I made will be touched.

Step 7: CLEAN UP! This final part is simply putting the finishing touches on the photo.
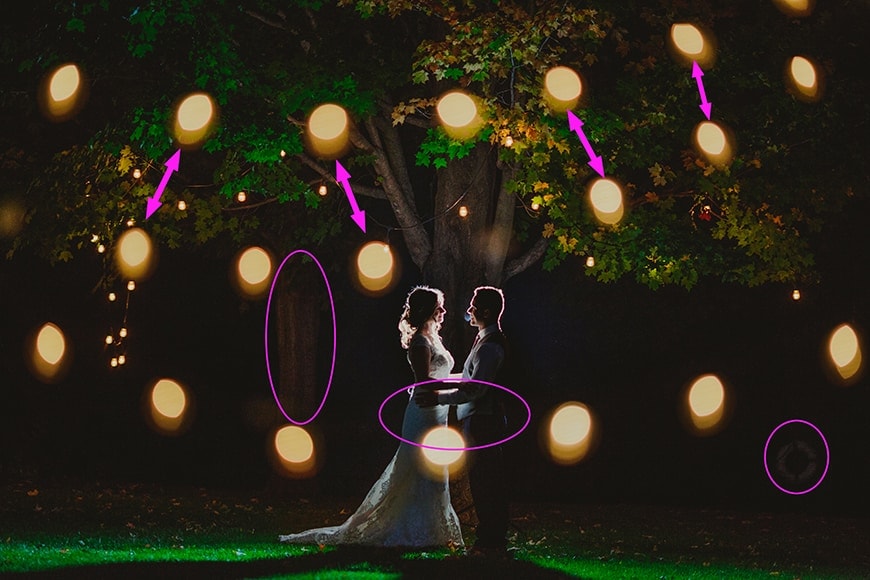
There are some elements in the background that are quite distracting such as the second tree trunk on the left side and the weird artifact on the bottom right-hand side. So again, using the Adjustment Brush tool, I simply brushed over those spots and decreased exposure to hide them again.
Moreover, the yellow lights needed a bit more PUNCH in the yellow glow, so I brushed over those and cranked up the Saturation and Highlights a bit.
I also noticed the area around the couple's hips was left on the cool side, so that was brushed over as well and warmed up a touch!
I’m super thankful for this handy dandy tool as it really helps me finish up a photo without the use of Photoshop. Small basic adjustments like that can all be done inside Lightroom which saves a ton of time at the end of the day!
And there you have it!
Remember, regardless of your camera settings, the overall feeling of an image always trumps the technical aspect of it!
7. Stacy White | Landscape Photographer


The Story
“This was taken on the East Coast of Florida near Jupiter. I love this area because of the rocks on the beach… it doesn't look like this is part of Florida. This was a sunrise shoot, and it was dark and the sun was coming up over the water, so the rocks remained dark even as the sky got light.”
The Editing Process
Step 1: One of my first steps is to go into Lens Corrections – I checked “Remove Chromatic Aberrations” and “Enable Profile Corrections”. This is especially useful with my wide-angle lens.
Step 2: On this image, checking those boxes in Lightroom removed the vignette on the edges and removed the distortion that you sometimes get on the edges. The chromatic aberrations aren’t always noticeable, but since this image has the dark rocks near the light sky, I checked this just to make sure I didn’t get any fringing on the edges of the rock.
Step 3: Then, I went back to the Basic menu and adjusted the White Balance, increased the Shadows, reduced the Highlights, and added a little bit of Contrast.
Step 4: I noticed my horizon was a little off, so I straightened my image.
Step 5: I changed the color profile to Adobe Vivid to give it a little pop
Step 6: I then increased the Vibrance, added a little Texture, and a touch of Lightoom Dehaze.
Step 7: This shot was taken at sunrise, where the light was just on the horizon on the waterline, so I wanted the sky to be a little deeper like it looked at the point of capture, so I added a graduated filter.
Step 8: Then I went into the Tone Curve. Here I lowered Highlights and Lights, then increased Darks and Shadows.

Step 9: Since the large rock was still a little dark, I used the adjustment brush to bring up the shadows.
Step 10: After all this, I noticed some dust spots from my sensor in the blue sky, so I used the spot removal tool to remove them.

Step 11: I exported the image from Lightroom, and made sure the Output Sharpening area was set to sharpen for screen.
8. Uiler Costa | Landscape & Aerial Photographer
The Story
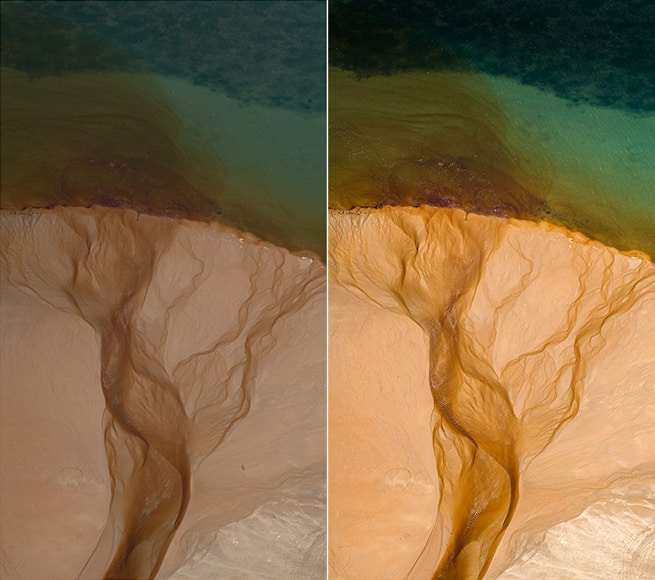
“This photo is part of my long term project about All Saints Bay located in Salvador, Bahia – my hometown. I am fascinated by aerial seascapes and landscapes and here, in the northeast of Brazil, we have awesome places to photograph nature at its best. I often hire a helicopter and fly over the bay to photograph.”
The Editing Process
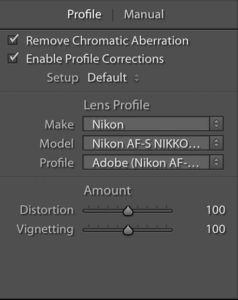
Step 1: Lens Corrections – Here I apply “Enable Profile Corrections” and “Remove Chromatic Aberrations”.

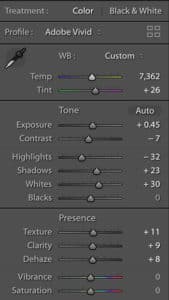
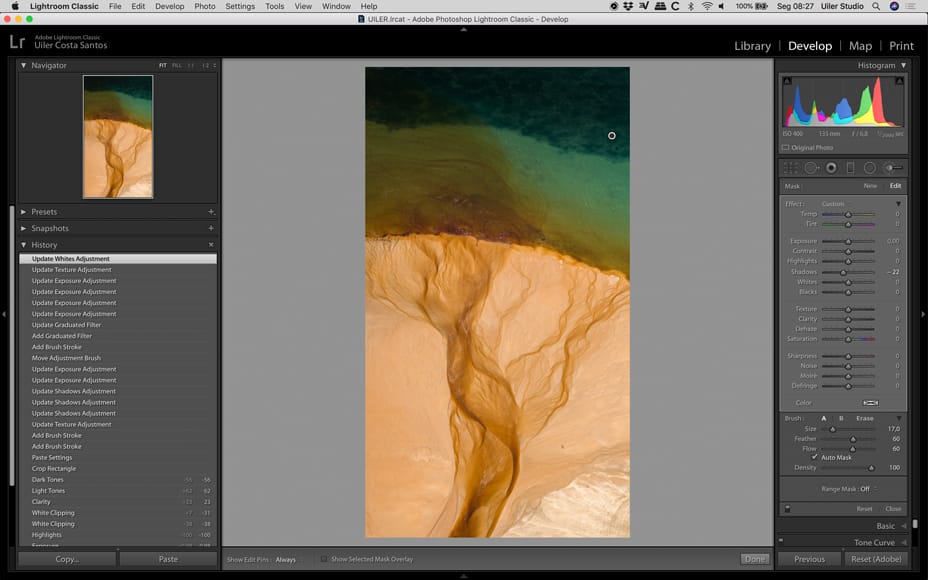
Step 2: Basic adjustments – In this part, I increase the exposure, decrease the highlights and a little bit of the whites. This tends to make the image flatter but it's an important step to prevent blowing out the white areas when I reach the part of giving more contrast to the image. Then I add some clarity to create a bit of contrast in the mid-tones.

Step 3: Tone Curve – Here is where the images pop. I increase the lights and decrease the darks and this creates contrast and brings out the colors of the images.
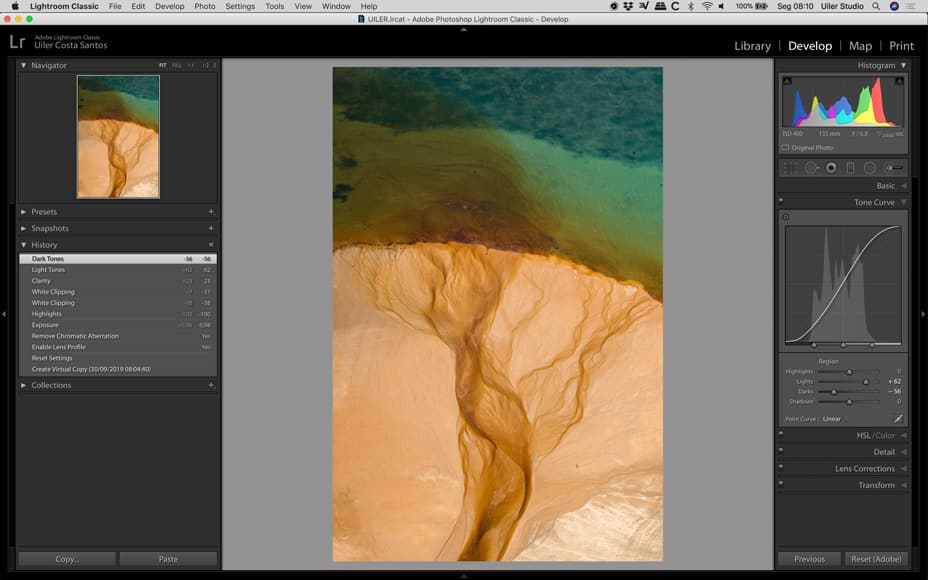
Step 4: Crop – I think this image will work better more vertically so I crop the image (see how to crop in Lightroom).

Step 5: Graduated filter – On the top of the image I use the graduated filter to decrease the exposure a little bit, to match the way I saw the scene.
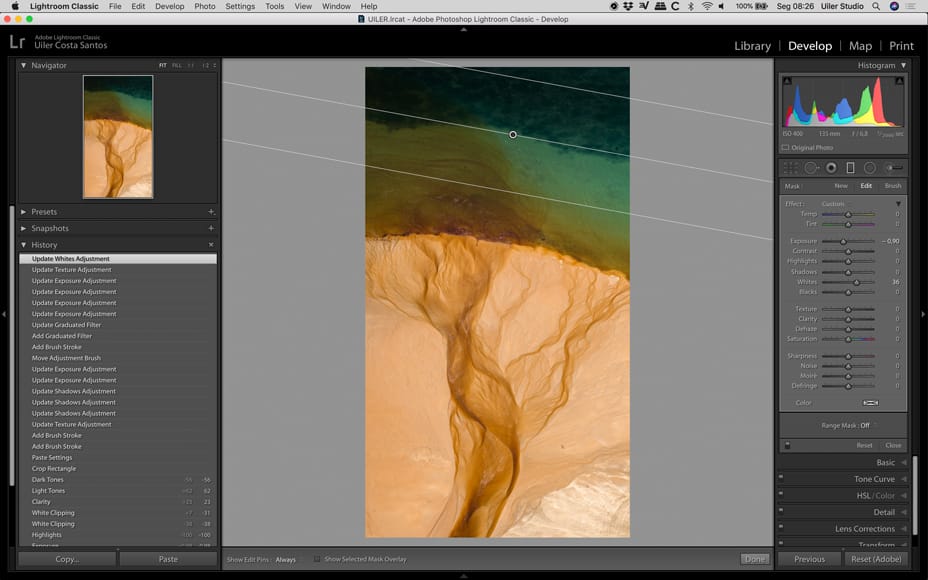
Step 6: Adjustment Brush – I use this to decrease the shadow in some of the top areas.
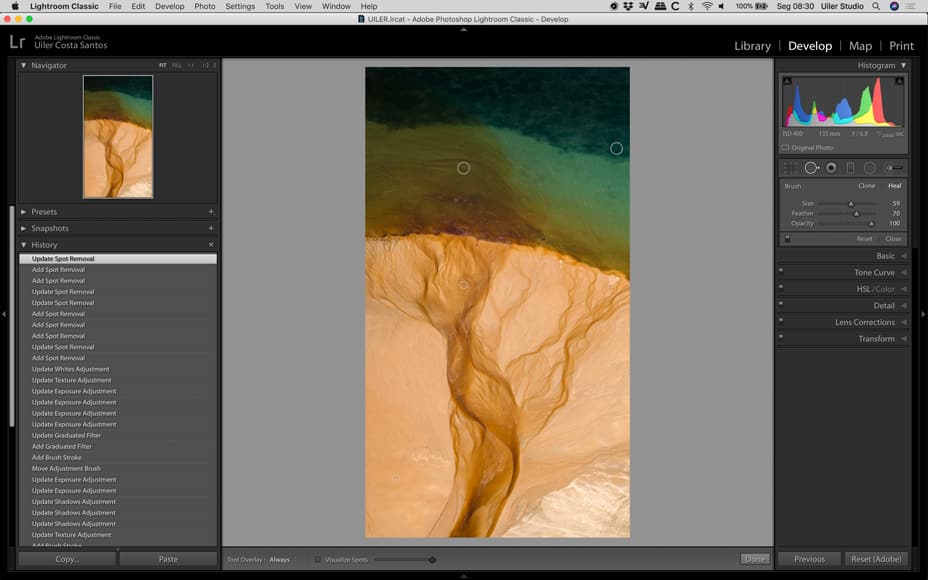
Step 7: Spot removal – Here I remove some dust spots from my sensor. This part is really important for me because I print my images and finding spots on the final print is not so good.
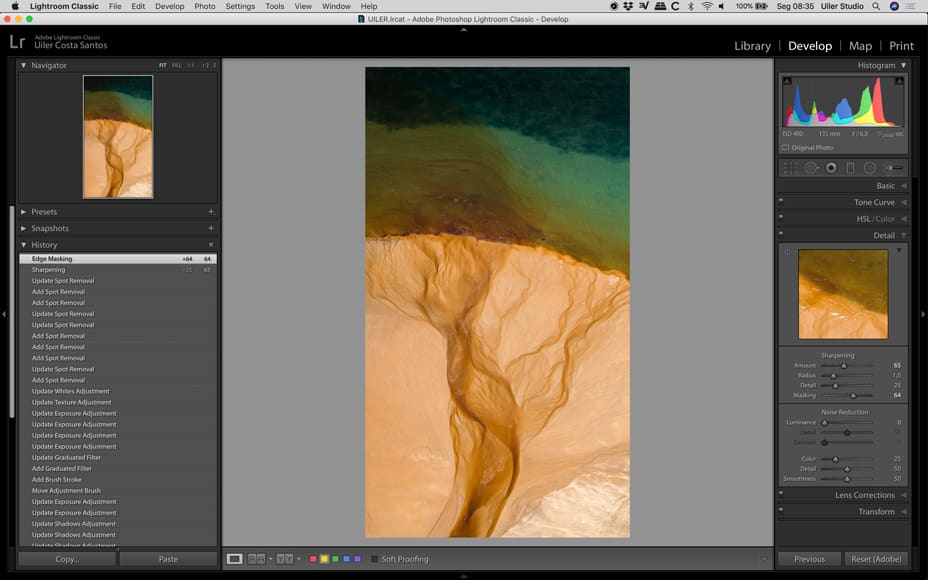
Step 8: Detail – Here is the final part. I increase the amount of sharpening and also the mask.
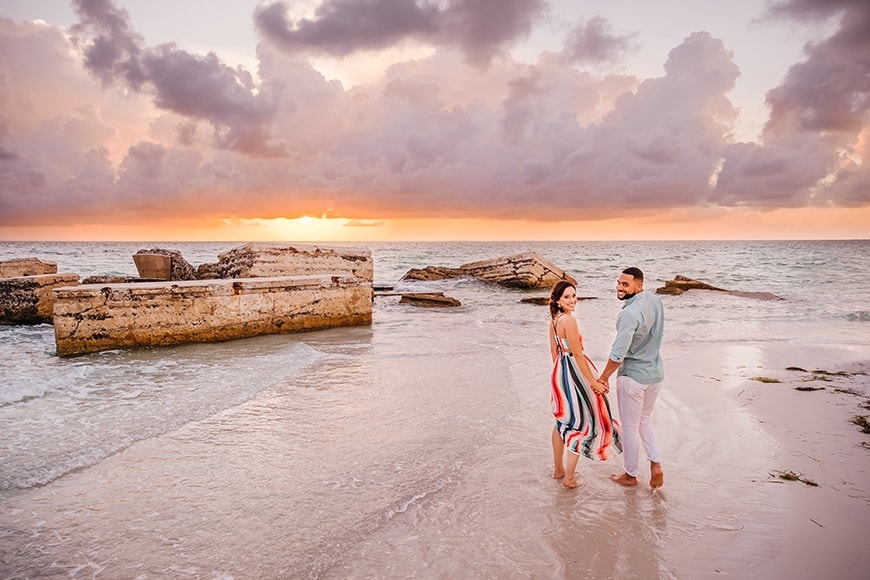
9. Ashlee Hamon | Wedding Photographer

The Story
“This image was a favorite from a destination photography session on the beach. The couple came from Ohio specifically for the Gulf Coast sunsets of Florida.
We were racing the clock before the sun was actually down to make it to my grand finale spot among the ruins of an old fort.
I specifically shot this image to keep detail in the incredible sky. I knew that I could bring back a lot of the shadows and exposure once I got it into Lightroom, but if I lost the sky I could never get it back.
Because I knew I would be using gradients and brushes to change the exposure of large parts of the image, I made sure to compose my subjects well out of the way of the entire sky. Trying to edge out your subject can be very painstaking and often very noticeable. By keeping them within the rest of the sand and areas that I would want to lighten anyway the final result is very natural.
I also try to balance not underexposing too much in-camera.”
The Editing Process
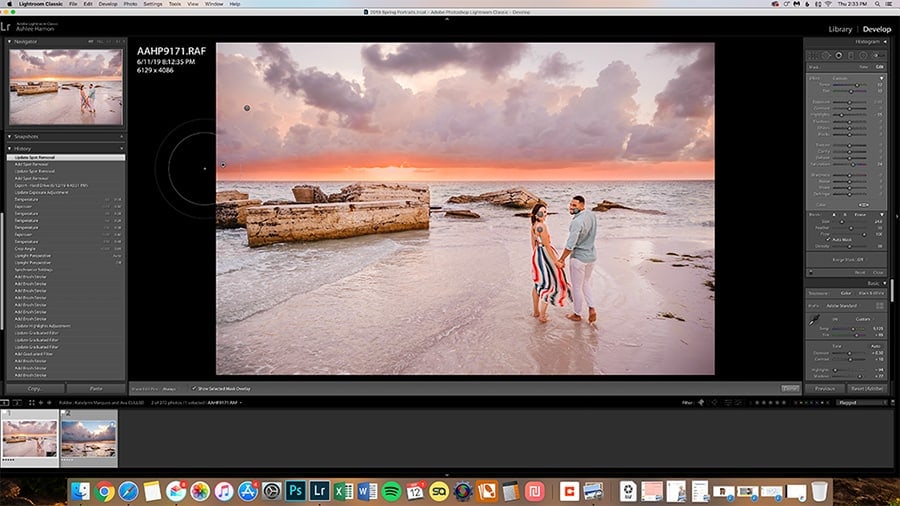
Step 1: I apply my custom preset on import. This preset punches up the contrast, tones down the highlights, brings out the shadows, clips the blacks and whites, adds a bit of saturation & vibrancy, split tones the highlights and shadows minimally, increases the sharpness + noise reduction, and finally adds a hint of vignette.
Step 2: My next adjustments are for exposure and white balance. In this case I only increased the exposure a tiny bit to keep detail and color in the sky.
Again I intentionally underexposed so I could keep the sunset and bring out the rest in Lightroom. For the white balance I dragged both the Temp and Tint far to the right to make a nice warm image. I find you've got to increase the magenta when you warm up with the yellow to keep the skin tones nice.

Step 3: Then the fun begins! I love to use gradient filters and they are especially useful when shooting on the beach because the horizon line offers the perfect break.
I dragged in an exposure gradient from the bottom of the image through to the horizon line. I had it increased by over a stop but also brought down the highlights and brought up the shadows at the same time. That gave me a more dynamic lift of the exposure and felt the most natural.
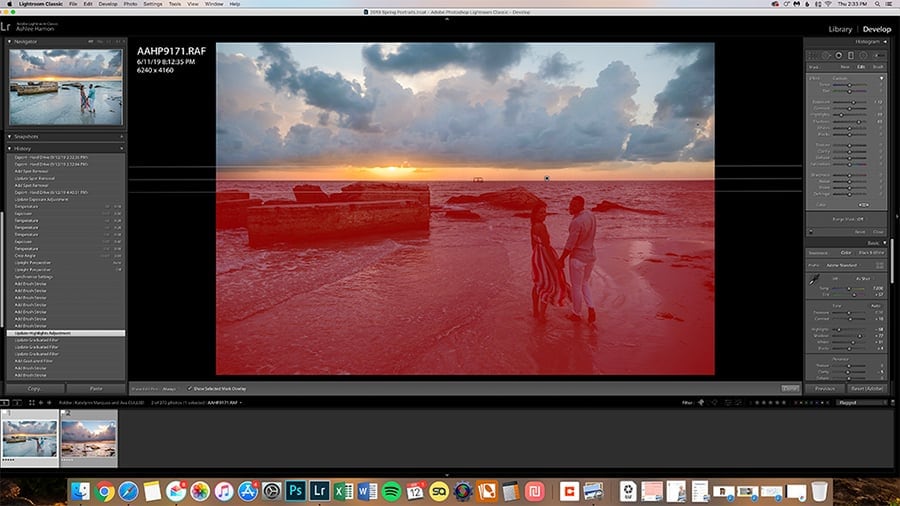
Step 4: From there I used a brush to paint in some enhancements to the sky/sunset. I grabbed a brush with full opacity but a good amount of feathering so that you would not see a line.
The brush added even more warmth plus saturation. I painted that in on the underside of the clouds.
I also used the brush to add strategic dodging to the subjects themselves. I brightened them up and made sure not to “go outside the lines” of their bodies so that there wouldn't be a lighter halo around them.
Again I wanted this all to look very natural in the final result.

Step 5: Lastly, I took out a few distractions using the cloning tool set to “heal”. I also used full opacity and a healthy amount of feather so that everything blended.

Step 6: Straightened out a little with the crop tool and viola!
Lightroom Tips from Ashlee:
Use brushes and gradients for white balance! Adding or balancing the right color in the right places makes a world of difference. Get the overall color where you want it and then enhance skies or correct skin with these tools.
Also, don't forget to use the clone tool to take out any distractions. I always use it on “heal” with a small buffer of feathering.
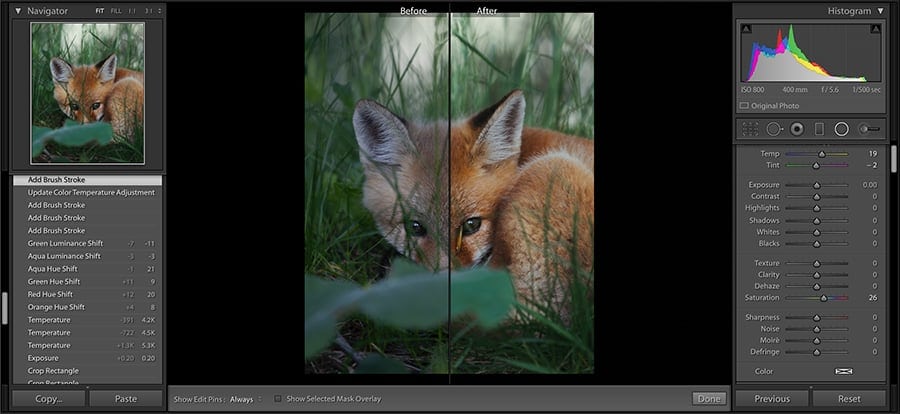
10. Valérie Derome-Massé | Wildlife Photographer
The Story
“I spent a few weeks last spring watching a fox and her cubs. I kept going back to the same area and spent hours waiting for them to come out of their den in order to observe their behaviours and hopefully come back with a few shots.
I took advantage of this opportunity to test a few lenses and bodies to find the right combination for fox photography (and other wild animals who are either dangerous or difficult to approach).
Almost all of my observations were made at night just after sunset which made the task very difficult due to harsh lighting conditions. Except for that one time.
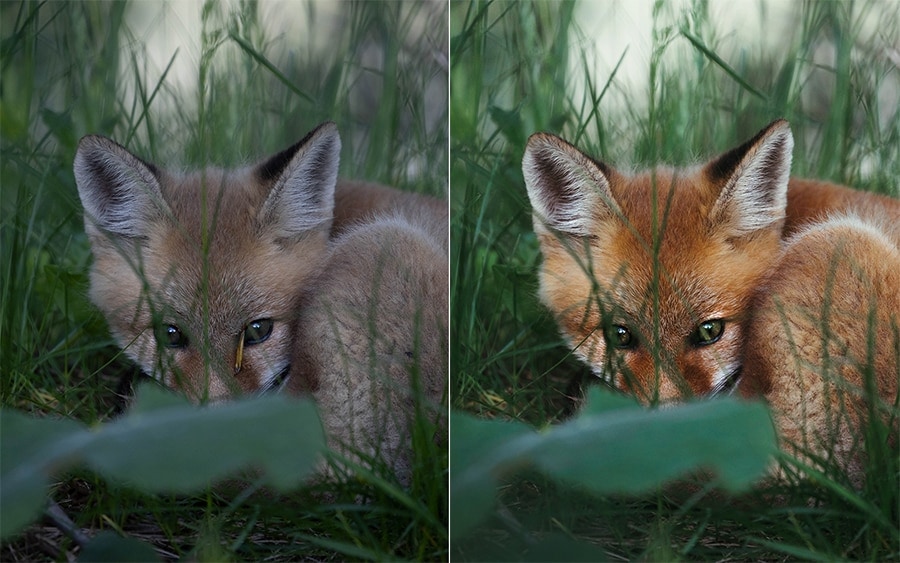
I arrived early in the day hoping to be able to find a quiet spot and merge with the environment long before the foxes would come out. Just as I arrived at the location I’ve tamed for a few weeks already, I came face to face with this young fox who was curled up napping in the middle of the forest.
I crawled very slowly at ground level until I made it to a safe and good distance to get a close-up portrait shot. He opened his eyes, looked at me for a few seconds and fell back asleep.
That was it. One of the most peaceful observations I made this year.”
The Editing Process
As for the editing, I am no fan of heavy image transformation and I tend to keep things simple.
The key is to focus on the animal’s eyes and make it stand out from its background. Of course, as we were in late June it made it easier for editing as the vegetation had started to flourish.
This is the editing process I use with all of my photos.
Step 1: The first step takes place in the Lens Correction menu where I enable both the profile corrections and the removal of the chromatic aberrations.
Then, I head over to the primary menu where I adjust the exposure, add some contrast and correct the white balance. I usually always tweak up the tone curve a little bit to give the image more depth.

Step 2: Afterwards, I make a few adjustments in the colour section.
As foxes have rich orange fur, it is crucial to make it stand out. I enhance the orange saturation and desaturate the greens and yellows just a little bit such that the oranges are more present.
I usually have to adjust the greens “hue” a little bit to make it greener, somewhat closer to blue than yellow as I am very picky on greens.
Step 3: Then comes my favourite part of the editing process: brushes.
One of the many reasons why I love photographing foxes is that I am amazed by their gaze which lucky for me makes them very photogenic.
Using the brush and the radial filter tools I accentuate the highlights and shadows in the eyes such that the reflections of the environment in his eyes (the forest in this case) become more noticeable. This draws our attention to the eyes and gives the feeling as if we were in the photo with the fox.
I also accentuate the highlights and shadows of his ears to give him more character and presence.
Again using the filters in the menu at the top, I added a graduated filter at the bottom of the photo and lowered the exposure such that our eyes are redirected to the middle of the image.

Step 4: Lastly, I remove the yellow leaf from stuck in the corner of his eye in Photoshop. I usually use the spot removal tool in Lightroom itself but this time since the leaf was hiding a part of his eye it was easier to do it afterwards in Photoshop with the stamp tool.
How to See Before and After Images in Lightroom
If you're wondering how to switch to the before/after view in Lightroom, keep reading…
Being able to see your edits side-by-side with the original images gives you a reference point to work from and helps you determine whether your edits are on the right track or not.
You can switch to the before/after view by using the top menu or by using the toolbar (which by default shows underneath your image).
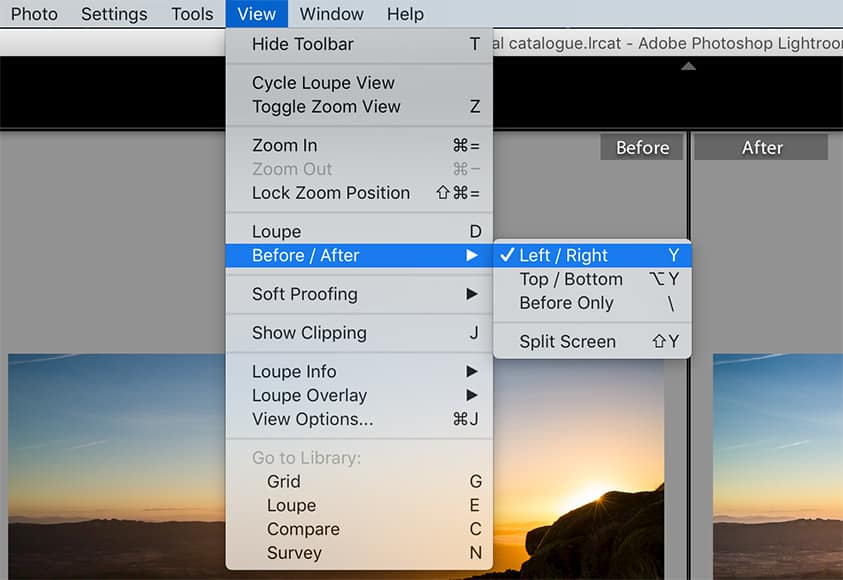
To use the menu:
- Click on the View menu, then click on “Before / After”
- This brings up a sub-menu where you can select different display options
To make switching between views even faster, you might want to go for the toolbar option. To do this:
- Click on the View menu, then click on “Show Toolbar”.
- If you don't automatically see the before/after options, click on the small arrow on the right-hand side of the toolbar and select “Before and After” from the drop-down list.
- You should now have several options visible. The first two icons allow you to toggle between different before/after views (for example, split-screen vertically or horizontally). The second lot of options allows you to copy settings across from one version of your image to the other.

Having the toolbar visible makes it very easy to switch from your regular Lightroom development view to the various before and after views.
Finally, one of the super-simple and handy Lightroom keyboard shortcuts is using the backslash key (/) to temporarily toggle to the “before” view and back again.
Frequently Asked Questions
How do I see before and after in Lightroom?
The easiest way to see before and after in Lightroom is to use the toolbar beneath your image. If your toolbar isn't displaying, you may need to first click on “View” and then “Show Toolbar” to bring it up. From there you can use the buttons to easily switch between different ways of displaying your original and edited image – like side by side, above and below, or split-screen.
What you can do with Lightroom?
Adobe Lightroom is an all-in-one image editing and library management software. That means you can process raw images, make global and local adjustments, and also store and organise your images so you can easily find and recover them at any time.
How do I switch between original and edited in Lightroom?
If you want to quickly compare your edited image with the original in Lightroom without keeping both on the screen at the same time, you can simply hold down the backslash key (\). This toggles to a view of your original image. Releasing the key will take you back to your edited version.
How do I get better at Lightroom?
Like anything, mastering Lightroom takes practice. The more you use it, the easier it will get. That said, it can also help to watch tutorials, read resources on the web, and look at examples of how other photographers use it in their post-processing workflow to arrive at a great final image.

Tania Braukamper is an Australian-born writer who also loves to take pictures of sunsets and street scenes. She currently lives in Portugal.
1 Comment
Leave a Comment
👋 WELCOME TO SHOTKIT!
🔥 Popular NOW:

Hi Tania,
I am Portuguese and I also live in Portugal.I hope you enjoy my beautiful country!
Thank you for sharing these examples, but I get lost in the editing process. Would it be possible to write down each step and share the image files? This will allow us to practice with Lightroom and go from A (before) to Z (after).