


How to Export Adobe Audition to MP3
Ideal for musicians, podcasters, and audio editors, learn how to streamline your workflow and share your audio more efficiently with Audition and MP3s.
Audition | Software | By Ashley Darrow
Shotkit may earn a commission on affiliate links. Learn more.
MP3 is the most popular audio file type and knowing how to export your audio project to MP3 is vital for musicians and producers alike.
This guide is going to show you how to export audio to MP3 in Adobe Audition.

Great features, regular updates, cloud storage - the Single Plan is the most affordable way to get Audition.
Although there are lossless audio file types that offer higher quality, MP3 is still the most versatile of them all.
Podcasters, musicians, and even filmmakers should know how to work with MP3 files in Audition.
I’m going to walk you through a step-by-step guide for exporting to MP3 in Audition as well as cover a few of the technical details that explain why MP3 is still so important.
What is an MP3 Anyway?
MP3, also spelled mp3, is formally known as MPEG-1 Audio Layer III. It’s a coding format for digitized audio recordings.
I’ll spare you the technical jargon and get right to what made MP3 so popular.
The MP3 encoding was first developed in the late 1990s. This was a period of time when the internet was rapidly expanding and file storage was much harder to come by.
There was a strong demand for a file type that could retain high audio quality but also come in a package that was small enough to easily transfer over dial-up internet.
To give this conversation some perspective. The same 3-minute song on an MP3 file is about 90% smaller than that same song on a WAV file.
MP3 files work by using a lossy compression algorithm. The term “lossy” simply means that the compression cannot be reversed and parts of the original audio recording are lost permanently during the compression.
The MP3 algorithm compresses the highs and the lows of an audio recording which most listeners can not normally hear anyway.
MP3 is still prized for its balance of quality and small file size. I’m regularly exporting projects to MP3 as some websites, like Patreon, still prefer the smaller file size over higher-end options.
MP3 is also a great option for sending a test recording before you bother with the final project. You can send a quick MP3 cut of vocals to your producer or bandmates to get a feel for things before you export to something without the lossy compression.
Now that you’ve got a good understanding of what makes MP3 so popular, let’s create one!
Step-by-Step Guide to Exporting Adobe Audition to MP3
I’m now going to cover the step-by-step guide for exporting an MP3 file.
Keep in mind that this is an in-depth guide that covers all of the ins and outs of the MP3 file format.
If you’re looking for a quick and dirty solution, you can just use the default settings that pop up after you select export and then pick MP3.
Step 1—Export Your Project
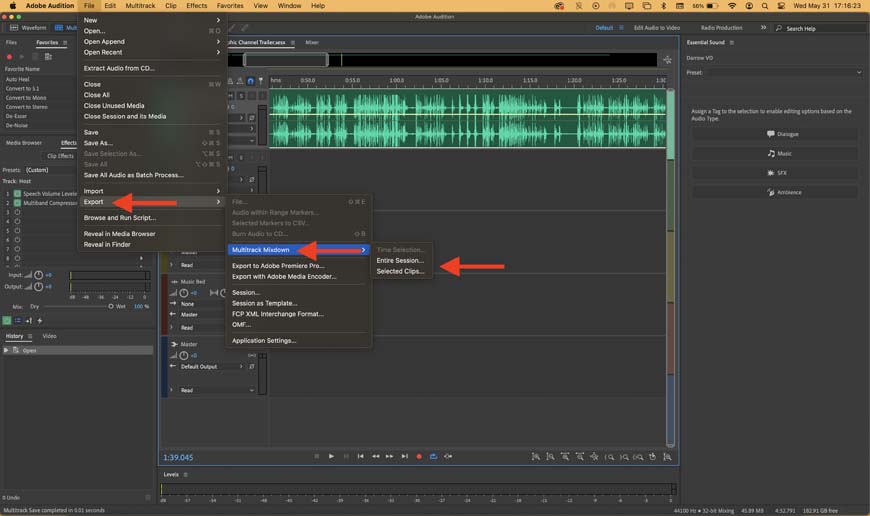
Your hard work is ready to share with the world. Time to export!
The first step is the easiest. Once you’ve finished editing your audio file or multitrack project, all you need to do is navigate through File > Export and pick the export option that works for your needs.
Step 2—File Name and Destination
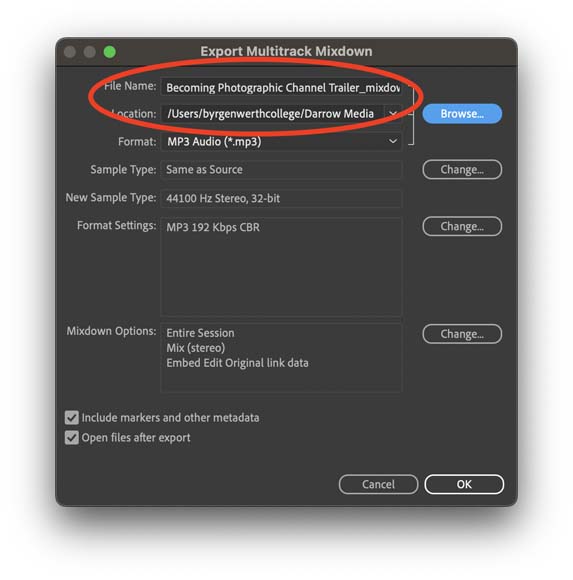
Remember to give your files useful names to help you find and sort them down the road.
The next step is also pretty straightforward.
Simply pick a name for your completed audio project and a destination of where you’re going to save this file.
Adobe Audition always defaults to the last location you use to save a project. I can’t tell you how many files I’ve accidentally saved in the wrong directory because of this feature.
If you ever save a file and think you’ve lost it, just check the last folder you exported an Audition project to.
Step 3—Select Your File Format
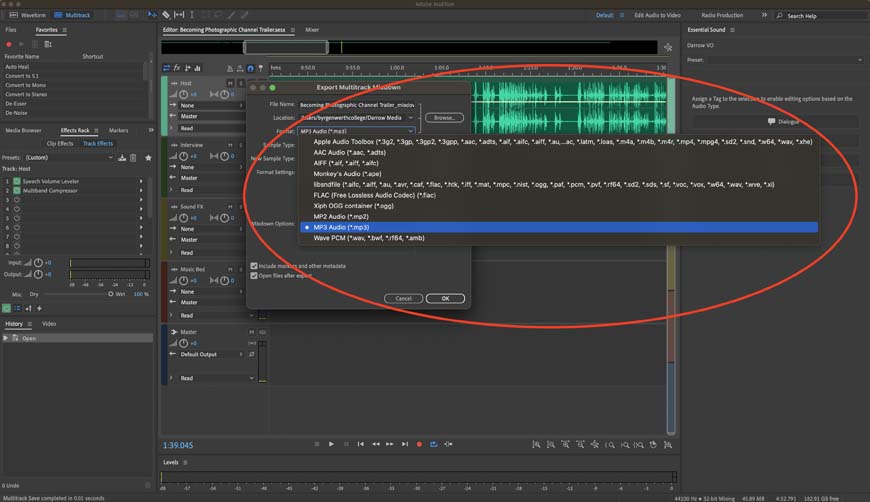
A whole world of audio file types to choose from, but today it’s all about MP3!
Now’s where we finally get to start working with the MP3 file format.
Click on the drop-down menu and you’ll be able to select any of the file formats that Adobe Audition supports. There is a massive list of file types, but we’re just focused on MP3 today.
Step 4—Select Sample Type
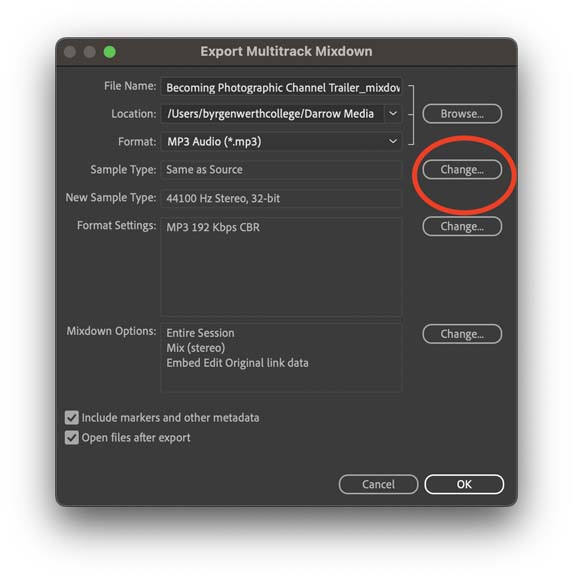
Now you need to select your sample options.
I typically stick with a respectable industry standard of a 32-bit float bit and a sample rate of 44.1 kilohertz.
However, you can lower both of these if you’re looking to save storage space or increase them if you want even more audio fidelity. Keep in mind that increasing things beyond those industry standard limits doesn’t always yield perceptible results.
You can also change these for your particular file needs.
Step 5—Change Any MP3 File Settings
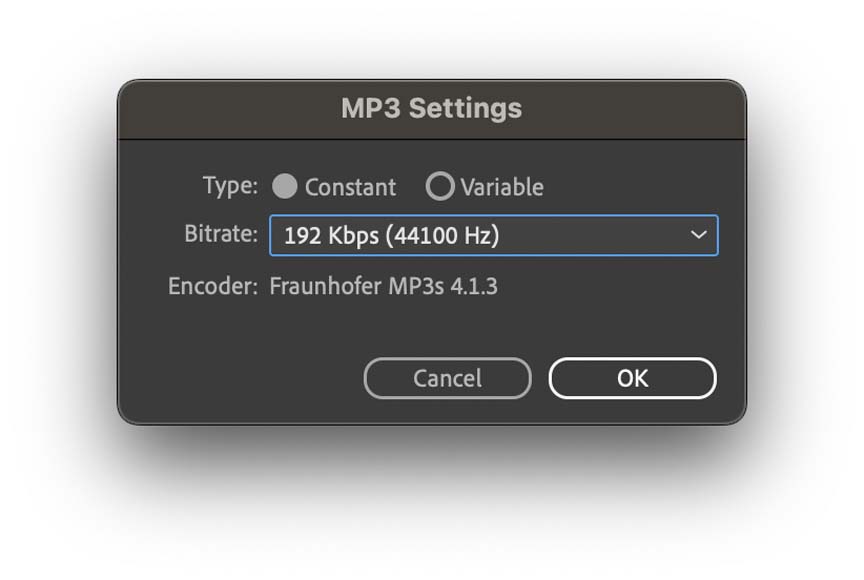
A small menu that can have a big impact on your final project file.
You now have an option to pick the setting specific to the MP3 file type.
One of these options will be another opportunity to select the bitrate for your MP3 file. The other lets you toggle between constant bit rate and variable bit rate sampling.
Step 6—Hit the Export Button!
You’ve now mastered the world of MP3 exporting!
You’ve now got your MP3 file fully configured and you’re ready to go.
Your last step is to hit the export button and you can upload that MP3 to your favorite audio platform of choice or go old school and burn it to a CD.
Tips for Exporting Adobe Audition Files to MP3
I used a lot of audio production terms walking you through the step by step of how to create an MP3 using Adobe Audition.
I’m going to take a second to unpack terms like bit rate, sampling, and a few other tips that you should know for working with the MP3 file type.
Bitrate
Bitrate, also known as bit depth, represents the amount of storage space that you’re dedicating to this audio file.
The more storage space you dedicate to the audio file, the greater its dynamic range is going to be.
Dynamic range in audio is essentially the same as dynamic range in photography and videography. It represents the total range between the lowest sounds humans can perceive and the highest sounds humans can perceive.
A high bitrate means a larger file size, but a greater dynamic range. Lower bitrates will save you storage space, but you will sacrifice dynamic range for that lower file size.
Sample Rate
The sample rate is the rate at which a digital sample is taken of an audio signal measured in kilohertz. The higher the rate of sampling, the greater fidelity the digital file will have to the actual acoustic audio waves.
44.1 kilohertz is the industry standard for CD recording while 88.2 kilohertz is considered the standard for premium, high-end audio.
Anything above that can be difficult for consumer technology to handle and is typically reserved for extremely slowed-down audio clips and high-frequency recording.
Matching Source Rate
It’s off on the right decision to keep the sample type the same as the source audio material. This is especially true when working with lossy file types as changing their sample type can introduce more loss.
However, it’s also good to know industry standards and best practices.
CBR or VBR?
CBR stands for Constant Bitrate. This essentially tells Audition to give the file one, level bitrate that never changes throughout the file.
VBR stands for Variable Bitrate. This means the bitrate will change throughout playback. VBR is much more demanding on computers and isn’t optimized for streaming services.
I stick with CBR unless I have a very specific reason to switch to VBR.
Which Audio Format is Best: WAV or MP3?
Generally speaking, a WAV file is going to offer superior quality over your standard MP3. However, it’s not quite as simple as saying one is better than the other.
WAV files do offer superior audio quality, but this also means that they have a much larger file size. If you were devices are also capable of playing WAV files as much of the market is still geared towards playing an MP3.
I tend to use WAV files when I’m uploading to sites like SoundCloud that can handle larger file sizes. I also use these file types when I’m working with audio.
This is a lot like photography. You have an easier time working with a RAW image with a larger file size since it gives you more information to work with than you would if you were editing a heavily pixelated jpeg.
MP3s are also much easier to share. Again, this is like photography.
We’ve all seen how Twitter, Instagram, and other sites compress our images rather than letting us upload larger file sizes.
The takeaway here is that each of these formats has its place in your audio editing workflow as well as in distributing final projects.
Here’s a comparison table of WAV vs MP3 audio formats:
| WAV | MP3 | |
|---|---|---|
| File Size | Large file size | Compressed and therefore significantly smaller file size |
| Audio Quality | Lossless and high quality. Ideal for professional use. | Lossy compression, lesser quality compared to WAV, but generally acceptable for casual listening. |
| Compatibility | Wide compatibility but not universally supported on all devices | Universally supported across almost all devices |
| Ideal Usage | Professional audio work such as music production, broadcasting, editing, and archiving | General everyday use such as music streaming, podcasts, and audio for videos due to its small file size and decent quality |
| Metadata | Limited support for metadata (like artist, album name, etc.) | Full support for metadata, which is crucial for sorting and organizing a music library |
FAQ’s
What format does Adobe Audition use for audio files?
Adobe Audition works with an expansive catalog of audio file types. These include WAV, MP2, MP3, M4A, and Ogg Vorbis just to name a few.
How do I change the format of an Audition file?
Audition allows you to easily change file types by using either the Save As or Export features. You can use these to convert one audio file into just about any other audio file type.
Is Adobe Audition good for audio recording?
Adobe Audition is one of the best applications out there for recording audio. This is especially true if you’re recording voice-over work, vocals, or music in a studio setting.
How do I save an Adobe File as an MP3?
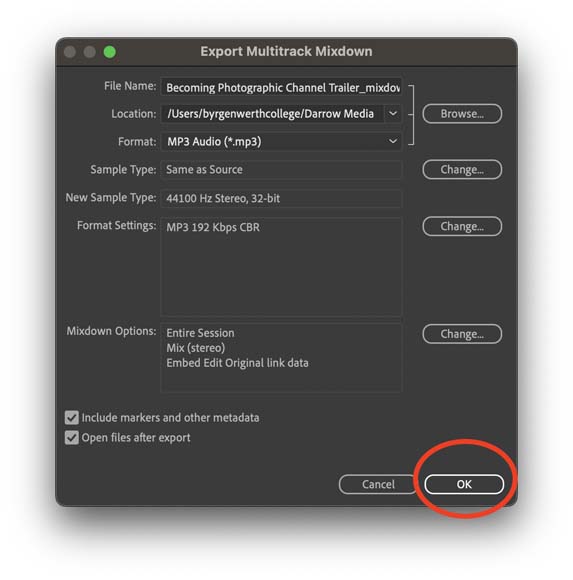
Saving a file as MP3 is very easy. All you need to do is navigate to File > Export and then choose either File if you’re working with a single audio file or Multitrack Mixdown if you’re working with a larger session. You can then select your MP3 settings and export your file.
How do I convert WAV to MP3 in Adobe Audition?
You can quickly convert your WAV file to an MP3 in Adobe Audition. All you need to do is select Save As or Export, choose your MP3 settings, and then pick a destination for your new MP3 file.
Does Adobe Audition support MP3?
Adobe Audition supports MP3 encodings. It supports the standard encodings for MP3 as well as MP3 Pro and a wide range of encoding options for this file type.
Exporting to MP3 in Audition – Final Thoughts
Not only are you ready to start exporting to MP3 using Adobe Audition, but you also know the ins and outs of the MP3 format – and why it’s still so popular today.
If you want more tips on Adobe Audition, check out my other guides on this incredible DAW.
You can also let me know any questions you have about Audition in the comments below.

Ashley is a photographer, writer, and film critic. When Ashley’s not writing essays on photography, cinema, and theory, he’s out taking pictures with retro film cameras.
2 Comments
Leave a Comment

👋 WELCOME TO SHOTKIT!
🔥 Popular NOW:

Hey, I have Adobe Audition 2025 (or 2026?), and for some reason when I go to export my file there is no mp3 option. The ‘File…’ option is grayed out. My only options are Multitrack Mixdown and exporting it to Adobe Premier Pro or Adobe Media Player. Do you know what I can do?
Yes — this is a very common Audition gotcha, and nothing is broken 👍
It comes down to which workspace / mode you’re in.
The key issue
You’re currently in Multitrack view, not Waveform view.
In Multitrack, Audition does not allow direct “File > Export > File…”, so:
File… is greyed out
You only see Multitrack Mixdown
MP3 isn’t offered directly
That’s normal behaviour in all recent versions (2024–2026).
Option 1 (Most common fix): Mix down, then export MP3
This is the correct workflow if you’re working in Multitrack.
Step-by-step
Multitrack view
Go to
Multitrack ▸ Mixdown ▸ Entire Session
Audition will create a new waveform file
You’ll now be in Waveform view
Go to
File ▸ Export ▸ File…
Choose:
Format: MP3 Audio
Set bitrate (e.g. 192 kbps or 320 kbps)
Export ✅
👉 This is why MP3 “disappears” — MP3 export only exists in Waveform view.
Option 2: Export MP3 directly from Multitrack (hidden way)
You can do it in one step, but Adobe hid it a bit.
Multitrack ▸ Mixdown ▸ Entire Session
Choose Time Selection or Entire Session
In the dialog:
Change Format to MP3 Audio
Choose location & bitrate
Export
This skips opening the waveform, but uses the same engine.