


How to Remove Background Noise in Adobe Audition
Own your own sound-proof recording studio? Didn't think so! This guide will help you remove all those annoying background noises no matter where you are.
Audition | Software | By Ashley Darrow
Shotkit may earn a commission on affiliate links. Learn more.
Today, I’m going to show you one of the most requested tips for audio editing: How to remove background noise in Adobe Audition.
Removing noise is an absolute must for anyone mastering vocals, voice over, or anything else in an audio editing program. Luckily, Adobe Audition comes packed with some powerful noise reduction tools.

Great features, regular updates, cloud storage - the Single Plan is the most affordable way to get Audition.
I have quite literally recorded hour-long podcast episodes in active construction sites and used these tools to create a clean listening experience from some very noisy audio which is full of background noise.
I’m going to walk you through the three fastest, and most effective, ways to remove noise using Adobe Audition.
How to Remove Background Noise in Adobe Audition
I’m going to cover the three most effective tools for removing noise from your audio: De-Noise, Noise Reduction (Process), and Adaptive Noise Reduction.
De-Noise
De-Noise is the easiest way to remove background noise from your Audition project.
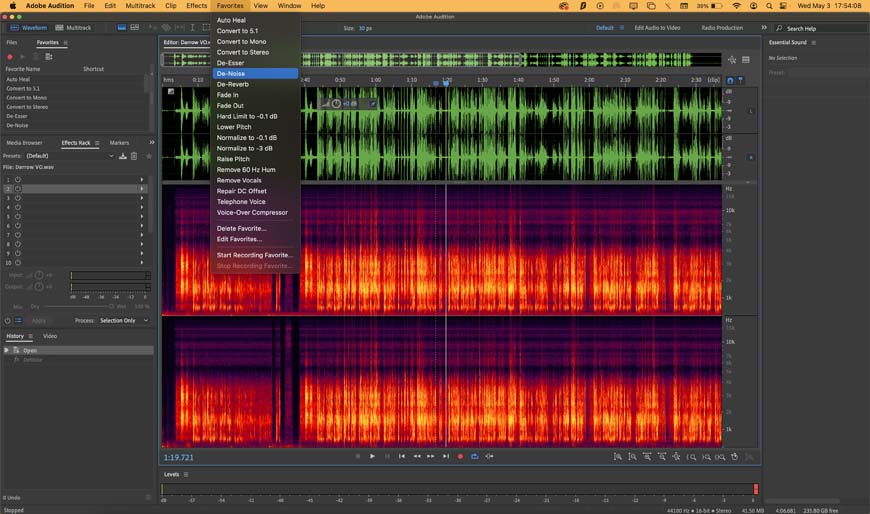
If you’re still working with the default Audition workspace, you can find De-Noise listed under “Favorites” in the top menu bar. If it’s not there, De-Noise can always be found in the effects menu under Noise Reduction / Restoration.
De-Noise is an automated process that removes background noise from your entire file. In my experience, De-Noise has a light touch when it comes to removing unwanted sound which doesn’t always make it the right tool for every project.
Noise Reduction (Process)
Standard Noise Reduction works by first taking a sample of noise from your audio file and then removing any sounds that match that sample from the file.

I’ve got one noisy recording to work with for this guide on how to remove background noise Adobe Audition.
Noise Reduction will not work until you capture a noise print. You can create a noise print by highlighting a section of audio and hitting Shift+P on a Mac or Windows.
The Noise Reduction menu also has a one-button “capture noise print” option.
The easiest way to pop up the Noise Reduction options is to use the keyboard shortcut Command+Shift+P on a Mac, or Windows+Shift+P on PC.
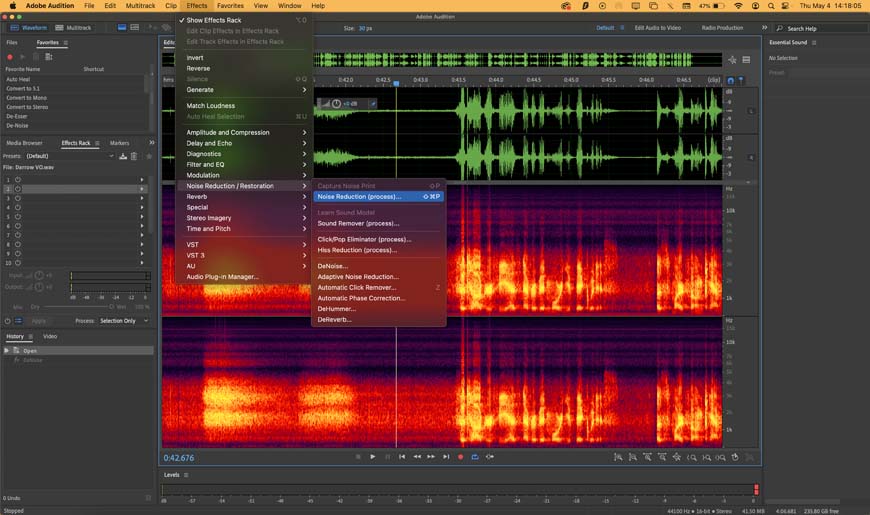
You can also navigate to Effects > Noise Reduction / Restoration > Noise Reduction (process).
This way of removing noise is heavily dependent on capturing a good noise print. If your noise print contains sounds similar to those you want to keep, it might not work.
A good example of this is removing unwanted voices from the background of podcast audio. Background voices and the audio you want to keep are incredibly similar which means this Noise Reduction effect might do more damage to your audio than it’s worth.
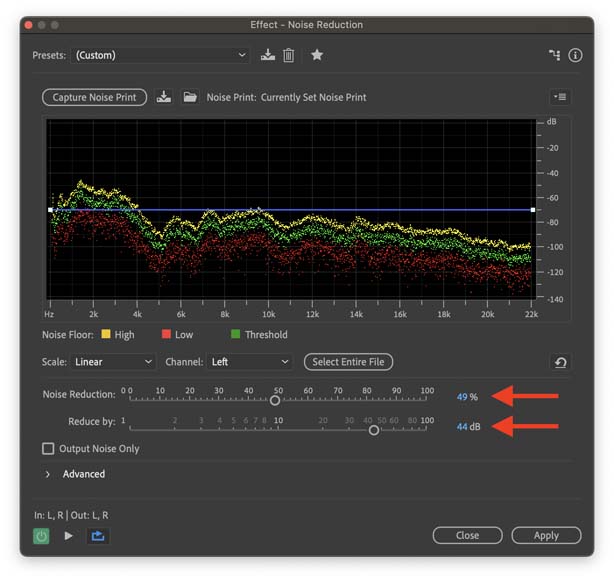
This will open up the controls for the noise reduction effect. The two sliders on the bottom adjust the amount of noise that the effect removes from your audio.
I recommend playing around with the sliders until you’ve removed your annoying noise without damaging the audio you want to keep.
Adaptive Noise Reduction

Adaptive Noise Reduction is similar to the standard Noise Reduction, but it works in the effects rack rather than in the waveform editor.
You can find the Adaptive Noise Reduction effect by navigating Effects > Noise Reduction / Restoration > Adaptive Noise Reduction.

The various sliders that pop up when you open the Adaptive Noise Reduction tool allow you to adjust the noise reduction. Here’s a quick breakdown of what each of these sliders changes.
- Reduce Noise By—This sets the amount of reduction that the noise remover effect does. The higher this number goes, the more likely you are to damage the audio you want to keep. It’s better to go easy on it than to have to fix distorted audio later on. Balance is the key to success.
- Noisiness—How noisy is your audio? This slider sets the percent of original audio that contains unwanted noise.
- Fine Tune Noise Floor—This setting lets you manually adjust the noise floor after Adaptive Noise Reduction automatically detects it for you.
- Signal Threshold—Adaptive Noise Reduction automatically calculates your signal threshold, but you can manually adjust it with this slider.
- Spectral Decay Rate—You want to fine tune this slider to improve how quickly noise reduction drops the Db of detected noise—it helps clean up the final audio.
- Broadband Preservation—This slider prevents Adaptive Noise Reduction from altering frequencies above or below any detected noise. Lower Broadband Preservation settings will remove more noise, but might introduce audible changes to your project.
- FFT Size—This setting adjusts how many frequency bands are analyzed. A higher number is better for sustained noise like a hum while a low number is better for isolated noise like clicks and pops.
If you want to make changes, Adaptive Noise Reduction shows up in the effects rack when you’re in the multitrack view.
One of the strongest advantages of Adaptive Noise Reduction is that it can work in real time while you’re playing your audio. This allows you to get a strong sense of the changes you’re making to your project without having to go in and out of settings menus.
Three Tips for Preventing a Noisy Audio File
The best way to remove noise from an audio file is to never record that noise to begin with. I’ve got three tips that can help you get a cleaner signal so you’ve got less to worry about when it comes to post processing.
My first tip is to always try to record in a quiet setting if at all possible. This means picking a quiet corner of your apartment or even checking out a meeting room at your university or local library.
You can also prevent echoes and noise by making some simple changes to your recording setup.
Acoustic insulation foam has gotten incredibly popular with voice over artists, podcasters, and even twitch streamers, but even temporarily hanging up a blanket can help dampen some of that noise.
Learning proper mic placement and positioning is another great tip for reducing noise. I also strongly recommend using a pop filter which not only removes plosives, but creates a physical marker for how close you need to be to your microphone.
FAQ’s
Can Adobe Audition remove background music?
Adobe Audition has a powerful tool for removing music or vocals from a track known as the Center Channel Extractor.
The Vocal Remove preset removes any singing to create an instrumental track while the Acapella preset removes the instrumentation and leaves only the vocals.
What are the noise reduction techniques in audio?
There are three broad categories of noise reduction when it comes to recording audio.
Passive control is anything you set up to absorb or attenuate noise such as acoustic foam panels or a pop filter in front of your microphone while active control involves using other sound frequencies to negate the sound of noise.
You can also reduce noise by editing audio files in software like Audacity or Adobe Audition.
What is adaptive Noise Reduction in Adobe Audition?
Adaptive Noise Reduction is a live audio effect in Adobe Audition. This means that you can add it to the effects rack and edit its settings in real time which contrasts with standard noise reduction which can only be applied when using the waveform editor.
Conclusion
These tools are going to help you clean up audio whether you’ve got a noisy Zoom file to fix or you’re working on the finishing touches of a videography project.
Let me know if you have any questions about working with audio or Adobe Audition down in the comments.

Ashley is a photographer, writer, and film critic. When Ashley’s not writing essays on photography, cinema, and theory, he’s out taking pictures with retro film cameras.

👋 WELCOME TO SHOTKIT!
🔥 Popular NOW:
