


How to Record Audio Files in Adobe Audition
Whether you want to record a podcast in Adobe Audition or just make some funky music samples, this guide will teach you everything you need to know.
Audition | Software | By Ashley Darrow
Shotkit may earn a commission on affiliate links. Learn more.
The first thing you need to learn at the start of your producer career is how to record in Adobe Audition.
I've mastered thousands of hours of audio and this was the very first thing I had to search for when I got started with Audition.

Great features, regular updates, cloud storage - the Single Plan is the most affordable way to get Audition.
I'm going to keep this guide short and sweet so that you can learn what you need to and get to recording!
(If you're new to this amazing app, check out how to use Audition and how much Audition costs.)
How to Record in Adobe Audition
Recording in Audition is pretty easy.
Here's my audio production workflow for starting a new recording.
I go through these five steps every time and it goes a long way to minimizing those small errors that can ruin a lengthy audio take.
Step 1: Create Your Session

To get started, all you need to do is click File > New and then pick either a multi track session or a single audio file.
The multitrack audio interface is ideal for larger projects with several separate tracks such as a podcast or vocals within an accompanying instrument.
The single file audio interface will be the right choice when you only need the one track.
Step 2: Select Your Audio Hardware and Audio Input

Your next step is picking your audio inputs. This is essentially your mic and headphones.
You can find these settings by clicking Adobe Audition > Settings > Audio Hardware.

I always double check to make sure that I'm using the right hardware for the project I'm currently recording.
Double checking your input device is one of the best ways you can set yourself up for success.
There's nothing more defeating than wrapping up hours of voice over work only to realize that you were recording that all through your laptop mic instead of your expensive studio microphone.
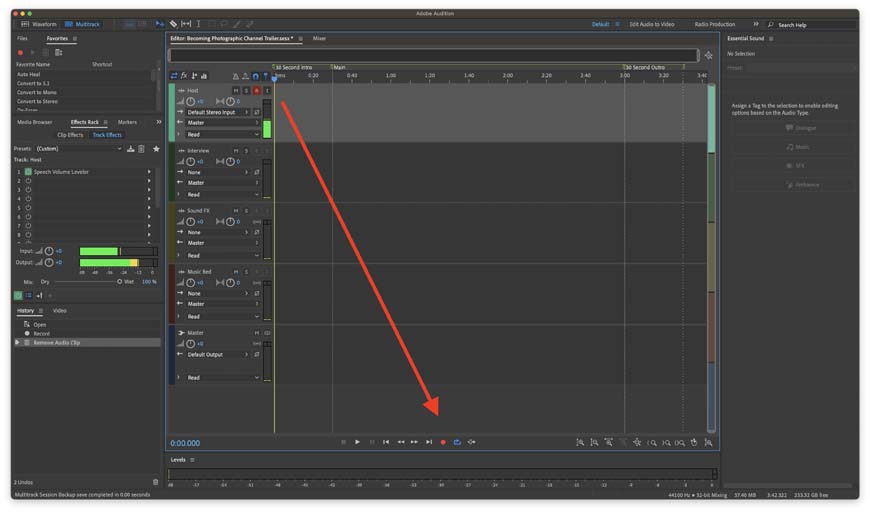
Step 3: Arm Your Recording

You need to arm your recording before Audition will actually let you record on a specific track. The arm button has an “R” on it and is next to each track.
Click on the “R button” and it will turn red which arms the track for recording.
You’ll also notice that a little green bar starts moving next to your track. This is showing you that you have “levels” which means your tracks have signal and are ready to record!
Step 4: It's Time to Record Audio!
We're going to move town from the arm button to the bottom of the screen where you'll see the red record button.
When you click on the red recording button, your audio file will start to form. You'll see a waveform appear in real time on every track that's recording.
You can hit spacebar or the square “stop button” when you're done.
Step 5: Save, Export, and Edit Audio
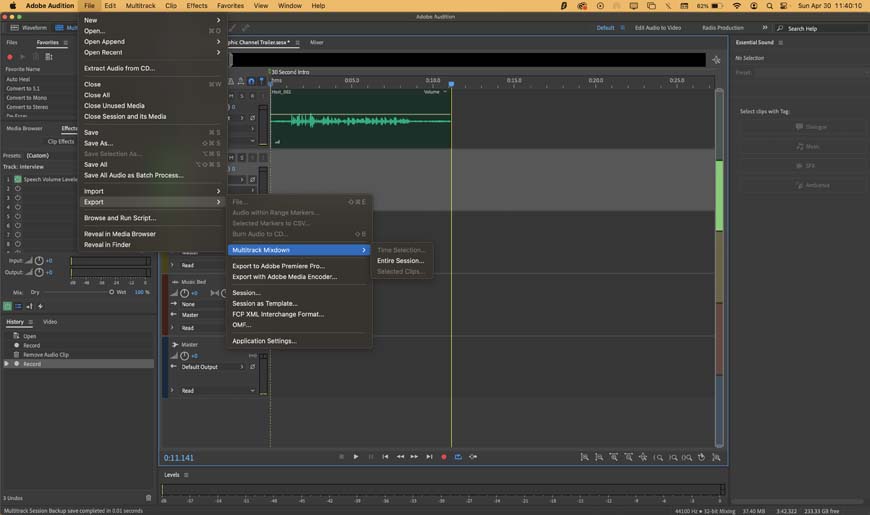
Once you're done recording, you should save your project and then export the recorded audio. You can export to a wide range of file types, but MP3 and the WAV file are the most common – see how to export Adobe Audition to MP3.
Exporting multiple tracks exports the entire session mixed down into a single audio file. You can also highlight individual sections to export on their own or export a single audio file.
Here's a quick tip about saving. I hit the “Command + S” keyboard shortcut every few minutes while recording to make sure that I don't lose everything in case the app crashes.
FAQ's
Can you record music with Adobe Audition?
Audition is a powerful DAW that's great for recording vocals, acoustic tracks and mastering sound. However, it lacks MIDI support which makes applications like Fruity Loops Studio, Garage Band, and LMMS other options that musicians should consider.
Why can't I record in Adobe Audition?
There are three main reasons why your recording isn't working in Audition. You need to make sure that the red “R button” is highlighted, which arms your track and prepares it for recording, you need to make sure that you have the right microphone selected, and you should enable the microphone in your computer's privacy settings.
Is Adobe Audition good for vocals?
Adobe Audition is an excellent DAW when it comes to recording and mastering vocals. It's great for a variety of styles from ASMR soundscapes to harsh metal vocals.
What audio files can be used in Adobe Audition?
Audition can open files with up to 32 channels. Here is a complete list of every file type supported by Audition CC: AC-3, APE, AU, AVR, BWF, CAF, EC-3, FLAC, HTK, IFF, M4A, MAT, MPC, MP2, MP3, OGA, OGG, PAF, PCM, PVF, RAW, RF64, SD2, SDS, SF, SND, VOC, VOX, W64, WAV, WMA, WVE, and XI.
What are the disadvantages of Adobe Audition?
There are two major disadvantages to Audition. The first is that it does not offer MIDI support, and there are better options for anyone who wants to create music. The second major weakness is that Audition is very expensive, and there are free alternatives like Audacity that are nearly as strong.
Conclusion
This quick guide gives you everything you need to start an Audition recording, whether you're doing vocals or starting an audio podcast or video podcast.
If you've got more questions about Adobe Audition or recording audio files, let me know down in the comments, and I'll cover your questions in my next audio production guide.
Finally, if you're looking for alternatives to Adobe Audition, see here.
Great features, regular updates, cloud storage - the Single Plan is the most affordable way to get Audition.

Ashley is a photographer, writer, and film critic. When Ashley’s not writing essays on photography, cinema, and theory, he’s out taking pictures with retro film cameras.
👋 WELCOME TO SHOTKIT!
🔥 Popular NOW:
