


How to Render in After Effects (Fastest Way)
Getting your movie clips or animations out of After Effects and into the world involves a process called rendering. Here's the quickest way to do it.
After Effects | Software | By Ashley Darrow
Shotkit may earn a commission on affiliate links. Learn more.
Mastering animations, motion graphics, special effects, and more all starts with knowing how to render in After Effects.
Your video editing skills can get a huge boost by learning some basic After Effects skills.
Even knowing how to render video projects like a basic lower-thirds template can make your videography look that much more professional.
Learning how to use After Effects took my videography to a whole new level, and I'm going to get you started today by showing you the ins and outs of rendering compositions.
Download the latest version of Adobe After Effects to follow along with this simple tutorial.
Start a free 7-day trial today
How to Render in After Effects
Rendering is what we call exporting in After Effects.
When you're ready to realize a finished product, you need to add it to the render queue so that it can be converted to your desired file format.
I'm going to start with the three ways that you can render video.
Here’s how it’s done.
1. Send Your Composition to the Render Queue

Sending your composition to the render queue is my usual way of rendering a finished After Effects project.
In the top menu bar at the top of your screen you'll see a “composition” section. Click on that menu and then select the “add to render queue” option.
2. Export to Render Queue

If you're used to working in Photoshop, you can also render an After Effects project through the export menu.
Select File > Export > Add to Render Queue, and your project will be sent to the render queue below.
You can also use the keyboard shortcut CMD+CTRL+M or Windows + CTRL + M on a Windows PC. This sends the active project to the render queue.
3. Render Using Drag and Drop
You’ve got a third option for sending your project to the render queue. The previous two options yield the same result of having the entire project rendered, but this third option does something unique.
You can highlight the entire project, or sections of your project, inside of the project window and then drag and drop those project files into the render queue.
This will render each section of your project independently. This is ideal if you need to show off particular sections of an animation or a fact to a client or colleague.
4. Adjust Your Render Settings
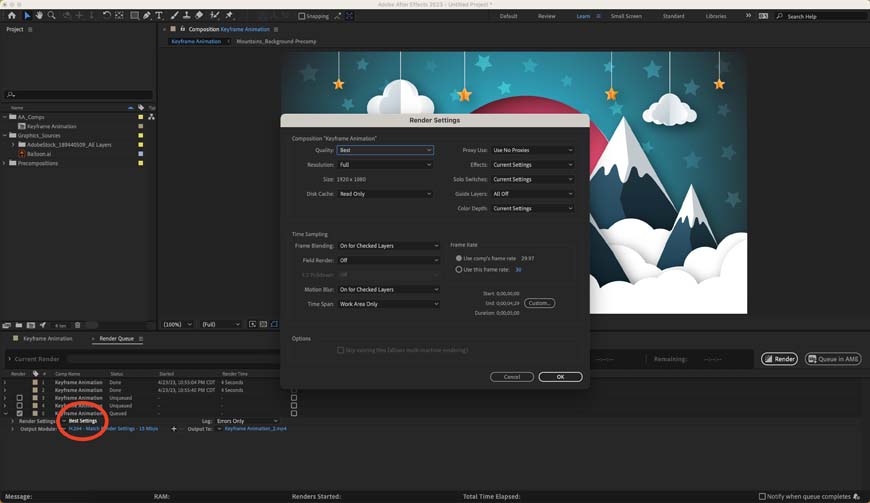
Anyone who's new to After Effects might get confused by the differences between render settings and the output module. The difference between these two settings is actually pretty straightforward.
Your render settings are found in the queue panel, and they govern all of the settings that you have for your composition.
Render settings allow you to toggle effects on and off, change color options, and select the time span for your composition, for example.
Pick your render settings or leave them as is if you want your exported file to match your project settings.
5. Configure Your Output Module
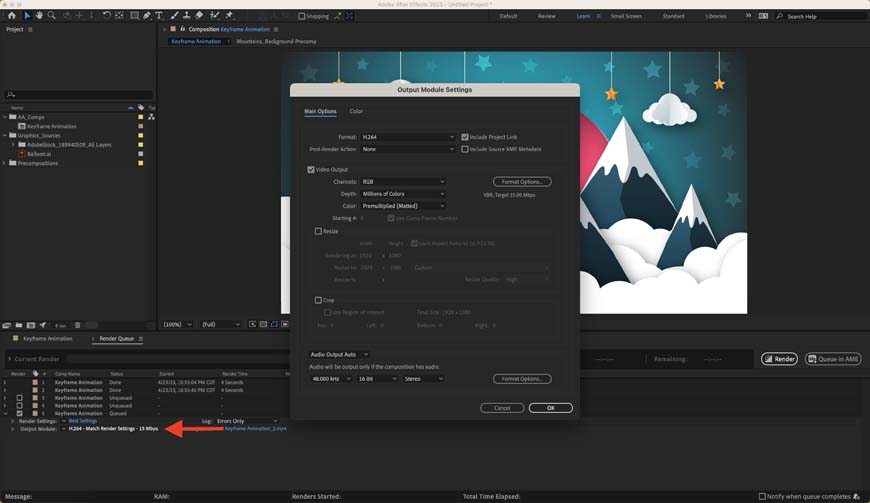
The output module governs all of the settings for the file that the render ultimately creates.
This includes things like the file type, color space, and bit depth. Changing the video format is great when you need to export multiple versions for different platforms.
I usually leave my render settings as is to let them match my project file, but I'm always changing around the output module to make sure that I get the exact file that I want after the render.
6. Pick Your Output File Settings

The final thing that you need to do to render a file is select your “output to” settings.
This is simply the name of your file and where it's going to save on your computer or hard drive.
Here's a quick tip that I wish I would have known when I first started working with After Effects.
If you forgot to pick your output destination for your file, it's going to default to the last place you saved a render.
This means you can look in the folders for a previous project to find any renders from a current project that might have accidentally been saved in the wrong place.
How to Get Faster Renders in After Effects
Rendering a short project is lightning quick, but once you've got a project that's longer than a few seconds, you're in for a long render.
Here are a few tips for speeding up renders in After Effects.
- Upgrade Your Hardware—One of the best things you can do for improving render speeds is to upgrade your hardware. Switching to solid-state drives, adding more RAM, and improving your graphics card can all boost your render speeds.
- Simplify Compositions—Your computer has to work through your entire composition while it's rendering. Deleting unused layers, removing any duplicate effects, and generally cleaning up your composition will improve the render speed.
- Use the Render Queue—The render queue itself is your best friend when it comes to speed. The Adobe Media Encoder queue tends to be much slower than using the built-in render queue in After Effects.
- Update Memory & Performance Settings—There are a few options in the Memory & Performance settings that you should update. You should enable multi-frame editing and increase the amount of RAM allocated to After Effects.
- RAM Best Practices—Adobe apps use RAM just like any other program on your computer and there are ways that you can improve how this memory is utilized. Turning off other applications you're not using and keeping RAM hogs like Chrome in check can help you get better render speeds.
Render Queue VS Adobe Media Encoder Queue
The difference between the render queue and the Adobe Media Encoder is really straightforward.
The render queue uses a streamlined version of the Adobe Media Encoder that's embedded into the After Effects application.
This means that it runs faster than the Adobe Media Encoder, but it does not have the same features. The Adobe Media Encoder has more features and more options than the render queue.
Sending your project to the full media encoder queue will use more processor power. In my experience, the built-in effects render queue can handle almost any project.
Final Thoughts on Rendering in After Effects
After Effects has a lot of its own terminology that isn't shared with other apps in the Adobe family, this makes it a little intimidating to approach if you're used to working in Lightroom or Photoshop.
I hope this guide got you started and cleared up some of the mysteries of rendering projects in a.
Let me know if you're having trouble with After Effects, and I'll help you out with another guide on this Adobe app.
If you like this guide, make sure to check out my other articles on Premiere Pro, After Effects, and other media editing apps.

Ashley is a photographer, writer, and film critic. When Ashley’s not writing essays on photography, cinema, and theory, he’s out taking pictures with retro film cameras.
👋 WELCOME TO SHOTKIT!
🔥 Popular NOW:
