


Best Camera Gear for Hiking and Backpacking
What's the best camera gear for hiking and backpacking? From cameras and lenses to backpacks and tripods, find out how to choose the best gear for you.
Shotkit may earn a commission on affiliate links. Learn more.
Backpacking and hiking are two of my greatest loves – but so is photography. Combining these things seems like a no-brainer, but figuring out what to carry and when has taken me a lot of years to dial in.
I’m not really much of a gearhead and, as an avid traveler, have lived on a shoestring for much of my life. That means that what I invest in needs to count.
Still, I have well over 15 years of photographing the wilderness under my belt.
Here’s what I've learned about the best camera gear for hiking and backpacking.
Key Considerations
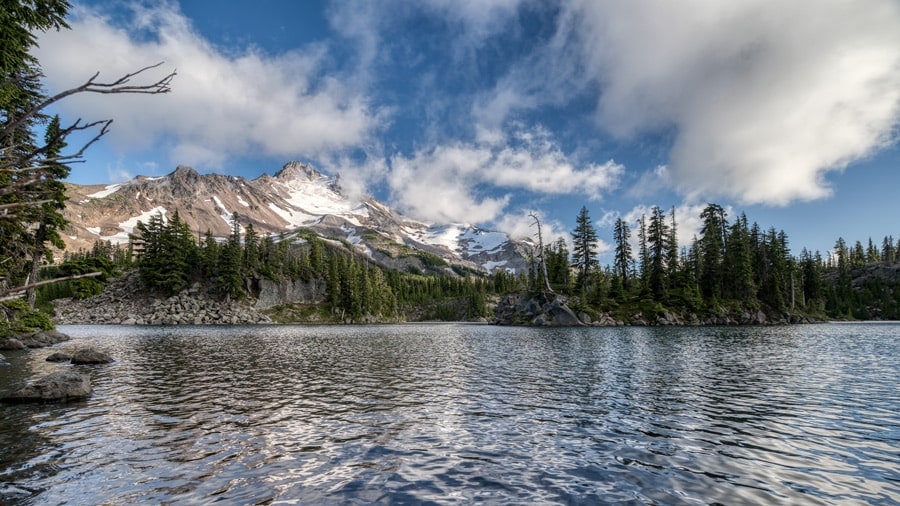
This was taken on a weekend trip to the Mount Jefferson National Park Wilderness area. I chose not to take a tripod on this trip, but the Sony A7iii has good enough image stabilization for 1/50 and even hand-held HDR in lower lighting. | Sony A7iii + Sony FE 16-35mm f/4 | 16mm | 1/50 | f/8 | ISO 100
There are many things that determine what I take out on the trail and when. Sometimes it's a small kit, sometimes it's a bit larger.
Here are some key questions I ask in order to determine what pack I take and what camera setup I use. You can try asking the same questions yourself:
- How long will I be out?
What you need to carry for a day hike is obviously quite a bit different from what you’ll need for a five-day backcountry adventure. Everything from the style of backpack to how many lenses you bring will factor in here.
There’s also a significant difference in gear between a short day hike (say 1-5 miles) and a longer day hike (6-12 miles).
- What's the purpose of the trip?
Not all of my wilderness excursions are to places that I know will be photogenic. Sometimes I just need to get out and explore new places.
I live in the beautiful northwest US and am blessed with lots of great hiking within a 20-minute drive – but not everything’s going to have sweeping vistas.
This kind of day hike will require different gear than, say, a trip to the Hoh River trail in the Olympic National Park.
Am I primarily hiking but taking my camera gear with me just in case I might find something worth photographing (or because I can’t bear to be without my camera)?
Or is the trip specifically photography-centered, where the whole point is to come back with some portfolio-worthy shots?
- What style of photography will I be shooting?
If you're a casual photographer who just wants to document the beauty around you, your gear needs won't be quite the same as, say, an astrophotographer or a landscape photographer who loves to shoot the golden hour with 10-stop ND filters.
Someone who's going out specifically to capture wildlife will have different needs as well.
- What's my budget?
While having the latest and greatest gear is by no means a necessity on the trail, there is a level of functionality and comfort that good equipment brings.
Heavy as it was, I was willing to lug a bulky Nikon D7000 around for years because it was what I had. Over the years, I've also hiked with not-so-great packs and sleeping bags.
Do I recommend this? No. But we do what we must. So I've included budget options in this article as well (many of which I still use).
It's only when my entire Nikon kit went missing a year or so ago (long story) that I finally decided to take the plunge and invest in what I'd really been longing for: a Sony a7iii.
The difference it made in both the quality of my images and in how much weight I was carrying was considerable.
Still, it was years before I made that upgrade, and even then only under duress. With technology today, there are plenty of great budget options out there, both in terms of hiking gear and in the world of camera equipment.
What Type of Camera Should You Bring?
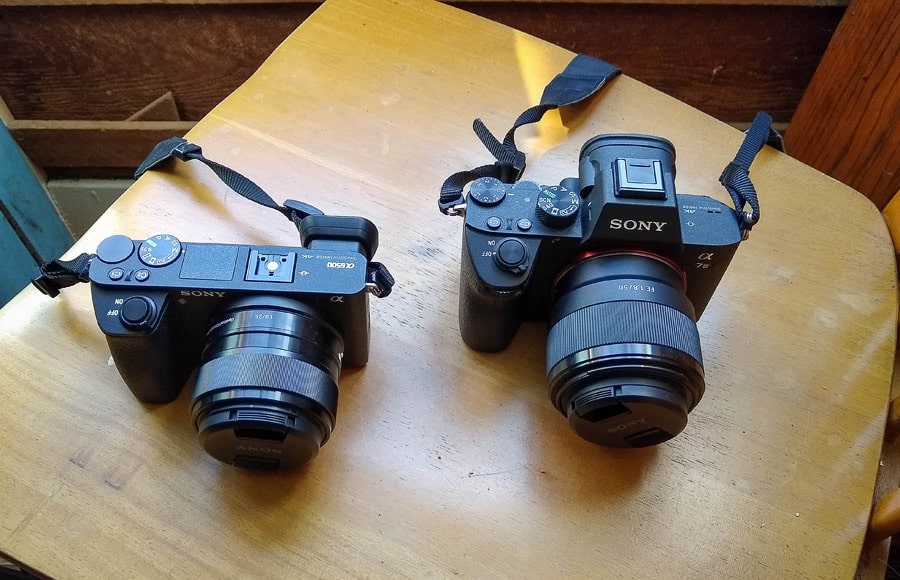
The CMOS Sony a6500 is considerably smaller and lighter than the full-frame Sony a7iii. It's also less expensive, as are the a6500 lenses. DSLRs are even larger.
Obviously the lighter and smaller your camera setup, the better it is for lugging into the backcountry.
While DSLRs have been the industry standard for a long time, mirrorless cameras and compacts are now where it's at when looking at getting the best images out of the smallest kit possible.
You should check out our guide to the best camera for hiking in addition to reading my thoughts below.
Mirrorless Cameras
These days mirrorless cameras are the best way to go when looking for superior images and full control of the output, but which one to invest in will depend on your budget and the camera ecosystem you're wanting to invest in.
When I stepped up from my Nikon D7000 DSLR to my Sony A7iii, the difference was so extraordinary I couldn't imagine ever going back – both in terms of image quality and in size/weight.
[Related: 10 months with the Sony A7iii – Video]
If you're wanting the most stunning landscapes possible, the Sony A7Riii (42.4 MP!) is now almost in the same price range.
[Related: Sony a7Riii review]
For something a bit smaller, both the Sony a6500 or the FujiFilm X-T3 are great buys. They each have a good variety of crop-sensor lenses available or you can invest in the full frame lenses and wait until you're ready to move on to full-frame bodies. (I'm seriously considering both of these for my secondary camera.)
[Related: Sony a6500 review | Fujifilm X-T3 review]
If these all break the bank, consider going just one or two steps back and getting the Sony a6000 or the FujiFilm X-T2. Both can be found at great prices and are excellent performers.
[Related: Fujifilm X-T2 review]
On the other side of things, if budget is not an issue and landscapes are your thing then the Sony A7Riv, with its whopping 61-megapixel sensor, is pretty much the best you can get.
Check out Shotkit's review of the best mirrorless cameras for more info.
Compact Cameras
I got started by taking an Olympus C-740 point-and-shoot on a couple of hikes. It took such fantastic photos that I came down with the photography bug. This was one of the first photos I took with it. | Olympus C-740 | 6.3 mm |1/50 | f/2.8 | ISO 100
If you're going for a particularly long backpacking trip and can't take the extra weight (e.g. hiking the Pacific Crest Trail) or you're needing a second camera for some reason, compact cameras have come a long way.
These days you can get extraordinary control, optical zoom and image quality, all in a camera that's about the size of a deck of cards.
Of course, the sensor size will be nothing like that of a larger camera, but the size/weight trade-off is sometimes worth it. The sheer portability alone makes them the best camera for backpacking.
If a compact is all you're bringing and you want top-of-the-line imagery, the Sony RX100 vii is an amazing performer. The downside is that it's particularly pricey.
For those of us on a tighter budget, the Canon PowerShot SX720 and the older Sony RX100 are both perfectly viable options. (I'm still carrying an old hand-me-down PowerShot SX230…)
For those needing something waterproof, the Olympus Tough TG-5 is affordable and has a lot of great reviews.
While I haven't tried this particular model, I can say that it was an Olympus point-and-shoot that got me into photography. I took the C-740 on a couple of hikes and was so impressed with the image quality that I became immediately hooked.
Obviously there are a lot of other great mirrorless and compact camera options out there. These are just the ones I'm familiar with and have taken out in the field.
Check out the Shotkit guide to the best compact cameras for more options.
Lenses
A 50mm lens can land some great shots. | Nikon D7000 + 50 mm f/1.8 | 50mm | 1/10 | f/8 | ISO 200
As an avid hiker, you're probably interested primarily in landscapes and/or wildlife. That's a good thing, as it limits the type and amount of lenses you'll need.
If this is you, you can probably leave your portrait, art, and macro lenses at home.
I tend to hike with 2-3 lenses: my wide angle (Sony FE 16-35mm f/4), my nifty fifty (Sony FE 50mm f/1.8), and occasionally a telephoto for wildlife shots (Sony FE 70-200mm f/4). These are the best lenses for hiking.
[Related: Best Sony Lenses]
More than two-thirds of the time I'm using my wide angle and that's what stays on my camera body.
The telephoto is the one I use the least and am most likely to leave at home. (Obviously, if your primary focus is wildlife this will be reversed for you.)
The same is true when I was shooting with my Nikon D7000. I carried a Tamron 10-24mm f/3.5-4.5, a Nikon 50mm f1.8, and a Nikkor 55-200mm.
When I'm planning to do a photos series or photo story about a trip, I need a variety of shots, not just wide angle. That's where having multiple lenses comes in. | Olympus E-520 + Olympus 14-42mm | 42 mm | 1/60 | f/5.6 | ISO 100
Occasionally I'll be creating a series that needs a variety of shots, not just sweeping landscapes. On those shoots my 50mm will be on my camera body about 50% of the time.
Another option is to just travel with two zooms – one wide angle to mid-range and one mid-range to telephoto. That's what I did when I had my Olympus E-520. I had only the two kit lenses and they worked well enough for my skill level at the time.
As far as wide angles are concerned, I'm still using a zoom. While I do value the sharpness and compactness of primes, I tend to use the whole focal range and am often not in a position where I can “zoom with my feet.”
Still, if you can get yourself into the practice of using primes, you'll shave off a few more ounces.
To Tripod or Not to Tripod?
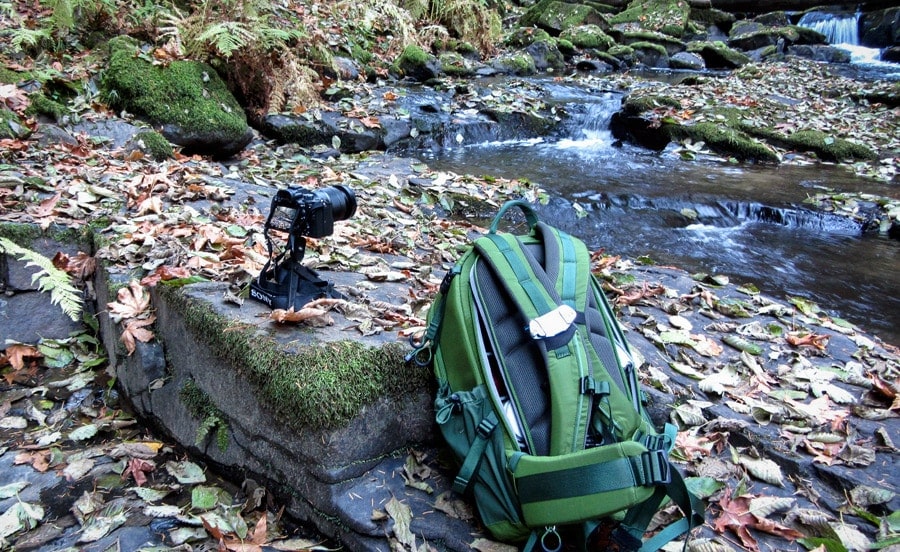
Because I wanted to work with long exposure, I lugged in my Zomei Z699c travel tripod along the Dungeness River in the Olympic National Park. I especially wanted to play with shutter speed and water. | Nikon D7000 + Nikon 50mm f/1.8 | 50 mm | 1/2 | f/10 | ISO 100
This is a question many of us traveling photographers agonize over. For a landscape photographer who shoots at the golden and blue hours, works with HDR, or does any other long exposure photography, a tripod is almost always a necessity. Some even consider this as part of their must-have hiking photography gear.
At the same time, even the lightest of travel tripods will add considerable bulk and weight to your setup – check out the best travel tripods for a closer look at what's availble.
Hence the million-dollar question: to tripod or not to tripod?
Since I love both HDR and long-exposure photography, I tend to default to having a travel tripod, especially if I'm going to a place I've never been before.
If I know the area really well and have seen that the views don't lend themselves to HDR or long exposure photography, I might settle for a mini tripod (I use the Ultrapod II) or just rely on my camera's internal image stabilization.
Obviously it's important to take the lightest, yet most stable travel tripod you can afford. For me, that's the Zomei Z699c – a good mid-range travel tripod that's not exactly light, but also doesn't break the bank.
[Related: Zomei Z699c Review]
There are plenty of lighter (read: more expensive) options out there. If money wasn't an issue I'd go for Peak Design's new travel tripod. It's light, yet has a tremendous reach with a strikingly small profile when folded up.
Related: Peak Design Travel Tripod Review]

Some hikes I just don't feel like carrying the extra weight of a tripod. That's when I stick an Ultrapod II into my pack. A Joby Gorillapod will also work, but the Ultrapod is both lighter and less expensive.
For a fair compromise between having a tripod and no tripod, mini tripods like the Ultrapod II or Joby Gorillapod are great options. They're compact and light and can be placed in positions a normal tripod wouldn't be able to match.
I prefer the Ultrapod over the Gorillapod because it's lighter and far less bulky. It's also less expensive.
[Related: Ultrapod II Review | Best Joby Gorillapod]
What Camera Gear to Bring on a Day Hike
Day hiking with the Mindshift Backlight 26L, Peak Design's Capture Clip, and the Ultrapod II at the Alsea River in Oregon. The Backlight has more camera gear space than I need, so I modified the camera carry area for extra snacks and clothing. The front pockets I used to store a journal, another jacket, and a few other odds and ends. There was plenty of space to spare.
Day hikes can be anything from 15 miles in a day up a mountain and back to a simple walk in the woods. That means there's a huge amount of diversity possible in what to bring, both in terms of hiking gear and camera gear.
My daypack set up varies depends on the purpose of my hike. When I'm looking to just get a hike in and not really focusing on photography, I'll take a standard hiking daypack with hydration compatibility and throw in a camera insert or just my camera with a wide angle.
These days I'm using an Osprey Sirrus 24L and an Ape Case Cubeze 39 for the insert. It's a small pack, but will hold a 2L water bladder, snacks, extra clothing, and of course, my camera insert.
For camera inserts, I actually prefer Tenba's BYOB 9 (mirrorless) or BYOB 13 (small DSLR), but after mine went missing I thought I'd try the Cubeze system.
After about a year of using the Cubeze, though, I have to say Tenba's inserts are worth the price.
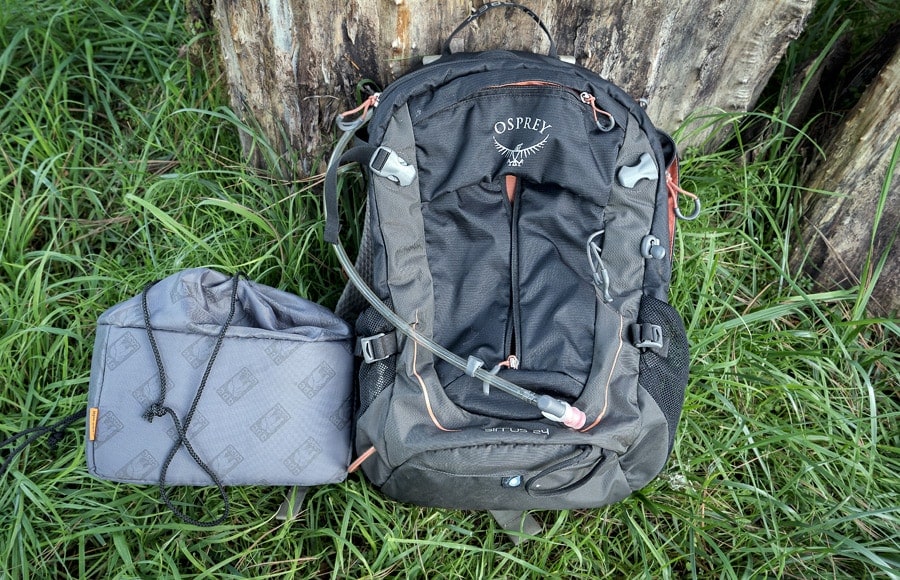
When I'm out for a quick hike or want to travel light, I take my Osprey Sirrus 24L and use a camera insert. Here you see the Ape Case Cubeze 39.
Either way, both inserts allow me to bring 2-3 lenses easily. The Tenba inserts I've tried also have a few pockets for batteries, cards, and lens cloths as well. I also throw in my filters and my remote shutter.
If I'm hiking with the Osprey Sirrus 24L, I won't be bringing a tripod. Sometimes I might throw my Ultrapod II in just in case, but that's about it. (The Ultrapod II takes up next to no room and fits easily in a side pocket.)
For camera access, I use the Peak Design Capture Clip. As long as I'm not needing to change lenses a lot, this works quite well for me.
[Related: Peak Design Capture Clip Review]
Sometimes I'll even forgo the camera insert, wrap my 50mm in a sock, and leave it on top of my clothes for easy access. (My wide angle will be on the camera body.)
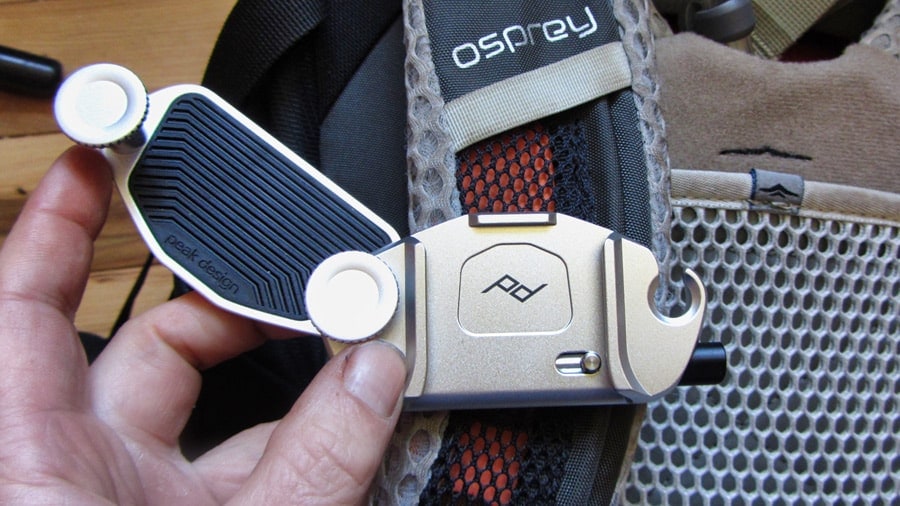
I love working with the Peak Design Capture Clip when on the trail. It keeps my camera at the ready without putting any extra strain on my neck or shoulders. I also appreciate having my camera off to the side and attached to my backpack strap instead of hanging in front of my chest.
If my focus is photography, I'm more likely to settle on a camera backpack made for hiking – check out the best camera backpacks to see some great options.
It's been hard to find one that really works for me, as most have far more camera gear space than I need. I'm rarely looking to bring that many lenses and multiple camera bodies on my backcountry trips, and I certainly don't need my laptop.
Another issue with most hiking camera daypacks is that they don't make space for hydration systems. That's a real issue for me, as hiking with water bottles doesn't work well for me.
Luckily there are now a few out there designed for those of us who know we can't eat or wear our cameras.
Right now, I'm really enjoying the Mindshift Backlight 26L. Like other camera backpacks, it has far more camera equipment room than I need, but other than that it's an excellent pack for me. The overall size is just right, and it has a sizable amount of room for hiking gear.
It also has a number of different ways of carrying a tripod.
All the gear is stowed in the back panel, but the pack is designed to spin around and give you access without taking the pack off.
I also appreciate that the Backlight comes with ice axe loops and numerous ways to strap extra gear to the outside of the pack as well. All in all, a sturdy, well-built pack.
The Backlight is considerably bigger and heavier than the Sirrus 24L, but it sits comfortably on the back and for longer hikes I do need to carry the extra gear.
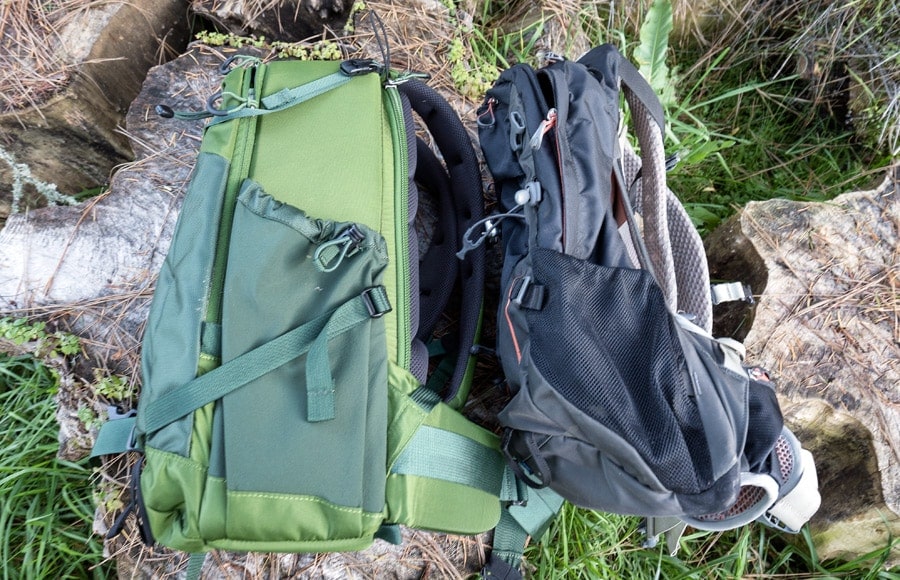
Here you see the Mindshift Backlight 26L camera backpack compared with my Sirrus 24L. The Backlight is considerably bigger, but provides easy access to all my camera gear, not just what's on the Capture Clip.
Unfortunately, the Mindshift Backlight 26L has no hydration compatibility – a serious bummer for me on longer hikes.
I also don't tend to use the flip-around option much. The Capture Clip is much faster for me unless I need to change lenses, and for that it's often more comfortable for me to put the pack down.
Still, it's an excellent pack and can carry an incredible amount of gear.
Other Day-Hike Camera Gear Essentials
Depending on the hike and the type of photography I'm doing, there are a number of other things I might need. Most I also bring on backpacking trips, so I'll save a list of these until the end of the article.
What Camera Gear to Bring on a Backpacking Trip

For backpacking trips, I take my Osprey Ariel 65L and a camera insert. (Here the Cubeze 39.) I make sure to take the Capture Clip with me for easy camera access.
Since I frequently go on multi-day backpacking trips, figuring out my camera setup is a pretty big priority. I need it to be light and to take up as little room in the pack as possible.
While I've looked at a few backpacking camera backpacks, none of them had the room I needed for backpacking gear (think 4-10 day trips) and the access didn't beat that of the Capture Clip. As a result, I went back to using a camera insert + the Capture Clip.
Currently, I'm using Osprey's Ariel 65 AG as my main backpacking pack. It fits me well and is super comfortable.
The tripod gets attached over the sleeping bag compartment or along the side if I'm not bringing stove fuel.
If the Cubeze 39 isn't large enough to carry my other camera essentials, I'll bring a separate dry bag to stow them in. That's listed in the “other essential gear section” below.
Skiing and Snowboarding
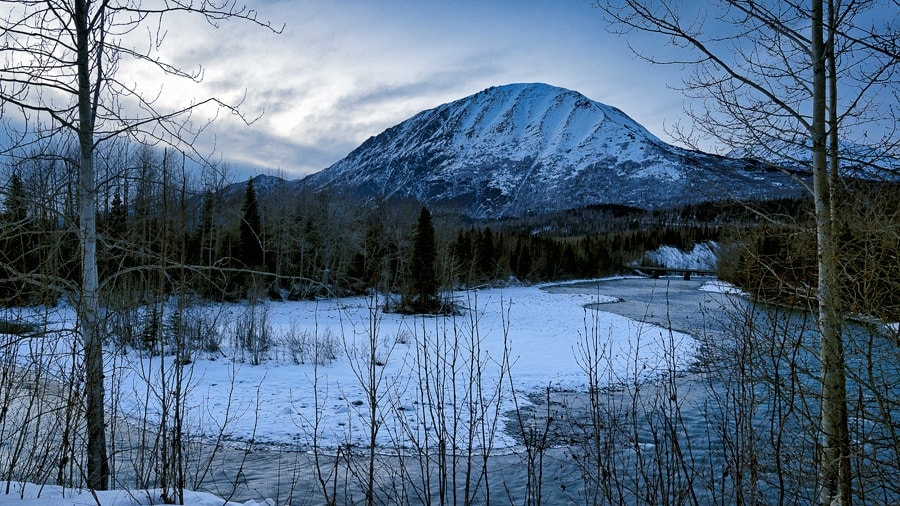
Skiing along the Kenai River in Alaska. I'd never been on this route before, but chose to take a tripod since we'd be hitting both the golden and blue hour. | Sony A7iii + Sony FE 16-35mm f/4 | 26mm | 1/2 | f/8 | ISO 400
For skiing and snowboarding, what pack I take will often have to do with both the weather and whether I'll need to strap my skis or board onto the pack.
If there's no precipitation in the forecast and I'm not planning on using cramp-ons (i.e. carrying my skis), I might just stick with the Mindshift Backlight.
On the other hand, if there's a chance of crazy weather or I'll be doing intense climbing or downhill action, I'll go with the LowePro Whistler.
The LowePro Whistler is the ultimate bomb of a skier's/snowboarder's camera backpack. Take a fall? No worries – your gear is protected. Inclement weather? Everything stays dry. Freezing temperatures? Everything's designed for mittened or gloved hands.
The only downside to the Whistler is that it's a huge pack for a day trip. Be sure to get the 350 version if you have a mirrorless or just want a smaller pack.
Other Essential Camera Gear

Backpacking in the Joshua Tree National Park. | Nikon D7000 + Tamron 10-24mm f/3.5-4.5 | 10mm |1/250 | f/8 | ISO 100
Okay, so you're good on your camera, backpack, and tripod. What else do you need? Here's a list of the gear that I find essential in the field.
- Extra batteries
If you're shooting with a CMOS mirrorless camera, your battery life probably isn't great. Even if it is, it's always good practice to bring extra batteries. With my Sony A7iii, I generally only need 2-3 on medium-length trips, but I'm a pretty conservative shooter. Make it a habit to include these in your hiking accessories.
- Extra memory cards
For obvious reasons! You don't want to run out of space or be stuck without cards if one has a problem.
- Camera jacket (for rainy or snowy weather)
Unless I'm on a day hike with clear weather, the Vortex Storm Jacket is always in my bag. Mountain weather is incredibly unpredictable and the Storm Jacket lets me continue shooting under almost any circumstances.
[Related: Vortex Storm Jacket Review]
If I'm taking a camera backpack like the Backlight or the LowePro Whistler, it fits nicely in the camera gear area. If not, I simply store it on its own (it comes in its own case) or stash it in my camera gear dry bag.
- Filters
I always keep a circular polarizer filter on my wide angle lens, except of course when I'm using a 10-Stop ND filter. At the moment I'm using a Hoya 72mm DMC PRO1 as my polarizer and a B+W 72mm for my 10-Stop ND filter.
The B+W is expensive, but has much less discoloration than the less expensive Ice or Hoya ones I've tried.
- Remote shutter
A remote shutter is needed for any kind of long exposure work, especially if you're working in bulb mode. I use a Viltrox FSK. Make sure you check its batteries before leaving.
- Cleaning kit
For me this usually just means a bulb air blower and a few lens cloths that I keep in a clean place. I used to carry a more thorough kit but found that I never used it in the field.
- Power bank
If you're going on a multi-day trip and/or are taking a lot of photos, it's generally a good idea to bring a power bank or two with you. My favorite is the Anker PowerCore+. It'll also charge your phone/GPS.
- Dry bags
Dry bags come in a number of different sizes. I keep a 3L, a 5L, and a 10L on hand for storing anything from cables, chargers, and extra batteries to clothing. All of my packs have rain protection as well, but I always feel better knowing my gear has this extra protection.
They're also super handy when going out on kayaking or canoeing trips.
- Quick-release camera strap
Sometimes I need a camera strap on my camera, other times it just gets in the way. Since I'm often switching between tripod, my capture clip, and carrying around my camera by strap, I need something that will come on and off quickly.
I highly recommend the Peak Design Slide Lite. I've been using it just a few months but really love its versatility and ease of use.
[Related: Peak Design Slide Lite Review]
Final Words
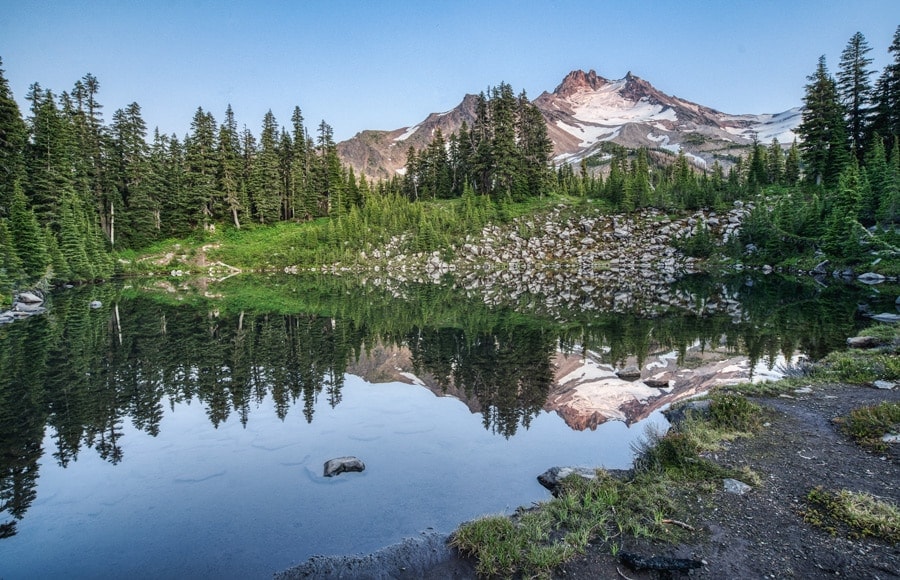
Mt. Jefferson reflected. | Sony A7iii + Sony FE 16-35mm f/4 | 17mm | 1/10 | f/8 | ISO 1000
Photography in the wilderness comes with its own set of challenges, the biggest of which is how to pack in your camera gear comfortably while having room for everything else you'll need and keeping your camera accessible.
What do you think? Do you have favorite gear you like to use on the trail? Do you have a setup that works especially well for you?
Let me know!
Teryani Riggs (they/them) is an adventure, who loves all things wild and free. Teryani can often be found in the midst of a social/eco-justice campaign, hiking through wild backcountry, or hitchhiking around the world listening to other people’s stories. While their focus has historically centered on landscape, travel, and wilderness photography, they’ve also been hired to shoot genres as varied as historical fiction reenactments in the studio to product and food photography.
3 Comments
Leave a Comment
👋 WELCOME TO SHOTKIT!
🔥 Popular NOW:

For skiing or rafting I just rely on my iPhone. Its waterproof and perfectly capable. It also is my “second camera” on a hike. For actual hikes though, I am currently upgrading to the Z9 from a D7200. I carry a zoom lens 35-120mm zoom lens. “IF” I take a second lens, it is exactly for what you said… for something else like night photography or animal photography but usually just settle for the single lens. I am going to consider going more macro lenses because of your article though.
Overall, I don’t worry about the weight of my specific needs equipment. I won’t be deciding based on weight but need. I really like having my camera at all times for any hike and the option of choosing a lighter camera isn’t really an option. If I don’t want to take it, I use my iPhone… as simple as it gets. Packs, tents, sleeping bags and other kits have options that affect the weight. I would rather spend my money on a lighter more packable tent, than spend money on a smaller less capable camera.
Thanks for your thoughts on this, Tuson – I agree, weight is a huge consideration when hiking.
There’re some great tips and advice here Teryani. Keep up the good work!