


Removing Haze with Lightroom Dehaze Filter (Tips & Tricks)
Find out the best Lightroom Dehaze Filter tips in this must-read guide! Learn how to get started or take your shots to the next level with 6 PRO tricks.
Lightroom | Software | By Usnea Lebendig
Shotkit may earn a commission on affiliate links. Learn more.
The Lightroom Dehaze filter does what its namesake implies – removes or adds haze to an image.
As such, it’s particularly handy for landscape photographers. What most people don’t know though, is that this simple slider does much more than remove fog or haze.
It’s a really fantastic effect, and every Lightroom user should know a bit about it and more importantly when to use it.
Let’s take a look at this nifty little tool.
Popular course reveals the simple tricks to getting incredible results with Lightroom in record time. Give Your Photos The Look They Deserve!
![]()
What is Dehaze in Lightroom?
Simply put, the Lightroom Dehaze filter fixes haze by heightening the overall contrast of a photo.
It’s perfect for bringing out the details of landscapes where distant objects look washed out. Conversely, if you want to add more haze or mist for artistic reasons, you can also lessen the contrast and increase the haze.
What’s cool about this filter is that it only boosts the contrast in areas that look flat.
Unlike the Contrast slider, it avoids areas that already seem “contrasty”. That makes it uniquely useful in several different applications, not just removing haze.
Here are my favorite unconventional applications:
- Retrieving Lost Details in the Sky
Lightroom’s Dehaze filter actually does a fantastic job of returning detail and color to skies. It even works when the skies are blown out!
- Adding that Special “Something” to Black and White Images
If you shoot in black and white, you probably know that much of the secret to amazing photos lies in the level of contrast. Bumping up the contrast slider works if there’s not enough contrast all the way around, but what do you do when the highlights and shadows are contrasted enough, but the midtones are flat?
Because the dehaze slider only adds contrast to areas of low contrast, it’ll target the greyed out midtones and leave the high contrast areas alone.
Try it out. You’ll be impressed!
- Making Your Night Photography Pop
Lightroom’s Dehaze slider is perhaps one of the best tools for intensifying and emphasizing night skies.
Night photography requires a high ISO and no matter how good your camera, a high ISO almost always creates a haze in between the stars. While increasing the contrast and saturation’s one way to go about fixing this, Lightroom’s Dehaze tool often does a much better job.
It’s generally far more effective than applying noise reduction or even adjusting the blacks to compensate for this “mistiness” between the stars.
- Intensifying the Aurora
The Milky Way isn’t the only part of the sky that the Dehaze slider can really make pop. Use the Dehaze tool on the Northern Lights to add contrast and saturation in a way that will bring out the colors of the Aurora while leaving the rest of the sky crystal clear.
Be careful with it, though. A little definitely goes a long way here.
- Removing Light Condensation from Your Lens
If you shoot outdoors in wintertime, you’ve probably taken your camera out too fast and ended up with a foggy lens. (I know I have!)
If you’re too impatient to wait while the condensation clears, you might end up with a misty photo or three. That’s where the Dehaze tool comes in handy.
It’s not as good as remembering to let your camera acclimate to the temperature outside your bag, but it does a fair job of removing any fog that may have made it onto your lens.
- Reducing Window Glare
A polarizing filter will often do the trick in reducing glare, but I find that they don’t always work. That, and I don’t have one for each of my lenses.
Lightroom’s Dehaze slider effectively reduces window glare while increasing the contrast beautifully. It even works when photographing through aeroplane windows.
Dehaze vs Clarity vs Texture
The Dehaze, Clarity, and Texture sliders all affect the contrast of your photo, but each does it on a different scale.
The Dehaze slider works on the larger scale by increasing the contrast in broader areas of tone or color (i.e. low-frequency areas). It also adds saturation to color casts.
The Clarity slider works on a medium scale, adding or subtracting contrast to the light and shadow areas that fall in the midtones. Used well, it gives the illusion of sharpening or added “clarity”. It’s best used in high-frequency areas (think tree branches as opposed to open sky).
The Texture slider was originally added to Lightroom as a “smoothing” tool for portraits. It affects the smallest details of your image, targeting narrow edges that span a small range. It’s the slider to use when you want to heighten fine details. The Texture slider is subtler than either Dehaze or Clarity, and unlike the latter two, doesn’t significantly change saturation or color.
These three sliders work together to add the perfect amount of “punch” for your photos.
Where is Dehaze in Lightroom?
In older versions of Lightroom Classic, the Dehaze slider could be found in the Effects panel. In more current versions of Lightroom Classic CC you’ll find it near the bottom of the Basic panel in the Presence section of the Develop module.
It can also be used as a local adjustment with the Adjustment Brush, Graduated filter, and/or Radial Filter.
How does Dehaze work in Lightroom?
When there’s too much water (i.e. haze, mist, fog, steam etc.) between the subject of your photo and your lens, you’ll probably find your image lacking in the desired contrast and color.
The Lightroom Dehaze tool fixes this by finding the lower-contrast areas of a scene and adding contrast to them. Simply move it to the right to reduce haze and to the left to add it.
Remember that the Dehaze Lightroom tool can negatively affect skin tones when people appear in your photo, so you may need to experiment with the tone curve or apply a graduated filter or masking to control the effect. Adobe Photoshop dehaze has the same effect on skin tones too.
When was Dehaze added to Lightroom?
The Dehaze slider was added to Lightroom in 2015, shortly after Adobe went to a subscription model. The new Lightroom Classic CC (then known as Lightroom CC) was given the filter, but it didn’t make it into the updates to the standalone version of Lightroom 6.
If you’re still using Lightroom 6, you can still get the effect via third-party plugins like LRHaze and LRHazeFilters.
Unfortunately, Lightroom 5 users are out of luck. There is no Dehaze slider nor plugin for L5.
How do you Dehaze photos using Lightroom?


Now for the fun part – using the Lightroom Dehaze filter. Luckily, it’s pretty easy, especially if you’re using it for it’s intended effect – removing haze.
Step 1: Choose a Hazy Photo
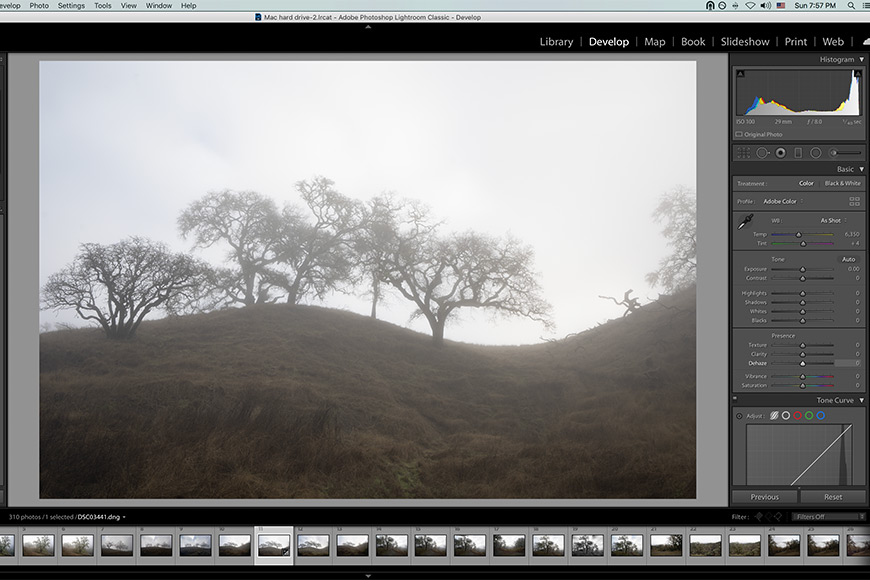
In Lightroom Classic, choose an image where you’d like to reduce the haze or fog. The one I chose has a fair amount of mist rising up from the grass, creating a bit too much haze in the sky and tree branches. I wanted a bit more clarity and color in the areas where the mist was thickest.
That makes it a perfect candidate for the Lightroom Dehaze filter.
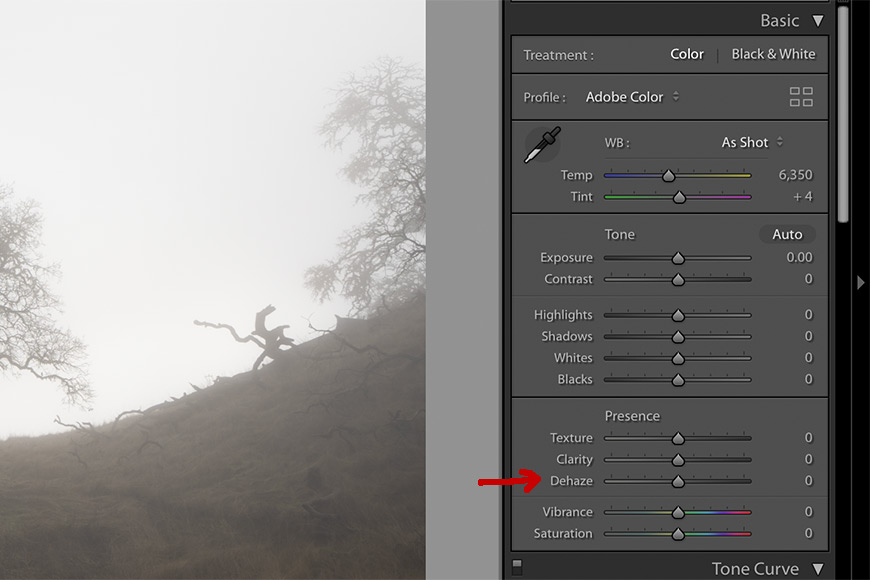
Step 2: Adjust the Dehaze Slider

Once you’ve chosen your photo, navigate to the Develop module. If the Basic panel isn’t already open, toggle the little triangle next to it. Once it’s open, look towards the bottom of the panel where the “Presence” sliders are.
To reduce the haze in your photo, move the slider to the right. If you want to add more haze, move the slider to the left.
Step 3: Make Any Needed MicroAdjustments
When you use the Dehaze filter, you might find that there are some unintended consequences. Here are some of the most common and what you need to do to fix them:
- Color
First, you’ll probably find the colors of your image somewhat shifted. Often this is a pleasant effect, but if not, you’ll need to navigate back to the White Balance section of the Basic Panel and adjust from there.
- Brightness
Adding or reducing haze will affect the overall brightness of your photo. Reducing haze makes the photo darker, adding haze makes the photo lighter. If this isn’t to your liking, then you’ll need to adjust the Exposure.
- Halos
If your image has any high contrast objects near the areas that the Dehaze filter effects, you might get some haloing. Unlike the first two issues, halos can be a bit more challenging to remove. The easiest way is to use the Radial filter to either dial back the effect in the problem area. Conversely, you can use the Radial filter to apply Dehaze selectively, avoiding the problem area.
- Noise
Too much “dehazing” will add noise to your photo, so use the filter judiciously.
Final Words
While you don’t have to use Lightroom to get the dehaze effect (for example, the Dehaze Photoshop tool does a fine job too – search for ‘dehazing in Photoshop’ in YouTube for plenty of good tutorials), applying it in the same program you use to import and adjust your photos can certainly streamline your workflow.
The Lightroom Dehaze slider doesn’t work miracles for every image, but when it does work, it creates a phenomenal effect. Try it out in the different situations listed above and see how it works for you.
Just be aware, less is usually more when applying effects, so use it wisely. Used well, it can definitely add another dimension to your workflow.
Have you tried this tool yet? What was your experience? Let us know in the comments.

Usnea Lebendig is an experienced photographer and reviewer who loves to photograph professionally and in moments where the world’s beauty and/or strangeness leaps in front of the lens.
1 Comment
Leave a Comment

👋 WELCOME TO SHOTKIT!
🔥 Popular NOW:

As a landscape photographer, I actually really LOVE this tool. I also find that Lightroom’s Dehaze works better than Luminar’s. Also, Luminar’s slider only goes in one direction…you can’t add more haze.