


Guide to Northern Lights Photography
Capture stunning images of the northern lights with this photography guide. Covers where to find an aurora borealis, gear, settings & more!
Learn | Photography Guides | By Greg Cromie
Shotkit may earn a commission on affiliate links. Learn more.
In this guide to northern lights photography, we're going to cover all you need to know for your upcoming photographic adventure.
So, you've finally decided to tackle one of your bucket list items and make the journey north. Your destination could be any one of several locations, but your core objective is the same – to photograph the northern lights.
Well done you! All you need now is the knowledge to make the most of this once-in-a-lifetime opportunity.
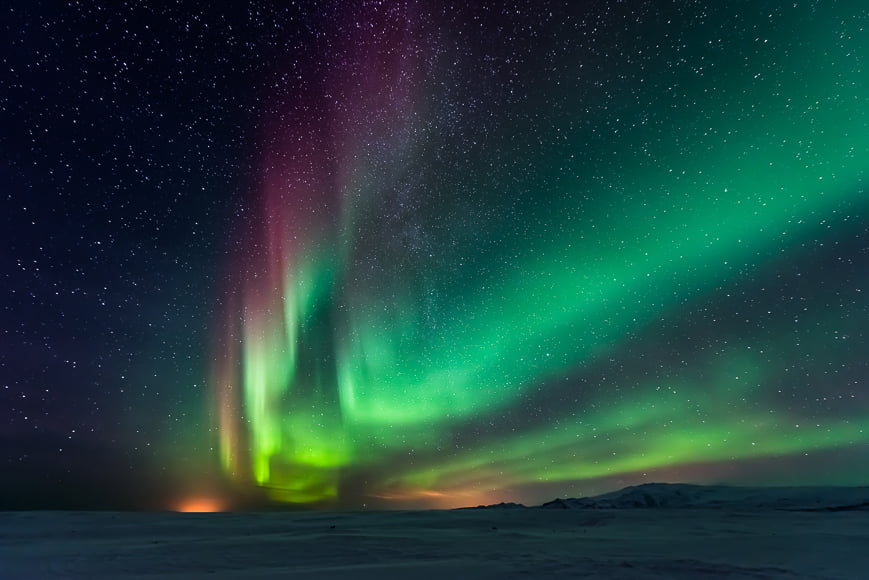
The northern lights are one example of the astronomical phenomena known as polar lights, or aurora polaris. They're a natural occurrence found in both the northern hemisphere (with the aurora borealis) and the southern hemisphere (with the aurora australis).
This striking light show appears in the night sky above a specific latitude as giant wavering curtains of light.
Once you've captured this magical display, you'll return from the frozen north to thaw out and showcase some of the most excellent images you've ever taken.
Let's take a look at how you're going to make that possible.
When, Where & How Can You See the Northern Lights?
There's a lot to unpack and learn about the northern lights to ensure you make the most of the opportunity to photograph them.
The last thing you want is to go unprepared and capture poor images or, worse, none at all.
Let's start with when, where, and how to find them.
When to Spot the Northern Lights
There's a lot more to the timing of the northern lights than dates on a calendar. There's a bunch of science involved too.
By far, the best time to spot them is during equinox events. The term equinox relates to times when the sun crosses the plane of the earth's equator, which results in night and day being equal in length (i.e, more or less 12 hours of daylight and 12 hours of darkness).
The autumn equinox takes place during September, and the spring equinox occurs in March. The dates vary a little from year to year, so it's worth taking a look at your intended destination on this Time & Date site.
You can see the northern lights outside of those dates, but that's when they're by far the best.
The alignment of the sun, the rotation of the earth, and the speed and strength of the solar wind impact our magnetic field – this is what causes the lights. The equinox is when all of those factors are optimal, resulting in stunning light shows.
Many will tell you that there's a northern lights “season” – especially those in the travel industry.
But in reality, the factors that cause the northern lights are always at play – it's just the intensity that surges at certain times of the year.
The “season” (if you want to call it that) runs from September until April due to the shorter amount of daylight hours during that time of year.
Where to Spot the Northern Lights
If you want to pack up your camera bag and take a trip to see the northern lights, then you're going to have to head north. Far north.
Thankfully, there are multiple travel options available (other than during COVID) to destinations where you can spot and capture the northern lights. For the map-reading nerds out there, we're talking as far north as between latitude 64° and 70°.
In essence, we've just drawn a ring around the Arctic Circle that includes the northern limits of Alaska, Canada, Iceland, Russia, Norway, Sweden and Finland. These are all countries that encounter short summers with limited daylight and months of darkness during winter.
If I were to point out one destination that's accessible and a phenomenon in its own right, it would have to be Iceland. The beauty of Iceland means that you can photograph much more than just the northern lights – although they'll undoubtedly be the highlight (pardon the pun).
Finally, it's worth pointing out that the northern lights are far more accessible than their southern cousins: you'd pretty much need to travel to Antarctica to get a good look at those. (That said, I do have a talented friend who managed to photograph them from a beach on the southern tip of Australia.)
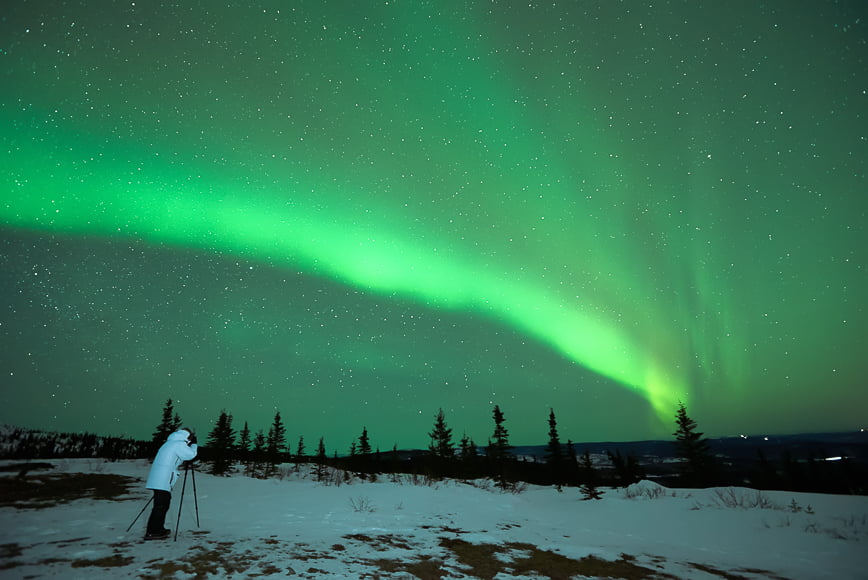
How to Spot the Northern Lights

Now you know where to go and when, the next and most crucial step is to understand how to spot and photograph the northern lights.
As we've covered here, the best viewing locations are usually those within the Arctic Circle at the times of the year when nights start to become longer.
Keep in mind that you're in the far north and it's likely to be freezing at night so prepare accordingly – check out our Iceland guide for help with this.
Getting around is going to require either some pre-booked travel service or access to a car.
You're not going to capture fantastic images of the northern lights from your hotel room balcony and will need to travel to a location with less light pollution. Local guides and even some web research will help you with this.
Another handy tool is a light pollution map, which you can find by searching Google. These can be global or location specific and pull a range of data from satellite services to construct a map with light and dark hotpots.
Regardless of how you go about it, for the best results, you need to be free of the light pollution caused by car headlights, homes, shopping centres, airports and streetlights.
One more handy idea is to use your daylight time to scout the area where you'll likely set up for your shoot. It's far easier to form a composition with good light than it is in the pitch dark. You'll get a better idea of the location, the best direction to face and also how to get there safely.
Resources for Spotting the Northern Lights

The next essential ingredient is for the sky to be as clear as possible.
I understand that you can't predict the weather forecast three months in advance when you're booking your trip – so it's true that some of it is going to come down to luck.
Regardless, your job is to organise your shoot for the clearest night you can achieve. Local weather services will provide information on cloud cover conditions, so you have a better idea of finding clear skies.
You can also see weather satellite images via a service such as MeteoStar to approximate cloud coverage. Ideally, you want less than 20% cloud cover so you can capture clear images with as much detail as possible. Clear skies will also ensure less movement in your image, when shooting long exposures.
Fortunately, we're starting to close the window on the best way to capture stunning pictures of northern lights.
The final step is to use one of the handy aurora activity sites to understand the intensity of the lights.
We measure the northern lights with an aurora activity index, otherwise known as the Kp-index, with a range from 0 (weak) to 9 (strong). There's a lot of science and data behind the prediction process and if you love that kind of detail, then head over to one of the following sites for more info:
- For a detailed explanation of the Kp-index, head over to Space Weather Live for all the exquisite detail.
- Also found on Space Weather Live is a detailed look at the OVATION Auroral Forecast. It's a map that provides an immediate forecast for the intensity of the northern and southern lights.
- For those travelling to Iceland for northern lights activity, then be sure to check out this dedicated site over at the Icelandic Met Office.
However, if you're looking for a more straightforward way to obtain a northern lights forecast, I highly recommend you take a look at Space Weather Aurora Forecast. This site provides a relatively simple means of reading the aurora activity based on the Kp-index.
It shows the immediate activity over 48 hours, including the best time of night to see the aurora. Plus, it provides a broader forecast with over a full month of projections, including moon phases.
What Camera Gear Do You Need for Northern Lights Photography?
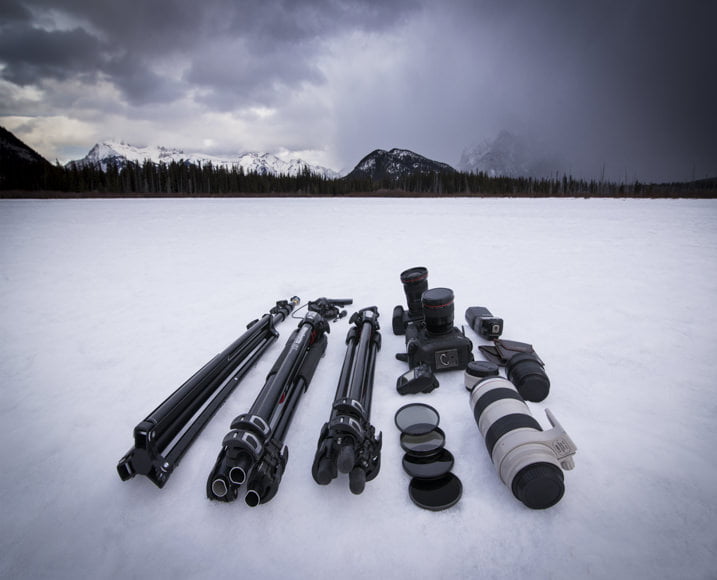
Camera gear of Northern Lights / landscape photographer Paul Zizka
Just as I explained in my Iceland landscape photography article, having the right gear will ensure your success at capturing the northern lights.
-
Camera
While it may seem obvious to say that the essential bit of equipment is a camera, the kind of camera is critical.
A decent quality point and shoot camera will capture a suitable image of the northern lights. The question is, how good an image will that be?
Ideally, you're going to want a DSLR or a decent mirrorless camera – the debate over full-frame versus a cropped sensor is irrelevant, in my opinion. But ensuring that it's a good quality camera with manual controls will allow you to design your photographic approach.
What's more, you're likely to be in freezing conditions so please ensure that your camera (and lenses) can withstand cold, snow and ice.
We'll cover essential camera settings for capturing northern lights images in the next section. It's probably a good idea to take a look at that and use it as a checklist for the kind of camera you'll need.
-
Lens
Unless you're intending to do some landscape or wildlife photography while visiting a region, you don't need a bag full of lenses to photograph the northern lights.
As a minimum, you're going to need a good quality wide-angle lens that has a wide aperture (ideally, at least f/2.8) and manual focus. Again, you may want to invest in something that has weather sealing and isn't going to freeze from the inside out.
Image stabilisation is a great feature to have on any lens, but in this case, you aren't going to need it as you'll have your camera mounted to a tripod.
A prime lens is likely to have a wider aperture but only gives you the one fixed focal length. As a result, you may have to crop your images later.
A wide zoom lens gives you greater flexibility in the focal length but in most cases has a narrower maximum aperture (f/2.8 is usually the widest, although Canon offers a 28-70mm f/2 zoom now for its RF series.)
Something between 10mm and 24mm is ideal – that way you can capture a decent patch of sky plus any land-based elements you want to include in your composition.
-
Tripod
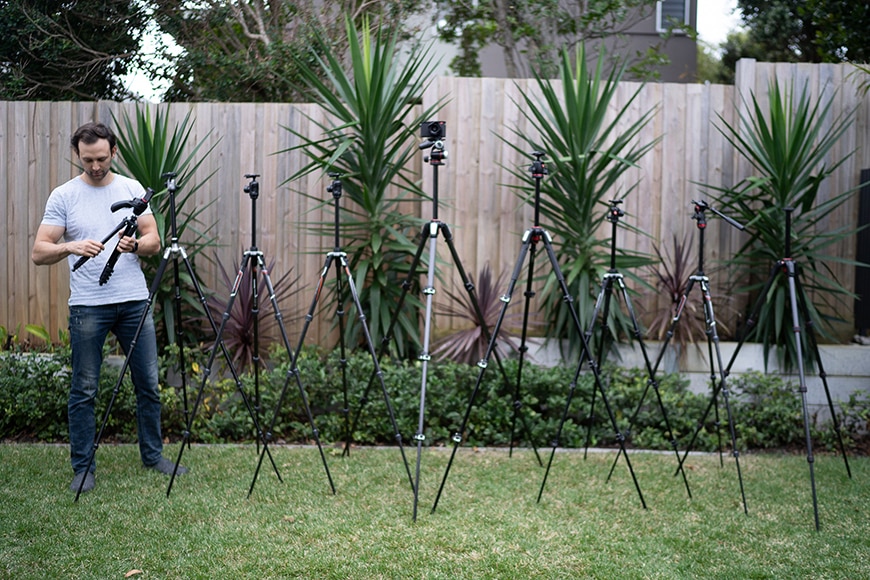
A good tripod is essential for a steady shot while shooting the northern lights.
A tripod is going to be essential for any successful northern lights photography adventure.
With your camera mounted to the tripod, you can frame your composition and achieve manual focus without having to refocus due to camera movement.
What's more, you'll be shooting with a long exposure time, and any amount of camera shake will ruin your image.
Tripods come in a range of sizes and weights – avoid those that sit close to the ground. You'll also need a tripod that can support the total weight of your camera, lens and batteries.
-
Accessories
It's likely that to access your ideal light-pollution-free destination, you're going to have to hike some distance. You want to focus on the terrain and not an armful of gear you're lugging.
A good quality camera backpack that holds everything and provides you with balance and comfort is going to be your new best friend.
Photographing the northern lights requires long exposure settings, and that drains your camera batteries faster than usual.
Batteries don't weigh a lot so pack all the batteries you have (just be sure to charge them before you set off). If your camera can be charged via an external power bank, pack one of those and the appropriate cable too.
Also, pack spare memory cards with ample capacity, a quality micro-fibre cloth for wiping snow and ice off your camera, and a cleaning cloth for the final lens polish.
You can either use the self-timer on your camera or a remote shutter release cable to remotely trigger the shutter. This way, there's no chance of camera shake from you touching the camera body.
An additional tip is to turn Live View mode off when taking your shot, to prevent any additional shake (unless you're using a mirrorless camera).
-
Other Gear
I won't go into too much detail about other gear as you can check out the Iceland article for an in-depth list.
But in essence, you're going to a freezing climate and if you don't take care of your comfort and safety, you'll leave empty-handed.
Dress appropriately by following the guidance of locals and experts. Wearing multiple layers on your body with at least one set of gloves is going to save the day. Two pairs of sock, a neck warmer and a beanie will also up the comfort level.
Pack for safety including torches/flashlights, water, snacks and appropriate footwear – I can't stress enough how essential this is!
Camera Settings for Northern Lights Photography

Now that you've picked your destination, booked your flights and gathered the essential gear, it's time to think about the camera settings for northern lights photography.
There are plenty of guides and photography tips out there on long exposure work – we have a few here on Shotkit so be sure to check them out.
Or you may think you already know how to capture the northern lights because you can shoot astrophotography successfully. But it's important to remember that this is a phenomenon like no other and your camera settings are going to be far from standard.
Above all else, once you've read through and understood these settings, get your camera out and practice them until you can almost set them while blindfolded.
After all, you're going to be out on a frozen tundra in pure darkness, and the last thing you want is to be fumbling around with camera settings.
-
Image Format
Any worthwhile photography endeavour should always demand the best image quality possible. And while cameras can deliver outstanding quality JPEG files, there's very little you can do with them in editing applications.
By far the best file format for photographing the northern lights is RAW format. Whether you use uncompressed or lossless compressed RAW is going to depend on how well your camera handles these file types.
With a RAW file, you have a far greater chance of managing the detail in highlights and shadows in post-processing. Above all else, you'll create images that pop with the colour and majesty of the northern lights.
-
Metering Modes
The metering mode determines how the camera will manage the exposure of the image.
The most common forms of metering in most cameras include spot metering, matrix metering, centre metering and evaluative metering. You can dial in any of these modes, and the camera will know how to read the existing light and handle exposure.
In northern lights photography, evaluative metering is best as the camera will determine the lighting in all areas of the frame (both the super dark areas and the bright highlights) and then decide on the best exposure level. Matrix metering mode is also a popular choice.
-
White Balance

Modern-day DSLRs and mirrorless cameras have a pretty good handle on managing white balance. I don't know many photographers who mess with this setting much at all.
However, for the sake of education, White Balance controls the colour cast visible in a composition so it has a more natural look. While you can achieve this in post-processing, I'd always recommend that you use an in-camera white balance best suited to night photography (see guide).
The settings are going to depend on how dark the night sky is.
If there's a bit of light pollution, then a cooler setting of around 3,500-3,900K is ideal. For genuinely dark skies, you can crank this up above 4,000 and achieve well-balanced images where the natural colours display correctly.
The biggest take away is to practice with this while at home in the backyard. Get to know the kinds of outcomes you get from altering white balance well before you board your flight.
You can see some helpful white balance examples here.
-
Focus
Despite the advances digital cameras have made with auto focus technology, I'm going to ask you to turn it off!
When photographing northern lights, you want to have complete control over your camera's focusing system. By design, auto focus hunts for its subjects and being able to focus on mystical phenomena in the sky is not exactly easy.
You may be able to grab focus, but the lens will always try to hold that and, as a result, will push and pull focus to get it.
With manual focus, once you have it set, you can be sure that it's not going to change – unless you bump or shift your set-up.
To begin with, you need to set your manual focus to infinity. Rather than attempting to achieve this by focusing on the northern lights, try placing your focus point instead on the furthest object – such as the horizon line or the most distant mountain peak.
Once you see it in crisp focus either via the LCD screen or the view finder, you have your focus at infinity. Take a practice shot or two, and zoom in on your camera screen to check how it looks.
A good idea is to use a piece of tape and either tape the focus ring in place, or at the very least mark the spot on the focus ring and lens barrel. That way, if it ever gets shifted by accident, you can quickly regain infinity focus in no time.
With infinity focus, you'll have everything within your composition in sharp focus.
-
Aperture
While in manual mode for full control of your camera, you'll want to open up your aperture wide for northern lights photography.
A suitable aperture would be f/2.8 or as wide as you can achieve if your lens does not go this wide.
(Most premium f/2.8 zooms are perfect for this type of photography, but can be rather expensive – look more to prime lenses which offer large apertures at more budget-friendly prices.)
With a wide aperture (smaller f stop digit), the diaphragm within the lens is wide open, allowing as much light as possible to travel down the lens and hit the image sensor. This is essential for night photos.
-
Shutter Speed

As with any nighttime photography, you're going to use long exposure techniques to make the most of your northern lights shots.
It's important to remember that when you're in a dark setting, the camera will struggle to gather enough light to form a clear image. To combat this, you want to use a long exposure time (i.e. slow shutter speed in photography) to keep the shutter open longer.
The longer the shutter is open, the more time there is for light to hit the sensor.
When photographing the northern lights, you'll need to experiment with shutter speeds. But most importantly, you'll need to be observant of the flow of the lights.
The northern lights is not a static show but rather a flowing river of ethereal light. Sometimes it moves fast and other times slower.
For faster flow, use a shutter speed of around 5 seconds and experiment from there. If the lights are moving fast, too slow a shutter speed will result in a blurred display.
If the flow is moving slowly, then aim for around 15 seconds, and dial-up or down from there. A 15 second exposure should capture everything nicely, and if you're lucky enough to have clear skies, you won't introduce any cloud blur either.
-
ISO
The final setting to dial in is ISO. As with a lot of dark environments, the temptation during Nothern Lights photography is to crank up the ISO value, especially with the ISO range on modern cameras being so wide.
However, to do so would be a big mistake as you'll end up with an image that's impacted by noise.
The best settings are going to depend on the overall lighting conditions. You have to contend with the contrast between the darkness of the sky and the brightness of the aurora.
A good starting point for ISO is to set it at 800 – chances are you're going to have to go higher and not lower. By managing your shutter speed, aperture and overall exposure, you can minimise the use of high ISO values.
Side note: a full frame sensor has better ISO capability than a crop sensor (or smaller), but that doesn't mean you can't get a clear shot around ISO 800 with a non-full-frame camera.
Above all else, practice is the best way to master your camera settings for when you photograph the northern lights. Shoot practice shots while at home – either from your backyard or a nearby rural area, gradually adjusting the ISO.
Then have a bit of a pixel peek on your computer to see how high you can push the ISO before it looks too grainy for your tastes.
Getting it right well before you depart on your next photography tour will bring you one step closer to nailing the perfect aurora shot. If you still need more info, you can see more on camera settings here.
Editing Tips for Northern Lights Photography

For the sake of this article, I'm going to talk you through the use of Lightroom Classic to edit your northern light pictures.
Adobe Lightroom is available for both mobile and desktop, and it's one of the most powerful and capable photo editing solutions.
You don't need to be heavy-handed on the editing to make a northern lights picture pop.
If you paid attention to our earlier advice on camera settings, chances are your image will already be good – you just need to elevate the strength of the elements that nature has already provided, making your final image look as good as they did when you witnessed them with your naked eye.
Let's cover a few steps:
On the right-hand side of the Develop tab in Lightroom, expand the Basic menu. In this menu, you'll see a range of sliders.
Starting with the Tone sliders, increase Contrast and Shadows while considerably decreasing Highlights and dropping Blacks just a little.
In the Presence sliders, increase the Clarity, Vibrance and Saturation just enough to give your image a little more punch.
If you're feeling especially creative, delve into the HSL / Colour / B&W menu – here you saturate the colours one at a time.
And that's it! If you've captured an image that's in focus, has good exposure and minimal image noise, the editing process is super easy.
Northern Lights Photography FAQs
Can you take pictures of northern lights with phone?
Yes, it is possible to photograph the northern lights with your phone – either Android or iPhone. However, your phone's inbuilt settings may not be adequate, so it's best to download a specialist app such as NightCap Pro, Northern Lights Photo Taker App, or LongExpo Pro. Also, don't forget to mount your phone to a tripod.
Why do the northern lights look green in photos?
The northern lights tend to look more saturated and colourful in photos because they're taken with long exposures. As for which colours appear, that depends on atom collisions in the magnetosphere, which occur at different altitudes. Green just happens to be the most common (occurring at about 100-240 kms above the Earth’s surface).
Which country has the best northern lights?
Iceland is definitely one of the best places to see the lights. Other top countries include Canada, Norway, Greenland, Finland, Sweden, and Russia.
Final Words
Photographing the northern lights is a once-in-a-lifetime opportunity – and a dream that many of us never get to experience. My best advice is to make the most of it.
Prepare in every way you can to ensure that you have the right gear, knowledge, and camera settings to master your northern lights photography.
Do that, and you'll return home free of frostbite and proudly showcasing mind-blowing images of a dancing aurora borealis.

Check out these 8 essential tools to help you succeed as a professional photographer.
Includes limited-time discounts.

I’m a Melbourne-based street photographer and blogger. I love to travel to Japan to photograph and document its dynamic people and culture.
1 Comment
Leave a Comment
👋 WELCOME TO SHOTKIT!
🔥 Popular NOW:

Thanks for checking out my guide. If you have any questions or comments then please leave them here and I will get back to you. Cheers. G