


Mobile Workflow Solution with the iPad Pro
Editing on the go can be a pain. The iPad Pro syncs seamlessly with your iMac, Macbook, or iPhone, making mobile culling and editing a breeze.
Shotkit may earn a commission on affiliate links. Learn more.
I looked at many options for speeding up my photography workflow. In the end, it was the iPad Pro that stood out for its ease of use and portability.
The iPad Pro has completely revolutionised my workflow, allowing me to work from anywhere. That's brilliant when having to juggle a full time wedding photography business and an ever-growing young family.
Hands down, this is the best purchase I have made in the past few years. While there are some limitations, as with most technology, the positives far outweigh the negatives.
For me the biggest selling point of the iPad Pro
Which iPad is best for photographers?
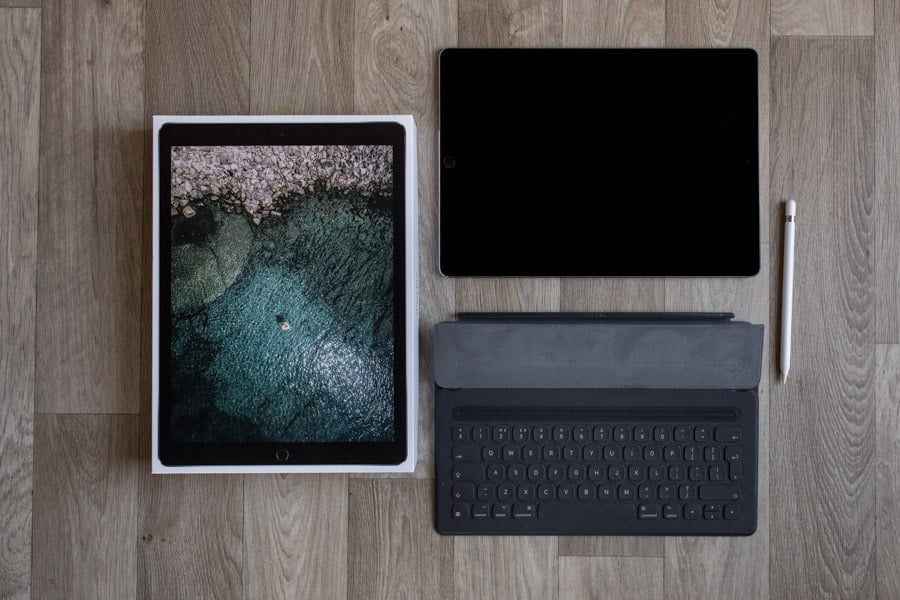
My 12.9″ iPad Pro with the Apple Smart Keyboard Folio
I opted for the larger 12.9” 2nd generation iPad Pro so I'd have the largest screen possible to work on my photographs.
(See here for smaller 10″ tablet options.)
I also went for the largest memory size at 512 GB (the newer 3rd generation iPad Pro has 1TB of disk space). I knew it would be necessary over the next couple of years.
What do I use the iPad Pro
for? Absolutely everything. I cull on it, edit on it, send emails, draw up contracts – if it can do it, I’ll use it.
 for? Absolutely everything. I cull on it, edit on it, send emails, draw up contracts – if it can do it, I’ll use it.
In combination with the Smart Keyboard Folio, the ipad Pro can easily replace a laptop, allowing you to perform all your daily admin duties as a photographer, as well as photo editing/organisation.
The only limitation is not being able to use the full version of Photoshop for more advanced editing. That's mostly due to the restrictions of the app rather than the iPad.
There are apps that can do more extensive retouching such as Pixalmator, but I tend to just stick to Lightroom for my iPad Pro editing.
I then do more advanced post-production on my desktop.
My mobile workflow with the iPad Pro
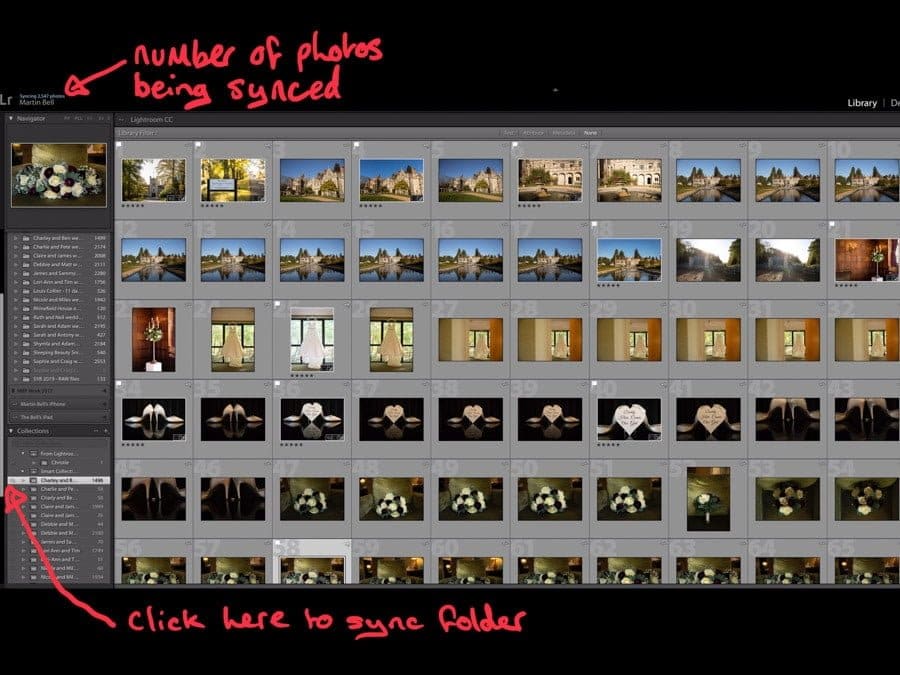
Screenshot of my Lightroom interface from my desktop computer.
As with all workflows, what works for some may not work for all. Still, this is what I do, and hopefully it will help with your mobile workflow solution.
First, I make sure I am logged into my Adobe Creative Cloud account on both my Lightroom Classic CC (desktop) and my Lightroom mobile (iPad Pro).
[Related: The most affordable way to buy Lightroom]
After an initial cull for ‘moments’ in Photo Mechanic, I import as normal into Lightroom.
I then create a smart catalogue, making sure to enable the sync function by ticking the box on the left hand side of the smart catalogue.
I then simply highlight the images I want to add and drag them into that smart catalogue. The files will then automatically sync to the cloud.
When I open Lightroom Mobile on my iPad Pro or iPhone , they will appear in there. Simple.
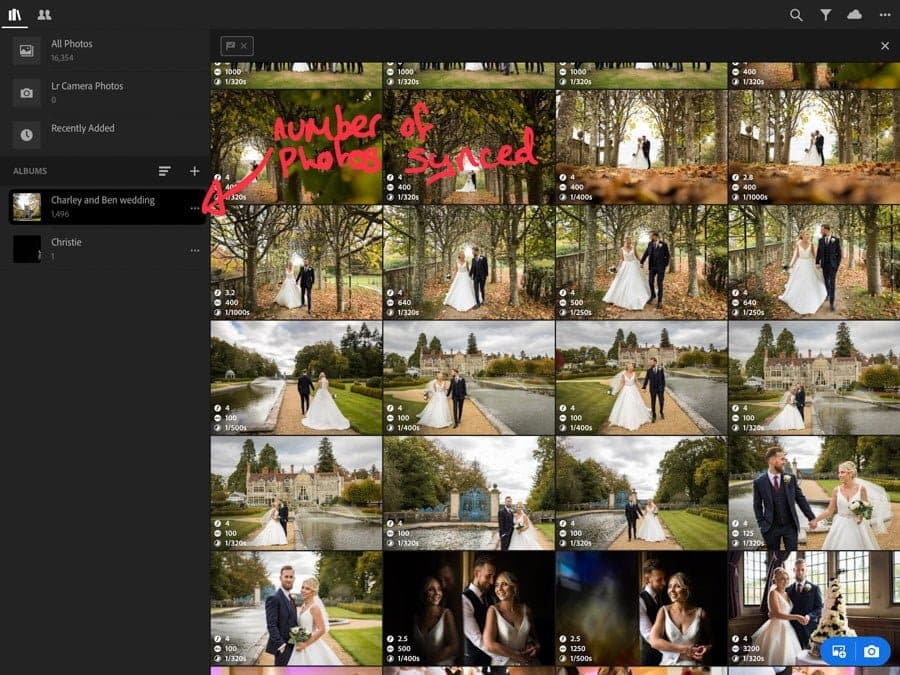
Screenshot of the Lightroom interface on my iPad Pro once images are synced.
As you sync across all devices, any flagging, ratings, or adjustments to those photos will sync as well.
The only downside to the syncing is the time. It usually takes about an hour for 2,000 images to sync, but a little time spent here will be a big saver later down the line.
A handy tip – If you keep the syncing on in Lightroom Classic CC while you are working, editing becomes a little slow.
It’s no problem on the iPad Pro, but with Lightroom Classic CC it’s a killer.
When working on your desktop make sure to un-sync the smart catalogue whilst you are editing and then re-sync when you are finished.
All the edits you’ve done will then be synced to the iPad Pro.
I also use my iPhone when I don’t have my iPad Pro with me, but it’s much easier to see on the larger screen of my 12.9” iPad Pro.
Culling photos on the iPad Pro

Screenshot of Lightroom on my iPad Pro showing how to rate and flag photos.
Culling is one of the most time-consuming and tedious tasks within my workflow, and I wanted to make it as easy and enjoyable as possible.
The iPad Pro not only speeds up this part of the process immensely, but actually makes it so much more enjoyable to do.
Once the photographs are synced via Adobe Creative Cloud, and are all within my Lightroom mobile app, I can set out to flag the photographs I would like to use by swiping up on the right hand side of the screen.
[Related: How to sync photos across devices with Lightroom CC]
Alternatively, I can rate the photographs with stars using the left hand side of the screen.
A handy tip: For flagging and starring photos on the iPad Pro, you first have to navigate to that section of Lightroom mobile.
It took me a little while to figure that out, but it’s just a button on the bottom right of the screen.
Each photograph loads extremely quickly, so I can see if it's a keeper in the blink of an eye.
The main part of this photo culling process for me is to check the sharpness of the photograph. The speed of the iPad Pro makes this very quick.
To sort through about 1,500-2,000 photographs, it takes me 2-3 hours max.
I tend to use the Apple Pencil for my culling and editing on the iPad, but it is not essential as a simple index finger will do.
Editing on the iPad Pro

Canon 5D MKIV + Canon 35mm f/1.4
 | 1/250sec at f/4 ISO 1250
This is where the iPad Pro is a little different to work with and takes a little bit of getting used to.
A lot of my editing takes place on my desktop. When I'm away from the office though, and have a deadline to meet, I can edit extremely quickly on my iPad Pro. I can even edit to the same standard as any desktop.
Lightroom mobile has all the same functions as the desktop version, like brushes, radial filters, etc., but the layout is different.
Once you get used to the difference it is extremely easy to use.
The screen on my iPad Pro is True Tone, which renders beautiful and accurate colours. This makes colour adjustments just as accurate as on a calibrated computer screen.
Post Production on the iPad Pro
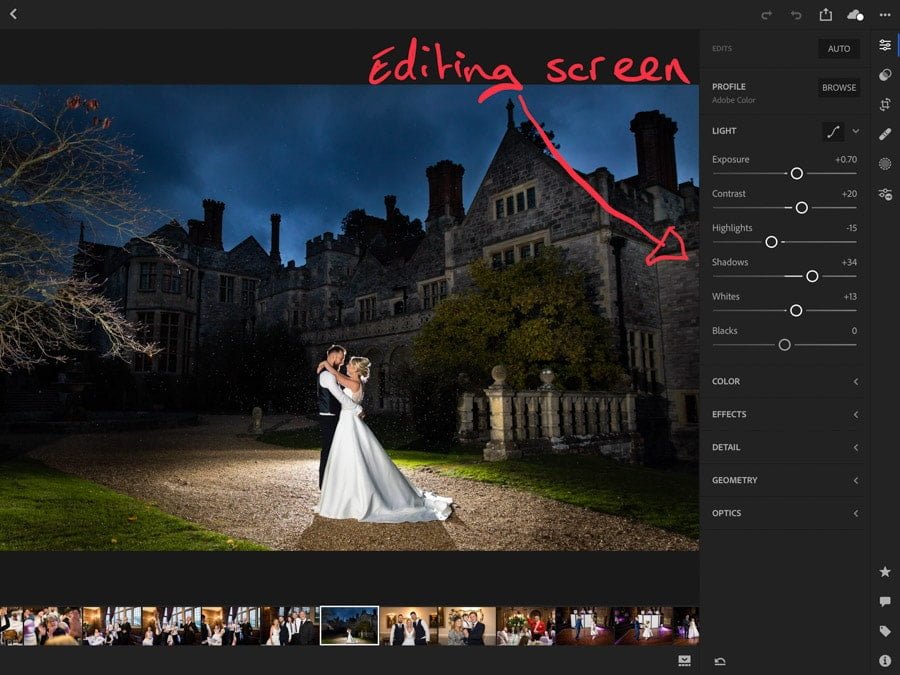
Screenshot of the Lightroom editing screen on my iPad Pro.
Once I've flagged and edited the photos, I export from Lightroom Classic CC on my desktop straight onto my external hard drive.
I then do any black & white conversions before uploading into my client’s Pixieset gallery.
Once uploaded, I can access the gallery on any device and send out the image download details to clients. Easy.
iPad Photography workflow | Conclusion
Canon 5D MKIV + Canon 35mm f/1.4
 | 1/2500sec at f/2.8 ISO 125
When I set out to create a better, more mobile workflow I hadn’t thought of using multiple devices. Now that I am, I could not imagine my workflow with anything other than the iPad Pro.
Syncing my photographs across multiple devices is a breeze with Adobe Creative Cloud and has sped up my workflow immensely.
This has resulted in happier clients as my turnaround time for production of photographs has improved.
The mobile functionality of this workflow also means that I can be working on my iPad Pro in a coffee shop one minute and then picking up where I left off on my iMac shortly after.
That's a real game changer for me.
The iPad Pro has given me a mobile workflow solution that allows me to cull my photographs faster. I'm spending less time in front of the screen and more time with my family.
This is something that was very important to me when I looked to change the way that I worked. I know it will appeal to the majority of photographers.
The ease of culling your photographs is brilliant too.

Canon 5D MKIV + Canon 24-70mm f/2.8 II USM
 | 1/125sec at f/4 ISO 400
Simply swiping up to either flag or rate them makes this part of the workflow not only more enjoyable but an absolute breeze.
The extremely fast load times per picture are a huge selling point for the iPad Pro, too.
Once you get your head around the slightly different editing features of the iPad Pro, you really will be able to use this piece of kit for the vast majority of your workflow.
With my culling and basic editing now taking place largely on my iPad Pro, I can work from anywhere whilst still producing photographs to the same standard that I would on my 27” iMac .
.
A simple mobile workflow solution in today's photography world is an absolute must. For me the iPad Pro was the perfect choice for what I needed.
However, I understand that for some people there will be other options more suitable to them.
I love the simplicity of the iPad Pro and wouldn't want to be without it.
This is a guest post about using the iPad pro as part of a mobile workflow solution, by wedding photographer Martin Bell.
Disclaimer: All recommendations are impartial and based on user experience, with no bias to the products or the brand. The products in this post may contain affiliate links.

Check out these 8 essential tools to help you succeed as a professional photographer.
Includes limited-time discounts.
14 Comments
Leave a Comment

👋 WELCOME TO SHOTKIT!
🔥 Popular NOW:

Hello! Thank you so much for writing this. I’m curious if you’ve tried using a “SC to USB-C” card reader? So instead of uploading on a desktop, you cull directly from on the SD. Not ideal, but wondering if that would be comparable with LR on the iPad and how that would effect the swiping/loading speed. Looking to speed up my culling process and (and on the go)… and I’m not normally a LR user. Thanks for an advice.
Hi Martin, very interesting article.
Personally, I’d love to be able to have a mobile workflow so I can start my serious culling asap after the job. Using photo mechanic, or importing my photos on my desktop would be a step I’d like to avoid.
Have you found any good workable ways to upload the photos straight to your iPad? Or is that just a no-go? I know that it’s technically possible but I’m more curious about if it’s doable in a fun way.
Thanks.
Warm regards, Bartjan
Hi Bartjan,
Thank you for your comment and pleased the article was helpful! I still import my images via my desktop and do an initial cull in PhotoMechanic as I find this the quickest and easiest way. I don’t upload any photographs to my iPad as it would take up too much memory within the device. Hope that helps.
Best wishes, Martin
Hello Bartjan
As Martin has suggested, there’s a whole separate discussion about use of space and whether or not to import directly into the iPad, but … IF you choose to upload directly to iPad, then I’ve found the best way to do this is via an Apple SD Card Reader attachment. It’s a normal SD Card Reader, but instead of connecting via a USB cable, it has a lightning port on the other end, and plugs directly into the iPad.
I’m not trying to sell for Apple, but it’s easy to use and photos then load instantly – the upload process is simple from there. I bought mine for about $60 AU directly from Apple and I use it regularly. Hope this helps
I use the iPad Pro 12.9 3rd Gen for editing my horse racing photos and I love it. I almost forgot how to use Lightroom Classic CC. I will try to sync from LR Classic CC moving forward. NICE POST and he has a very nice Website to accommodate his hard work.
Hi Jay,
Thank you so much for your lovely comment and I too take a little while to get used to the LR Classic CC after working on the iPad Pro for a period of time.
Best wishes, Martin
interested with the comment as to down side! “The only downside to the syncing is the time. It usually takes about an hour for 2,000 images to sync”, but a little time spent here will be a big saver later down the line. Downside is actually shooting 2,000 images!
Please explain
Hi John,
Pleased to. I am a wedding photographer and shoot on average about 3000-4000 images per wedding (sometimes more depending on the length of the day). Once all the images are imported onto various hard drives I then do an initial cull in PhotoMechanic for moments and then import the rest into my LR classic CC catalogue before syncing these across to my iPad Pro where I can do a further cull for sharpness. The number I sync is about 2000, sometimes more, sometimes less. I hope that helps.
Best wishes, Martin
I have always heard it’s important to turn True Tone off because it is not giving you accurate colors. This is due to the fact that with True Tone enabled, the screen will change color temp based on the particular ambient light you happen to be in at any given time.
Exactly right, Daniel – true tone is great for reading at night, but not for anything to do with image editing! :p
You’re exactly right Daniel. For when I am culling the photographs I keep True Tone on and when I am editing I turn it off to make sure the colour is correct. I also always do a second check for colour when I have finished the full set of photographs, before I export on my iMac, to make sure every image is consistent. Once I am happy I can then send the finished jpegs through to my clients. I hope that makes it clearer.
Very interesting and good to know. I really need to look into this for traveling!
Really please it was helpful Scott! :)
Thanks Mirko! Did you see this article?