


How to Create The Orton Effect for Dreamy Landscape Images
The Orton Effect may be overused, but for good reason - it's a fun and creative way to make your landscape images look dreamy! Here's how to do it.
Learn | Photography Guides | By Teryani Riggs
Shotkit may earn a commission on affiliate links. Learn more.
The Orton effect is a popular technique used in both landscape photography and portraiture, and even in movies like Peter Jackson's The Lord of the Rings.
Have you ever noticed ethereal landscape photos that look a bit soft and dreamy?
Maybe they reminded you of scenes from The Lord of the Rings movies or seemed vaguely reminiscent of a watercolor painting?
If so, you may very well have been looking at an image with the Orton effect.

Great software for adding the Orton Effect to photos in just one click
Many photographers use the Orton effect to add a bit of “special sauce” to their images.
In this article, we'll look at just what exactly the Orton effect is, how it can impact your photos, and how to apply the Orton effect in Adobe Photoshop, Lightroom, Luminar Neo, Luminar AI, and Luminar 4.
Ready? Let's jump right in!
What is the Orton Effect?

Many photographers use the Orton effect in their landscape photography to add a soft, dreamy look to their photos | Credit: Teryani Riggs
The Orton Effect was created in the 1980s by landscape photographer Michael Orton. He wanted to simulate the sort of dreamy glow that watercolor paintings have.
The original post-processing technique involved capturing at least two exposures of the same scene onto transparency film.
The first image would be in focus and exposed normally. The second image would be out of focus and slightly overexposed. The frames were then sandwiched together into a single image.
The end result would be a mixture of hard and soft details all suffused with a glow that created what Michael Orton himself referred to as a “painterly effect.”
The Orton Effect technique became so popular with landscape photographers that when things went digital, some post-processing programs began to include it.
The first was Adobe Photoshop Elements 10, the “Orton Effect” as a guided action in their 2011 release, but Luminar and others followed not too long after.
Luckily the Orton Effect is easy to create and apply to your own landscape photography.
Let's take a look at how it's done.
How to Create the Orton Effect in Photoshop
Like most effects, there are a number of different ways to create the Orton Effect in Photoshop. The one detailed here is my favorite. It's fast and gives you a lot of flexibility in controlling the final desired effect.
Start with a Raw file in Lightroom and make your basic edits first, including local edits such as those that require the Healing Brush tool. Don't apply any sharpening yet, as that's best done afterwards.
Once you're finished with the basic edits, send your image over to Adobe Photoshop – we're about to use a Photoshop Smart Object.
If you wish to do non-destructive editing (optional), create a Smart Object by right-clicking on the photo, scrolling down the menu and selecting Edit In > Edit as Smart Object in Photoshop. This will allow you to come back and make changes to the image later on.
Next, you'll need to make a copy of the background layer. If you're using smart objects, right-click on the background layer. This will open up a menu that includes New Smart Object Via Copy.
If you're not working with Smart Objects, select Duplicate Layer by using the keyboard shortcut: with the background layer selected, press command-J Mac or CTRL-J on Windows.
Do this again so that you have two additional layers.
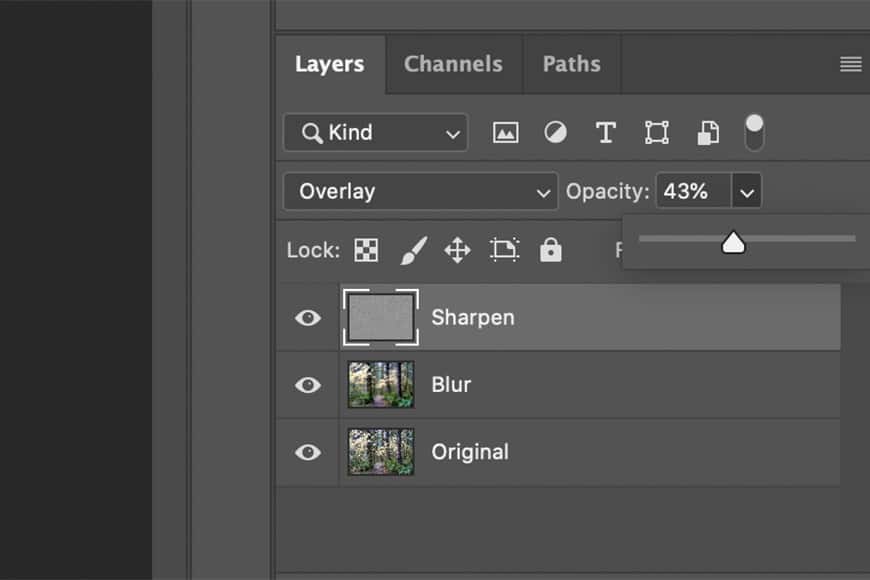
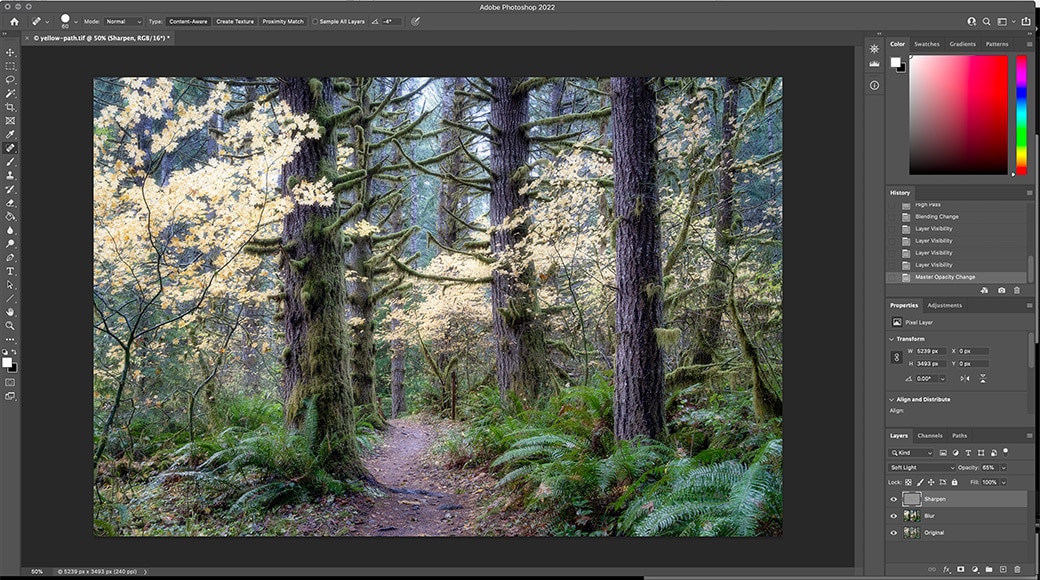
Rename the middle layer Blur and the top layer Sharpen. (I keep the background layer as a reference. Here it's renamed “Original” and unlocked.)
Note: Strictly speaking, you really only need two layers – Blur and Sharpen. I do this process with three because I like to have the base layer as a reference.

We'll be working with the Blur layer first. Sharpen should be on top and invisible.
Once that's done, uncheck the eye to the left of the Sharpen layer to make it invisible. It should look like the layers panel in the image above.
Next, click on the Blur layer and navigate to Gaussian Blur. (Filter -> Blur -> Gaussian Blur.)

With the middle layer selected, click on Gaussian Blur in the filter menu.
Once the Gaussian Blur box pops up, you'll need to choose a radius. This will be different depending on the image and what camera you're using, but a good starting point is to make the radius equal to the number of megapixels the image was shot at.
This forest image was shot at 24 megapixels, so I've set the radius value to 24.
The larger the radius, the stronger the glow and dream-like effect. It's ok to make it a little strong, as we'll be adjusting the layer opacity later.

Next, we'll need to add contrast. This is done by going to Image -> Adjustments -> Levels. (It can also be done with a Curves Adjustment Layer.)
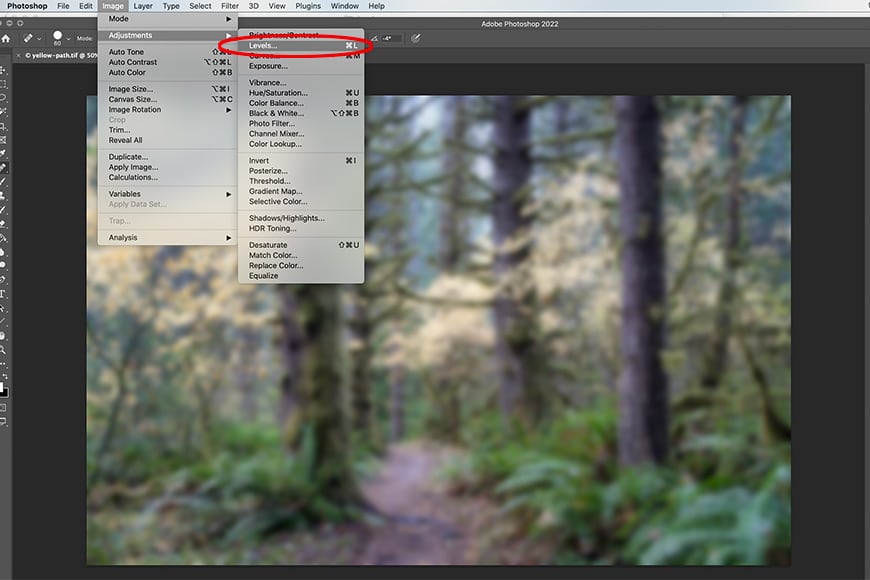
Pull the shadow slider far-right and the highlight slider far left until there’s a lot of contrast. Again, since we'll adjust the opacity later, we can go pretty strong here.

Here I've pulled my shadow slider into the value of “19” and the highlights slider to “213.”
Now that your image is all blurred and contrasty, make it invisible by reducing the layer opacity to 0.
Look away from the monitor for a moment before coming back to the screen and slowly adjusting the opacity back up, adding the blurred layer in little by little.
A little goes a long way here! Depending on how strong you made this effect layer, you shouldn't really need anything beyond 8-25%. I've set mine to 17% for this image.

The Gaussian Blur adds a nice glow, but it also reduces some of the detail and texture in your photo. As a result, we'll need to add that back in via the High Pass filter.
First, go back to the layers panel and make the Sharpen layer visible. (This will momentarily hide the Orton Effect layer.)
Next, go up to the top menu and hit Filter -> Other -> High Pass.
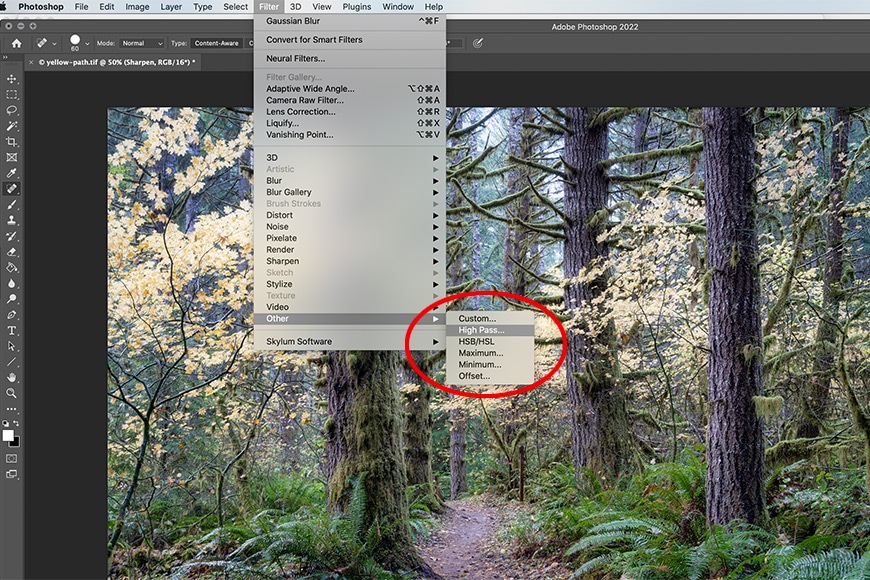
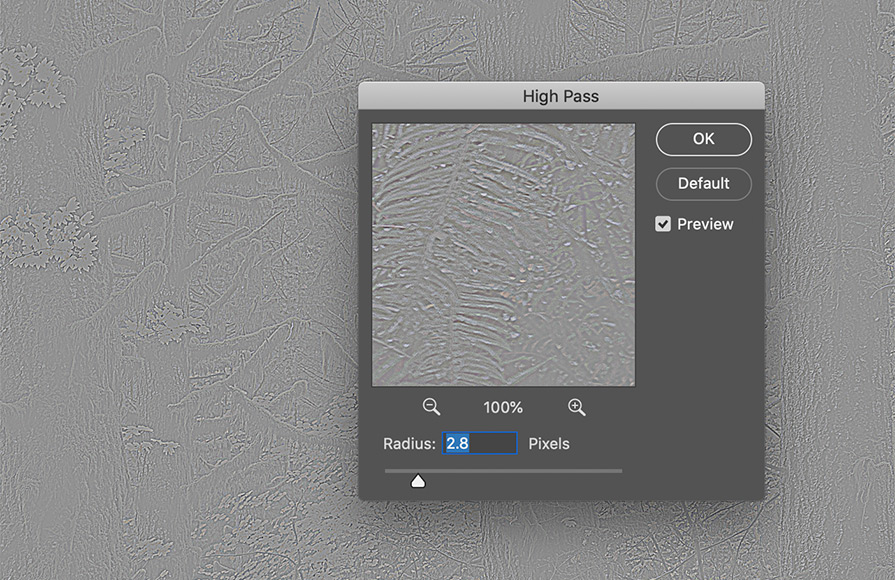
The box that pops up will ask you to choose a radius size again. Choose a value that just makes the edge outlines in the photo visible. In a full-size Raw photo, that will be somewhere between 2.8 – 3.2.
Again, the radius value depends on the camera used to capture the image. I tend to use somewhere between 2.8 – 3.2. The outline of your image's edges should just be visible.
To blend the filter into the photo, go up to the Blending Modes pull-down menu and choose either Soft Light or Overlay.

Next, use the layer opacity slider to fine-tune how much detail you want to add back in. If there are areas you want to remain softer than others, use a layer mask.
If you like, you can add the two top layers to a group and then adjust the group’s opacity. This is also helpful if you want to add a layer mask to control where the Orton Effect is applied.
The final image will have a blend of both soft and hard edges, as well as a dreamy glow.
There are other ways to apply the Orton Effect in Photoshop, but this method is both easy and powerful.
How to Create the Orton Effect in Lightroom
While not quite the real thing, we can come to a pretty close approximation of the Orton Effect in Lightroom.
Once you've done your basic edits, go to the Presence Panel in the Develop Module.
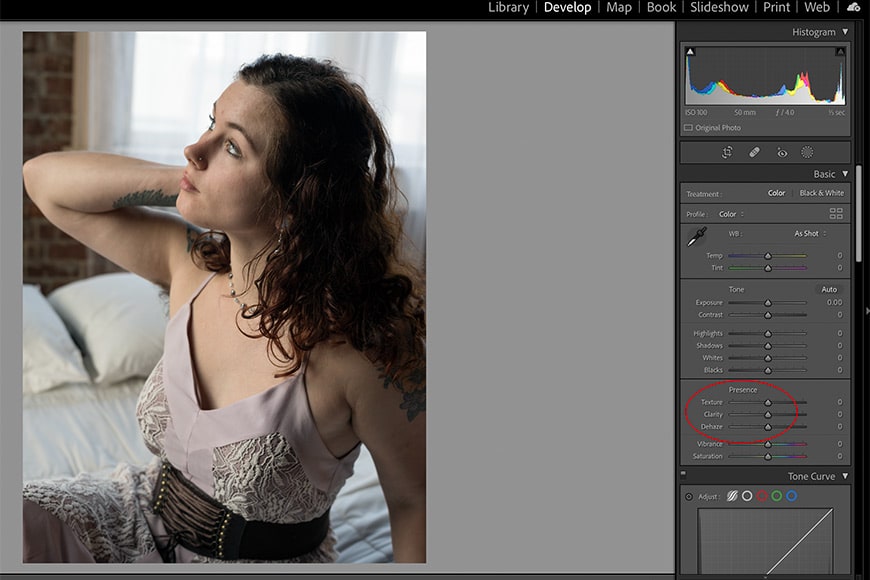
First, decrease the Clarity by moving the slider to the left. Negative clarity will blur out some of the fine contrast in the midtones while adding white to the midtones.
For portraits, I'd suggest somewhere in the -10 to -45 range. For normal landscape images, -5 to -10 will usually be enough. For foggy and/or dreamy landscape photos, you can go up to -45.
Next, adjust the Texture. Decreasing it (to the left) will reduce the micro-contrast, making the image softer and dreamier. Increasing it will add a bit of the detail back in.
In simplistic terms, the negative Clarity is what creates the soft glow, while the negative texture is what creates a “painterly” effect.
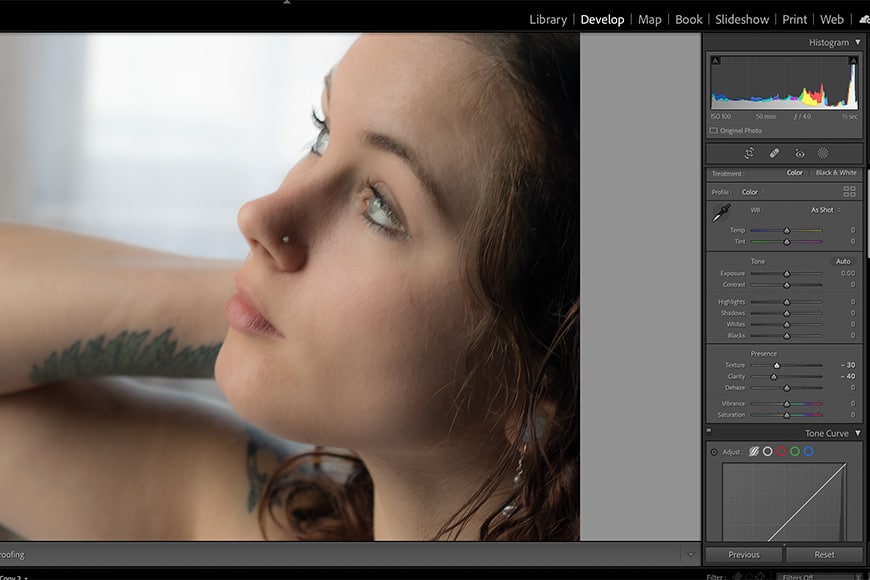
One aspect to having the Clarity and Texture in the negative, though, is that it'll blur out some of the finer details. To compensate for that, increase the Sharpening.
(Feel free to use an adjustment layer to just target important details while leaving the rest of the image soft.)

When creating the Orton-like effect, your image is likely to lose a bit of contrast. Most images will benefit from adding contrast back in at this point.
That's it!
While not quite the real thing, it's a bit less involved than creating the Orton effect in Photoshop.
How to Create the Orton Effect in Luminar Neo
Luminar Neo now includes dedicated Orton Effect and Orton Effect Soft options within the Glow tool, making it much easier to create that soft, dreamy look in just a few clicks.
In our full tutorial, we show you how to use the effect effectively, fine-tune the settings, and avoid an overly hazy or artificial result.
Find the full step-by-step here: How to Achieve the Orton Effect in Luminar Neo.
How to Create the Orton Effect in Luminar AI
Luminar makes it even easier to apply the Orton effect to images.
Process the photo as you normally would and then navigate down to the Glow filter in the Creative section.

Under Type, you’ll see two different Orton effects: Orton Effect and Orton Effect Soft. (Soft Focus also can give an Orton-like look, so try it out too.)

Note: Luminar's sliders really pack a punch, so go easy on them!
Personally, I prefer a very subtle Orton Effect, so I've only moved the slider to 12. Even that much has made my image a lot brighter.
If a high key photo isn't what you're going for, click on the Advanced Settings. There you'll be able to dial in the softness, brightness, contrast and warmth to find the look that works best for your photo.

As usual, leave the sharpening to the end.
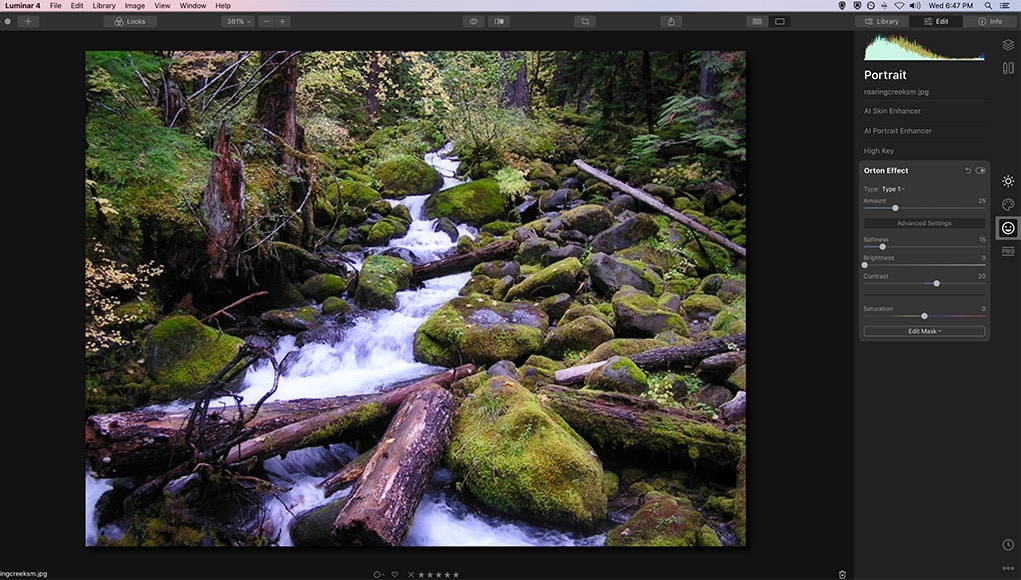
How to Create the Orton Effect in Luminar 4
Applying the Orton Effect in Luminar is pretty similar to using the Orton Effect filter in Luminar AI – it's just located in a different place.
In the Edit Module, navigate down to Portrait.
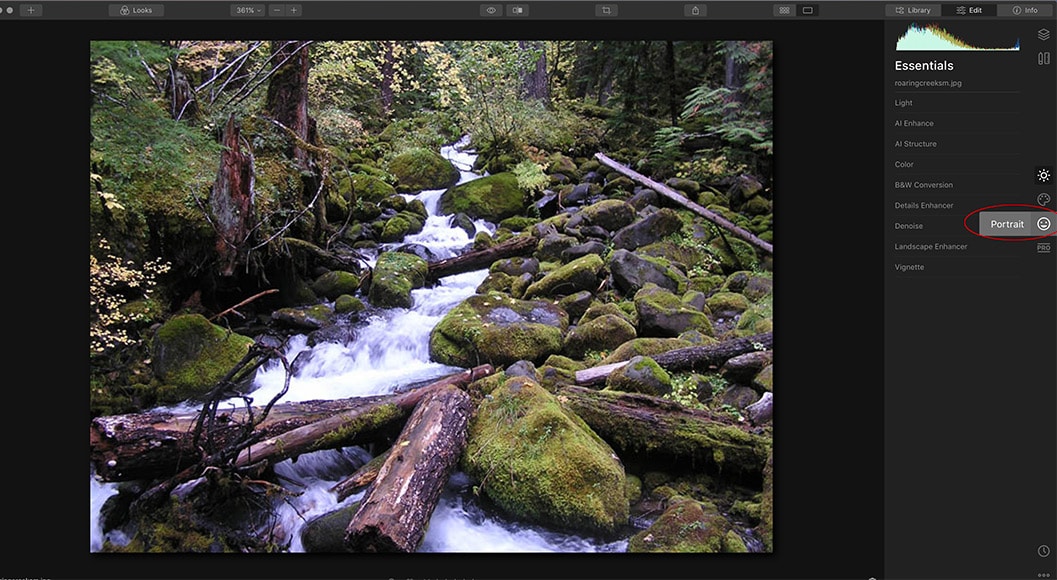
The Orton Effect is the last filter in the Portrait set. Clicking on it will give you the option of Type 1 or Type 2 Orton Effect, as well as an advanced settings panel and a layer mask option.
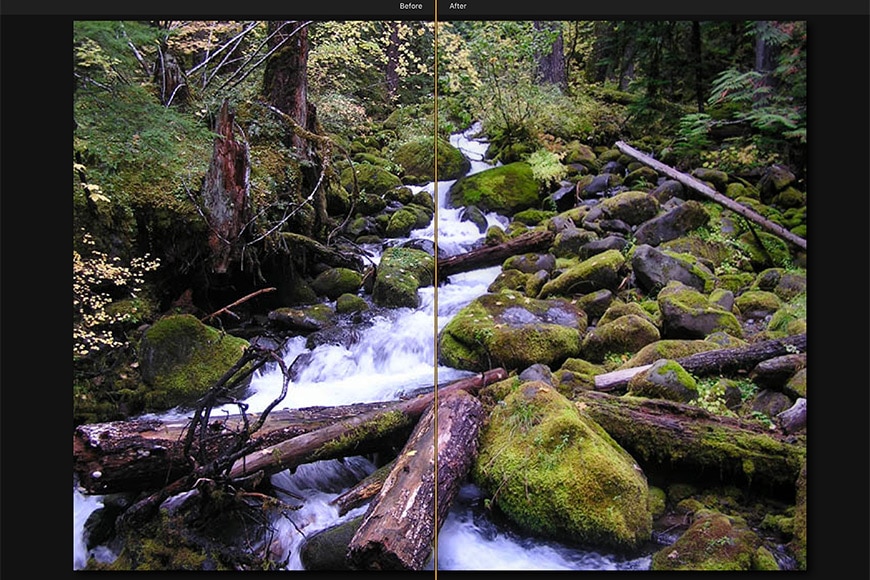
Here's the before and after:
Final Words
Whether you create Orton Effect images in Photoshop, approximate it in Lightroom, or use the Luminar filter, you'll be amazed at the difference it can make, transforming an ordinary image into something extraordinary.
In fact, most photographers use at least a little of the Orton Effect in their landscape photography. Many others love the soft glow it creates in portraits.
Either way, it's a wonderful technique to have in your toolset.
Just remember, when using the Orton Effect less is certainly more.
What about you? Have you ever used the Orton Effect to enhance your portraits or landscape photography? Do you think it's a magical tool or sorely overused? Let us know!

Check out these 8 essential tools to help you succeed as a professional photographer.
Includes limited-time discounts.
Teryani Riggs (they/them) is an adventure, who loves all things wild and free. Teryani can often be found in the midst of a social/eco-justice campaign, hiking through wild backcountry, or hitchhiking around the world listening to other people’s stories. While their focus has historically centered on landscape, travel, and wilderness photography, they’ve also been hired to shoot genres as varied as historical fiction reenactments in the studio to product and food photography.
2 Comments
Leave a Comment
👋 WELCOME TO SHOTKIT!
🔥 Popular NOW:

Thank you so much!
Truth be told, I use a touch of the Orton Effect in Luminar 4 quite a bit for my landscape photography. I have Luminar AI as well, but they somehow changed the Orton effect into more of a glow than is useful for me. :-(