


Understanding Overexposure & Underexposure
Underexposure and overexposure can be used creatively in photography, but they can also be unwanted outcomes. Learn why it happens and how to fix it.
Learn | Photography Guides | By Teryani Riggs
Shotkit may earn a commission on affiliate links. Learn more.
Regardless of where your photography skill level is at, understanding the nature of exposure is perhaps the single most important technical factor you'll ever learn.
In fact, it's safe to say that exposure lies at the heart of photography (both digital photography and film).
It not only determines how light and dark the tones interact in your photos, but the choices you make regarding exposure will also determine the overall look and feel of your photographs.
While there's no artistically “correct” exposure for an image – it all depends on the look you're going for – there are some basic tenets that determine whether a photo is overexposed, underexposed, or “just right.”
That's what we'll be focusing on in this article, as well as how to avoid unintentionally underexposed or overexposed photos.
Let's get started.
What is Overexposure?
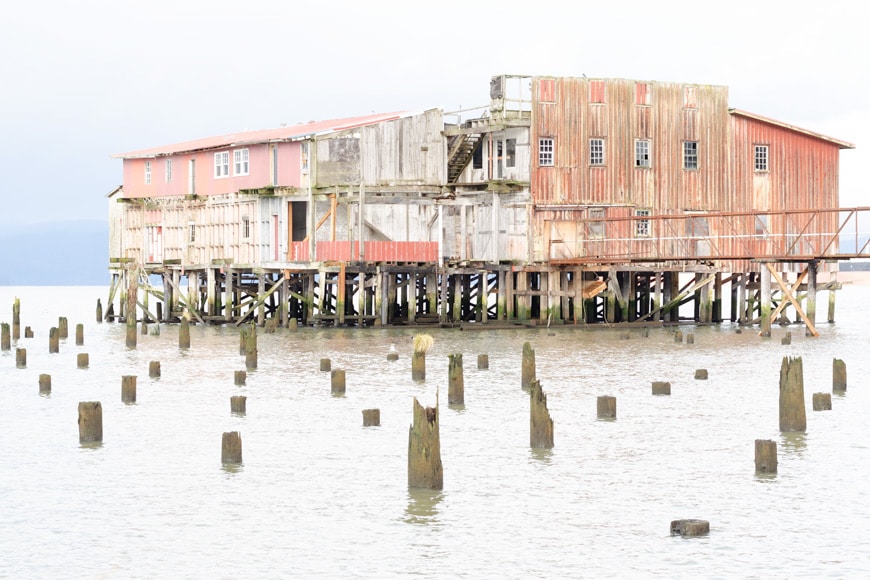
An overexposed photo will often have a bright, washed-out look.
Overexposure happens when too much light hits the camera sensor. The result is an image that is either brighter than it should be or one that has areas within it that are too bright.
Otherwise known as clipping, this is when you don’t have any details in the highlights of your image.
What is an Overexposed Photo?
Technically speaking, an overexposed image has a loss of detail in its highlights. This results in a washed-out image and/or the brightest areas of the image becoming completely white (also knowns as “clipped whites” or “blown-out highlights “).
Overexposure happens when something is off in your camera settings: either your aperture is too open, your shutter speed too slow, or your ISO is too high.
Now let's define the opposite of overexposure.
What is Underexposure?
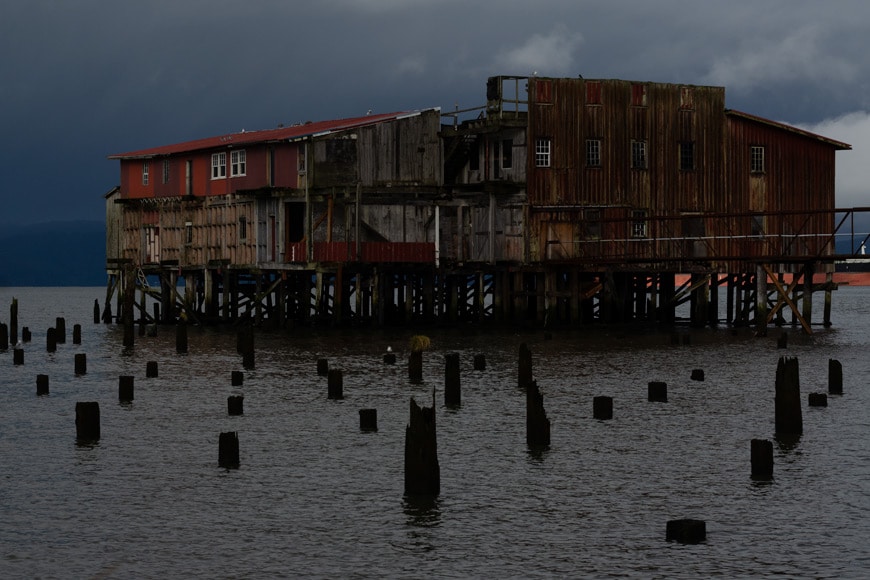
This underexposed photo has clipped blacks under the building and in the pylons in the water. It also is too dark overall.
Underexposure occurs when the amount of light hitting the camera sensor is too low. The resulting image comes across as too dark, with many of its shadows turning to black.
While underexposing just a little can deepen the color saturation in a pleasing way (especially for sunsets), too much underexposure can make it difficult to see the subjects in your photographs clearly.
What is an Underexposed Photo?
Technically speaking, an underexposed photo has a loss of detail in the shadow areas. This creates an image where it's literally hard to make out what's happening in the shadows.
It also tends to make the darker areas of the image turn to black (i.e. “clipped blacks”).
Like overexposure, underexposure happens as a result of having one of your settings off in the exposure triangle: either your shutter speed was too fast, your aperture too small, and/or your ISO too low.
What is Correct Exposure?
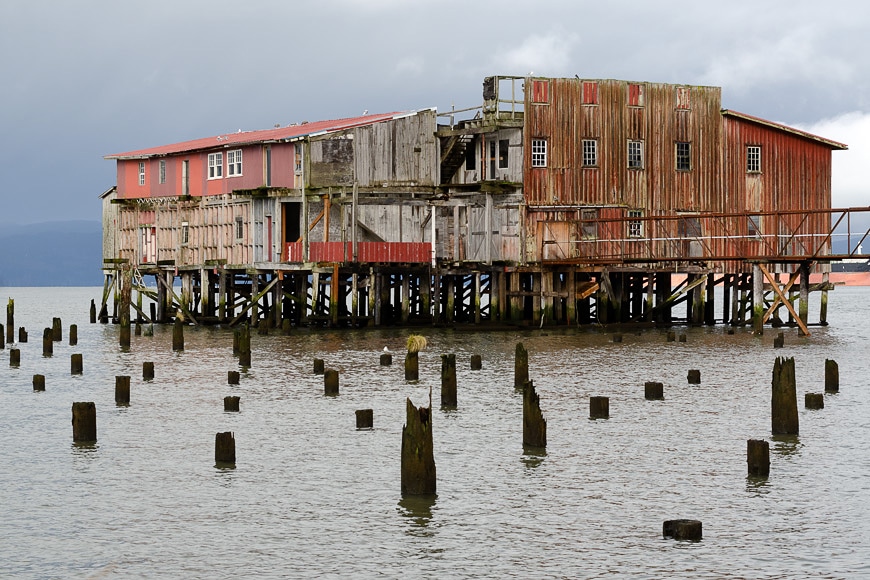
Technically speaking, “correct exposure” is where there are no clipped highlights or shadows. Artistically speaking, an image is correctly exposed when the photographer achieves their intended result.
Believe it or not, there's actually no such thing as a “correct exposure” – at least artistically speaking. If you achieve your intended effect, you've succeeded.
If you're not intentionally trying to make an overexposed or underexposed photograph, the best exposure is one where all of the information is still available in the highlights and shadows.
…and it's important to capture this “correct” in-camera. This is because photography editing programs like Adobe Lightroom may seem miraculous in their exposure correction abilities, but they can't do everything.
For example, you can't correct both the exposure and color at the same time. Correcting the exposure inevitably throws off some of the colors, regardless of whether you're correcting for overexposure or underexposure.
Some colors will be fine. Others will be changed considerably, depending on how much exposure correction you feel you need.
Of course, if having your colors remain exactly the same isn't that important to you, this won't be a big deal.
If you need your colors to remain spot on, though, then correctly exposing in-camera will be vital to you getting images you're shooting for.
9 Tips for Avoiding an Underexposed or Overexposed Photo
Under ordinary circumstances, correctly exposing your images in-camera isn't that difficult under ordinary circumstances. It just takes a bit of know-how and practice.
Here are a few tips to get you started:
1. Master the Exposure Triangle – The exposure triangle should be first on any budding photographer's list of phenomena to explore. It explains how the three elements of exposure – shutter speed, aperture, and ISO – work together to create the overall exposure of an image.
2. Use Your Camera's Exposure Meter – These days most digital cameras include some form of exposure meter. For example, when shooting in manual mode the Sony A7 III has a +/- exposure bar both in the viewfinder and in the LCD screen. Just change any element of the exposure triangle to move the little arrow into the middle and your image will be correctly exposed.
3. Learn to Read the Histogram – The histogram is a bar graph that shows where your pixels are in relation to pure black and pure white. Histograms have a lot of exposure information in them and learning to read them can make them your best friend, both for in-camera exposure and during post-processing.
4. Use Exposure Compensation – If you're shooting in aperture or shutter priority mode, you can use your camera's exposure compensation dial to override the camera's exposure settings.
5. Turn on your “Blinkies” – Many cameras come equipped with a feature that tells you when your highlights are getting clipped. This highlight alert blinks in the areas where your highlights are blown out when you're reviewing your photos.
6. Use Exposure Bracketing – If you're not sure what exposure will be best for an image, turn on your camera's exposure bracketing. This tells your camera to take three shots every time you press the shutter button. One photo will be as your settings dictate. The other two will be a darker and lighter version (usually by a +1 and -1 exposure value). Just be aware, for longer exposures you'll need to have your camera stabilized (i.e. a tripod).
7. Invest in a Light Meter – If you're doing flash photography, an external light meter will help you nail your settings every time. They're well worth the investment – especially for studio photography.
8. Keep Your ISO Low – Your ISO setting determines your camera sensor's sensitivity to light. Too high of an ISO can not only overexpose your image, it could also introduce noise. Good rules of thumb when starting out is to shoot at ISO 100 in direct sunlight, ISO 400 on an overcast day, and ISO 800 indoors. You can use higher ISOs in low-light situations, depending on your camera's capabilities.
9. Expose for the Highlights – If you're working with a scene that has both bright highlights and dark shadows and you're not wanting to shoot in HDR, set your camera's exposure for the highlights. This won't give you a perfectly exposed photo, but it'll help you out considerably in post-processing, as it’s much easier to recover detail in the shadows than it is in the highlights.
How to Fix an Overexposed Photo

The circled sliders are the ones most often used for correcting overexposure. It's helpful to keep an eye on the histogram when fixing overexposure issues. The little triangle in the upper right will remain lit as long as you have clipped highlights. When it turns off, you're out of the danger zone.
Ok, for whatever reason you've landed an overexposed photo. Now what?
First, let's hope you were shooting in Raw. Shooting in Raw allows you much more flexibility in working with your photos. You can shift the exposure much farther without damaging the image – just how far will depend on your camera's sensor and the amount of dynamic range.
That being said, the tips below for fixing overexposed photos in Adobe Lightroom work for both Raw photos and Jpegs. If you don't already own Lr, find out the best way to buy it here.
1. The Exposure Slider
If your image is universally overexposed, the exposure slider is a good place to start. Move it to the left to globally decrease the overall brightness of your image. But beware – this slider packs a strong punch. Go slowly.
It's helpful to keep an eye on the histogram here. It'll let you know when you've gone too far – especially if you have the clipped highlights/shadows triangles engaged.
Note: with Raw images, (depending on your camera), you'll have somewhere around 4-6 stops of play before negatively affecting the quality of your image. In Adobe Lightroom, this means moving the slider down to -2/-3 for an overexposed image.
2. The Highlights Slider
If only the brightest parts of your photograph are suffering from overexposure, then the Highlights slider will be your best friend. Depending on how far they're blown out, this slider can help you recover highlight data without affecting the overall brightness of the image.
3. The Whites Slider
The Whites slider affects the brightness of the mid-tones of your image. Pull it to the left and you'll take the brightness of your mid-tones down. Just be careful – the mid-tones contain a lot of vital information and going too far here can take the life out of your photo.
4. Adjust the Levels/Curves
While this doesn't target exposure specifically, correcting the levels and/or curves of an image can often fix mild exposure issues. It will also positively affect the contrast.
Not sure how to do this? Adobe Photoshop has an excellent “auto adjust” option in its Curves adjustment dialogue.
5. The Local Adjustment Tools
If you want to affect some areas and not others, Lightroom has some great local adjustment tools. Use the adjustment brush to paint over areas that are too bright or the graduated filter for lowering the exposure from one side to the other (i.e. skies).
How to Fix an Underexposed Photo
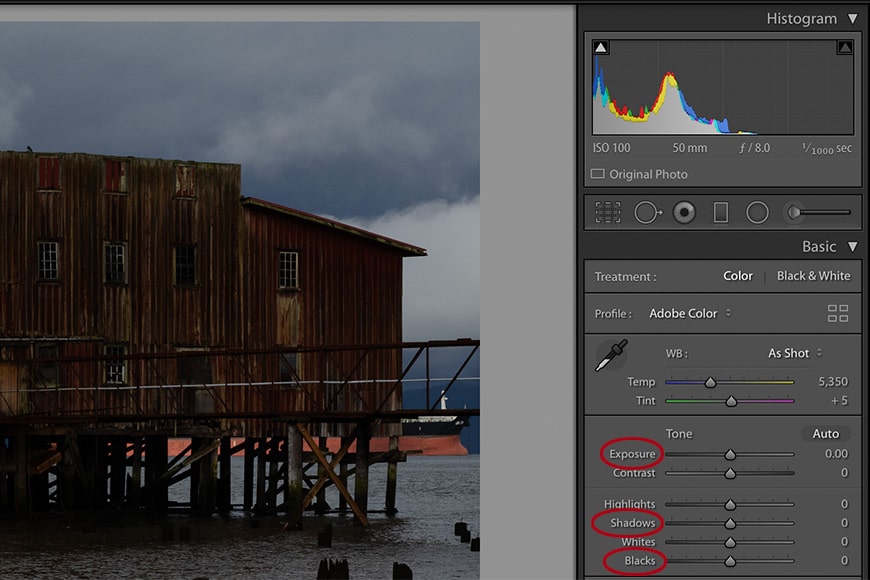
Here, the main sliders you'll use are again the exposure slider, with the possible addition of the shadows and blacks sliders. Notice that the histogram has the clipped blacks triangle lit.
As far as the sliders are concerned, fixing an underexposed photo in Lightroom is pretty much doing the opposite of what you'd do for an overexposed photo.
1. The Exposure Slider
To increase the brightness of an entire image, move the exposure slider to the right – slowly.
Again, it's helpful to watch the histogram so you can tell when you've gone too far and/or when you've moved out of the danger zone of clipped shadows.
2. The Shadows Slider
If you only want to lighten the darkest areas of your image, move the Shadows slider to the right. It'll raise the shadows and help you recover detail that was lost due to underexposure.
3. The Blacks Slider
Like the Whites slider, the Blacks slider works with the midtones in your photo. Pull it to the right and you'll brighten the black midtones. Again, be careful here. Raising the black midtones can reduce contrast considerably. A little goes a long way.
4. Adjust the Levels/Curves
Similar to working with overexposed images, correcting the levels and/or curves of a photo will often fix mild exposure issues.
5. Use Local Adjustment Tools
Use the adjustment brush to selectively paint over areas that you want to brighten, the graduated filter for brightening foregrounds without affecting the sky, and/or the radial filter for brightening faces.
Final Words
All photographers end up with unintentionally over- and underexposed photos from time to time. The more you actively practice mastering the elements of the exposure triangle – shutter speed, aperture, and ISO – the more you'll be able to avoid unintended exposure issues.
If you're not already, shooting in manual mode will speed up your learning considerably. (Mirrorless cameras have an advantage here, as you can immediately see what the effects of any changes in settings will do to the overall photograph.)
Other than this, shoot in Raw, watch your in-camera meters, and practice, practice, practice.
Have any other tips we should know about?

Check out these 8 essential tools to help you succeed as a professional photographer.
Includes limited-time discounts.
Teryani Riggs (they/them) is an adventure, who loves all things wild and free. Teryani can often be found in the midst of a social/eco-justice campaign, hiking through wild backcountry, or hitchhiking around the world listening to other people’s stories. While their focus has historically centered on landscape, travel, and wilderness photography, they’ve also been hired to shoot genres as varied as historical fiction reenactments in the studio to product and food photography.
3 Comments
Leave a Comment
👋 WELCOME TO SHOTKIT!
🔥 Popular NOW:

Hi, Imwondering if :
This won’t give you a perfectly exposed photo, but it’ll help you out considerably in post-processing, as it’s much easier to recover detail in the shadows than it is in the highlights.
Should be :
This won’t give you a perfectly exposed photo, but it’ll help you out considerably in post-processing, as it’s much easier to recover detail in the « highlights » than it is in the « shadows ».
Hey John – typically, it’s easier to recover underexposed details than overexposed ones. Have you found something different with your camera?
I’m curious, how many folks choose to deal with exposure issues with exposure bracketing?