


How to Photomerge in Photoshop Elements
Whether you're merging photos of people together or joining panoramas, this step-by-step guide to Photoshop Elements Photomerge will help.
Shotkit may earn a commission on affiliate links. Learn more.
The Photomerge tool in Photoshop Elements guarantees you the best approach to combining two or more images into one composition.

Download the latest version of Adobe Photoshop Elements to follow along with this simple tutorial.
I frequently use Elements’ Photomerge tool to combine images with clashing elements, and I can attest to its simplicity and straightforwardness.
Here’s a guide on using Photoshop Elements to merge your images.
The Photomerge Tool in Photoshop Elements Explained
Photoshop elements is among the most popular photo editing software used by thousands of professionals to improve how their captures look.
Photomerge is one of the innovative features available that allows you to combine two or more images into one image while eliminating all the complexities involved.
You’ll find the Photomerge tool under the Guided tab on Photoshop Elements’ start-up page at the top.
It includes several tools that make it easy to transfer elements from one picture to another and compose them into one seamless image.
- Want to learn how to blend photos in the full version of Photoshop? Follow this tutorial on Photoshop merging instead.
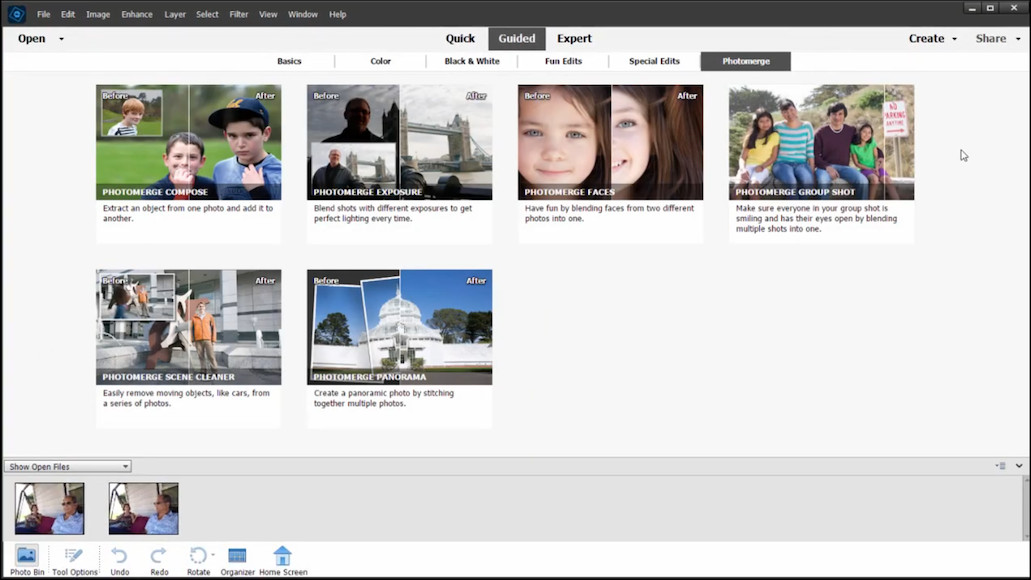
There are six presets available in the program, each handling specific elements on merging.
Photomerge Compose allows you to take two or more photos and blend specific elements into a single image.
Photomerge Exposure primarily deals with light exposure. It helps you merge your photos and retains the best-exposed parts.
Photomerge Faces allows you to manipulate the facial features of different people in different images to make funny or new photos.
Photomerge Group Shot is ideal for individuals editing group photos. This tool assists you in merging people into one or more group photos to achieve the perfect print.
Photomerge Cleaner eliminates obstructing objects, creating a new scene for your photos.
Photoshop Panorama allows you to blend images with a vast area or object into a single photo. For example, it could be images of a large field or stadium.
All these tools work in a similar fashion and can be accessed from within the photo editor.
How to Photomerge in Photoshop Elements
The guided mode in Photoshop Elements provides a wizard-like interface that accomplishes specific predefined effects.
Each option has an associated image, and you’ll see the image before and after the effect by moving the mouse horizontally.
This section explains how to navigate the different Photomerge options available in Photoshop Elements.
Using Photomerge Compose
This feature allows editors to replace image portions seamlessly and effortlessly.
For example, you can move a person from one photo to another, and not even a keen eye can observe the image manipulation. Here’s how to effectively use the Photomerge Compose feature:
1. Select two photos and save them in the Photo Bin.
2. In the Guided tab, click Photomerge Compose under the Photomerge window.

3. From the Photo Bin, drag the image you want to remove the person or object from.
4. Click one option from the Selection tools available and press Next to proceed. These Selection Modes assist in refining the selected areas.
5. You’ll notice that the selected portion in the previous step will be pasted on your base image. Ideally, the program should achieve the perfect fit and position of the added elements.
You can also move the selection around using the mouse and resize by dragging the coach marks. Resizing and proper positioning are crucial to ensure the pasted content falls proportionately to the rest of the photo.
6. The next step is to adjust the tonal and color values of the pasted elements to ensure they blend with the existing features. You can automate this step by clicking on Auto Match Color Tone.
7. After achieving the desired image outcome, save your work.
Using Photomerge Exposure
Photoshop Elements also has tools dedicated to helping you solve exposure challenges in your images.
It makes it easier to blend several photos with different lighting characteristics into one perfectly exposed image.
For satisfactory results, it’s wise to try the following during your photo session:
- Take two or more shots with the flash turned on to get properly exposed images
- Then take more shots with the flash turned off to expose the scenery properly
There are two modes available in Photomerge Exposure: Automatic and Manual mode. Here’s how to use each to transform your images.
Automatic
1. From the Elements Organizer, select the required images and add them to the Photo Bin.
2. Click Photomerge Exposure in the Photomerge window. Ensure you add a minimum of two and a maximum of ten images in the Photo Bin for satisfactory results.

Select Automatic in the Photomerge Exposure tab and select any of the options below:
- Simple blending, which doesn’t allow manipulation of the Photomerge Exposure Settings
- Smart blending, which allows the user to adjust exposure settings using sliders.
After achieving your desired results, click Next to save and share your creation.
Manual
It’s helpful to note that Manual Photomerge Exposure is your default mode if using photos taken with the flash on.
Start by choosing Photomerge Exposure in the Photomerge tab.
Select between two and ten photos and add them to the Photo bin. Photoshop Elements will display the selected photos for more straightforward navigation.
Select the exposed sections from the source by:
- Clicking the Pencil tool and using your mouse to paint the exposed areas in your source image
- Clicking the Eraser tool and using your mouse to paint over the regions to expose
You can also change the transparency levels of the selected regions to achieve a perfect blend or smoothen the blended edges by selecting Edge Blending.
If you want to correct how the photos align, click the Alignment Tool and select Advanced Options.
Ensure you save your work after achieving the desired results.
Using Photomerge Faces
Photomerge Faces is the perfect tool to combine and manipulate facial features. Here is a guide on how to use it.
1. Identify the images you plan to work on by opening the face image photos or selecting them in the Elements Organizer.
2. Choose Photomerge Faces in the Photomerge window.
3. Select one of the face photos in the bin as your base image and drag it to the Final window.
4. In the Photo Bin, click another image and open the Alignment tool.
5. The Alignment tool has three alignment markers. Place these markers on the eyes and mouth of the source and final image, then click Align Photos.
6. Select other images in the Photo Bin and use the Pencil tool to mark areas you’d like merged in the final photo. You can also use the Pencil and Eraser tool to fine-tune the final image by adding and removing some elements.
Click Next to either save, continue editing or share your final image.
Using Photomerge Group Shot
When shooting groups, it’s always wise to have multiple images of the same photo session to improve your chances of securing the best results.
Here’s how to merge multiple group photos using Elements.
1. The first step is selecting the group photos you want to manipulate with the editor by either:
- Going to the Elements Organizer
- Opening photos in Photoshop Elements
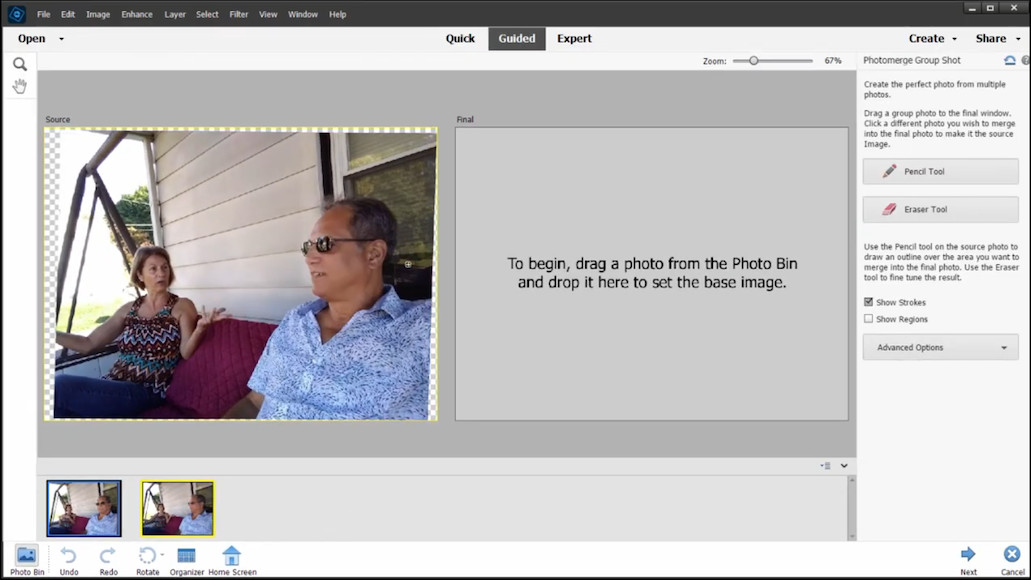
2. In the Guided tab, select Photomerge Group Shot under the Photomerge window.
3. Identify the best group photo in your collection, and move it from the Photo Bin to the Final window.
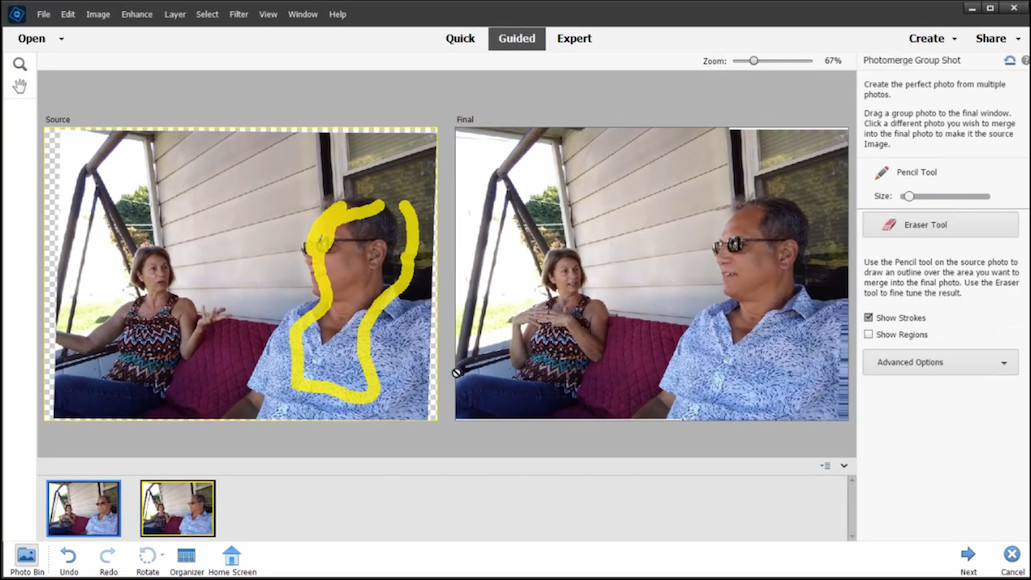
4. The next step involves selecting the other photos in the Photo Bin. Using the Pencil tool, mark the areas to merge into the final shot.
You can add additional content and fine-tune the final image using the Pencil or Eraser tool.
The following are some Pencil commands that can help you achieve satisfactory results;
- Use the Show Strokes option to show the Pencil Strokes marked in the final image
- Click Show Regions to reveal the regions selected in the final image
- Select Advanced Options to expand or collapse additional settings
- Use the Alignment Tool to correct how the multiple photos appear in the final image
- Click the Pixel Blending option to achieve a uniform blend of pixels in the final image
5. Once the outcome meets your expectations, click Next to Save, Continue Editing or Share your photo.
Using Photomerge Scene Cleaner
You can use the Photomerge feature in Photoshop Elements to create the perfect scenic photo using several images.
For best results, it’s always a good idea to use images with the same scene and a common angle. Here’s how to use the Photomerge Scene Cleaner:
1. Start by selecting two to ten photos in the Elements Organizer or by clicking Open Photos in Photoshop Elements.
2. Choose the Photomerge Scene Cleaner preset under the Photomerge tab in the Guided room.
3. Identify the best photo in the Photo Bin and drag it to the Final window. Note that the photo selected is your base image for the final image.
4. From the Bin, click any photo from which you want to transfer elements to the base image, and it will appear in the Source Window.
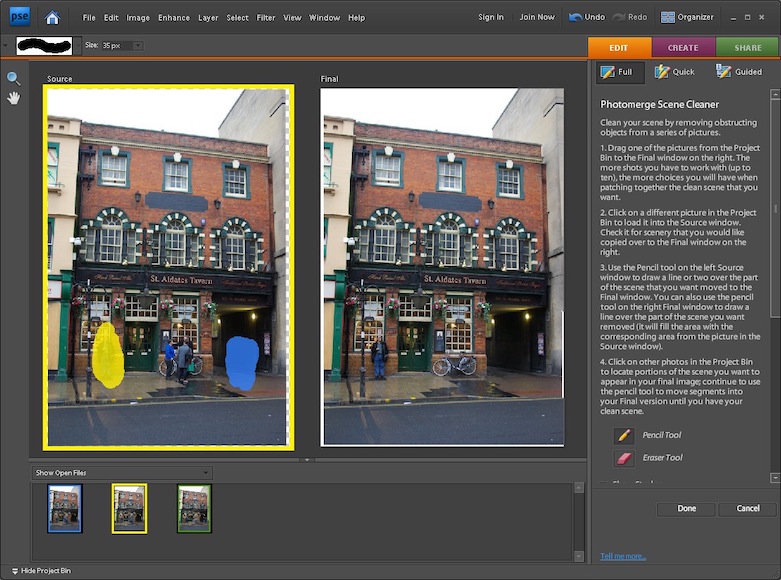
5. You’ll need to add or remove specific elements from the selected images. Here’s how:
- To remove a section, mark the areas you want to remove using the Pencil tool
- To add a section in the final image, mark the areas in the Source window using the Pencil tool
- To fine-tune the final photo, use the Pencil or Eraser tool to add or remove image contents
You can consider using the optional advanced features like the Alignment Tool and Pixel Blending to improve the final image.
Click Next to Save or Share your transformed image.
Using Photomerge Panorama
Using the Panorama Guided Effect in Photoshop Elements, you can stitch several pictures together. These pictures must have common overlapping regions in their characteristics.
To use Photomerge Panorama, do the following:
1. Start by adding the images to work with to the Photo Bin, then choose Photomerge Panorama on the presets page.
2. Choose which pan motion and layout settings you want from the Panorama Settings area in the Photomerge panel.

To see the options available, click the triangle. The options available include:
- Auto Panorama, which analyzes the source image and determines the ideal layout for a better merge
- Perspective, which creates consistent compositions by designating a reference image in your collection
- Cylindrical, which reduces the “bow-tie” distortion common with perspective layouts
- Other options include Spherical, Collage, and Reposition
3. Next, click the Settings checkboxes to fine-tune how the panorama looks. Here are the options available:
- Blend Images Together identifies the optimal border between the selected images and seamlessly joins the edges while color-matching the photos
- Vignette Removal executes exposure compensation in photos with darkened edges. Related: how to add a vignette effect in Photoshop Elements.
- Geometric Distortion Correction compensates for barrel, fisheye, and pincushion distortion in the final image
- Content-Aware Fill Transparent Areas fills all transparent areas with similar image content seamlessly
4. Click Create Panorama, and Elements will analyze the selected images to create a panorama.
You’ll get a preview of the new image created in the Expert view tab.
5. After getting a satisfactory outcome, save your work.
Frequently Asked Questions
Where is Photomerge in Photoshop Elements?
You can find all the Photomerge settings under the guided tab on the Photoshop Elements start-up page.
This feature has all the necessary tools to manipulate two or more images into one enhanced image and provides multiple configuration options.
Does Photoshop Elements Support HDR?
Unfortunately, Photoshop Elements doesn’t support High Dynamic Range capabilities. However, there are several approaches you can use to allow the program to create HDR images.
If you’re undecided about what editing software to use, check out how Photoshop Elements compares to Lightroom.

Jeff Collier is an experienced film photographer who enjoys experimenting with modern digital photography equipment, software and apps. He’s also an ex-world champion triathlete and avid cyclist, clocking hundreds of km each week in the beautiful Tweed Valley of northern NSW, Australia.
1 Comment
Leave a Comment

👋 WELCOME TO SHOTKIT!
🔥 Popular NOW:

I have tried to find information on opening photomerge (.pmg) files that were saved in PSE 15, but seems it can’t be done. I have an older version of PS CS2 which has the option of opening an working with .pmg files. How can I open .pmg files with PSE 15? Thanks for your help.