


How to Add a Vignette Effect in Photoshop Elements
Photoshop Elements makes it dead simple to add a vignette effect to your photos. Follow along with this tutorial to find out the quickest ways to do it.
Shotkit may earn a commission on affiliate links. Learn more.
Adding a vignette in Photoshop Elements is a great way to direct your viewer's eye to the subject in your photo.
I find myself using the Photoshop Elements vignette tool on almost every single one of the pictures I edit – especially portraits.
Here are a couple of simple ways how you can use the vignette tool yourself.

Download the latest version of Adobe Photoshop Elements to follow along with this simple tutorial.
Understanding the Vignette Tool in Photoshop Elements
Vignetting reduces an image's brightness and saturation on the edges, providing more focus to the center. It results in a clear center part as it fades out the edges.
One of the most practical ways to create your vignette is using Photoshop Elements. This platform makes it easy to edit your image using the dozens of features available.
Generally, Elements is logically organized and automated for improved practicality.
It ensures you have everything you need for image editing and customization. It would help to note that you'll have to consider manually installing some applications like Camera Raw.
There are three different sections in Photoshop Elements; the Organizer, Home Page, and Photo Editor. On the Home Screen, you get direct access to news and special tasks like accessing recent projects and creating slideshows.
The organizer tab handles all the photo management tasks, from rating, importing, and captioning. Elements provides the necessary resources to sort photos logically and automatically, unlike other platforms.
It handles everything from creating image albums to identifying and stacking faces in standardized groups like friends or family.
“]Everything juicy on the platform happens at the Photo Editor and is where you'll spend most of your time. Three options are available at the main window's top; Quick, Guided, and Expert.
Choosing the Quick tab provides you with essential editing functions like Smart Fix.
These functions are ideal for anybody new to Photoshop Elements or image editing as they often successfully deliver. For those who might want more control, there are options to tweak lighting, exposure, color balance, and sharpening.
The Guided option guarantees step-by-step assistance through all the editing tasks, from correcting skin tone to resizing its boundaries.
The edits available are conveniently organized in categories like Color, Basics, and Special edits for easier identification.
Users who want to work on their images manually with a Photoshop-like interface and access to selections and layers should consider Expert mode.
It allows you to explore the hundreds of manual adjustments available, providing more control over the results.
An automatic toolbar is available in Quick and Expert Modes for automatic and manual adjustments.
Photoshop Elements also comes with some valuable and time-saving special features. It would be wise to understand the effectiveness of each tool depends on the image.
For example, when using the sky replacement feature, you must match the image's lighting and exposure with the selected substitute sky.
Step-by-Step Guide to Vignetting in Photoshop Elements
Using Photoshop Elements to create a vignette is the most straightforward and practical approach.
You'll first need to identify your image's subject to determine which area to vignette.
This section explains more about the different techniques to use Elements for efficient vignetting.
The Guided Edit Technique
You can create a vignette effect on your image using the guided edit process available in Photoshop Elements. It is the easiest approach as it provides access to in-built vignette techniques in the platform.

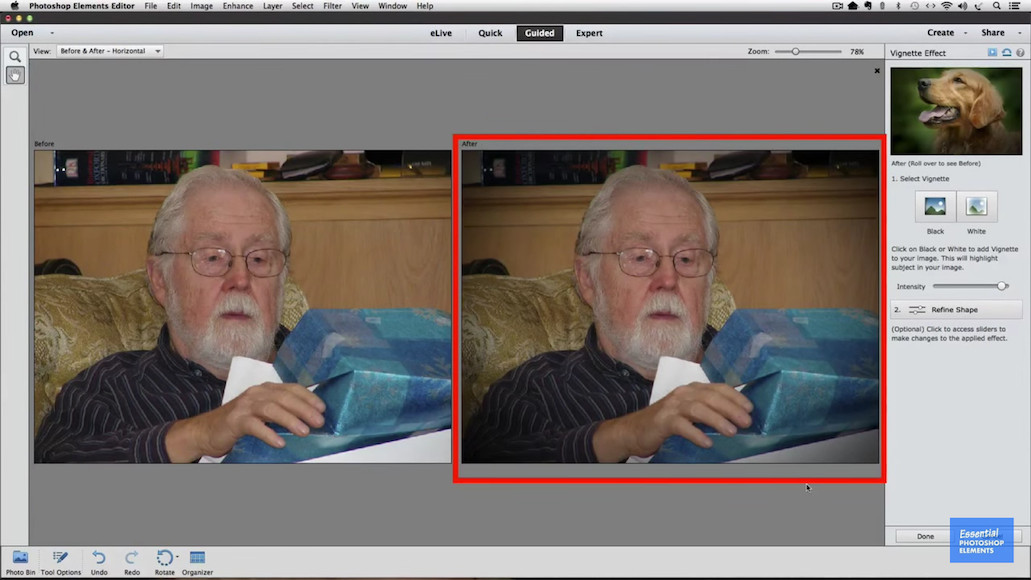
Start by clicking the Guided tab on the window's top. On the left of your window, you'll observe two tools. Click on the view dialog box, and select Before&After- Horizontal to get a side-by-side view of the image before and after manipulation.
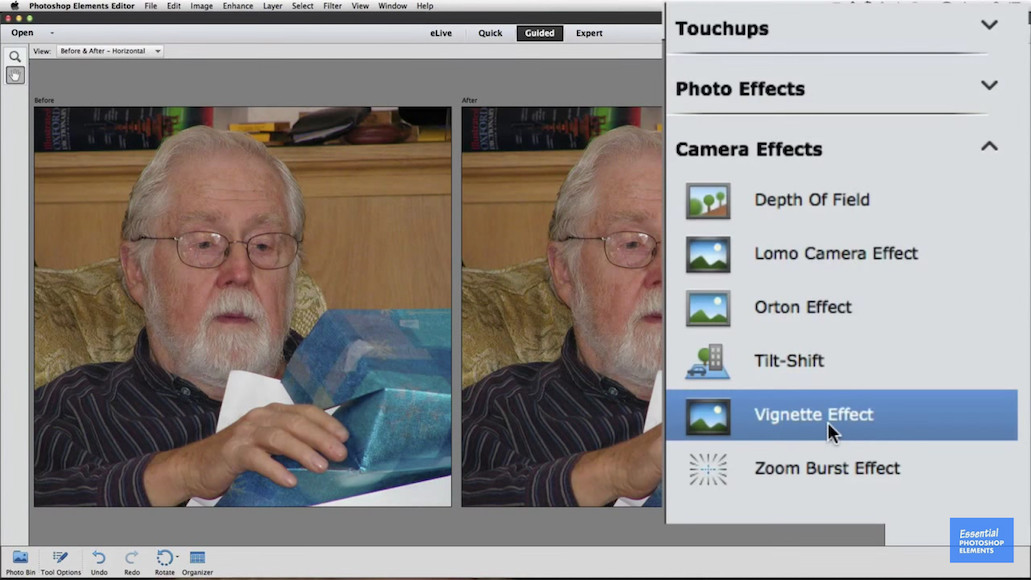
On the right panel, click on camera effects to see the available presets. Choose the vignette effect from the drop-down list that appears, and the panel will display instructions on installing a vignette.
The vignette effect panel allows you to configure your image's vignette ideally for satisfactory results. The first option lets you choose the color of the vignette between black and white.
The intensity slider makes it easy to adjust the effect's boldness on your image. An optional refine shape feature is available to help adjust the effects design; roundness and feather.
Ensure you save your work by clicking done at the page's bottom.
The Expert Technique
The best way to create custom vignettes is through the expert approach. This technique provides you more control over the process by allowing you to tweak even the most minor elements in your image.
Start by selecting the Expert tab at the top of the page. On the left, you'll observe several customization icons; on the right is the layer's panel.

Create a new layer by clicking the create a new layer icon shaped like a folded white paper. It adds a new transparent layer on the background and is named layer one automatically.

Click the Edit menu, and choose Fill layer to add shades of black. Choose black in the dialog box that appears and confirm to apply the changes to your image.
Applying the changes will have the layer change to black and block the image. Go to the layers panel, and turn off layer one visibility by clicking on the eye icon beside it.
Select the Marquee tool on the left side menu to design how the vignette effect will appear. Set the feather to zero and activate the device by clicking on the page's bottom.
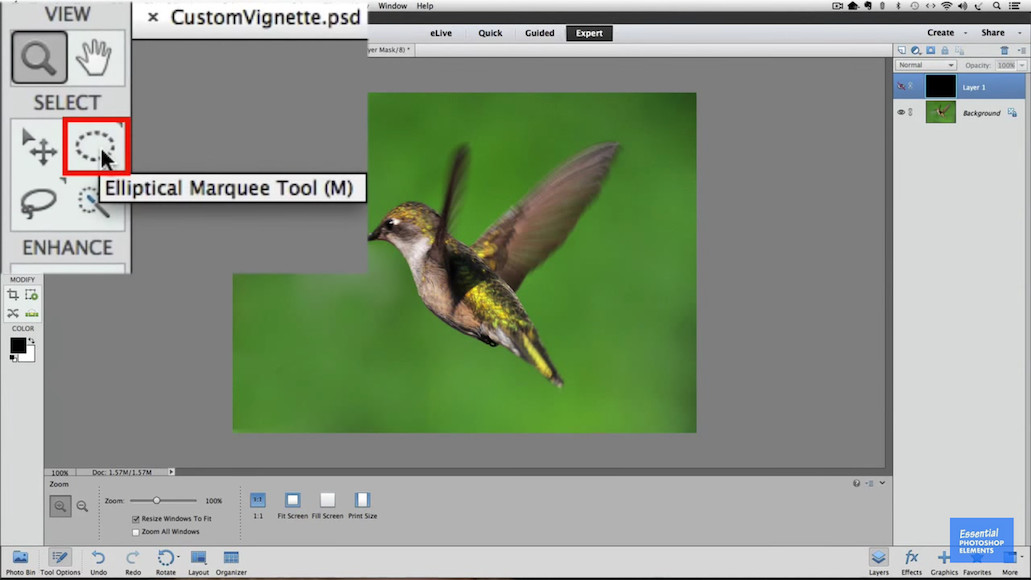
Click and drag on your photo diagonally until the subject falls within the shape boundaries. You can also move and adjust the selection by clicking and dragging while using the tools available in the Enhance folder.
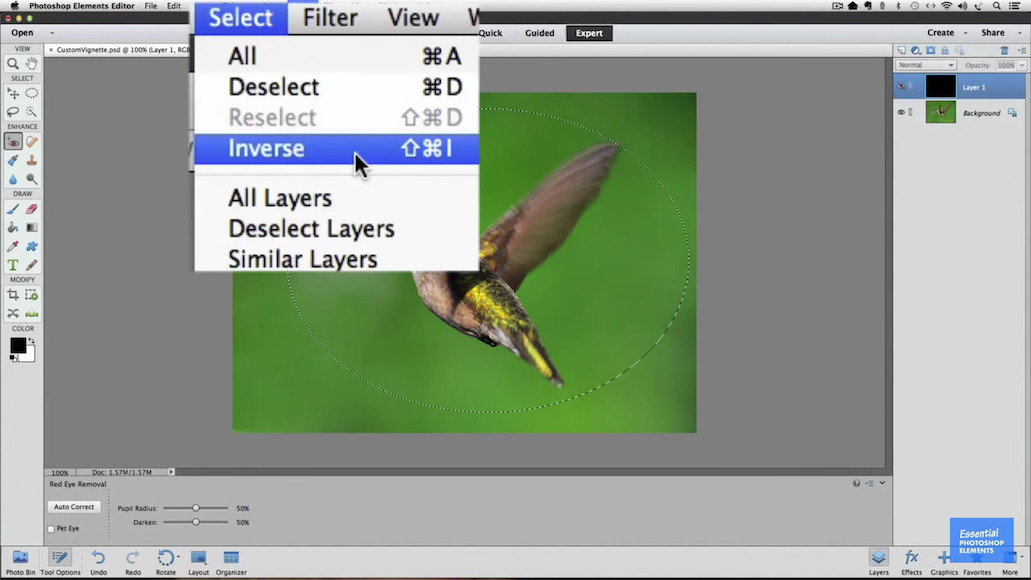
Inverse selection involves having everything apart from the subject selected in the image. Select Inverse in the drop down menu available on the Select tab to do this. (Shift+Ctrl+I)
The next step is turning Layer 1 visibility on by clicking on the eye icon in the layer's panel. Still, on the layer's panel, add a layer mask by clicking the rectangular icon with a transparent circle.
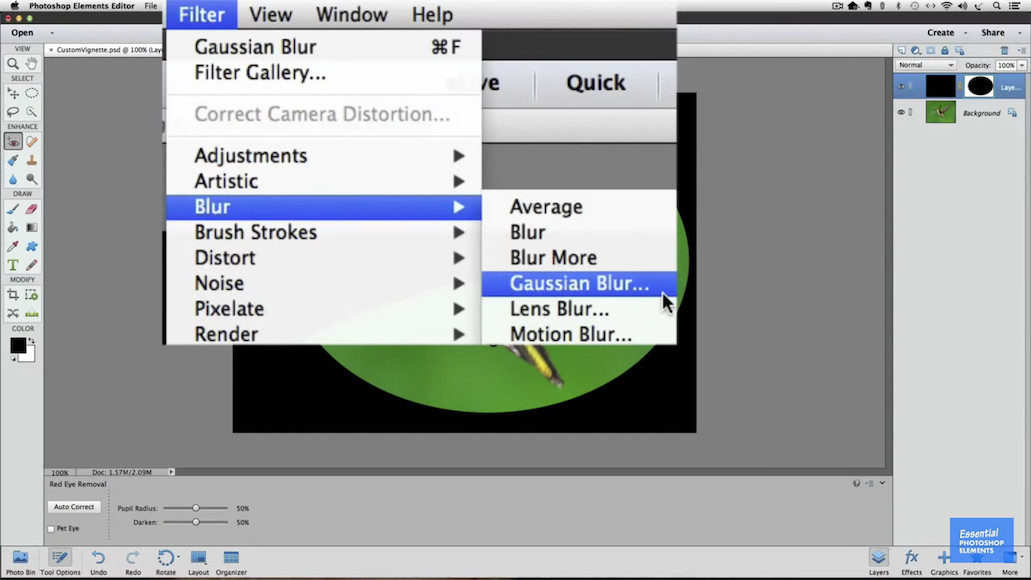
Go to the filter menu and select Gaussian Blur in the Blur drop down menu. The Gaussian blur dialog box will appear, and you can blur out the edges of the vignette effect to make it softer or sharper.

You can also use the tools in the Draw folder to edit the intensity of your vignette's boundaries. For example, you can click on the brush icon and adjust its size using the bracket keys. Ensure you have a soft edge brush by navigating the dialog box on the page's bottom.
Tips for Effective Vignetting
Vignetting indicates that an image has been captured and edited professionally. However, an unwanted and incorrectly-executed vignette is a pain for most photographers. Here are some tips that will guarantee you satisfactory outcomes in your image editing career;
Experiment with Different Vignette Shapes
You must understand the different vignette shapes available to guarantee high chances of achieving the perfect image configuration. Photoshop Elements has varying vignette shapes you can apply to your images.
Invest your time learning about these shapes and types to help you create the desired effect in your photos. For example, a circular vignette frame is perfect for subjects with obsolete figures.
Pay Attention to Your Image's Light Sources
Lighting is a vital consideration when creating vignettes. It significantly impacts the image's outcome and must be considered for quality photos.
There is a high possibility that the viewer will miss the photo's subject if the configuration is too dark. The perfect design has faded boundaries without compromising the lighting around the issue.
Understand Vignette Types
There are many ways you can create vignettes on your images, and knowing them will improve your chances of effective Vignetting. Mechanical and natural vignetting are two of the most common approaches. It will also help if you know how to navigate and manipulate different platforms like Photoshop Elements in professional image editing.
FAQ
How Does Vignetting Affect Your Photo?
The most common vignette effects are black or grey-black around the corners of the images. The border appears gradual, with light shading around the borderline. Most photographers prefer vignetting to direct the viewer's focus to the photo's subject.
Vignetting removes the distracting elements in the photo, providing more focus to the subject. Subtle vignettes are the best way to improve viewer focus without significantly altering other aspects of the image.
You can also use vignettes to create a vintage appeal in your images. Most old cameras produce vignette-fitted pictures due to the lens quality and other internal components.
Is Vignetting Good or Bad?
Vignetting can be both good and bad; it depends on the type of picture you want and the image's subject. Photographs with the subject-object in the middle benefit most from vignetting effects. The effect guides the viewer's focus to the central part of the image, which is what most photographers want.
It would be wise to avoid vignetting when dealing with images that feature landscape orientation. Such shots require the viewer to view the entire picture and its components. Adding a vignette will darken the edges and might compromise the image's significance.
How Can You Stop Vignetting?
Although vignetting makes your image pop, not all photos need it. You must know how to remove the vignette effect from your images, and here are the various approaches to do so;
- Remove the optical vignette by increasing the focal length
- Remove the mechanical vignette by using the correct lens and hood combination without unnecessary filters
Can You Edit Raw Files on Photoshop Elements?
The Camera Raw feature in Photoshop Elements makes editing and transforming raw files easy. You'll have to choose open a processed raw file in the platform's menu. Ensure you save the file in a Photoshop Elements-supported format after editing.
See also:

Jeff Collier is an experienced film photographer who enjoys experimenting with modern digital photography equipment, software and apps. He’s also an ex-world champion triathlete and avid cyclist, clocking hundreds of km each week in the beautiful Tweed Valley of northern NSW, Australia.
👋 WELCOME TO SHOTKIT!
🔥 Popular NOW:
