


Time lapse Calculator for Photographers
Want to experiment with time-lapse photography? This free online calculator will help you prepare your shot for success! (Includes a simple How-To guide.)
Learn | Photography Guides | By Ana Mireles
Shotkit may earn a commission on affiliate links. Learn more.
A photograph is a slice of time. When you snap a picture, you're registering things as they are in that specific fraction of time.
Time lapse photography allows you to record and display changes in time – that's what makes it so fascinating. We would never be able to see these processes in any other way.
The basic principle is that you make a series of photographs throughout a specific period of time, with a determined time interval in between them.
Once you have those images, you can combine them using time-lapse software to make a stunning timelapse photo or use them to make a time lapse video.
On video, when the images were taken at a frame rate slower than the frames per second – fps – you used to play them back, it appears to speed up.
For example, you capture one picture (frame) per second and then make a video at 24 frames per second – fps. Then, every second of the video will represent 24 seconds of real-life action.
In photography, all the frames are blended into one picture. You've probably seen the pictures of a moon eclipse where you see the event's entire progress – like the one below. These images are done with time lapse photography.

Credit: Ian Parker
Here are some other popular subjects to capture with the time lapse technique:

Credit: Jonatan Pie

Credit: Rodolfo Marques
- Rainbows

Credit: Fabrizio Frigeni
- Moving clouds

Credit: Stephan Egli
Some photographers use time lapse for artistic projects. For example, check out Luke Rasmussen's work, who creates LED light rainbows by photographing his climbing routes.
Whatever subject you choose to do, the tricky part of time lapse photography is determining the parameters to make the photos. To facilitate the work, you can use a timelapse calculator.
With a time lapse calculator, you can calculate the intervals between pictures, the clip length (for video), the image size to know the memory usage, etc.
In this article, you'll see how to use the timelapse calculator from PhotoPills. However, we'll also give you some other links for other websites and time lapse apps, for an iPhone interval calculator, etc.
Time-Lapse Calculator
How to Use the Time-Lapse Calculator
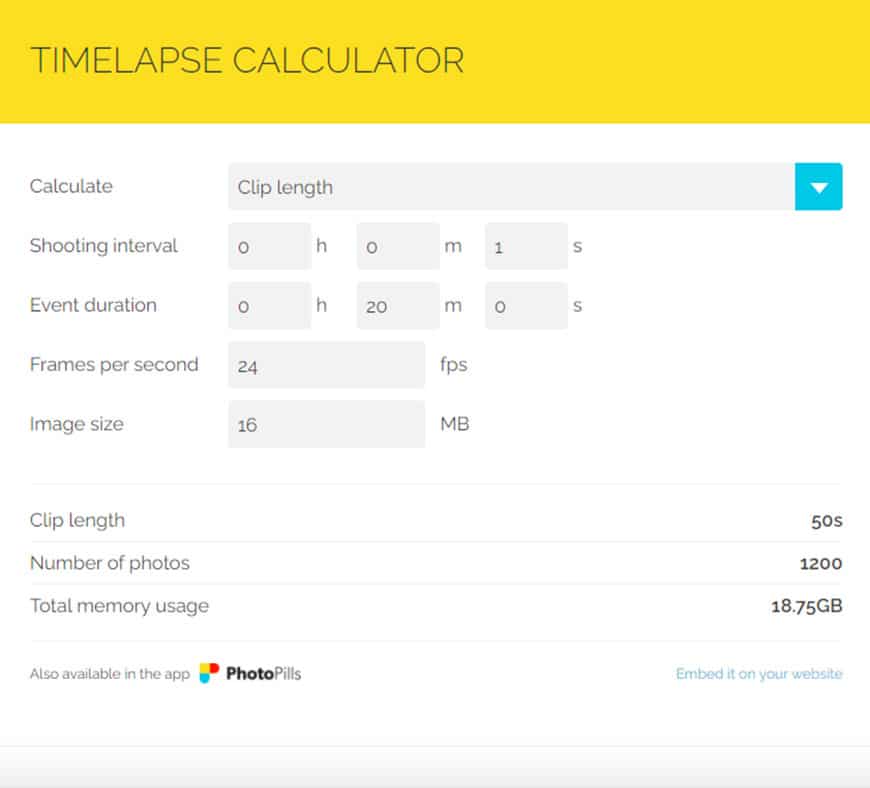
Start by setting what you want to calculate. When you open the drop-down menu, you'll find three choices: Shooting Interval, Clip Length and Event Duration.
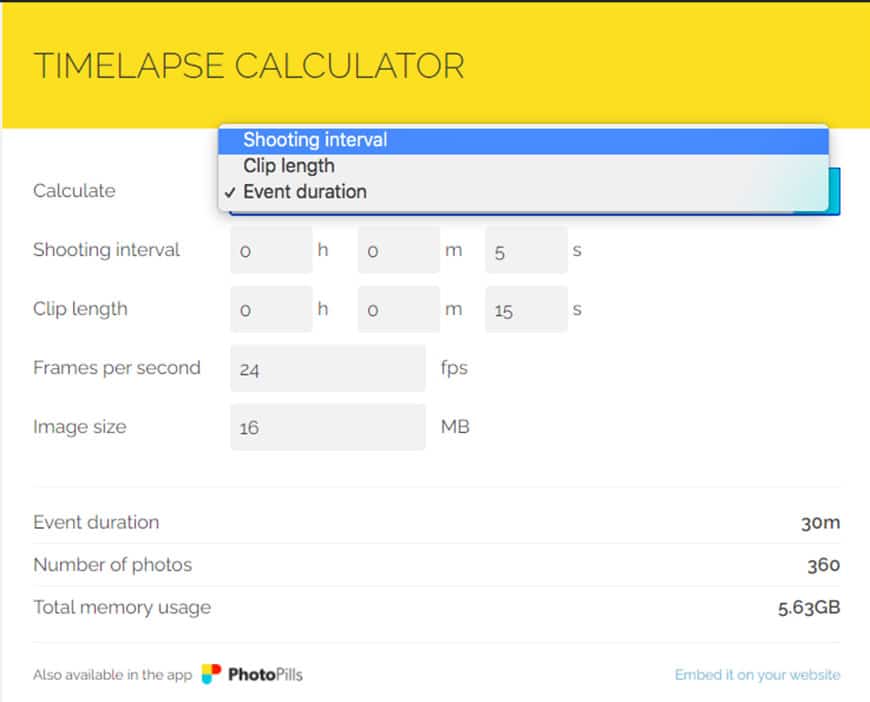
Once you set the calculator for one of them, the other two need to be input manually. Therefore, the fields below will change depending on what you chose.
For example, if you set it to calculate Shooting Interval, then the following fields will be Clip Lenght and Event Duration. Instead, if you choose Clip Length, the next field will change to Shooting Interval and so on.

Then, choose the frame rate – expressed in frames per second—lastly, the image size. As you modify these values, the Number of photos and Total memory usage will adjust.
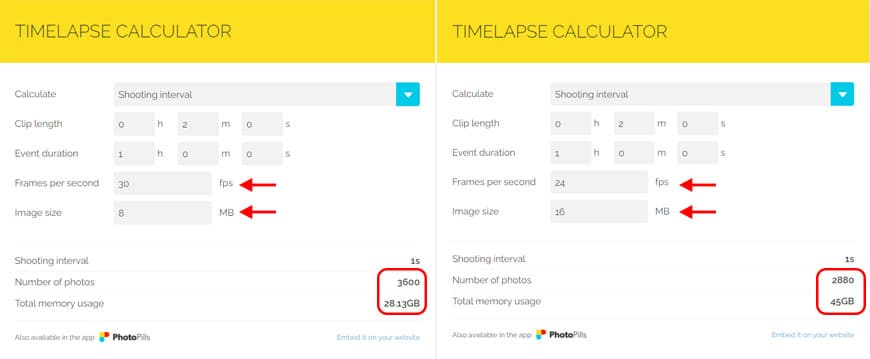
On the PhotoPills app, you'll find an interval table accompanying the calculator that can be of help for common subjects.
For example, if you want to capture fast-moving clouds, PhotoPills suggests an interval of 1 second and a Duration of 20 minutes.
The calculation would look like this:
Other Recommended Time-Lapse Calculator apps

If PhotoPills isn't for you, here are some other websites that offer free calculators.
Some of them are specialized according to your gear – for example, if you're using an iPhone or a GoPro.
Omni Calculator – time lapse calculator
Pro Lapse – time lapse calculator
Hustl – iPhone time lapse calculator
CamDo – Go Pro time lapse calculator
Time Lapse FAQs
How do you calculate time-lapse time?
To calculate the interval (or lapse) between photos, you first need to know how long is the event you want to capture (in seconds). Then, divide it by the number of photos – that's the interval.
For example, a 60-second event captured in 10 photos means you need to take a picture every 6 seconds. The easier way to make all the calculations for your project is to use a time-lapse calculator.
How long is a 10 second time-lapse?
It depends on the number of frames captured per second. For example, if you're using an iPhone, the number of frames is relative to the time that you're making the video. This ensures that it will never be too long or take up too much storage space. A 10-second time-lapse video on iPhone corresponds to 2.5 minutes of recording.
How long is 30 second timelapse?
As it depends on the number of frames captured per second, on an iPhone default app, it would correspond to 7.5 minutes of recording. If you use a third-party app or a camera where you can change the settings, this time may vary.
How long is 1 hour in time-lapse?
If you use 30pfs with an interval of 2 seconds – one hour makes a 1-minute video. On the other hand, a one-hour timelapse video with the same values would show a 60-hour event. You can use time-lapse calculators to change interval values and frame rates to get different video lengths.
How long can you do a time-lapse for?
Theoretically, you can do a time-lapse forever – in practice, battery life can put a limit on your creativity. On iPhones and some other smartphones, the time-lapse mode consumes less battery than regular video. The battery might last around 2:30 to 3 hours.
Cameras, such as Go Pro stay on between frames – this means that they continue to consume battery regardless of the interval. The battery might run for about 2 hours before it dies.
Does Time-Lapse take a lot of space?
Time-lapse can take a lot of space depending on the frame interval and image size. iPhones automatically adjust the settings to keep your time-lapse videos short and light.
For cameras, it will depend on the photo size and amount of photos. You can use a time-lapse calculator (such as the one shown in this article) to figure out how much storage space you need.
Final Words
I hope you found this article helpful to start using a timelapse calculator to control your camera settings better and achieve the desired results.
If you have any questions don't hesitate to ask. Also, if you have any experience doing time-lapse photography and you want to share your experience in the comments section, we'd love to hear from you.

Check out these 8 essential tools to help you succeed as a professional photographer.
Includes limited-time discounts.

Ana Mireles is a Mexican researcher that specializes in photography and communications for the arts and culture sector.
2 Comments
Leave a Comment

👋 WELCOME TO SHOTKIT!
🔥 Popular NOW:

Exactly what I was looking for.
Thanks for reading my article – let me know if you have any questions.