


How to Create a Vignette in Lightroom (3 Fast & Easy Ways)
Learn how to create, enhance and even remove a vignette in Adobe Lightroom in this easy to understand guide for photographers (incl. tips for Lightroom Mobile.)
Lightroom | Software | By Ana Mireles
Shotkit may earn a commission on affiliate links. Learn more.
Technically speaking, a vignette in photography is when the edges of a picture are darker than the center.
This can happen naturally in different cameras and with different lenses. For example, wide-angle lenses create more vignetting than telephotos.
Also, wide apertures can cause a vignette. This is also a characteristic of toy cameras in film photography, because the optics are rough and simple, causing different aberrations.
While this is something that happens when you take a photo, you can also add it or enhance it in post-production to create a different effect.
In fact, even if the theory behind it says that vignettes are darker edges, you might find some photographs that have lighter pixels in the periphery or even a soft blur. Both of them are creative variations of a vignette.
In this guide, we'll take a closer look at vignetting and how to add, enhance or even remove the effect in Adobe Lightroom.
Popular course reveals the simple tricks to getting incredible results with Lightroom in record time. Give Your Photos The Look They Deserve!
![]()
Learn how to create a vignette effect in Photoshop.
Why add a Vignette in Lightroom?


At this point, you might be asking why you would want to add a lens aberration to your images. Well, the idea of vignetting a photograph is to pull the attention of the viewer towards the center of the image.
This way, you can emphasize the importance of the subject or avoid the eye wandering outside of the photo. You can use it to add some ambience or mood to your images or recreate a style like vintage photography or lomo.
The good thing about vignetting in Lightroom instead of using Adobe Photoshop is that you can easily batch-edit. By creating a preset, you can apply the same vignette effect to all of your images.
How to Create a Vignette in Lightroom
Ok, now that you know what a vignette is and why you would want to use Lightroom to create it, let's see how you can do it.
In this article, I'll show you three different ways to do it so that you can choose the one that's best depending on the photo.
I'll be using Lightroom Classic, but all three methods are fully compatible with Lightroom CC.
Option 1. Lightroom Post-Crop Vignette Tool
Credit: Oxana Iyashenko
Adding a vignette is so popular that Lightroom has its own tool dedicated to it – it’s called Post-Crop Vignette.
This is the easiest method and the most intuitive. It’s also the one you should choose if you did any cropping because it will apply the vignette to the image as you have it now, not as it was taken originally.
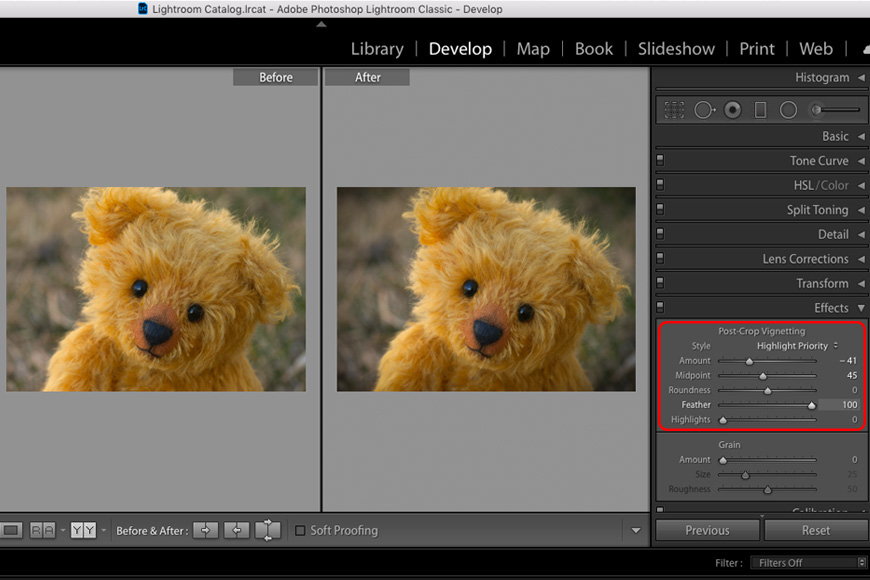
Where is the Vignette tool in Lightroom? Go to the Effects panel in the Develop module. First, you should choose the style that you want to use. By default, it’s going to be set to Highlight Priority. This helps the highlights blend better with the effect.
Here you’ll find various options to customize the vignette by moving the different sliders. The slider named Amount is what determines how dark or light the vignette will be.
Total black would be -100 (all the way to the left), and 100 (all the way to the right) is total white. On very rare occasions you’d hit either of those extremes; most likely you’ll find the right amount somewhere in the middle.
The other thing that you’ll want to adjust is the size of the vignette. In other words, how far towards the center it should go. You can control this using the Midpoint slider.
Feather is another important value. This will decide how smooth the transition is between the vignette and the original image.
When you pull the feather slider to the left, the vignette will get harder edges diminishing the transitions and making it more evident.
If you pull the slider to the right, the vignette will be blended into the image creating a more natural effect.
These are the three most used. However, Lightroom gives you some other possibilities to get more creative.
You can change the shape of the vignette with the Roundness slider. Then there are the Highlights; this is most useful when you need to recover some highlights if you were working on Color Priority.
Option 2. Lightroom Radial Filter
Credit: Alexey Derevtsov
Now you’ve seen how easy it is to add a vignette with Lightroom. But you’ve probably also noticed that despite the customizing sliders it still has some limitations.
For example, if your subject is not exactly in the center and you'd like to make the center of the vignette slightly towards one side.
Another issue with the Post-Crop Vignette is the fact that it will apply the same vignetting all around. While this is OK in many cases, not all images are like that.
So, if you want to have more flexibility, you can use the Radial Filter and even make local adjustments with the Brush.
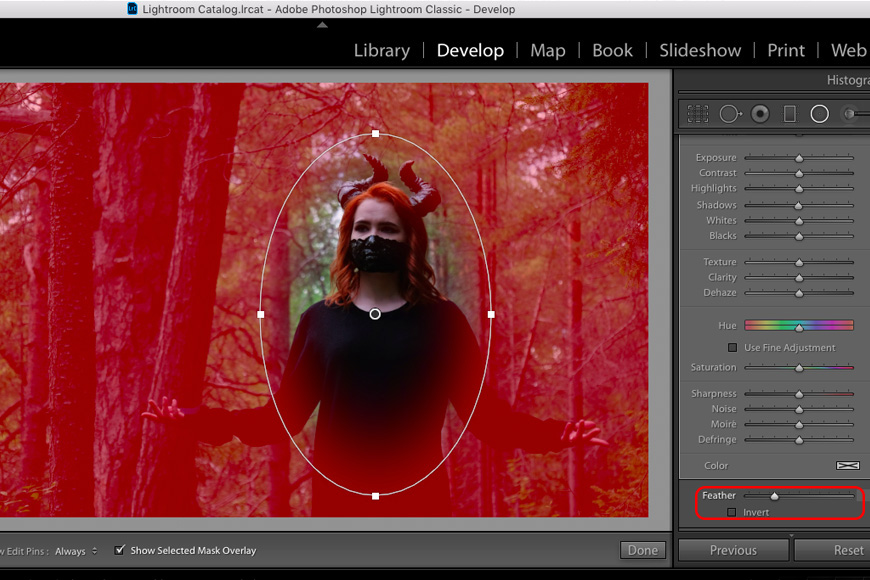
You can find this filter amongst the Adjustment Tools. Otherwise, you can activate it directly from the menu Tools, Radial Filter. Then, click in the center of the photo and drag it outwards to create the circle or oval that you want.
Once it’s created, you still have the chance to modify it by pulling on the holders around the edge. You can also change the position by clicking and dragging the pin in the center.
Then you can adjust the feather slider on the bottom to smooth the transition and blend the effect into the photo. Now you have all the edit sliders available to apply the vignette.
The most common way to do it is by lowering the Exposure. However, you can also move the Shadows or the Blacks depending on the result you’re looking for.
Option 3. Lightroom Lens Corrections

Credit: Gagan Gulyani
This method will give you a vignette effect similar to the one that an optic system creates naturally.
The results that you can achieve are very subtle in comparison to the previous methods, but most of the time when you're doing vignetting you don’t want to overdo it.
To use this tool, you have to go to the Lens Corrections panel. By default, it will open the Profile menu. For this effect, you want to choose Manual.
There you’ll find the Vignetting section with two sliders: Amount and Midpoint. They work just like the ones in the Post Crop Vignette.
Drag the Amount slider to the right to determine how dark the vignette will be. Then move the Midpoint slider to adjust the size ratio between the vignette and center.
As you can see, it’s quite limited, but it can give great results without the risk of making a vignette that overpowers the subject.
How do I get Rid of Vignette in Lightroom?
As I mentioned before, most lenses create some sort of vignette. Sometimes it can be more distracting than you would like and therefore you might be looking to remove the vignette instead of adding it.
Luckily, any of the above-mentioned methods can be used for this too.
If you're using the Post-Cropping Vignette, all you need to do is move the Amount slider to the right instead of the left. This way, you’ll be lightening the edges and thus removing the vignette.
If instead, you’re using the Radial Filter, you can increase the Exposure by dragging the slider to the right. Or you can move the Highlights or Whites sliders for other lighting effects.
Finally, if you’re using the Lens Corrections, you can use the Profile menu that opens by default when you go to the panel.
Here you’ll see everything greyed out. Check the box for Enable Profile Correction and Lightroom will automatically apply the corrections needed for the lens that you were using when you took the photo.
Then you can further adjust the vignetting with the sliders that will now be active. If the lens is not recognized, or the image has no metadata because you got it from a stock photography website, you can use the Manual menu.
Otherwise, you can enable the profile correction and try changing the type of lens until you find one that removes the vignetting from the photo you’re working on.
How to Create a Vignette in Lightroom Mobile
Credit: Ana Mireles
You might be wondering if adding (or removing) a vignette is possible on the mobile version of Lightroom.
The good news is that it is, and even if it’s not always as flexible as the desktop version, you can still use all three methods shown in this article.
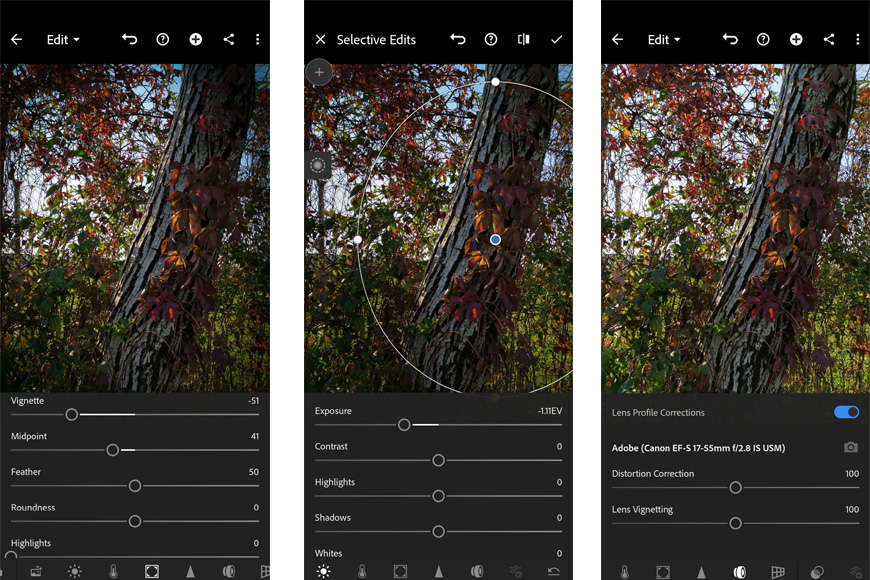
Option 1 – Scroll to the Effects tab in the menu and open it. Here you’ll find the Vignette slider. This controls the amount. Then you have the sliders for Midpoint, Feather, Roundness, and Highlights. It works like the Post-Crop Vignette tool from Lightroom Classic or Lightroom CC.
Option 2 – Tap on the Selective tab. Then click on the Plus sign to add a new mask and choose Radial Filter. Click and drag to create the mask just like you would do in the desktop version.
Once it’s created, tap and hold on the central pin to open the Mask Options. Tap on Invert Radial Gradient. Then open the Light menu and drag the Exposure to the left if you want to add a vignette or right if you want to remove it.
Option 3 – Open the Optics menu and enable the Lens Profile Corrections. If your lens or smartphone is not recognized, tap on Manually Select a Profile.
Then try different profiles until you find one that suits your photo. Then you can further adjust the effect using the Lens Vignetting slider.
Adobe MAX 2024 Update
The Adobe MAX Update 2024 further enhances Lightroom Mobile’s powerful editing and workflow management toolkit.
The 2024 MAX update adds the new Quick Actions feature and significantly improves the Generative Remove function.
Quick Actions automatically creates masks to best suit an image's subject matter. It also suggests ways to optimize your workflow further and reduce time spent editing on the go.
Generative Remove is the second standout feature of Adobe MAX Update 2024 for Lightroom.
It’s simpler than ever to identify an unwanted distraction, circle it, and Generate Remove cleanly remove the item and correctly render the vacant space.
Final Words
The next time you need to highlight the subject of your photos, you can consider Lightroom vignetting.
I hope you found this article useful. If you have any doubts or suggestions, write them in the comments section.

Ana Mireles is a Mexican researcher that specializes in photography and communications for the arts and culture sector.
👋 WELCOME TO SHOTKIT!
🔥 Popular NOW:
