


How to Edit in Filmora (A Guide for the Absolute Beginner)
Even if you're an absolute beginner to video editing, you can learn how to use Filmora and edit your videos like a pro. Just follow this easy guide.
Filmora | Software | By Judyth Satyn
Shotkit may earn a commission on affiliate links. Learn more.
If you’re keen to embrace the world of video editing, then it’s definitely worth trying out the Filmora video editing software.
Filmora is a powerful video editing tool that can perform many tasks. On top of that, it’s also straightforward to learn and use.
If you’re an absolute beginner to video editing, you can learn how to use Filmora and edit your videos like a pro by simply following the guide below.
Download the latest version of Wondershare Filmora to follow along with this simple tutorial.
Start a free 7-day trial today
How to Edit in Filmora
Editing video might seem daunting at first but you’ll be pleasantly surprised at how easy it is to do using Filmora.
In this guide, you’ll learn how to splice, speed ram, add overlays, and much more.
Read on for a tour of Filmora’s video editing basics – the building blocks and tools to launch you into video editing.
Before you Start
Before you start editing, make sure your video footage is compatible. If you’re new to editing video, it’s best to start by using video clips shot on the same camera.
Editing video involves lots of planning, re-edits, and drafts. Before you open your computer, put pen to paper and draft out a rough plan.
It’s easier to work when you have an idea of what you want to achieve when editing before you hit the software.
Start
Head to Filmora’s website to download, install and launch the editing software onto your desktop.
Open Filmora and click the New Project button.
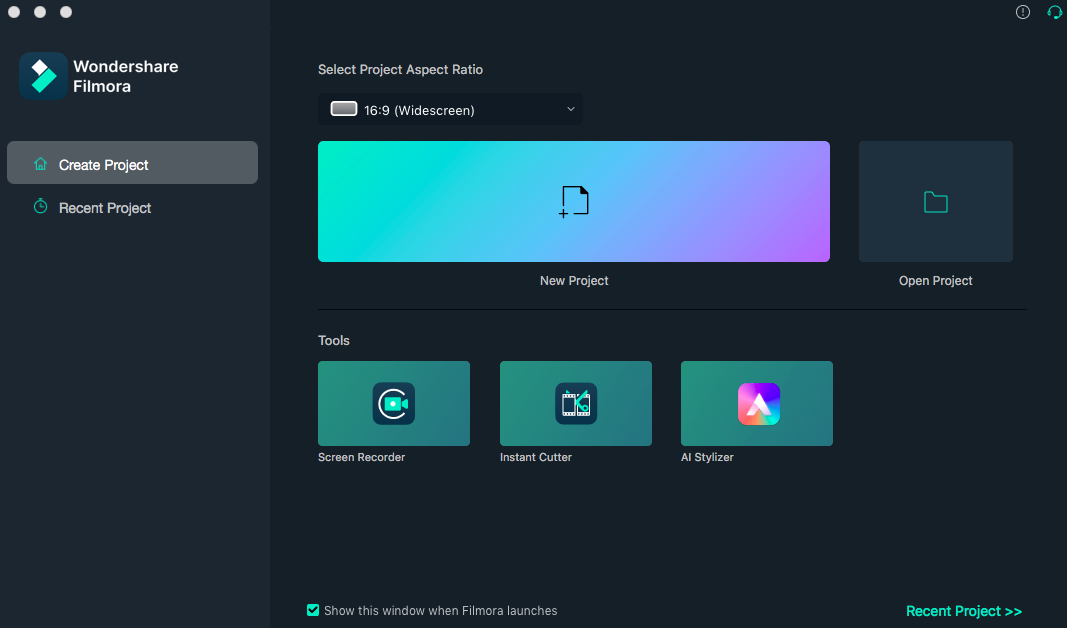
When you click New Project, your editing workspace will open. Here, you’ll be given the option to upload your own media or use stock media.
Upload your video clips into the workspace and you’re now ready to begin editing.
Splice and Slice
Cutting footage is the age-old traditional edit. In times past, stills (or frames) had to be manually sliced and spliced using a pair of trusty scissors.
Luckily, using scissors to edit film is a thing of the past and not something the 21st-century vlogger or video editor needs to succumb to.
You might have only one video clip that you intend to cut and merge sections back together in, or a few different video clips to trim and join together; either way, the editing process is the same.
To slice and splice, have your chosen video clips uploaded and ready in Filmora’s media library, then drag and drop them into the same video timeline track.
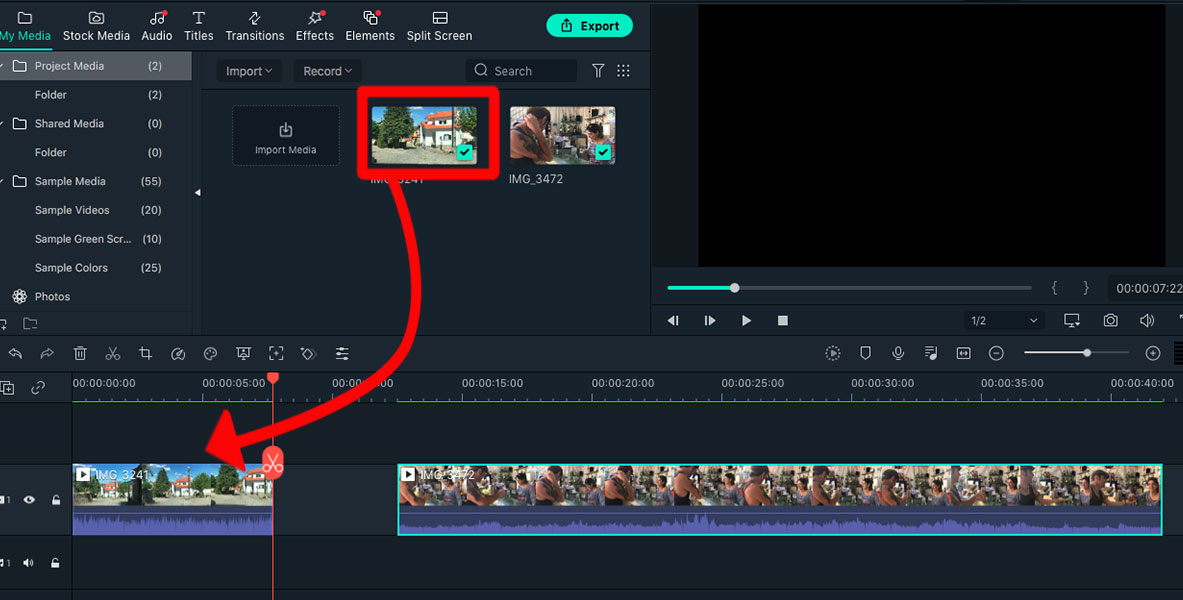
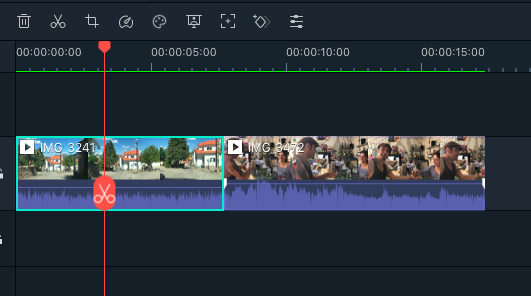
When the video clips are in place on the timeline track, trim them using the red Splice tool.
Move the Splice tool over the section you wish to cut and hit the scissor icon. Your video clip will now be sliced.
Delete the trimmed section you don’t want by clicking on it to select it and then hitting Delete on your keyboard.
Now that your video clips are trimmed to size, you can merge them by moving them beside each other. Simply drag them into place.
Hit Play below the preview window and your video clips will now play as one clip.
Crop
Knowing how to crop a video post-shoot is handy for when the video is shot too far away or an unwanted object has made its way into the video clip.
Activate the section of the video clip you wish to crop in the timeline by clicking on it. When it’s surrounded by a green border, it is activated.
Click the Crop tool positioned above the timeline track.

When clicked, a Crop and Zoom preview window will appear.
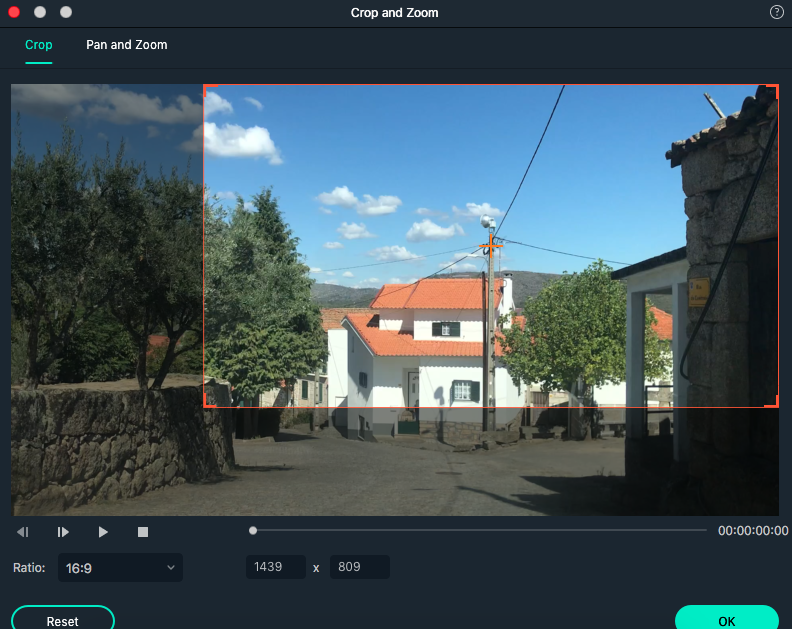
Make sure Crop is selected at the top left of the preview window.
Adjust the red bounding box by dragging the corners into position. You can then reposition the bounding box by dragging it across the preview window.
When you’re happy with the crop size, click OK in the bottom right-hand corner.
Hit the Play button under the video clip preview window to check you’re happy with the final crop.
Alter Playback Speed
Altering the speed of your video – slowing down or speeding up – is a simple edit that generates captivating effects and can be used for educational or creative purposes.
You can use it to slow down a trampoline jump or speed up city traffic to create visual intrigue.
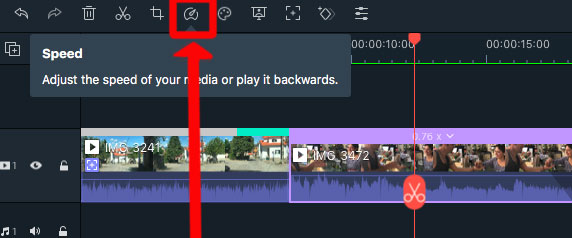
So, how do you do it? First, activate the video clip you wish to speed up or slow down in the timeline track by clicking on it.
In the menu bar above the video timeline track, click the Speed tool.
Once clicked, a drop-down menu will appear, giving you a selection of choices.
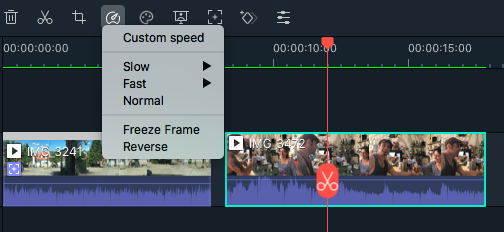
Select Slow or Fast and adjust the settings to speed up or slow down the clip in increments.
You can also choose to freeze frames or play in reverse.
Select Custom Speed from the drop-down menu, and a pop-up window will appear.
Here you can set the Speed slider to adjust the speed of your video clip or alter the duration by entering new digits beside the Duration box.
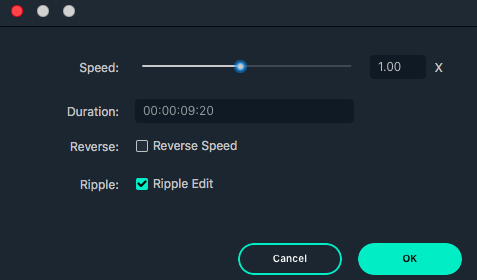
Then press OK.
Click Play in the preview window to check that the speed is correct and suits your project.
Adjust Lighting
You can change the lighting of a video clip to improve the visual quality or to add extra atmosphere and evoke emotions.
Dull colors can be amped up and their saturation increased to create a vividly rich scene.
Sometimes, two spliced video clips won’t have the correct lighting. The colors of the clips can be toned down or brightened up so they match each other and are visually compatible.
To alter the color of your video clip, click on the Edit tool or double-click the clip.
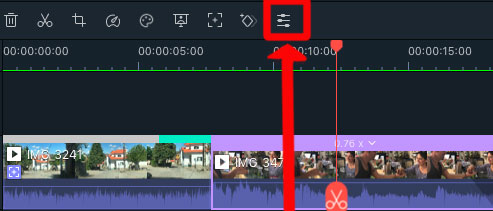
The Edit panel will open above the timeline track.
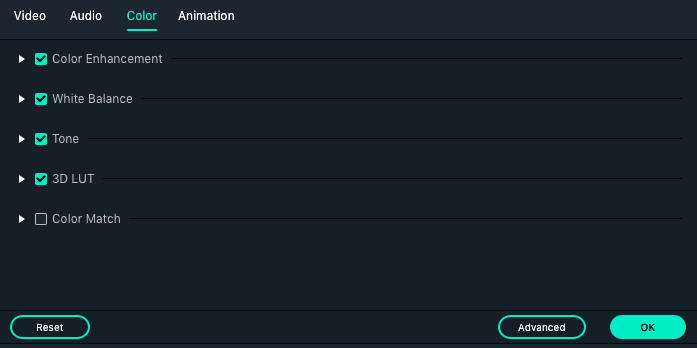
Select the Color option in the top right of the panel.
Here you will have the choice to adjust the Color Enhancement, White Balance, Tone, 3D LUT, and Color Match.
Click on the adjustment you wish to make and slide the adjustment bar. As you slide, you will be able to preview the change in the preview window.
When you’re happy with the color adjustment you have set, click OK.
Split Screen
Split screen is when two or more videos are placed alongside each other on the same screen.
Split screen is a popular editing technique used by Youtubers for interviews and comparative or demonstrational videos.
Filmora’s split screen templates make it easy to slot your videos into place to create your demonstrative video.
With 250+ dynamic templates to choose from, you won’t be restricted to a stiff, standard split-screen effect.
You can try the circular or diagonal split screen to showcase your dance event, travel trip or sporting vlog.
Select Split Screen from the top menu bar above your workspace.
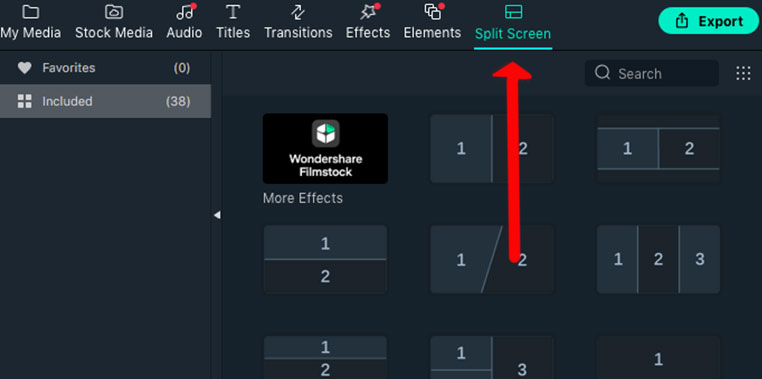
When selected, the split screen templates will open in the workspace below.
Click on the template you would like to use and drag it onto the timeline track.
Once the template is positioned on the timeline, drag and drop the media you wish to add on top of the split screen template.
It’s that simple.
Add Overlay
Whether you want to spice up your video with your own unique overlay or add explanative text to aid comprehension of a video, overlays are eye-catching and fun.
Overlays are when you hit the 21st century of editing. What would Instagram videos be like without overlays?
Adding overlays in Filmora is a simple drag-and-drop action.
First, add an extra timeline track above your video clip by clicking on the Add Track button at the top left of the timeline workspace.
Then click on the Effects button in the top menu bar.
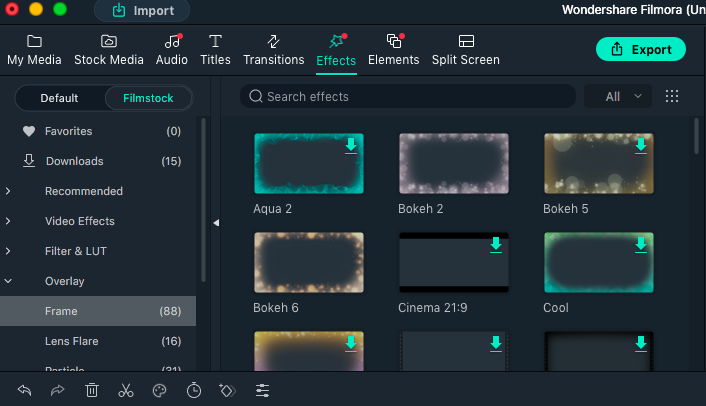
Once clicked, a side panel of effects will open to the left of your workspace.
Click the Overlay option and you’ll find a selection of overlays, like frames, lens flares, material, and more.
To add the overlay to your video clip, you simply have to click the overlay in the panel, then drag and drop it onto an empty timeline track.
The overlay’s length will need to be adjusted to match the video clip below.
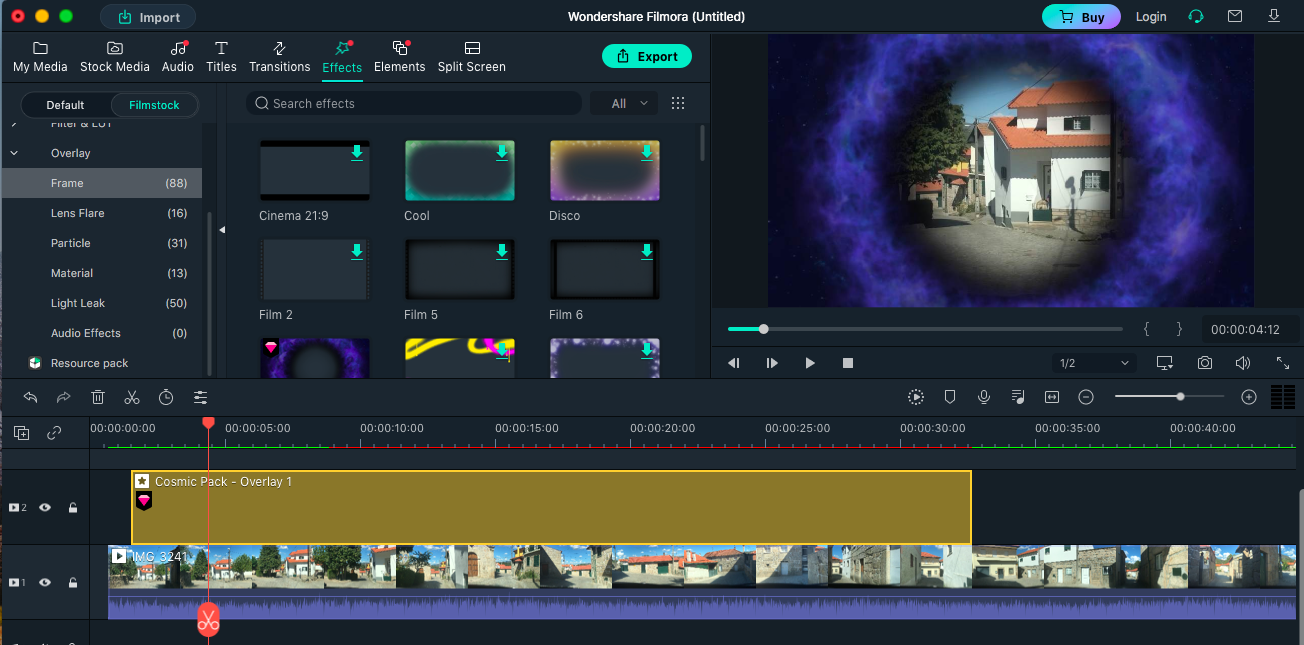
To extend the length of the overlay, hover your cursor over the side of the overlay track until arrow icons appear, then drag it to the length you require.
Alternatively, you can trim the overlay track with the Splice tool if it is too long.
Now hit Play in the preview window to see your funky new video clip.
Render and Export
Once you have finished editing your video clip, you will want to render and export it.
Rendering is required to ensure that your video clip isn’t too monstrously full of information that another device will struggle to play it.
In short, rendering is like compressing your video clip, including all edits, without losing quality.
To render, all you need to do is press the Render button over the timeline track.
The Render button is a dotted circle with a play button inside.
Once pressed, a pop-up window will appear telling you how long rendering is going to take.
When rendering is complete, click on the Export button at the top of your workspace.
The Export pop-up window will appear with export options.
Decide the best format and location for your video clip or export directly to the web.
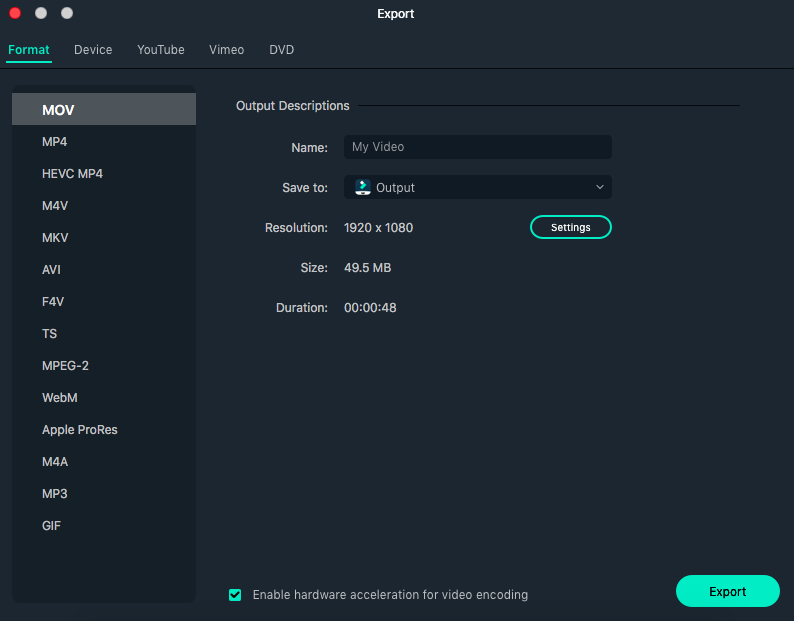
Then press Export.
- Read more about exporting videos in Filmora to save or share.
Guess what? You are now equipped to edit video clips in Filmora! Get started, and let’s see what you can create.
How do I edit better in Filmora?
When you have mastered the basics, it’s time to up the game and improve your video editing skills.
The first three words of advice are practice, practice, practice – because practice truly is the best way to hone any skill, and video editing is no different.
To practice, simply start by editing anything.
You don’t have to create THE video masterpiece, but every time you edit, you will be improving your editing skills.
Try out different Youtube tutorials which teach new editing effects and fads.
This will not only improve your editing skills but will stimulate your imagination with innovative ideas.
When you’ve mastered splicing and slicing video clips together, you move on to adding transitions between merged video clips.
When you’ve mastered cropping video clips, you can try zooming. Zooming is similar to cropping but includes the action of zooming in. (Here’s a guide to zooming in Filmora.)
When you’ve added overlays of all varieties – text, sparkles, frames, and flares – you can give masking a go.
Pushing the limits of what you can create will make you better at editing in Filmora.
And have fun creating – the editing world is full of potential and can bring your vision to life.

Judyth is an experienced studio photographer and glass artist. When she isn’t Photoshopping comedians into the bellies of sharks, you can find her cooking delicious treats for her guests.
1 Comment
Leave a Comment

👋 WELCOME TO SHOTKIT!
🔥 Popular NOW:

An absolutely superb set of instructions. Easy to follow, and brief an to the point.
Filmora will generate far more sales if someone with your intelligence and communication skills make a few YouTube videos.
Some are very badly done and dilutes the excellence of Filmora.
These problems are compounded by the ever-changing formats of Filmora. Sadly a YouTube video does not transform itself by divine help to cater to the viewer with a different version.
If you have information on how to change the color of for example a garment in the latest version do let me know.
Thank you and best wishes.