


Best Quality to Choose When Converting to JPEG
Discover the optimal settings for converting images to JPEG format to ensure the best balance between quality and file size..
Shotkit may earn a commission on affiliate links. Learn more.
In today's post, we'll talk about JPEG files and then teach you how to convert images to JPEG format, retaining the best quality possible.
Websites and social networks have “strict” rules that limit the size and type of image format you can upload.
On some of these platforms, images cannot be uploaded unless they are a JPEG file (also known as JPG). This can be very frustrating if the photo you are trying to upload is in another file extension, such as GIF, TIFF, or PNG.
Although converting to JPEG can diminish the sharpness of images, the format is known for its ability to maintain the best quality image in the smallest possible file size.
In the world we live in, where the virtual reigns supreme, we must know how to transform our images into JPEG format, as it's a common file format on the Internet.
This article will provide you with an easy understanding of the JPEG format, and how to get to it using Photoshop and Lightroom, which are programs used by most photographers.
Armed with this knowledge, you can have images with smaller sizes that retain great quality, allowing you to publish them on social networks or websites without disrupting the performance of the platform.
What is a JPEG?
The vast majority of photos we see on our computer or cell phone are JPEG files. But what exactly are JPEG images?
JPEG (or JPG) is a file format used for images created by the Joint Photographic Experts Group (JPEG) and uses its JPEG compression algorithm, which is able to reduce the image into several blocks of pixels.

Depending on the configuration and image quality, the JPEG format is capable of compressing to a ratio of 10:1 without any noticeable degradation.
For this reason, JPEG has become the de facto image standard on the Internet.
Being able to deliver a high-quality final file that preserves color information, along with other advantages, JPEG images are the most widely used format on the Internet for distributing digital images and photographs.
JPEG image files have also become a favorite on websites. It's therefore essential to know how to convert to JPEG format, whether using Photoshop or Lightroom.
JPEG Quality Settings Explained
The compression algorithm for JPEG has an image quality setting that defines the level of compression that will be applied.
JPEG quality is usually not stored in the metadata. So, the higher the compression, the smaller the file size.
This means that the quality level will vary according to the setting, which should be between 1 (lower quality images, small file size) and 100 (higher quality, large file size).

Image by hanseok song
JPEG images use a lossy compression algorithm. This algorithm will trade quality for compression.
A low-quality image will have a smaller JPEG file; a high-quality image will generate a relatively larger file. This is different from lossless image formats such as PNG, BMP, and PPM, where the quality never decreases.
The JPEG compression level is measured according to a percentage of the quality level. An image with 100% quality will have almost no loss.
An image with 1% quality, on the other hand, will result in an extremely light file with very low quality.
- Quality levels of 93% or more are considered “maximum quality”
- 85%–92% are “high quality”
- 77%–84% are “good quality”
- 70%–76% are “low quality”
- Anything below 70% is usually a very low-resolution image.
In general, this means that the quality level directly affects the visual quality of the image and the size of the file.
What Is the Best Quality When Exporting JPEG Images In Lightroom?
A very common situation I see among photographers, especially those just starting out, is that when exporting, they leave the JPEG quality slider at 100%, thinking that they will get the best quality in the final file.
Although we think that a higher quality value is the correct setting to have the best and highest image quality, it can actually disrupt your workflow.
So here's my tip on how to export high-quality images while saving disk space and exporting time.
Exporting your JPEG image at 84 versus 100 will equate to the same quality while giving you a much lighter and faster-to-manage file.
With the quality slider set between 77% and 84%, you cut up to 40% off the file size you would have originally obtained by exporting at 100.
Now, as well as saving file storage space, this will also help your images upload and download more quickly.
What Is the Best Quality Setting When Saving JPG Photos In Photoshop?
Determining the ideal JPEG quality setting in Lightroom and Photoshop can be a bit of a challenge, as we see different settings when choosing.
As we saw above, Lightroom gives us a percentage ranging from 0 to 100%.
In Photoshop, on the other hand, our choice goes from 0 to 12 when saving JPEG images via the “Save” or “Save As” dialog box.
Understanding the percentages seems easier than the numbers from 0 to 12, since 100% is the “best image quality,” 50% would be half the quality, and 0% would be no quality at all. But how do you transfer this understanding to Photoshop?
Adobe has left us confused as to which number represents which percentage.
I explained above that, in Lightroom, there is no change from one number to another, as in 100% and 94%. Adobe seems to have realized this and mapped the 0 to 12 scale to the percentage scale. We can say that quality in Photoshop is the percentage divided into different groups.
Changing from one number to another, such as from 93% to 100%, may not make any difference to the compression or size of the image, while changing from 93% to 92% would make a big difference.
Below is a table that represents these Photoshop groups in relation to the percentage of quality from 0% to 100% that appears when you click on “Save” or “Save as” and choose JPEG in Photoshop:
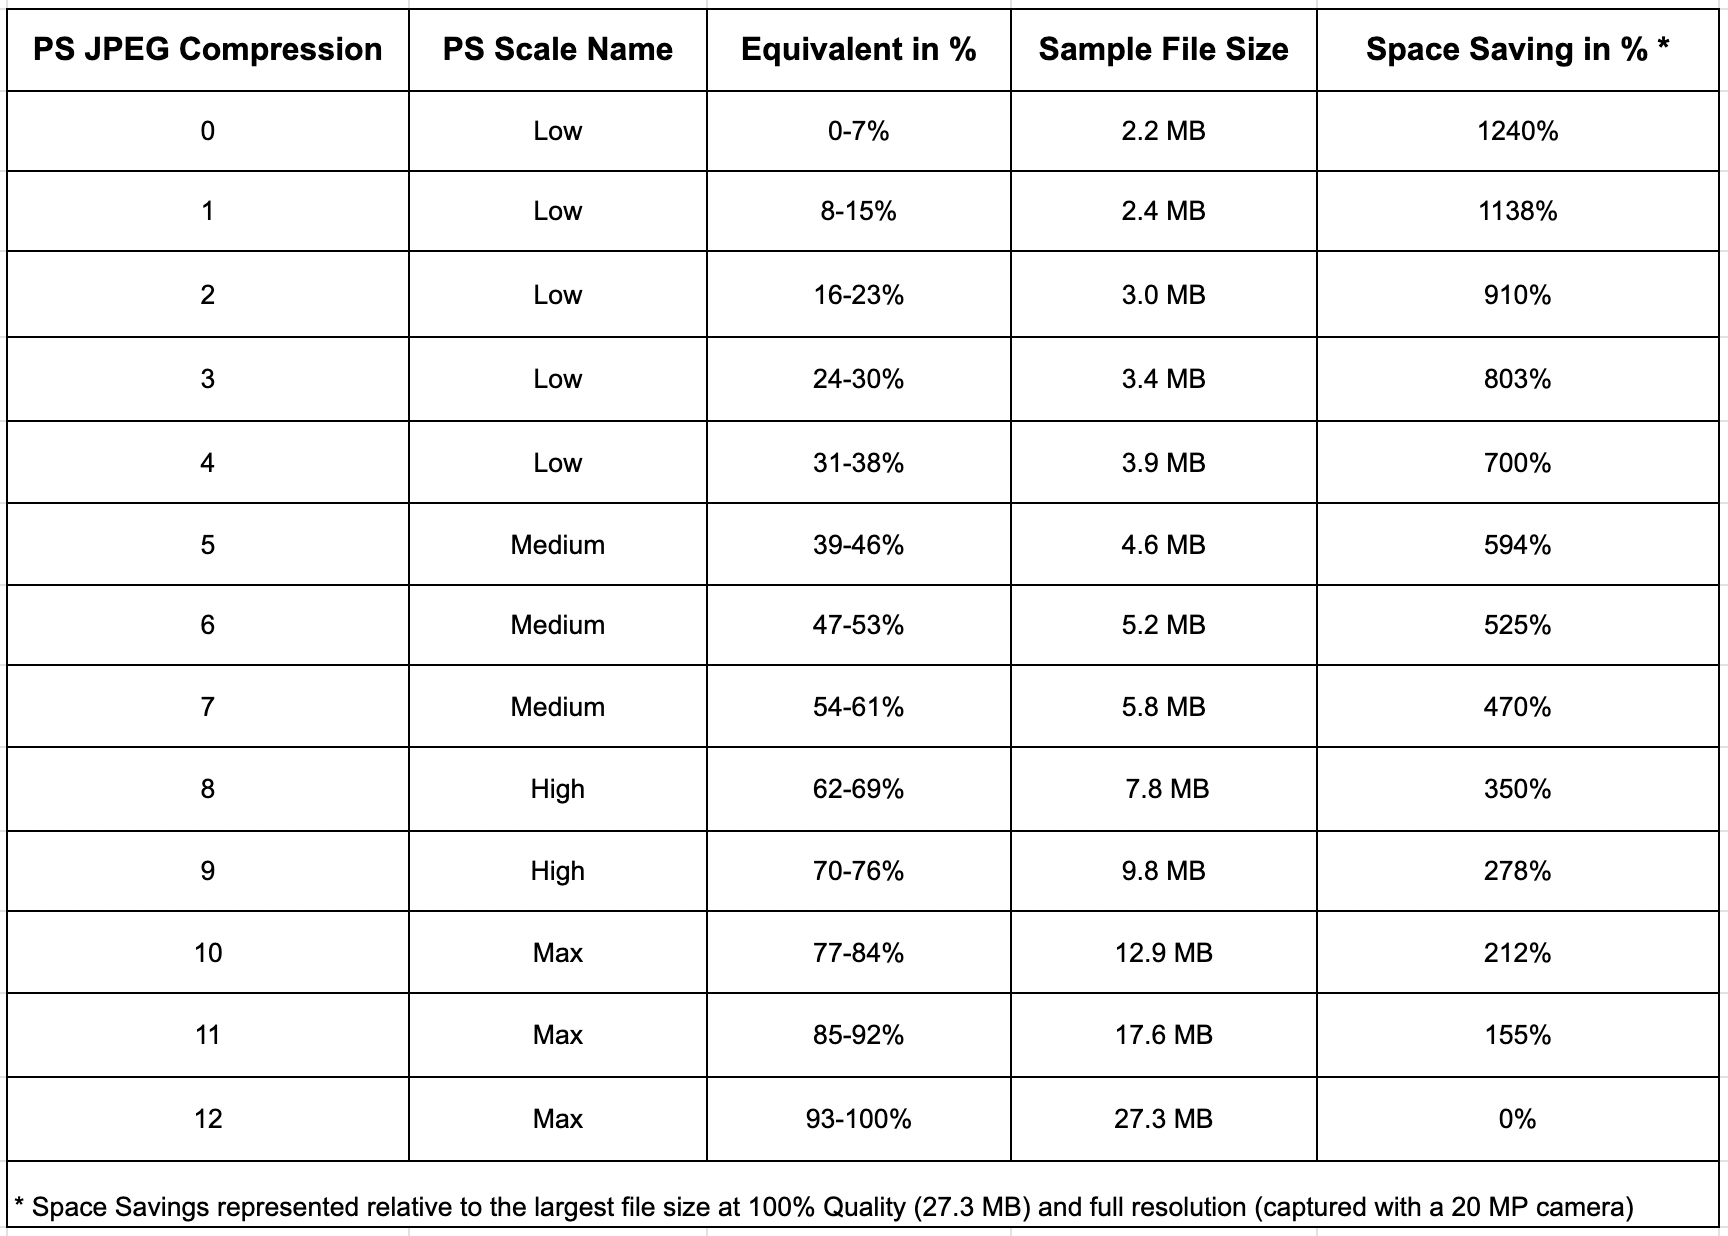
Info: Nasim Mansurov – photographylife.com
Photoshop JPEG Quality 10 vs 12: Is There Actually a Difference?
As you can see from the table above, there is a difference between saving a photo at quality number 10 and a photo at quality 12.
The difference won't be so noticeable to the human eye, it will be more a matter of the final file, which, when saved at quality 10, will weigh much less than when saved at 12.
It all depends on what you're using the final image for. If we're focusing solely on digital use, the ideal is to save at 10 rather than 12 because of the size and faster file management.
FAQ
What's higher quality PNG or JPG?
PNG is a high-quality graphics format, generally higher in quality than JPGs, which are compressed to save space. The PNG format uses lossless compression.
Read more about JPG vs PNG.
Should I convert images to JPEG 100%?
If you've always used 12 or 100% JPEG quality settings when exporting JPEG images, you're defeating the purpose of the JPEG format because you're applying too little compression, which results in a huge JPEG file size. This only increases your need for storage.
A basic recommendation is to use 77% in Lightroom or the value 10 for JPEG compression level in Photoshop.
Is HEIF or JPEG better quality?
HEIF uses a more advanced compression algorithm than the JPEG compression method. This allows HEIF files to be smaller in size compared to JPEG files of similar quality.
HEIF has an advantage over JPEG due to its support for greater bit depth and better compression efficiency.
This means that HEIF images can display a wider range of colors and smoother gradients, resulting in more natural and realistic-looking images.
The problem with HEIF is its limited compatibility compared to JPEG. Although support for HEIF is growing, it is still not as widely supported as JPEG, which is practically universal.

Check out these 8 essential tools to help you succeed as a professional photographer.
Includes limited-time discounts.
Hello, my name is Leo Cavazzana, I’m a professional photographer and film director. As a photographer, I’ve been photographing our natural world for the past 8 years and worked on assignments with NatGeo, BBC, and UN on all 5 continents. As a film director, I’ve been directing commercials and campaigns for brands for the past 4 years. I’m passionate about sharing about the world and photography with others.
👋 WELCOME TO SHOTKIT!
🔥 Popular NOW:
