


How to Convert RAW to JPEG Photos (6 Popular Methods)
Learn how to convert RAW to JPEG for free using the in-built apps on your computer or mobile device. Discover the pros and cons of making the conversion.
Image File Formats | Learn | By Judyth Satyn
Shotkit may earn a commission on affiliate links. Learn more.
This is a comprehensive guide on converting RAW to JPEG using various devices and software.
Whether you're a seasoned photographer or a beginner, understanding how to convert your RAW files into a more accessible image format like JPEG is crucial.
I'll walk you through the process step-by-step, using popular tools and devices, so you can easily share, print, or edit your RAW files or JPEG images.
I'll also include some tips on getting the most out of each image format.
RAW to JPEG conversion is actually really simple when you know how so let's dive in!
How to Convert RAW to JPEG (Using Various Devices & Software)
There are multiple ways to convert raw files to JPEG format depending on what device or software you own.
Below you'll find the most commonly requested methods and an explanation of how to make the conversion yourself.
How to Convert RAW to JPEG on Mac
Converting files from RAW to JPEG using a Mac is a straightforward procedure due to Mac's free editing tool, Preview.
Most people assume that Preview is simply for viewing images on your Mac, but take a closer look and you'll find it includes a small selection of editing options.
To convert the file to JPEG first open your RAW image in Preview.
Right-click on the file you wish to open and select Open with > Preview.
When the file is open in Preview you can simply choose to save it as a JPEG file.
Click on File and then from the drop-down menu select Export.
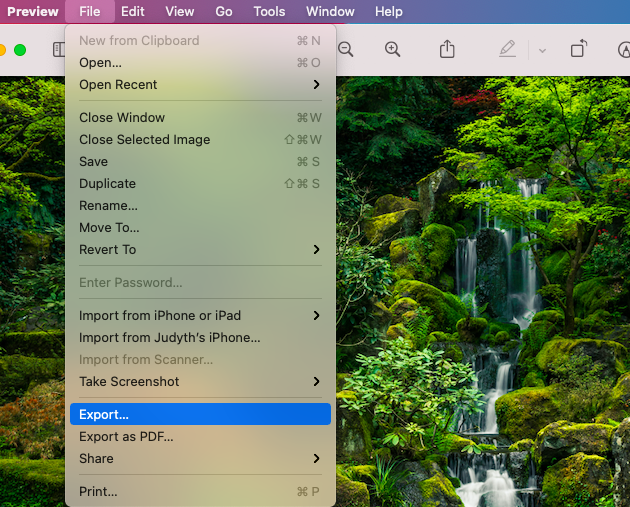
A pop-up window will appear and here in the box beside Format: you can select to save the file as a JPEG instead in RAW format.
Once selected hit the Save button and your image will now be converted to a JPEG format.

The original RAW file of the image will still exist, now you will have two copies a Raw file and a JPEG file.
You can also convert PNG TIFF and PDF files to JPEG using this technique on your Mac.
How to Convert RAW to JPEG on Windows
Similarly to Mac Windows comes with a free editing app, called Photo.
You can convert your RAW images to JPEG files using Photo.
Open your RAW file in Photo by right-clicking on your file and selecting Open With > Photos.
When the RAW files are open in Photo the procedure is easy, simply select Save As from the top menu bar.
Select Save As and from the drop-down menu beside select JPEG.
Set your choice of location and hit Save.
How to Convert RAW to JPEG on iPhone
Apple's ProRAW format allows iPhone users to shoot RAW files from their iPhones.
You might be confused by the.DNG extension on the photo file, but nonetheless it is still a RAW file.
The Pro RAW file stores 10 to 12 times more information than a normal photo, retaining the extra information needed for post-shoot edits.
But what happens when you want to convert them to JPEG, luckily you can do this straight from your iPhone.
Simply open the image in Photos and select the Share button in the bottom left-hand corner.
When you have clicked Share the share options will appear, scroll down until you find Save to Files, click this.
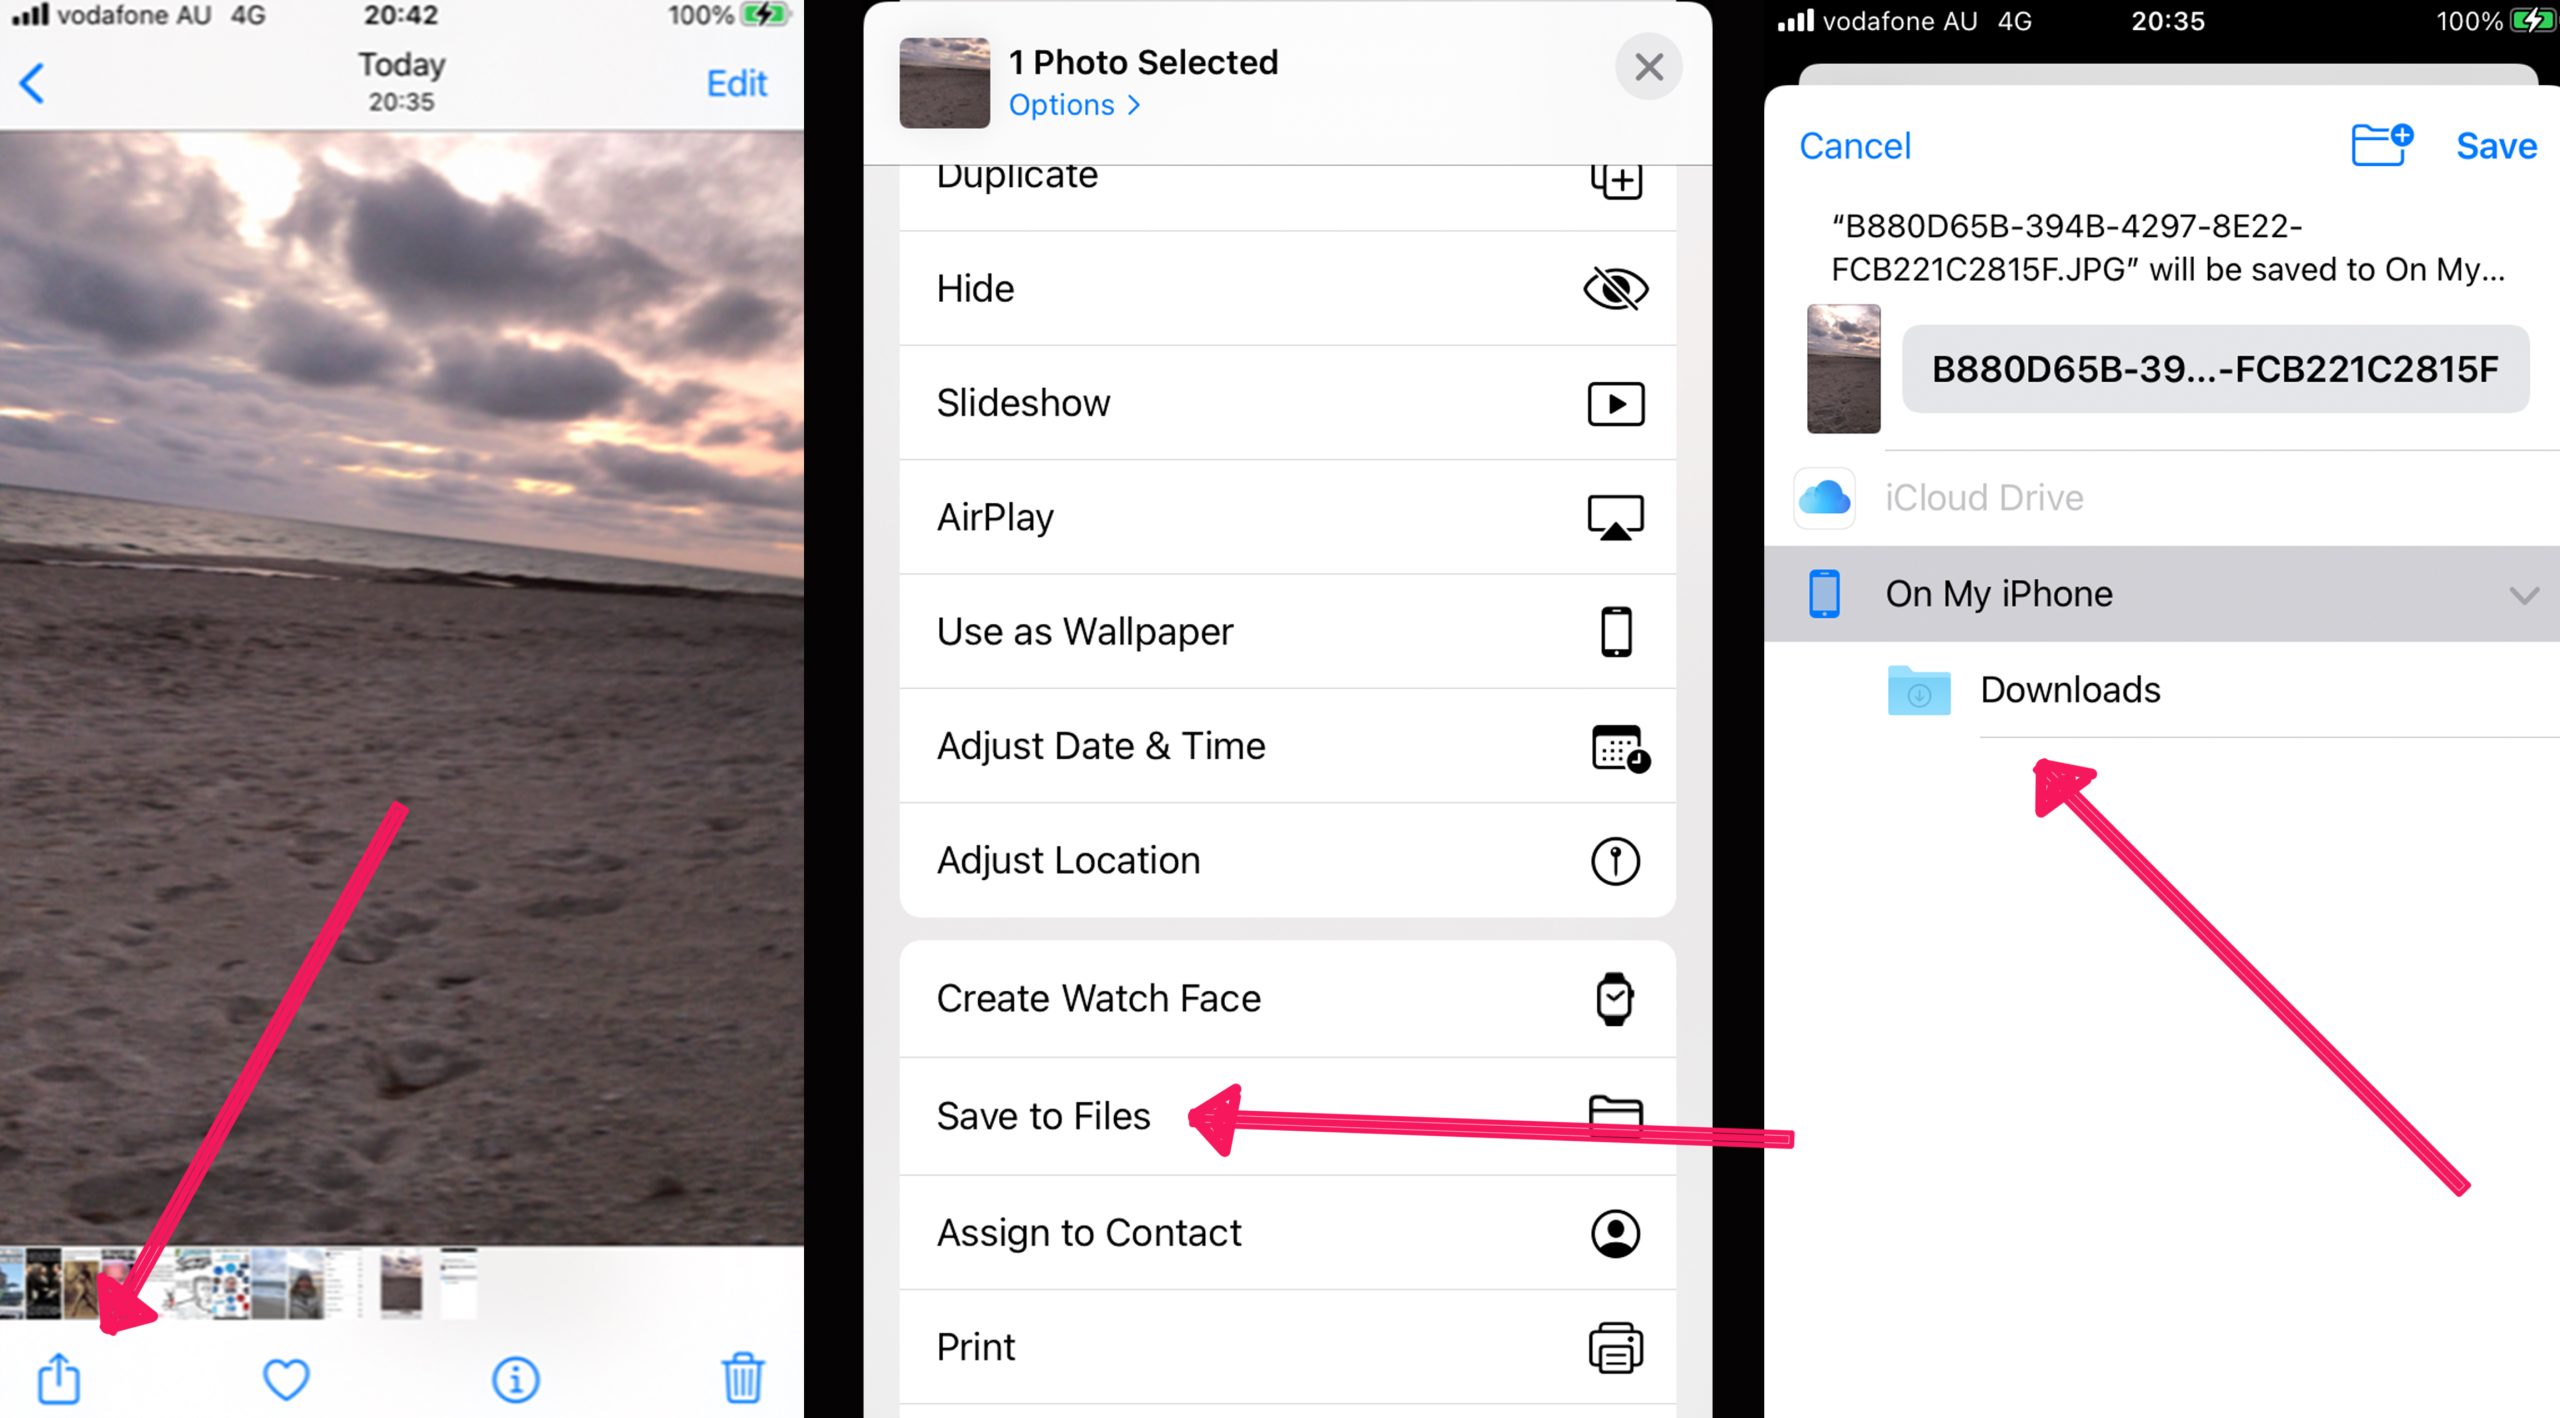
Photos will now present you with the option of locations for saving your file, chose a folder under iCloud Drive or On my iPhone.
Then click Save, your RAW file will now be saved as a JPEG image.
How to Convert RAW to JPEG in Photoshop
As the most well-known photo editing software people would expect that Photoshop would be the first port of call for converting RAW files to JPEG.
Converting RAW files to JPEG is a similar process as when using Mac's Preview application or Windows Photo application.
Open Photoshop on your desktop then open the selected RAW files, you can open multiple files if you want to batch edit or just one.
Head to the top menu bar and select Open and locate your file or files.
Once open in Photoshop from the top menu bar select File > Export > Export As.
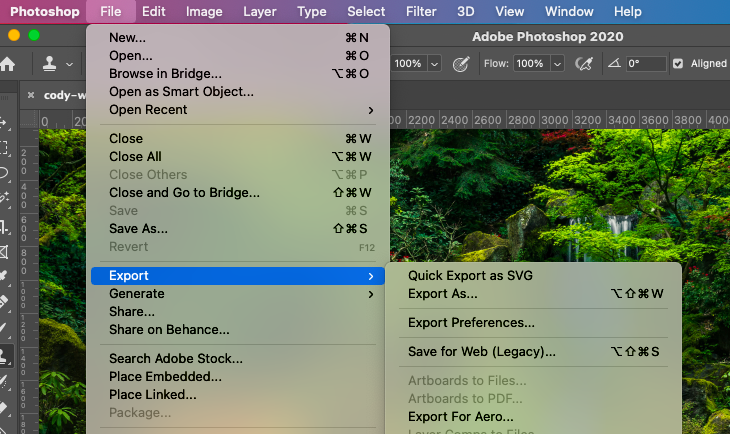
The Export As pop-up window will appear, here you can choose, the file size, and export location.
In the File Settings panel set the format as JPEG beside the Format box.
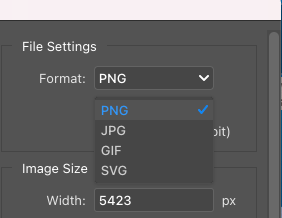
Once all the is correct hit the Export button in the bottom right-hand corner.
- How do I convert RAW to JPEG without Photoshop?
If for some reason you don't want to use Photoshop to convert your files from RAW to JPEG there are many ways you can do this.
To convert a RAW file to JPEG without Photoshop, you can use online apps, or any of the options listed in this article, which include, Lightroom, Preview (Mac), or Photo (Windows)
How to Convert RAW to JPEG in Lightroom
Lightroom is most often used for basic edits on Photos but can also be used to convert RAW files to JPEGs.
First, open Lightroom and open your RAW image by selecting File from the top menu bar and then Import Photos and Video from the drop-down menu.
You can also batch-edit a few files together if you want to convert more than one file to save time.
Simply open all the files you wish to convert in Lightroom and then select them all in Lightroom's library.
When you have all the photos selected click on File and select Export from the dropdown menu.
When the Export pop-up window appears set the location and file size for the file, then select File Settings tab.
In the File Settings tab select JPEG in the drop-down menu beside the Image Format box.
Now you can click Export and your file will be saved to your chosen location as a JPEG file.
How to Convert RAW to JPEG for Free (Online Method)
Some free online websites will convert your RAW files to JPEG files.
One such website is ZAMAR where you can simply upload your RAW file by selecting Choose File.
Once your image is uploaded click the JPEG button. When ZAMAR has finished converting you can hit the final button Convert Now.
Zamar will now give you the option to download your converted file.
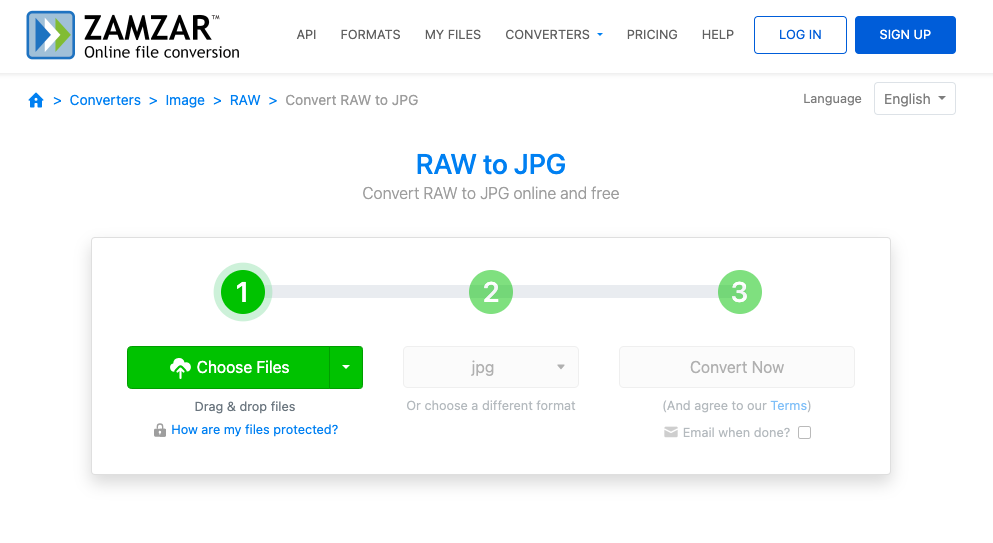
When hitting Convert Now you are agreeing to ZAMZAR's terms. These may be harmless but it is worth checking them before agreeing.
Raw.Pics.io is another website that will convert your images to JPEGS.
The beauty of this website is you can just drag and drop your files onto the homepage and follow the prompts.

Considering how many options there are to convert RAW files to JPEG it might be better to stick with your device's RAW conversion rather than uploading your precious images onto third-party websites.
Understanding RAW and JPEG Formats
| RAW Format | JPEG Format | |
|---|---|---|
| Pros | ||
| Quality | High quality with more detail | Good quality, usually sufficient for most uses |
| Editing | Greater flexibility in post-processing | Simple and quick to edit |
| Color and Exposure | More control over color and exposure adjustments | Automatic adjustments made by camera |
| Cons | ||
| File Size | Larger file size, takes up more storage | Smaller file size, more storage efficient |
| Speed | Slower shooting speed due to larger file size | Faster shooting speed |
| Compatibility | Not all devices and software support RAW | Widely supported by all devices and software |
| Editing | Requires special software to view and edit | Can be viewed and edited with most software |
Modern-day cameras shoot and save images as JPEG or RAW files and the photographer can often choose which one before proceeding to shoot.
JPEG stands for Joint Photographic Exports Group and is a raster file format. Most amateur photographers will opt for JPEG as they consume less storage.
Professional photographers who like to edit post-shoot will opt for RAW format.
A RAW file is considered not to be an image but rather image data yet to be processed.
Post-shoot processing is possible with a RAW file such as adjusting the white balance, tones, and colors of your image.
If the shoot was over-lit the image data collected would be over-exposed, with a JPEG this would be difficult if not impossible to salvage but if it is a RAW file it is possible to rescue when editing.
RAW gives the photo editor complete control, you can compare RAW to a film negative yet to be processed in a dark room, whereas a JPEG is like a printed photo that has been developed – the final product is impossible to change.
Understanding Compression and Quality Settings
When converting RAW to JPEG, it's essential to understand the concepts of compression and quality settings.
These factors play a significant role in the final output of your image.
Firstly, let's talk about compression. JPEG is a compressed file format, meaning it takes up less storage space compared to RAW files.
This compression is achieved by reducing the amount of data in the image.
However, this comes at a cost. JPEG uses a form of compression known as ‘lossy' compression.
This means that some image data is permanently lost during the compression process.
The more an image is compressed, the more data is lost, which can lead to a decrease in image quality.
This brings us to the second concept – quality settings.
When you convert a RAW file to JPEG, you'll often have the option to choose the quality of the JPEG.
This is usually represented as a percentage or a scale from 1 to 10 or 12. The higher the quality setting, the less compression is applied, and the more data is retained.
However, this also results in a larger file size.
So, how do you balance compression and quality? It depends on your needs.
If you're sharing images online or don't have much storage space, you might choose a lower-quality setting to reduce the file size.
However, if you're printing your images or need them for professional use, you'll likely want to choose a higher-quality setting to retain as much detail as possible.
It's also worth noting that once a RAW file is converted to JPEG and saved, the compression is irreversible.
This is why many photographers choose to keep their original RAW files.
They can always go back to the RAW file if they need a higher-quality version of the image in the future.
In conclusion, understanding compression and quality settings is crucial when converting RAW to JPEG.
It allows you to make informed decisions about the balance between image quality and file size.
Should You Convert RAW to JPEG?
Deciding whether you should convert RAW files to JPEG will depend on what you need your files for now and in the future.
Both file formats have their advantages and disadvantages and will suit different purposes.
Keeping your files as RAW will allow you the freedom to return and re-edit, with no loss of information.
However, it is worth considering if you will need to re-edit your RAW file as they consume a lot more storage than their JPEG counterpart.
If you have ample storage to store RAW files then you might as well, but if not you might want to complete your edits and save them as JPEG files.
The conversion process will compress the image resulting in a loss of extra information and downgrade its quality.
For most purposes, this is not a problem, but if you intend to conduct more in-depth photo editing in the future it might be wise to retain your image as a RAW file.

Check out these 8 essential tools to help you succeed as a professional photographer.
Includes limited-time discounts.

Judyth is an experienced studio photographer and glass artist. When she isn’t Photoshopping comedians into the bellies of sharks, you can find her cooking delicious treats for her guests.
👋 WELCOME TO SHOTKIT!
🔥 Popular NOW:
