


What is a CPL Filter and Why Should You Use One?
Wondering what a CPL filter is and when to use one? This guide has you covered! Learn how a polarizing filter can improve your photography.
Shotkit may earn a commission on affiliate links. Learn more.
A circular polarising lens filter (CPL filter) is an essential part of any outdoor photographer’s camera gear.
It helps to darken over-bright skies, reduce reflections, and/or suppress glare from water surfaces.
Blue skies will become more deeply blue and colors will often become more saturated.
Understanding what this useful accessory is and how it works will help you improve your landscape photography and give you much more control over your final product.
You should also see our tips on using camera polarizer lens filters.
What is a CPL filter?
So, what is CPL lens filter exactly? A CPL filter is a glass attachment that fits in front of your camera lens. The most common ones screw onto the front element of your lens and rotate.
For those of you into the science behind it, CPLs start with a linear polarizer which changes the balance of the light in the image.
This is helpful for both light in the sky and reflections, as both tend to be at least partially linearly polarised.
Out of the various types of lens filters, the CPL is one of the most useful, especially for landscape photography.
How to Use a CPL Filter

A circular polarizer can bring out the color and drama of the sky. | Sony A7 III + Sony FE 16-35mm f/4
Mastering the art of using a polarised filter will take a lot of practice. That being said, getting started with a CPL filter is pretty easy.
The first step, of course, is to buy a CPL lens filter that matches your lens diameter. (Make sure you have a lens that accepts screw-on filters.)
Once attached, simply rotate the filter until you get the desired effect. When composing your shot, your CPL filter will generally have the best results with the sun or other source of light to one side or the other. (Your subject should be at a 90-degree angle from the sun, for example).
If you compose your shot with your primary light source in front of or behind you, your circular polarization filter may have little or no effect.
One way to nail down the position where you’ll get the maximum benefit of your CPL filter is by making an “L” with your thumb and index finger. Point your thumb towards the sun. Position your index finger so that it’s pointing at the center of your scene and you’ll have the point where the sky will be evenly covered by the polarization of the filter.
Of course, you can just eyeball it or, if you have a mirrorless camera, use your LCD screen/viewfinder to see how the filter is affecting the scene and adjust accordingly.
One potential challenge is that, unlike other rotating filters, CPLs don’t have any markings showing you where to start. You’re just going to have to rotate it and see what happens to your image.
This isn’t much of a problem with mirrorless cameras where you can immediately see the effect of your adjustment, but for those using DSLRs without any live view option, it can be a bit of a pain.
Beware: Shooting with your CPL filter out of whack can make for some very unevenly lit skies – most of which won’t be easily fixable in post-processing. If you’re using it for lens protection and not for its effects, make sure you check its orientation before shooting a scene.
Another thing to be aware of is that CPLs will block at least some of the light getting into your camera lens. As a result, you’ll need to adjust your exposure settings accordingly, either by reducing shutter speed or by increasing ISO.
A high-quality CPL camera filter will usually diminish the incoming light by about a stop. Turn the filter to where it has a polarizing effect, however, and that can become up to two stops.
Another tip is not to assume that you always need to use your CPL at its maximum value. Check out the effects in all of its degrees so that you can find the look you’re going for. It won’t always be at the zenith of what the filter can do.
What Is the Difference Between CPL and ND Filters?
Both CPL and neutral density filters (ND filters, such as this one) are considered crucial to any landscape photographer’s kit – they allow for capturing more realistic and dramatic sceneries.
That being said, they do work a bit differently from one another and it’s helpful to know when to use which and when they can be used together.
A filter polarizer, like a CPL, lets certain polarized light waves in, while excluding others. This is what helps to increase the vividness of an image (particularly in the sky), as well as reduce reflections and glare on water surfaces and glass.
Neutral density filters, on the other hand, simply block out light. That’s it. A high-quality ND filter won’t change the color or contrast of an image. (Cheap ND filters, especially the higher-stop ones, often come with an unwanted color cast.)
In landscape photography, they’re most often used to slow the shutter speed used with an image (i.e. long exposure photography) or, as in the case of graduated ND filters, reduce the light in one part of the image (i.e. an over-bright sky) while not affecting the rest of the image (i.e. the foreground).
When Should You Use a CPL filter?
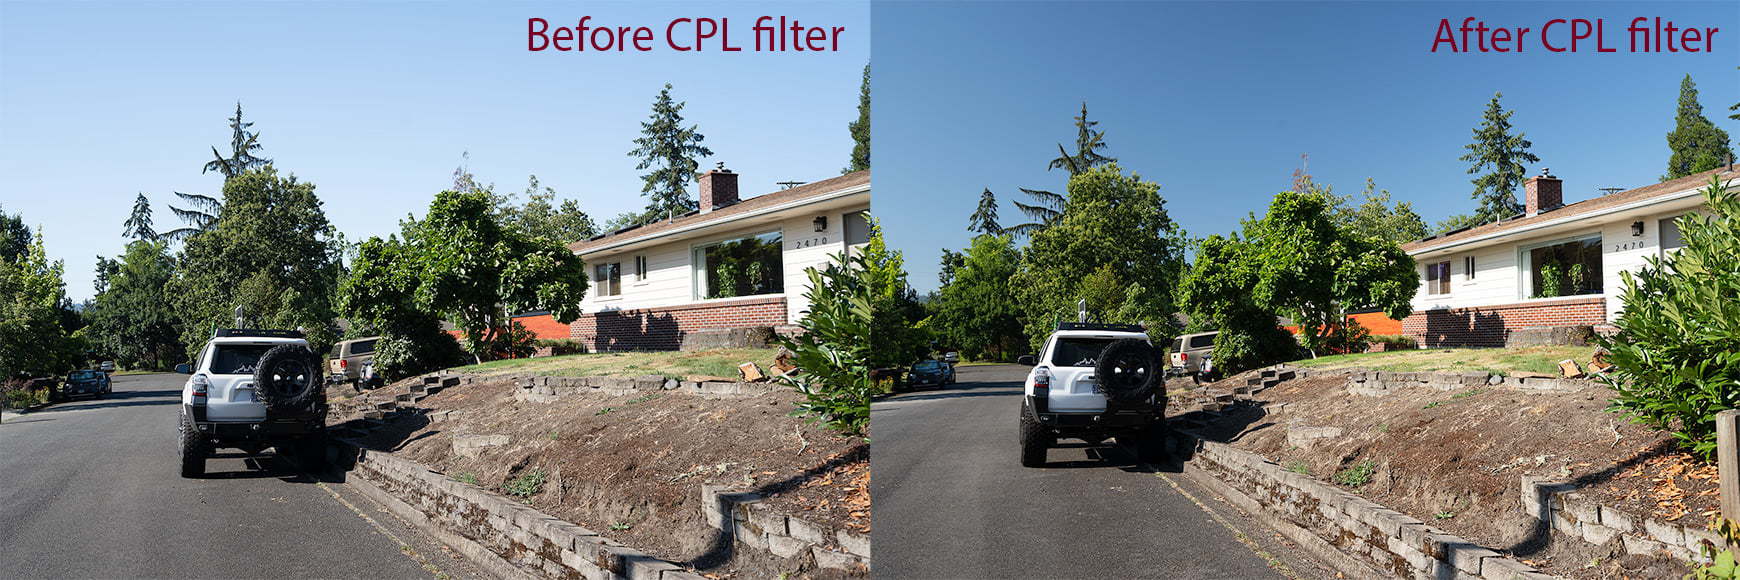
A circular polarizing filter darkens an over-bright sky and increases the saturation of the colors.
While there are many applications for a CPL filter in both indoor and outdoor photography, the most common uses are for darkening skies/enhancing color, removing reflections, and removing haze.
Some people keep the CPL filter on their lens all the time as an additional camera lens protector (the way others use a UV filter). If this is you, just make sure that you have the CPL rotated correctly when you’re not wanting the effect.
Darkening the Sky
Darkening an over-bright sky is perhaps the most classic use of a CPL filter. The effect is especially noticeable with a blue sky, as it not only darkens it but also increases the intensity of the blue by bringing out more color and contrast.
This works for both landscapes and cityscapes. A bonus is that the CPL filter often enhances the other elements in your frame as well.
Removing Reflections
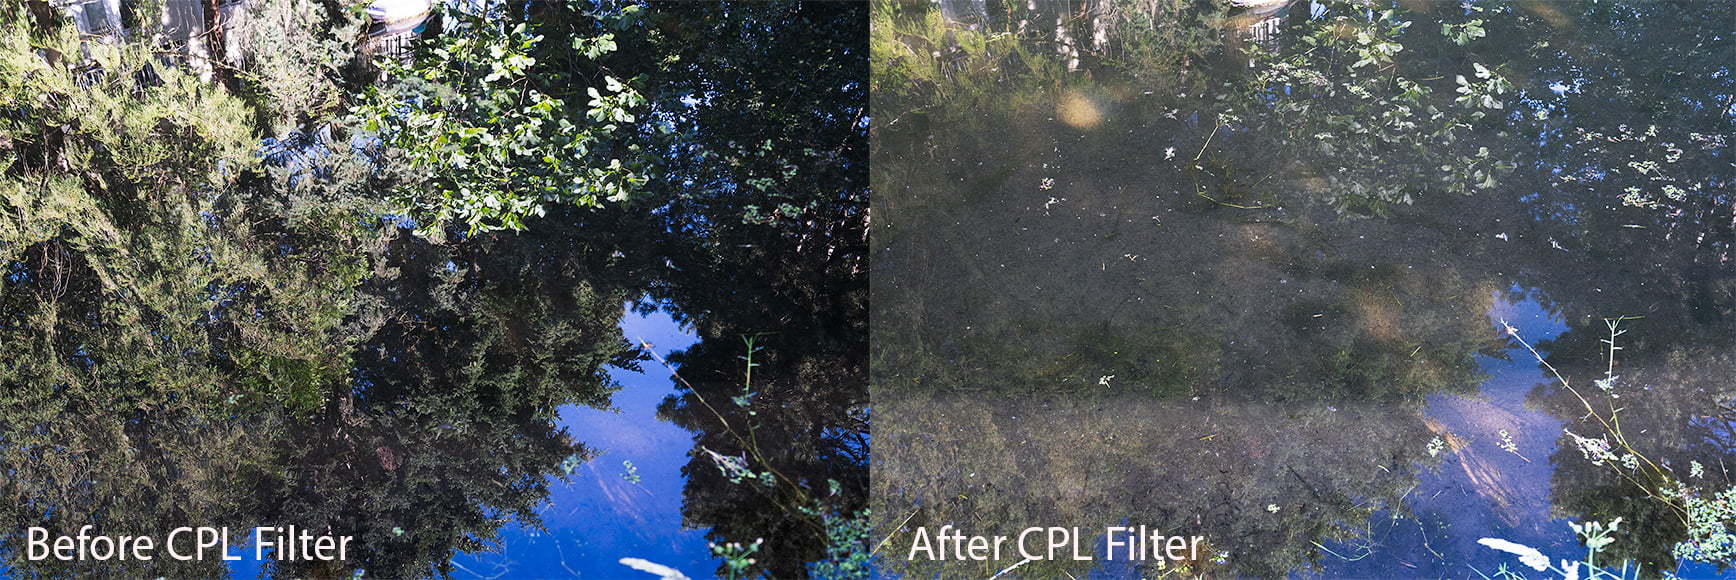
While this is just a demo photo on a murky pond, you can see how much the reflections are reduced. In clear water, you’d be able to see to the bottom.
Whether you’re shooting an artwork in a museum, through a car window, or simply trying to see to the bottom of a lake or pond, unwanted reflections can definitely ruin an otherwise amazing shot. A CPL filter can often reduce or even remove entirely these reflections.
CPLs will also minimize reflections when you’re photographing wood, painted metal, or items with a protective lacquer.
Just be aware, CPL filters aren’t a miracle cure for all water reflections. There are plenty of water/glass situations where a CPL filter won’t work at all. Still, it will definitely help out in many – especially in daylight – and is always worth a try.
The more you use it, the more you’ll get a feel for when it will work and when it won’t.
Side note: sometimes you’re actively trying to utilise a mirrored image in your photography composition – check out our tips on reflection photography here.
Removing Haze
If you’re faced with an atmosphere that’s a bit hazy and want to bring out a bit more clarity and contrast, a CPL filter will often be the perfect solution.
If you’ve ever worn polarized sunglasses, you’ll be well acquainted with the effect. Not only does the haze and glare get removed, but elements in the sky (like clouds) become more defined.
Increasing Saturation
When used on landscape photos, circular polarizers have the added bonus of deepening saturation, not only of the sky but also on elements such as foliage.
When Not to Use a CPL Filter
Make sure to check your polarizer’s orientation if you always have it on your lens. Strange things might happen to your sky otherwise – effects that are virtually impossible to correct for.
As much as CPL filters are useful, there are a few times when it’s better to take them off and/or use a null effect:
- When you want a reflection to remain in the scene. If you want the sky to have a “polarized effect” you can always add that later in post-processing.
- When you want “wetness” to remain apparent. Water is not always so easy to capture through a lens and that can make it difficult to tell the difference between, say, a dry rock and a wet one. If you want something to look “wet,” a CPL filter can sometimes get in the way.
- When shooting light itself (i.e. light painting).
- When there’s not enough light. This won’t be a big deal in any style of photography that uses a tripod, but if you’re handheld and need more light, take the CPL off. You’ll likely gain 1-2 stops.
- If you’re shooting with a wide angle lens. This is a bit of a catch-22 for landscape photographers as we want both the polarization effect and a wide angle. Unfortunately, using the two together can sometimes result in uneven sky color or color variations, as the CPL filter doesn’t have full coverage on lenses wider than 24mm. (I still keep one on my Sony 16mm-35mm all the time. I just make sure it’s turned to “no effect” when I’m wider than 24mm.)
- When using variable ND filters. This is one of those cases where you need to take the CPL completely off before using the variable ND filter. (See below.)
Can You Use a CPL Filter and an ND Filter Together?
Both ND and CPL filters work well together but often need to be used separately when combating specific issues. For example, water reflections and dull skies are two issues an ND filter can’t address.
One thing to be aware of though, is that circular polarizer lens filters don’t work well with variable ND filters (like this one). Variable NDs stack two polarizers together and can have weird effects when combined with an additional polarizing filter.
It’s also important to be aware that each filter you put between the scene and the camera lens creates one more obstacle for the light to pass through. Even a UV filter, which is often used to protect the camera lens, can disperse light, cause lens flares and reflections, etc.
Buying high-quality filters will reduce any tendency towards image quality loss, but even so, there’s always a potential for lens flare and unwanted reflections.
Conclusion
Whether you’re just starting out as a photography enthusiast or a seasoned pro, a circular polarizer lens filter is a must-have for any camera kit – especially if you do a lot of outdoor photography. It can return a lot of life to your photos, without having to do it in post-processing.
They can also be used for basic lens protection, while being much more useful than, say, a UV filter.
Hopefully you found this guide useful. Have any questions? Let us know in the comments below.

Check out these 8 essential tools to help you succeed as a professional photographer.
Includes limited-time discounts.

Usnea Lebendig is an experienced photographer and reviewer who loves to photograph professionally and in moments where the world’s beauty and/or strangeness leaps in front of the lens.
4 Comments
Leave a Comment

👋 WELCOME TO SHOTKIT!
🔥 Popular NOW:

Very helpful. Answered all my questions. Thank you
This is a basic ND filter set and will be very useful if you don’t have one already. The ND filters will be useful for shallow depth of field and sharper images when shooting at 2.8 with low ISO in bright light as well for long exposure in lower light. The CPL will be useful for reducing glare, reflections and improving saturation in bright scenes.
Well written and very informative. Thank you
Nice article. Im looking for a ND cum CPL, and came across a particular product from Nisi. Just don’t know if to go for it or not. Its around 90$. The ND strength is 6 stops and i plan to use it on Canon 24- 70 f2.8 II.