


Essential Camera Lens Filters (How to Choose & Use Them)
Check out this in-depth guide to lens filters to learn about filter types, when to use them, and how to choose the right one to improve your photography.
Shotkit may earn a commission on affiliate links. Learn more.
If you're like me, your first introduction to lens filters was buying a UV filter to protect your lens. It wasn't until much further down the road that I became aware of the other filters out there and how they could really add some oomph to my landscape photography.
As it turns out, lens filters are an important part of a photography kit. From protecting your lens to reducing glare to adding special effects, there are a number of ways they can enhance your in-camera photography.
That being said, understanding the different types of lens filters is important, as it's easy to mess up images too.
The good news is that once you get into it, lens filters are pretty easy to understand. The bad news is that there's such a wide variety of camera lens filters out there, it can be difficult knowing where to start.
In this article, I'll cover the main types of camera lens filters used in digital photography, what they're used for, and how to choose the best one for your needs.
Let's get started.
What Are Lens Filters Used for in Photography?
If you've ever asked yourself, “Should I use lens filters?” here's a summary of their various usages and benefits to help you decide if they align with your photography needs.
1. Lens Protection
The most common use for camera lens filters – at least among beginners – is for lens protection.
Keeping a filter attached to your lens can keep scratches, dust, and fingerprints at bay. And let's face it, it's a lot less expensive to replace a damaged lens filter than it is to replace an entire camera lens.
2. Correcting for Challenging Lighting Conditions
If you often find yourself in challenging lighting situations and you don't want to spend time correcting your images in post-processing, there are a number of great filters available that can help you out.
For example, if you're looking to darken an over-bright sky while not affecting your foreground, you might choose to use a polarizing filter or a graduated neutral density filter.
If you're shooting indoors with irregular light sources, you might choose to use a color-correcting filter.
3. Adding Impact to Your Images
Camera filters can also be used to enhance images, whether by adding a level of contrast, restricting the light entering a lens to decrease shutter speed, or adding special effects.
4 Styles of Lens Filter

Before we get to the different types of camera lens filters, let's take a look at what styles they come in:
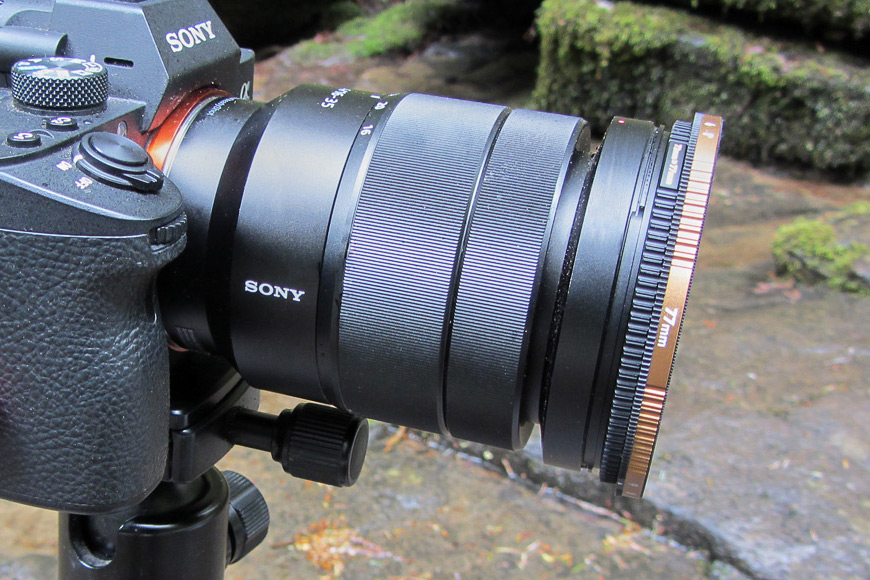
1. Circular Screw-On Filters
Circular screw-on filters are perhaps the most common type of lens filter. This type screws directly onto the threads at the edge of your lens barrel.
Screw-on filters are super easy to attach and swap out, and some can even be stacked on top of each other. They're also much more portable than most square and rectangular filters. Most allow you to put the lens cap over them, making it easy to keep them on 24/7 if that's what works for you.
Each screw-on filter is a different diameter, so if you have a number of differently sized lenses you might need to invest in more than one filter or in a set of step-down rings.
UV filters, circular polarizers, color filters, and ND filters frequently come in this form.
Be aware, though, not all lenses have threads on the ends of their barrels.
Also, circular filters come in different thicknesses. The thicker ones are generally less expensive and can potentially add vignetting. The more expensive ones are thinner, but depending on the model, can make it impossible to put on your lens cap.
2. Square Filters
Square filters drop into a filter holder that's attached to the front of the lens. While they're not as quick to attach as screw-on filters, they do come with a number of benefits.
For one, a filter holder set will often come with a number of adapters allowing you to use a single filter with a number of different lenses. There's no need to buy multiple expensive filters – just one.
Also, if you enjoy stacking filters it's easier with square ones because the filter holder usually has 2 to 4 slots, allowing you to use more than one filter at a time.
Lastly, square filters are generally larger than your lens diameter, preventing the vignetting that often happens when stacking screw-on filters. The most widely used sizes are 3×3 and 4×4.
3. Rectangular Filters
A popular filter-type for landscape photographers, rectangular filters also use a filter holder attached to the front of the lens. The difference between these and square filters is that there's more room to move them up or down – something important when using a graduated neutral density filter or any type of filter where the effect doesn't cover the entire frame.
The most widely-used size is 4×6, though other sizes are also available.
4. Drop-In Filters
While square and rectangular filters are sometimes called “drop-in” filters because of their filter holder system, there's another form of drop-in filter designed especially for use with larger telephoto lenses.
These lenses have a special slot in the lens body that you can drop a specially made filter into. Of course, you're unlikely to come across these unless you're using one of these huge lenses. Most photographers will be choosing between circular or square/rectangular filters.
8 Main Types of Lens Filter
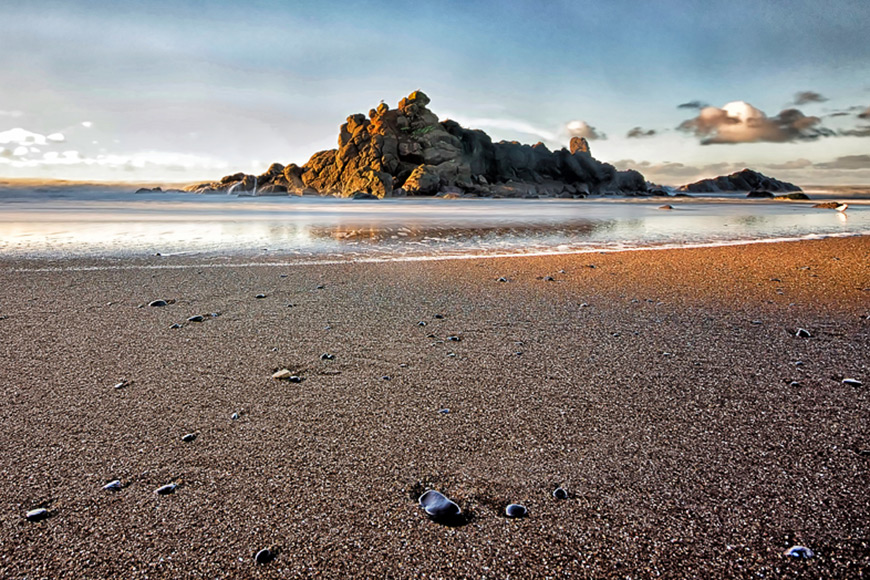
Some filters create effects that can't be easily duplicated in Photoshop. In this image, the waves have been converted to glass by a 10-stop ND filter. | Photo credit: Teryani Riggs
Which filter you invest in will largely depend on what effect you're going for. Choosing the right one is important because if misused or misunderstood, they can often detract from your image quality.
1. UV/Skylight Filter
In the past, it was important to block UV rays (including UV haze and UV light) from hitting the film in cameras. Digital cameras, however, have a built-in UV/IR filter so an additional filter is not needed.
In outdoor photography, skylight filters can reduce the blue cast that sometimes occurs. They can also keep the colors of nearby objects from reflecting on skin tones.
These days, skylight and UV filters are primarily used to protect the front element of your lens.
Less expensive UV filters can sometimes add a color cast to your images, so beware. If you're only using them for lens protection, you might consider buying just a clear piece of glass.
One thing to keep in mind, however, is never to use a low-quality filter with an expensive lens. It can definitely reduce the image quality you're paying so much for.
Also, never stack UV filters with other types of filters, as vignetting is much more likely.
2. Circular Polarizing Filter
Circular polarizing filters are used primarily to darken skies that are much brighter than the foreground. They do this by increasing the saturation of the sky and increasing the contrast between the sky and clouds – ideal for real-estate photography where a bright blue sky is often required by clients.
They also do a great job of removing reflections from glass or water and reducing haze.
Most landscape photographers never leave home without a polarizing filter – they're an absolute must for overly bright skies and when photographing waterfalls or other wet surfaces where reflections are unwanted.
While there are two types of polarizing filters – linear and circular – circular polarizers are the ones you want to use with a digital camera. They're made with an extra piece of glass that ensures you get accurate exposure results when light hits your camera's light meter.
Circular polarizing filters most often come as screw-on filters. Once affixed to your lens, you then spin the rotating element to get the effect you want.
Polarizing filters are another one you don't want to combine with other filters. You also don't want to use them with ultra-wide-angle lenses.
Another thing to keep in mind that polarizing filters can substantially reduce the amount of light entering the lens, so you'll need to adjust the exposure accordingly.
3. Neutral Density Filter
Neutral density filters allow for excellent long exposure shots in bright sunlight. | Photo Credit: Teryani Riggs
Neutral density (ND) filters have one purpose: to reduce the amount of light entering the lens.
They're made of darkened glass and come in various densities, the strongest of which will reduce the light up to 10 or even 12 stops.
Unlike graduated neutral density filters, a standard neutral density filter blocks light uniformly – i.e., the entire image is affected equally. This allows you to decrease your shutter speed while maintaining your chosen aperture and ISO.
The result? Silky waterfalls, glass-like oceans, and misty waves. They also add in motion blur so that you get a heightened sense of motion from clouds and other moving objects. They're a great tool for doing long exposure photography in a bright environment.
Videographers and portrait photographers often use a neutral density filter for maintaining a shallower depth of field when shooting in very bright light.
One thing to be aware of with ND filters is that quality really counts here. Less expensive versions will almost always have a color cast and will often reduce sharpness as well.
While the color cast can be removed in post-processing, the added softness isn't so easy to remove.
If you want to reduce your shutter speed further, it's fine to stack more than one neutral density filter together.
What's the best ND filter to buy? Read our guide to discover our recommendations.
4. Graduated Neutral Density Filters
Where standard neutral density filters affect the entire image, graduate neutral density filters (GNDs) affect only the upper part of the image.
They're designed to darken skies while leaving the foreground normally exposed. Because of this, they're also sometimes called “split filters.”
With film cameras, graduated neutral density filters are essential when capturing dramatically-lit landscapes.
With digital images, however, it all depends on whether you want the best in-camera shot possible or if you're happy taking multiple exposures and then blending them together in Photoshop.
If you have changing light or fast-moving subjects, however, a multi-exposure shot might not be feasible. That's where a GND is particularly useful.
There are three types of GNDs: hard edge, soft edge, and reverse. The basic rule of thumb is to use a hard edge GND when you have a clear, flat horizon.
Use a soft edge GND when photographing a horizon that's not flat, and usse a reverse GND when photographing sunsets where the sun is near the horizon.
Like ND filters, GND filters can also be stacked.
5. Color Filter
There are generally two types of color filters: warming/cooling filters and color subtraction filters (mostly used for black and white photography).
- Warming and Cooling Filters
In the past, warming and cooling filters were primarily used for correcting white balance.
They're still pretty essential for film photographers, but most digital photographers don't bother with them – especially those who shoot in RAW. It's so easy to fix the white balance in post-processing that most photographers won't need them.
Still, if you're feeling creative, shoot with film, or simply want to get the best in-camera shot possible, they could be worth your while.
Also, you may come across a few situations – like some underwater photography – where there is such an overwhelming amount of monochromatic light that no amount of adjusting the color temperature and white balance in post-processing will work (at least not without adding noise).
- Color Filters in Black and White Photography
Color subtraction filters are slightly different. They absorb a single color while letting the other colors through.
Each filter allows its own color of light through but blocks other colors to varying degrees. For example, using a red filter will let 100% of the red light through, but will block most of the blue and green.
Color subtraction filters are especially useful in black and white photography. The colors that are allowed through will appear brighter in a black and white image. The other colors will appear darker.
You can, of course, adjust the color filter in post-processing, but there's a certain pleasure to getting the look you want in-camera.
Color filters are definitely stackable.
6. Close-Up Filters
Close-up filters are actually a type of lens, but attach like filters. They magnify your subject in the same way reading glasses do, allowing your camera to focus more closely on a subject than it would normally be able to.
Close-up filters work on all sorts of camera lenses – even those on compact cameras.
If you only do macro photography occasionally and/or are not yet ready to invest in a costly macro lens, a close-up filter can be a great investment. They're quite affordable and even stackable.
That being said, these definitely reduce image quality and are no substitute for an actual macro lens.
7. FLD Filters
FLD filters help you capture better images under fluorescent lighting conditions.
They do this by correcting the color balance of images taken under fluorescent lighting.
In most cases, you won’t need an FLD filter as long as you’re using a digital camera with a decent white balance system.
8. Special Effects Filters
Like color filters, special effects filters went a bit out of vogue once digital photography and Photoshop came along.
Still, if you prefer to get the best in-camera photo possible and like the effects they provide, these filters are worth a go.
Here's a list of the most popular:
- Starburst filter – add a twinkle to light sources. Depending on which filter you buy, they'll turn lights into two, four, six, or eight-pointed stars.
- Multivision filter – duplicates your subject in a sort of kaleidoscope effect. Depending on the one you buy, they'll create between two and six duplicates. You can also choose between circular and linear. The circular multivision filter arranges your duplicates in a circle. The linear multivision filter arranges them in a straight line.
- Diffusion or soft filter – creates the soft-focus effect popular with portraits and still life images.
- Center spot filter – creates a diffusion effect where the center of the image is in focus but the edges are soft.
- Infrared filter – blocks out visible light while allowing infrared light into the lens. Great for IR photography.
Regardless of which filter type you choose, be aware that most photography filters will substantially change the dynamics of the light entering the lens. As a result, you'll probably need to adjust your exposure to compensate.
This is called the “Filter Factor.” Each filter has its own specific filter factor, so get acquainted with it before you use it.
How to Choose a Lens Filter
Once you've decided on the type of filter you'd like to use (i.e. UV filter, polarizing filter, ND filter, etc.), your next step is to choose the one that's going to work best for you.
-
Type of Filter
As mentioned in the first section, the most common filters either screw onto your lens or drop into a filter holder. You'll have to decide which style you want to invest in.
Screw-on filters are less bulky and often less expensive. They work great if you're only going to use the filter on one lens (i.e. a polarizing filter that you only want to use on a landscape lens).
They also make great camera accessories if you're buying a filter solely for lens protection – they often provide an air-tight seal and won't accidentally move (well, unless you're using a polarizing filter).
If you want to use a filter on multiple lenses, a square filter might be your better bet, since the lens holder will usually work on a number of different lens diameters.
Square or rectangular filters are also a better choice if you're looking to stack filters on top of each other.
Either way, be sure to check the diameter of the lens(es) you intend to use the filter on and make sure you order the right size.
(Tip: If you don't know your lens diameter, a quick way to find it is to look on the back of your lens cover.)
-
Construction
Some of the important things to look for in a high-quality filter are:
- the seals (for screw-on filters)
- type and thickness of the glass
- where the glass was made
- the quality of the coatings
- the material of the filter’s retaining ring (cheaper filters will have retaining rings made of aluminum; more expensive filters will have retaining rings made of brass)
- the height of the filter edges
Any of these considerations will affect both the quality and price of a filter you're looking to buy.
-
Price
Investing in a camera filter is a lot like investing in a lens – it's usually best to buy the highest quality you can afford. Cheaper filters tend to affect image quality with color casts, vignetting, or lack of sharpness.
If you're using a high-performance lens, make sure that the quality of the filter is just as good, or you'll be hampering the lens' performance.
You might not be able to see the difference in performance when photographing with a kit zoom lens, but try out a cheap filter on a more expensive, high-performing lens and you'll be sure to see the difference.
With some filters, you can see the difference even on less expensive lenses. For example, my first 10-stop ND filter was made by B+W and retailed for around $90. There was a considerable color cast, and a little bit of softness, but it was all manageable in post.
When I was on a trip a year or so later and forgot the filter, I bought a cheaper Ice 10-stop ND filter for around $30. The color cast was horrible and the softness almost too much to deal with.
When I finally got my hands on a high-quality Peter McKinnon Variable ND filter (available here for around $300), I was in heaven. No color cast and quite sharp. There was next to no post-processing repair to do.
So while it might seem tempting to go for the cheaper options (and good glass is never cheap!), if you have a high performing lens, don't skimp.
Lens Filters FAQ
What does a lens filter do?
Each type of filter serves a specific purpose. Some are used to protect your lens from damage, others to minimise glare, moderate the amount of light coming into the lens, or enhance colours and contrast in your images.
Do professional photographers use filters?
It depends on the situation and type of photography work, but generally speaking, professional photographers will know how to use filters and have some in their kit. Most landscape photographers, for example, will use neutral density and polarising filters on a regular basis.
Can I use a polarizing filter all the time?
It's not advisable. Some situations will be better served without a polarizer – for example, if you're shooting in low light, want to deliberately capture reflections, or want to capture the colour of the light.
Final Words
Lens filters are small but mighty and when used well can play a significant role in the outcome of your images.
Sure, you can achieve many of the same effects in post-production, but using a filter allows you to see what you're doing while composing and taking the photos.
Also, it's difficult to replicate some of the effects that filters bring – in particular ND filters used for long exposure photography.
Have you tried filters before? Which ones do you use now?

Check out these 8 essential tools to help you succeed as a professional photographer.
Includes limited-time discounts.

Usnea Lebendig is an experienced photographer and reviewer who loves to photograph professionally and in moments where the world’s beauty and/or strangeness leaps in front of the lens.
👋 WELCOME TO SHOTKIT!
🔥 Popular NOW:
