


How to Use Cropping to Enhance your Photos
Cropping your images is a simple but powerful way to enhance them, but there are a few rules and tools you need to learn first. Discover everything right here.
Learn | Photography Guides | By Ana Mireles
Shotkit may earn a commission on affiliate links. Learn more.
Did you know that you can use cropping to enhance your photos? You've probably experienced cropping when printing an image or uploading it to a social media platform – when your image gets ‘cut' – well, that's cropping!
In those cases, the photo gets cropped to fit a specific format or size. However, you can also crop your image as a creative decision or even crop a picture into a circle for use on social media or in an email signature.
If you want to know more about the best practices to crop your photos, keep on reading!
What is Image Cropping?
Cropping an image means that you are cutting one or more of the edges.
When the aspect ratio is locked, the same amount of pixels that you crop from the length will be automatically clipped from the height and vice-versa.
Instead, if you want to change the proportion between length and height, you can unlock the aspect ratio and crop only from one of the sides.
How to Crop a Photo
Depending on what photo editing software you're using, cropping a photo is usually just a case of selecting the ‘Crop' tool, then dragging the corners over your image to select the space which you'd like to cut away (crop) or leave.
Most editing tools will give you a few options to control the crop – you can respect the same aspect ratio as the original image, unlock it so that your crop is completely free of any aspect ratio constraints, or choose another aspect ratio for the crop, such as 1:1 or 12:9.
You're usually able to change the opacity of the cropped area, allowing you to better visualise how your photo will look after it's been cropped.
Finally, some smart editing apps such as Photoshop and Luminar offer a cropping feature that's powered by AI, meaning all the decisions are made for you.
Other Cropping Tips
Credit: Toa Heftiba
When you're copping a portrait, never cut at the body joints – avoid the knees, waist, wrists and elbows.
Instead, cut just above or just under the joint to flatter the body.
If you're cropping a headshot, don't crop the chin and keep your eyes on the upper third of the frame.
Credit: Todd Quackenbush
Cut out any distracting elements on the edges. If there's something that's distracting or you didn't manage to zoom in close enough to eliminate undesired elements – you can fix it by cropping the edge.

Mason Wilkes
Unless it's a creative cut, don't crop too tight – give your subject some space to breathe.
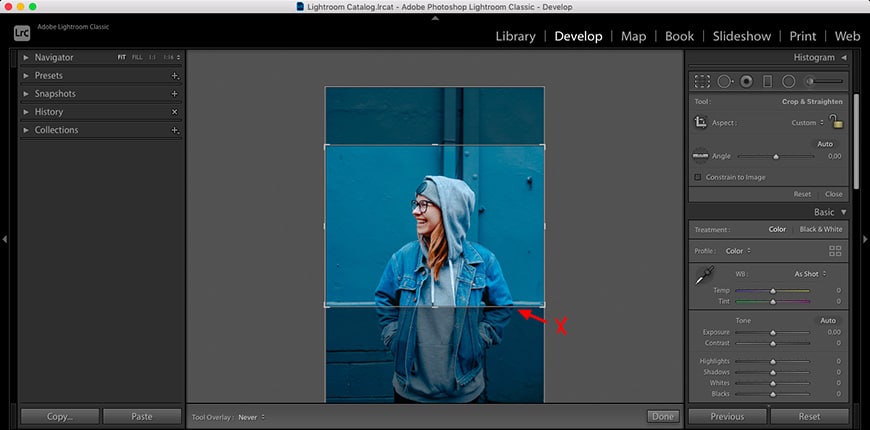
You can also use the shortcut key ‘X' when cropping in Lightroom to quickly switch from a landscape to a portrait orientation crop.

Credit: Frank Alarcon
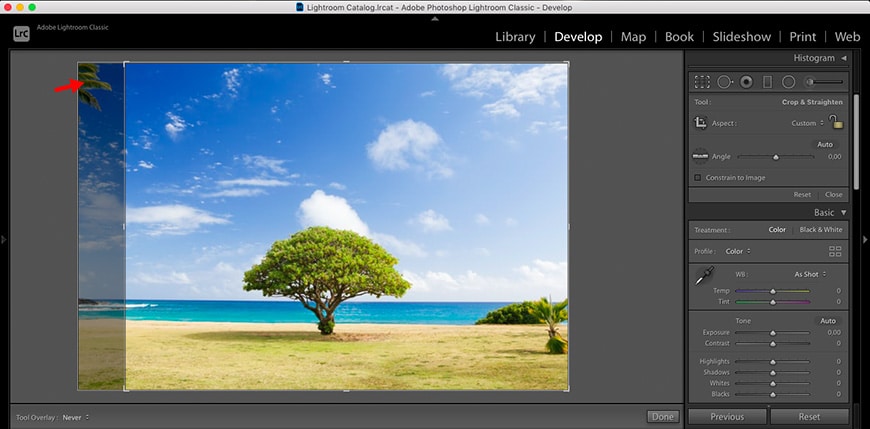
When making a crop on one side, always keep an eye on the entire frame to avoid cropping important information – especially if you lock the aspect ratio.

Credit: laib Khaled
You can use the crop tool to straighten the horizon – some programs like Photoshop and Lightroom have a ruler included in the crop tool to do this.

Credit: Jerry Wang
Try to get the correct framing from the original photo. If you use the crop tool as a zoom, you might end up with a very small image.

Credit: Tinashe Mwaniki
It's always good to know the guidelines, but it's also important to get creative – experiment with the crop tool.
Cropping Tool Recommendations
Cropping is one of the most common adjustments done in post-processing. That's why most photo editing tools and apps have a cropping tool.
If you don't want to hassle with photo editors because all you want to do is crop your image – there are free websites that allow you to do this.
For example, www.iloveimg.com allows you to upload a JPEG, PNG or GIF to crop and download for free.
If you want more choices, such as choosing the aspect ratio, export file type, resolution, and DPI, you can use www.image2go.com.
If you prefer to work on your phone, multiple apps do this as well. If you're cropping to use on social media, I like Photoshop Express.
It's free, and you don't need to know the size or aspect ratio for each platform because it has cropping options marked for use: Facebook Ad, YouTube Thumbnails, Instagram, etc.
For further creative control, I do recommend you use a more professional photo editor. I use Adobe Lightroom and Photoshop, but you can use Luminar NEO, GIMP or the one you like best.
You can also check out our post on the best free photo cropping apps.
Regardless of what you use, here are some cropping tool recommendations that apply to most programs:
- Use overlays to improve the composition.
- Use the block feature if you want to maintain the same aspect ratio.
- Double-check you're using the correct measurement unit (pixels, cm, inches, etc.).
- You can set a value for the resolution.
Image Cropping FAQs
How is cropping useful to photographers?
Cropping has many uses. You can crop an image when you want to eliminate an unwanted element close to the edge of the frame.
You might also want to crop the image to improve the composition. For example, if you prefer the subject to be on the side (following the rule of thirds) instead of the center.
Another use for cropping is to change the aspect ratio of your photo. For example, if you want to make a square image (1:1) out of your landscape picture (3:2).
While changing the aspect ratio, you can also change the photo orientation. You can crop the length of a portrait-oriented photo to make it landscape-oriented and vice-versa.
What is the difference between cropping and resizing?
When you crop an image, you are taking away a piece of it. You're effectively making it smaller. However, the uncropped pixels remain the same. You don't lose any quality, but you lose a piece of information.
On the other hand, resizing a photo means scaling up or down the original pixels. In this case, you can lose image quality, but you're still keeping the entire frame.
How do I crop a picture and keep the original size?
You can't crop a picture and keep the original size because cropping means that you're cutting and discarding a part of it. What you can do is to resize it to its original size after the crop. However, you'll be losing quality.
To do this, you should crop the image, maintaining the original aspect ratio. Each photo editing software will have a different way to do it, but usually, there's a lock function option in the cropping tool.
Can you crop a photo without losing quality?
A photo doesn't lose quality when you crop it. You're simply deleting pixels you don't want, but the remaining image keeps the same quality and resolution. It's resizing what can cause loss of quality.
Why does cropping increase the image size?
The increase in size after cropping only happens when you're working with JPEG files – it has to do with the compression algorithms of JPEGs.
If you crop a TIFF file, a PSD file or other lossless formats, the image size after cropping will be smaller.
Final Words
Cropping is a straightforward tool, but it can really enhance your photos when you use it well.
Hopefully, this article gave you an idea of the huge creative potential of a simple crop!
If you have any questions or suggestions, leave them in the comments and we'll be happy to reply.

Check out these 8 essential tools to help you succeed as a professional photographer.
Includes limited-time discounts.

Ana Mireles is a Mexican researcher that specializes in photography and communications for the arts and culture sector.
9 Comments
Leave a Comment
👋 WELCOME TO SHOTKIT!
🔥 Popular NOW:

I’ve recently started experimenting with different crop ratios and found it helps tell a much clearer story through the frame.
Very nice post about cropping of images, yes we can crop any kind of merged images to get your desired portion
This is a very interesting post. I have learned a lot from it, and I will put it into action.
Very interesting post,I have learnt a lots from this post,I will put in in action.Thanks
Thanks for sharing this post this is the best way for cropping images enhance the photos
Usefull information regarding cropping tool
Thank you very much. This is a great cutting tool
Last point – getting creative. I absolutely needed that. Thank you
Thanks for reading my article, let me know if you have any questions.