


Fog Photography: How to Get The Best Shots in Foggy Weather
Discover the art of fog photography and learn how to capture dreamy, ethereal images in misty conditions, including scouting, post-processing and more.
Learn | By Ana Mireles
Shotkit may earn a commission on affiliate links. Learn more.
Don't you just love fog photography? You can turn even the simplest subjects into a moody, atmospheric image.
Many people get discouraged when they wake up and see a foggy day. Instead, it should be the perfect situation to drive you out of the house to take stunning pictures.
Hopefully, after reading this article, you'll get as pumped as I am about fog photography.
I love to shoot landscapes in foggy conditions. Instead of coming back with a dull landscape with a grey, washed-out sky, the photos become mystical.
If you're interested in trying it, here are some fog photography tips to help you with your next photoshoot.
What Equipment Do You Need for Fog Photography?

Credit: Trung Nguyen
Camera
Like any type of photography, a good camera will give you better-quality photos. However, fog photography doesn't have high technical needs.
You can take fog photos with any camera, including a smartphone. The most important thing is that you can adjust the camera settings.
Of course, a bigger sensor allows you to have more resolution for bigger prints. It also has a better dynamic range and renders more details.
Also, being able to change lenses will give you more options in choosing your subject. And you can select a faster lens to let in more light.
- Read more: How to master your camera settings
Lens
The best focal length for shooting in the fog depends on the subject. If you're shooting landscape photography, then a wide-angle lens is better.
However, a normal lens or even a short telephoto would be best for shooting foggy portraits.
- Read more: What is the best focal length?
Tripod
Since you're probably working in low light conditions, you'll be using a slower shutter speed. It is important that you use a tripod to prevent camera shake. Keep in mind that fog pictures aren't usually sharp shots, though.
So, don't expect miracles even if you use a tripod or a faster shutter speed. The beauty of fog photography it's precisely its mysterious look.
It's also helpful because you'll use manual focus, which is better with Live View. If you shoot handheld, it would be very challenging to compose and focus your images.
- Read more: What is the best travel tripod?
Filters
You don't need a filter every time you photograph fog. However, an ND filter would benefit certain light conditions and shooting situations.
A neutral density filter allows you to make long exposure shots without overexposing your image. It's great if you're shooting with the light rays coming in from behind the fog, for example.
- Read more: How to choose a UV lens protection filter
Fog machine
So far, I've described the equipment needed to photograph natural fog. However, there is a machine that lets you create fog in the studio.
This is usually done for commercial photography or adding ambience to a portrait. As a genre, it's referred to as fog machine photography.
There are many machines on the market. The most budget-friendly can cost much less than 100 dollars – here's a great value one.
However, you can find some that go up to three or four thousand dollars too!
Mainly it depends on the power. This is strictly related to the area you want to fill with fog. Also, you should check the amount of control you have over the intensity and density of the fog.
Safety note – Can fog damage a camera?
Many people wonder if it's safe to do fog photography. Generally speaking, it is.
Most mirrorless and DSLR cameras are weatherproof. This will prevent the water in the air from entering the camera.
Probably if you leave the camera outside in foggy weather for a really long time, it could suffer some damage. For a regular photoshoot, you should be OK.
It is recommended to keep the lens on the camera. This will prevent any water from coming into the camera and potentially damaging the sensor.
For the condensation in the lens, you should bring a lens cloth. Once you're back home, dry everything as best as possible.
Also, send your camera for a professional cleaning every once in a while to keep it at its best.
- Read more: How to clean a camera lens
7 Fog Photography Tips: How to Capture the Best Photos in Foggy or Misty Conditions
Here are some fog photography tips and ideas for you to try.
1. Use manual focus

Credit: Karol Wiśniewski
Most auto-focus systems work by finding contrast in the scene. Fog tends to eliminate contrast. As a result, auto-focus will have a difficult time or not focus.
That's why it's better to use focus manually for fog photography. Using your camera's Live View will help you be more precise.
2. Use the camera in manual mode
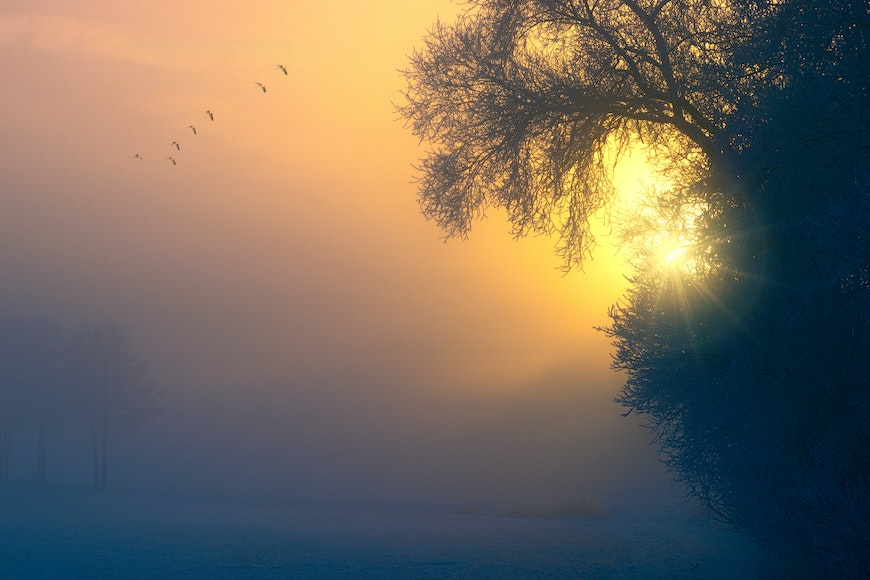
Credit: Johannes Plenio
Working with natural light when there's fog can be challenging. The exposure meter on your camera can have a hard time.
Once you have control over the exposure settings, you can decide exactly how you want your image to look.
For example, you'll need a slow shutter speed to achieve a smooth effect caused by the fog's motion. Instead, a fast shutter speed will result in sharper images.
You can also choose the depth of field by adjusting the aperture. Unlike other types of landscape photography, you don't need everything to be in focus.
You can use an aperture that more naturally represents what the human eye sees. So, something around f/5.6 or f/8 should be a good starting point.
A narrower aperture may cause you to use a higher ISO. You don't want this because it would add noise to the image.
3. Use the camera's histogram to improve your fog photography

Credit: Pixabay
The images tend to be very flat when you're doing fog photography. If you see the histogram, most values are concentrated in the center.
This is because the ambient light is so diffused. Try to expand the dynamic range by introducing white and black points in the image.
You can introduce light rays or a silhouette. Be careful not to have clippings; that's why checking the histogram is important.
Sometimes it isn't easy to see them on the preview.
4. Find a strong focal point
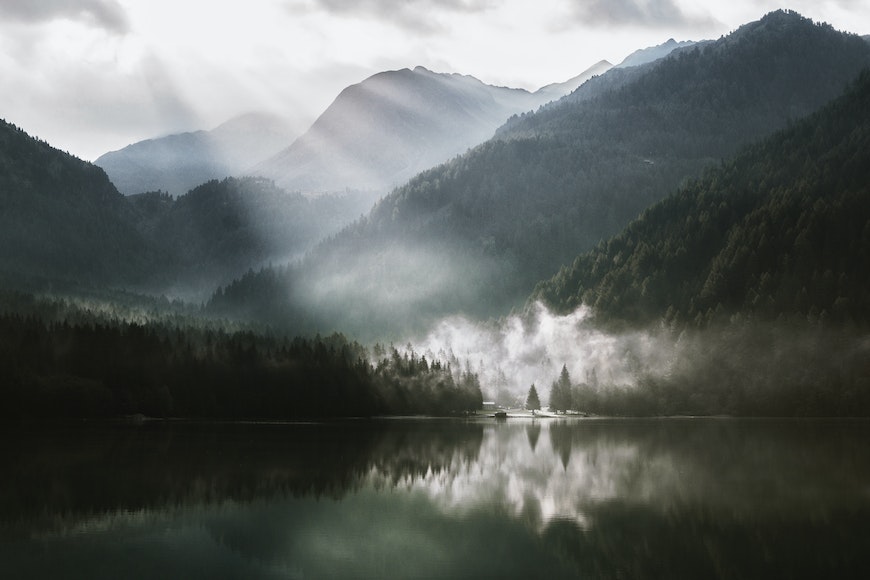
Credit: Eberhard Grossgasteiger
Composition is very important in fog photography. This is because you won't have much color or contrast to help guide the viewer to the subject.
That's why a strong focal point (AKA an anchor point) is key. Make sure you place it at a strategic point inside the frame. You can use a composition grid for better results.
Another idea is to use leading lines that disappear into the fog. This can be the anchor point that draws the gaze into the picture.
5. Capture how the fog flows
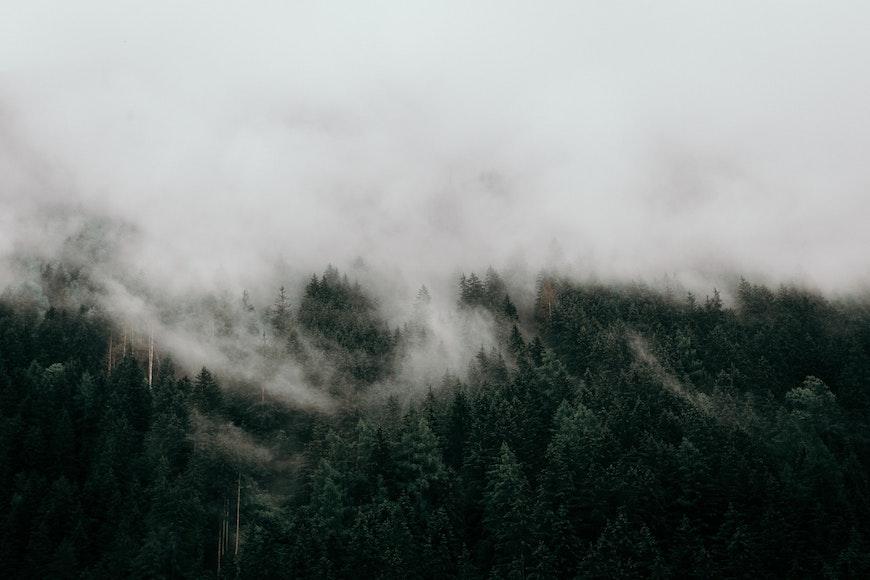
Credit: Eberhard Grossgasteiger
When you think about fog photography, you probably think about calm and stillness. However, it doesn't need to be this way.
Fog constantly moves, even if we don't notice it with the naked eye. You can capture this movement with long-exposure fog photography.
Photographing fog at different shutter speeds not only gives the illusion of motion. It also changes the texture of the fog.
To make a long exposure photograph, you'll need a tripod. This way, the camera will be steady. It's one thing to capture motion blur to create smooth fog. Another thing is to have a blurred image because we moved the camera.
So, once the camera is set on the tripod, use the timer or a remote shutter.
This will also help, especially for slower shutter speeds, which will, in turn, lend better to an ethereal photography style.
6. Fog photography at night

Credit: Artyom Malyukov
Here are a few tips if you're wondering how to take photos of fog at night.
- Fog makes a scene brighter than usual. This is because the droplets diffuse the light from any light source. This doesn't mean that you don't need a tripod and probably a longer exposure than usual.
- Don't rely entirely on the light meter. Always check the histogram and the image you just took. If necessary, use exposure compensation to correct it.
- Strong light sources such as lamp posts or car headlights will be brighter than usual. So, choose your vantage point accordingly.
- Use manual focus. This is usually recommended in any night photograph. This is because there might not be enough light for the auto-focus to work well. This problem is more intense during a night fog photoshoot. So, focus manually and choose an anchor point to focus on.
7. How to capture fog on a phone (mobile) camera

Credit: Thirdman
Photographing fog with your phone isn't much different than doing it with a camera. Here are four fog photography tips to help you out.
- You should use a tripod and a remote shutter to avoid blurry photos.
- Use the manual focus, especially if there's dense fog. In most phones, you simply tap and hold on to the main subject to focus on it.
- Use a camera app that allows you to control the settings. Even better if it has a histogram.
- The most important thing in mobile fog photos is composition. So, use the composition grids and choose an exciting subject.
This course on iPhone landscape photography is a great resource for getting some more tips.
How Should You Post Process Fog Photography?
It's important that you use a raw format when you shoot fog photography. This will give you more flexibility when you're post-processing.
The first step to editing any image is to adjust the white balance. Your fog photos might have a color cast depending on the weather conditions. You can fix it by using the Temperature slider.
As I mentioned earlier, the biggest problem with fog photography is the low contrast. So, when editing photos on foggy days, increase the dynamic range.
There are many ways to move the white and black points of the image to introduce contrast. One of the best ways to do it is using the Dehaze tool.
Be careful not to overdo it because this process can create noise. It also darkens the blacks, so keep an eye on the deep shadows to avoid clippings.
If you introduced too much noise, use the Noise Reduction slider. This tool can blur your images.
Fortunately, fog photography is not characterized by sharp focus. Of course, you don't want to exaggerate. Try to find a good balance.
Now you can move on to the usual editing workflow. This includes adjusting the exposure as well as shadows and highlights.
You can use the HSL/Color tools to adjust the tone of the overall image. Alternatively, you can try color grading.
Depending on your software, this feature may be called Split Toning or Color Grading.
The idea is that you can adjust the colors independently to the highlights and shadows.
How to Find the Right Location for Fog Photography

Credit: Quang Nguyen Vinh
To find the right location and plan your fog photoshoot, you first need to understand what it is.
Fog is a weather phenomenon. As such, you can predict fog. This makes it much easier to organize your next shooting.
Fog consists of tiny water droplets. This happens when the water vapor in the air condenses because it reaches the dew point.
The dew point is the cooling temperature needed for the air to achieve a relative humidity of 100%.
I know that this sounds quite complicated. So, let's put it in practical terms.
Fog requires specific atmospheric conditions. First of all, there needs to be high humidity in the air. Secondly, it needs a drop in temperature.
For example, when there's a rainstorm in the evening. There's water on the ground and water vapor in the air.
Since you know that the temperature drops during the night, so, you can predict fog in the early morning before the sun rises.
This is called radiation fog. It disappears when the air is warmed up by sunlight.
However, there are five different types of fog. The type depends on how they are formed, and each happens more often in specific places.
- Radiation fog: found in low-lying areas.
- Upslope fog: found around slopes such as mountains.
- Advection fog: found in coastal areas.
- Steam fog: found on water bodies when there's cold weather.
- Ice fog: found when the weather is below -25F.
Now you know where fog forms. You can plan your photo shoot when the weather offers the right fog conditions. Apps like Accuweather can help you to keep track and plan accordingly.
There's a big difference between a place with fog and the right location for fog photography. Not everything with fog will result in good foggy images.
When scouting locations, you should be able to identify which ones are suited for fog photography.
First, you need a place where there's an element that serves as an anchor point. This is because probably most of the background will fade into the fog.
Also, the colors will be toned down by the fog. So, make sure it's not a location that relies on color to stand out.
If you're travelling and don't have the chance to scout the place beforehand, try asking some local photographers.
Final Thoughts
I hope these tips were helpful and that you'll know how to make the best out of foggy conditions.
Even better, I wish you enjoyed it so much that you'll be looking for the perfect place to do fog photography.
Maybe you can plan a photo trip specifically dedicated to fog. Remember that in winter, it's easy to get foggy days. However, there's also summer fog. You just need to go to a place with high relative humidity.
I really recommend Northern Italy as a destination for fog photography. Which places do you know where foggy conditions are common?
Let us know in the comments so we can add it to the bucket list!

Check out these 8 essential tools to help you succeed as a professional photographer.
Includes limited-time discounts.

Ana Mireles is a Mexican researcher that specializes in photography and communications for the arts and culture sector.

👋 WELCOME TO SHOTKIT!
🔥 Popular NOW:
