


7 Popular Lightroom Editing Styles to Try Today
Developing your own unique Lightroom editing style is a great way to differentiate your photos from everyone else's. Use these styles as starting points.
Lightroom | Software | By Ana Mireles
Shotkit may earn a commission on affiliate links. Learn more.
An editing style is a way you process your photos so that they look a certain way.
You can follow current trends, or you can develop your own creative style.
Using Adobe Lightroom, you can edit with infinite styles, whether you go step by step or use a profile or a free preset.
In this article, I'll show you a few examples of different Lightroom editing styles to inspire you.
Popular course reveals the simple tricks to getting incredible results with Lightroom in record time. Give Your Photos The Look They Deserve!
![]()
(Here's how to buy Adobe Lightroom and how to use Lightroom Classic.)
Black and White

Photo Credit: Lood Goosen
You can turn your color photo into a grayscale one using Lightroom edits. This is one of the most classic editing styles you can try. So, it will never go out of fashion.
You can use a black-and-white editing style on any type of photo. Wedding photographers often choose two or three images from the event to deliver in black and white. It's also a beautiful style for boudoir photography or self-portraits.
Not just people benefit from this Lightroom editing style. It's perfect for landscapes and still-life photography too.
Step 1
On the left side of the Develop module, you'll find the Presets. Here, you'll find multiple categories that include black-and-white presets. Try Portraits: Black & White, Style: Black & White, or B&W.
Step 2
Hover over the Black and White presets. As you hover over them, you'll see a live preview of how your photo would look with it.
When you find one you like, click on it to apply it to your photo.
Step 3
Regulate the intensity of the preset by moving the Amount slider on top of the Presets panel.
Step 4
Make the final adjustments using the essential editing tools from the panel on the right. You can also use the B&W panel to fine-tune the preset and find your personal style.
Remember that after you've found a new editing style, you can make your own Lightroom preset to re-use again in the future.
Learn about advanced black-and-white editing in Lightroom here.
Color Grading

Photo Credit: Lood Goosen
Color grading allows you to adjust the colors separately on the highlights, mid-tones, and shadows. You've probably heard of this editing style as split-toning.
In the older versions of Lightroom, the tool used for color grading was called split tone. However, this only allows you to work on highlights and shadows.
Now, you can use the Color Grading tool to have complete control.
Step 1
Open your image in Lightroom's Develop module. Then, open the Color Grading panel on the right side of the screen.
Step 2
Use the color wheels to color grade your photograph. There are some proven formulas, such as adding warm tones to the highlights and cool ones to the shadows. You may also use complementary colors.
However, this is a matter of personal and creative choice. So, feel free to experiment.
Step 3
Using the three-way view, you'll notice a slider underneath each color wheel. This adjusts the luminance – move each one until you like how it looks.
If you're using the single-wheel look, you'll find that the Luminance slider is the third one – underneath Hue and Saturation.
Step 4
Now, you need to adjust the Bleeding and Balance using the sliders at the bottom of the Color Grading panel.
You can get some more inspiration for this technique by checking out these Lightroom before/afters.
Sepia toning
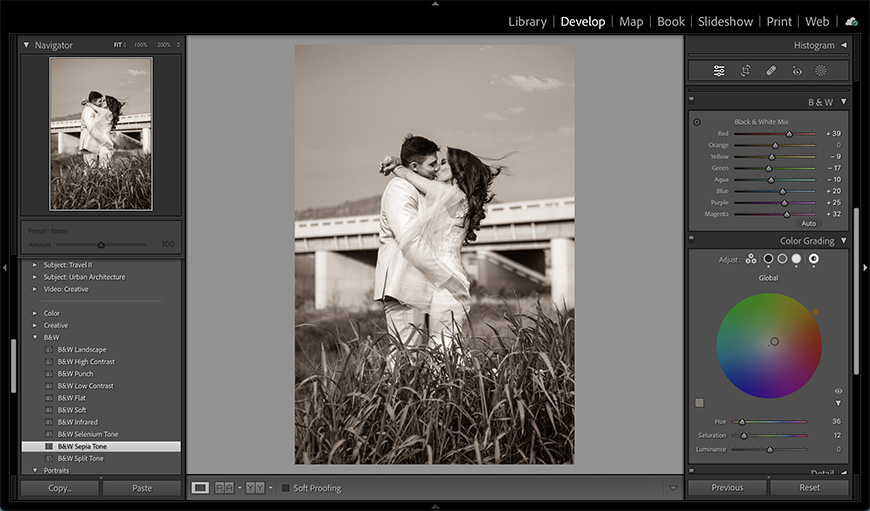
Photo Credit: Lood Goosen
The sepia-toning editing style is about recreating in digital a darkroom technique. In film photography, using a chemical process, you could give warm brown tones to a black-and-white print.
Turning your images into sepia is a popular Lightroom editing style in digital photography. You can achieve this style by using a Black & White Sepia preset or Black and White preset with warm tones.
Step 1
On the Presets panel on the left side, scroll down until you find the B&W section.
Step 2
Open the B&W presets menu and select B&W Sepia Tone.
Step 3
Use the editing panels on the right side to customize the effect. You can use the basic editing tools to adjust the brightness and contrast or the Temp slider to adjust the tone.
For more targeted adjustments, you can use the B&W panel sliders or the Color Grading tool.
Check out these other Lightroom tips to improve your workflow.
Cross-processing

Photo Credit: алексей-вечерин
Another Lightroom editing style that takes inspiration from film photography is cross-processing.
In analog photography, cross-processing means using chemicals to develop one type of film to process a different kind of film. For example, using a developer for a negative film with a slide film.
If you're not into film photography and don't want to get into the darkroom, you can digitally recreate the effect in Lightroom.
Step 1
It's better to start with an image that doesn't have too much contrast. Also, since the cross-processing mainly works with colors, you'll get a more dramatic effect if you have a colorful photograph.
Feel free to use the basic editing tools before you make the cross-processing effect.
Step 2
Now, open the Tone Curve and select the red channel. Then, adjust the curve to make an S shape. Then, repeat the process with the blue and green curves.
The S shape is just a starting point – you can move the values as you see fit. Since the chemical process gave unpredictable results, you can also be very free in the color you create digitally.
Step 3
Now, return to the Basic settings to adjust the effect to your liking. Usually, you'll need to lower the contrast or the saturation. However, it's a matter of personal choice.
Discover how to use gradients in Lightroom as another step in the editing process.
Vintage / Retro

Photo Credit: Lood Goosen
Another popular editing style is to make your images look vintage – also known as retro style. We've developed a nostalgic feeling about the old days in the last few years.
Vinyl records, film photography, disposable cameras, and other analog technologies have come back. If you like this look but want to remain digital – you can use a vintage editing style in Lightroom.
Step 1
Browse the Auto+ Retro or the Style: Vintage presets. Inside the Creative category, there are also a few vintage styles. You can simply hover over the presets to see a preview before applying them.
Once you find one that you like, click on it.
Step 2
Move the Amount slider at the top of the presets to adjust the intensity of your chosen one.
Step 3
On the right side of the screen, open the Effects panel. Here, you can regulate the amount of grain. Consider that film photography had more or less grain depending on the ISO of the film. It works similarly to the noise in digital photography.
Step 4
Additionally, you can add a light leak to make the retro effect more evident. You can use a graduated filter to do this. Then, increase the exposure and add some color to it.
- Boost your Lightroom skills with these free photo editing courses.
Dark and Moody Photography

Photo Credit: Tijana Drndarski
This style usually starts from how you light your scene, but it can also be a way to edit your images. It's characterized by a contrasting scene with deep shadows.
This Lightroom editing style is trendy in food photography. It's also used for foggy landscapes or more artistic portraits.
Step 1
Move the Temp slider to decide whether you want a cool or warm moody effect.
Step 2
Next, lower the overall exposure of the scene using the Exposure slider. You can increase the contrast so that it doesn't look flat. You can do this with the Contrast slider underneath.
Step 3
Fine-tune the exposure using the Highlights and Shadows sliders as well as the Blacks and Whites ones. Remember that the goal is to achieve rich colors and deep shadows.
Step 4
If necessary, lower the luminance using the HSL panel. Simply select the background colors and drag the Luminance slider to the left.
Step 5
This is entirely optional. If you want, you can add a vignette to darken the edges and drive the viewer's attention to the main subject.
You can find the Vignette tool in the Effects panel.
High-Contrast

Photo credit: Tomáš Malík
You can use a high-contrast editing style both to color or grayscale images. The effect is very dramatic, and it creates vibrant and eye-catching photos.
The main characteristic is that you have bright highlights and dark shadows. There shouldn't be many shades between light and dark to make the effect more noticeable.
Many presets involve increasing the contrast of a photograph. So, feel free to hover over your presets and see if you like the effects. Otherwise, you can do the editing yourself.
Step 1
In the basic editing panel, use the Whites and Blacks slider to determine how dark is the blackest point and how light is the whitest one.
Step 2
Now, use the Highlights and Shadows sliders to recover detail in your image after the previous adjustment.
Step 3
If you want to add more contrast, you can use the Clarity and Dehaze sliders.
Step 4
If necessary, use a brush to make local adjustments in the areas where you've lost too much detail.
Lightroom Editing Styles FAQs
What are the different editing styles in Lightroom?
When you open a photograph in Lightroom, you can use any of its tools to adjust its exposure and color. From the same picture, you can create multiple variations depending on which tools you use and how you apply them – that's the editing style.
The ones listed in this article are some of the different editing styles you can do in Lightroom. However, there are many others.
How do I find my own editing style?
There isn't just one way to find your style. The best way to do it is by experimenting and practicing. It usually takes time for any photographer to find a style that defines them.
You can start by reviewing which images you like most and why. By identifying the elements you like, you can combine them in different ways to make your own look.

Ana Mireles is a Mexican researcher that specializes in photography and communications for the arts and culture sector.
👋 WELCOME TO SHOTKIT!
🔥 Popular NOW:
