


How To Fix Grainy Photos with Free Apps & Software
Learn how to reduce noise and fix grainy photos! From software like Photoshop & Lightroom to free mobile apps, this guide has it covered.
Learn | Photography Guides | By Stephan Jukic
Shotkit may earn a commission on affiliate links. Learn more.
Grainy, noisy photos are just a fact of any photographer’s life. They can happen regardless of what kind of camera you’re using and are especially common if your photography involves a lot of low light shooting.
Sometimes digital noise in a photo can create rather cool looking retro effects if it turns out just right, so they might not all be total losses. Usually, though, graininess is a problem to be eliminated if at all possible.

Invaluable tool to fix grainy photos, remove noise and extract lost details from previously unrecoverable images.
Fortunately, most unwanted noise in photos can be easily fixed through several different software editing solutions, so don’t despair yet.
Go through the steps and suggestions in this guide to understand how to avoid graininess in the first place, and how to fix it if it happens.
What Causes Grainy Pictures?
Graininess in digital camera shooting is also known as digital noise, or just “noise”, and it can be caused by multiple factors. Most of these revolve around the following:
- Luminance noise: The single biggest cause of image noise is poor luminance, mainly from setting the ISO too high or wrong for a low light shot. All cameras can suffer this problem regardless of their price, but it’s especially common in those with less than exceptional ISO performance. Basically, the camera sensor will compensate by making whatever light signals it can capture more pronounced. The result equals excessive noise.
- Color noise: Color noise isn’t caused by lighting conditions so much as being a product of an overheated sensor. This is a common phenomenon in long exposure photos taken in low light or in time lapse photography. It often appears in shadowy scenes as a type of blotchiness.
- Sensor size: Grainy photos can happen in any camera if its capacity for light absorption is stretched to the limit or if its settings are improperly calibrated, but there is a definite connection between graininess and smaller sensors with lower resolution. High quality full format sensors offer dozens of millions of light-absorbing pixels to compensate for low light, and consequently they also tend to have great ISO sensitivity.
- Low exposure: An underexposed photo can be a very noisy photo and sometimes the graininess is caused by using the wrong exposure setting for your composition.
Filter noise can also happen if you’re using filters, and noise from any of these causes can also be worsened by improper focus or shooting photos from a distance.
As really basic problems with easy solutions, these can usually be fixed by making sure your camera is correctly focused and by getting closer to your subject if at all possible.
- Related: How to add grain to photos
Preventative Solutions
Right off the bat, the best way to fix grainy photos is by avoiding them in the first place. This will save you the hassle of extra retouching and fiddling in photo editing software later on.
Overexposing
That’s right. While overexposing the photos you take is a whole other correction problem in many situations, it can also sometimes help prevent graininess. To make this work, avoid raising your camera’s ISO settings, since doing this will just create the risk of more digital noise.
Instead, raise the exposure by one f-stop of increased aperture and try taking a photo. You can also slow down your shutter speed as an additional measure though this might not work so well for low-light shots of subjects in motion.
See our guide to overexposure vs underexposure.
Using a lower ISO

Lowering your ISO settings won’t necessarily work if the ambient darkness of the scene you’re trying to capture is too deep, but lower ISO does usually mean less noise.
If it can be functionally lowered after reducing shutter speed and increasing aperture, try doing that as well in your camera.
Metering the shot onto the brightest possible object
Setting your focus to the brightest possible object in your composition and taking a photo with the camera metered to this particular luminous point can also improve brightness and reduce noise.
This sometimes works because it causes the camera to avoid overextending itself in capturing details from darker sections of a scene.
Check out our guide to metering for more information.
Activating noise reduction
Not all cameras have a noise reduction setting built into their controls but, if yours does, it can be a handy in-camera tool for eliminating grainy photos.
The option to reduce noise will vary from device to device but try activating it and setting noise reduction to a low or moderate level to avoid detail loss
Taking photos in RAW

The RAW image format is much more versatile for correction and details than JPEG, which is compressed inside the camera to begin with.
Thus, if you’re unsure about the quality of the pictures you plan on taking, setting your digital mirrorless or DSLR camera to take both a RAW and a JPEG shot of your compositions is a useful tactic, for noise correction and for general versatility.
Working with more light
This is probably the most obvious preventative solution on this list but it deserves mentioning. If you want to avoid graininess in the first place, see if the photo scenarios you’re working in can be augmented by more light.
Some photographers hate using flash for their work (I’m definitely one of them) but other more subtle lighting devices like a reflector or soft box might work in some settings.
An external flash can also be useful if used carefully and especially if its light can be diffused to avoid a harsh exposure.
Obviously, you can’t always work with more light. Sometimes you just have to make the best of what you have with your digital camera and for this, fixing grainy photos and noise in post-production is the next step.
Fixing Graininess With Photoshop

If you still have noise in your photos, your next step is going to be a software fix. Let’s start with fixing grainy photos in Photoshop, one of the best-known photo editing programs in existence.
Step 1: To reduce noise in Photoshop, you need to launch your edition of the software, select and import the photo you think looks grainy, and then zoom in by 100% with the magnifying lens to confirm how much noise is in the details of the photo.
Step 2: Click on the Filter menu at the top of the Photoshop application and drop down to Noise. Then select Reduce Noise. The pop-up window that appears will offer you sliding controls for doing that.
There will be several sliders: one to reduce color noise, one for sharpening details, and one for preserving details. Tweak each of these to the left or right until you you’ve sharpened your photo as much as possible.
Step 3: If you still don’t like the Photoshop noise reduction you see, open the Shake reduction tool by clicking on Filter > Sharpen, and then select Shake Reduction. Use this to see if blur caused by a slight shake when the photo was taken can also be removed enough for a sharper image.
Using Lightroom To Repair Grainy Photos
Lightroom is Photoshop’s leaner cousin from the Adobe family of software products. The two applications are very similar in some ways but Lightroom offers a simpler set of image manipulation tools.
For reducing noise in Lightroom and cleaning up high ISO, you’ll only need to use a small selection of this program’s tools.
Step 1: Open Lightroom and import your photo to open it up. To the top right of the photo, you’ll see several menu options. Click on Develop.

Step 2: On the right panel, you’ll see several options. Scroll down to the Detail panel and click so it drops open. In here, you’ll have several slider options for photo sharpening and noise reduction.
Step 3: The sharpening and detail sliders can also be adjusted to clean up your photo, but for noise reduction, the sliders for Luminance, Detail, Color and Contrast will adjust the levels of noise caused through these respective characteristics.
Bear in mind that setting any of these values to lower levels can make you lose small visual details too.

Fixing Grainy Images Without Photoshop or Lightroom
Photoshop and Lightroom are famous and superbly professional options for photo editing, but they’re not the only ones available. A few others for desktop and mobile are also worth discussing.
Fixing Grainy Photos With Capture One
Capture One is a professional desktop photo editing suite that’s very similar to Adobe’s two big hitters.
One major difference between Capture One and Lightroom or Photoshop is that it’s aimed more at editing RAW photos, which should be useful if you followed preventative advice I mentioned above about shooting in RAW.
Like Photoshop and Lightroom, Capture One isn’t free, but the cost is reasonable and a trial period is available from its maker.
The software suite also automatically cleans up some noise on imported photos. If this isn’t enough to get the most out of an image you want to clean, here’s how to fix graininess and noise manually:
Step 1: Open up Capture One and import the photo you’d like to repair. Once it’s open in the editor interface, go to the Details tab and open it. This is the magnifying glass icon on the top of the box to the left of your photo.
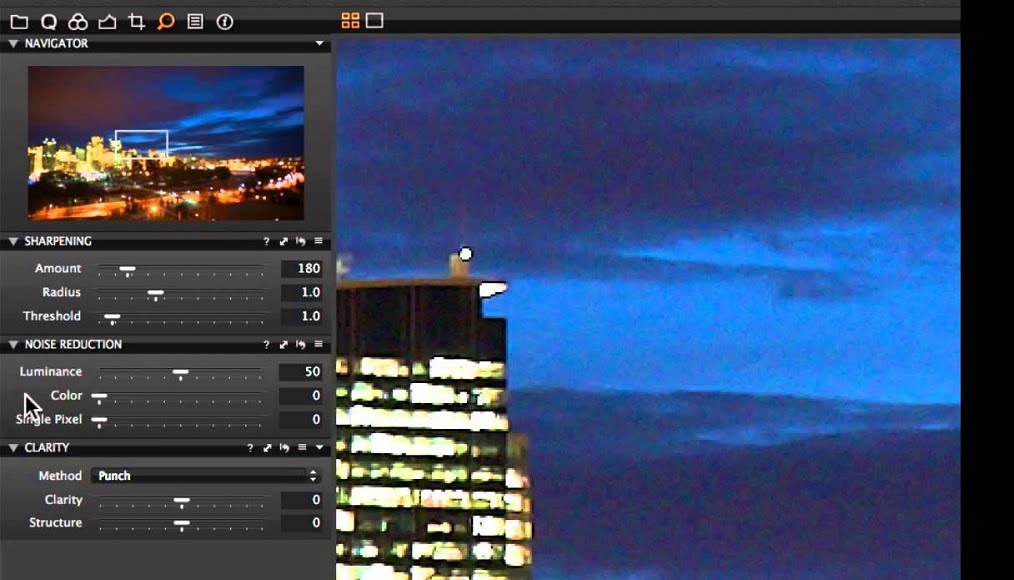
Step 2: In the Details tab, a series of Noise Reduction options will appear below. The first is for Luminance noise, the second for Color noise, and the third, Details, smooths the surface of an image. All are balanced at 50 by default.
Step 3: Adjust the above three settings gently to get the best balance of noise reduction and reduced graininess in your image. You can also fix artifacts in long exposure shots (a problem that sometimes occurs) with the Single Pixel slider.

Step 4: Above the Noise Reduction sliders, there’s a Sharpening tool as well. You can adjust the Threshold slider in this to decrease or increase how much sharpening is applied to details in your photo.
Step 5: Capture One sometimes adds simulated grain for a film look to photos taken at higher ISO. This can be changed manually below the Noise Reduction sliders under Film Grain by reducing the Impact slider.
Fixing Grainy Photos on Your Android Phone or iPhone
Quick-fix solutions for grainy photos are available for both Android and iPhone devices. These can be very useful if you want to edit your images without going through the process or expense of downloading and installing the large software suites above.
Noise Reducer Pro
Noise Reducer Pro does exactly what it’s name claims and it’s a quick n’ dirty solution that you can download for free to clean up grainy photos.
This little app is available for both Android and iOS devices, and it’s easy to learn since it provides only three settings for the single problem of image noise.
To use Noise Reducer, simply download the app to your iPhone or Android device, open it up, select the photo you want to clean, and apply one of the three possible noise reduction settings. These are Light, Medium, and Custom.
The last lets you tweak noise removal between a bare minimum and heavily.
The app also lets you compare the original and edited image side by side so you can clearly see what your editing achieved.
Noiseware
The Noiseware app is exclusive to the iOS platform but it offers a very professional noise reduction capacity for its size. It isn’t free but the $3.99 one-time price shouldn’t be much of a budget-breaker.
The Noiseware app is also extremely easy to use. Once installed, it offers up three preset options for getting rid of noise: Default, Weak, and Strong.
There’s also a custom option in which you can selectively reduce noise while balancing for better detail preservation. The app even has a Night Shot feature for fixing low light photos.
Lightroom for Mobile
Finally, if you already use Lightroom desktop edition on your computer, Lightroom for Mobile might work for quick fixes.
This app is available for free on both Android and iOS devices and offers pared-down functionality that includes a very simple but often effective graininess reduction tool.
Unlike the desktop edition of Lightroom, the mobile version doesn’t offer correction sliders for luminance and color noise. Instead, a single slider decreases or increases noise balance. However, if you already have a Creative Cloud Photography subscription, you can access additional editing tools in the app as well.
How To Fix Grainy Photos FAQs
What does grainy picture mean?
A grainy picture is one that’s not smooth and clear, specifically because of dots, specks, or visible pixels. While a grainy effect that replicates film photography may be desirable, noise or grain in digital images caused by low light or a poor sensor is generally something you want to avoid.
Can you fix a grainy picture?
Yes – you can certainly improve or even fix a grainy picture if you have the right software. That said, some photographs may not be completely salvageable if they were shot in a format other than raw (raw images are easier to fix because they contain more information).
What app fixes grainy photos?
Topaz Denoise is an excellent app designed especially for fixing grainy photos. Image editing software like Photoshop, Lightroom or Capture One can also be used. For Android or iPhone, try an app like Noise Reducer Pro, Noiseware, or Lightroom Mobile.
Final Thoughts
Fixing grainy photos is mostly about repairing noise from light and ISO-related problems caused during shooting. Thus, as I said above, shooting carefully in low light conditions is your best option.
Just making a habit of this will possibly save you hours of post-production work down the line.
However, since even the best cameras and photographers will end up with noise sometimes, the desktop and smartphone fix solutions above should be capable of turning a poor, noisy shot into something much cleaner 90% of the time.

Check out these 8 essential tools to help you succeed as a professional photographer.
Includes limited-time discounts.
Stephan Jukic is a technology and photography journalist and experimental photographer who spends his time living in both Canada and Mexico. He loves cross-cultural street photo exploration and creating fine art photo compositions.

👋 WELCOME TO SHOTKIT!
🔥 Popular NOW:
