


Guide to Metering Modes in Photography
Confused about your camera's metering modes? Read this simplified guide to find out what they are and when to use each one (with real-life examples)!
Learn | Photography Guides | By Ana Mireles
Shotkit may earn a commission on affiliate links. Learn more.
When you’re just starting to learn photography, everyone tells you how to adjust the shutter speed, aperture, and ISO until the metering scale is in the middle. Right?
The problem is that there are different metering modes that control the scale. So, to get the right exposure, your camera needs to ‘read’ the scene correctly.
That’s why it’s so important to learn how to use the light meter in photography.
If you’ve ever asked yourself what metering mode should I use for portraits, or what is the difference between spot metering and evaluative metering, or even just what does metering mean… this is the guide for you.
What is Metering in Photography?
Have you noticed that even when the camera is in full auto mode your images can be over or underexposed?
You’ve probably wondered how can this be if the camera is making all the decisions. Shouldn’t it know how to set the correct exposure?
This becomes more frustrating when you’re just starting to use manual mode in photography or even semi-automatic modes. You might think that it’s your fault and you weren’t getting the right settings.
The problem is that auto, semi-automatic and manual modes are all basing the correct exposure on the camera’s metering system.
That’s why it’s so important that you understand how the light meter works and its different metering modes. This way you can adjust it depending on the situation.
(Just to clarify – the light meter we’re talking about here is the one inside your camera, typically displayed as a scale at the bottom of the viewfinder – not dedicated light meters, such as the ones reviewed here, or light meter apps for phones.)
It might sound scary at the beginning but it’s something that, in the era of smartphones, we’ve all learned to do without even realizing it.
You’ve probably been in a situation where you want to take a photo with your phone and it’s too dark or too bright.
So, you tap on the subject and it automatically fixes the problem. Sound familiar? Well, what you did there was telling the phone’s camera where to get the information to determine the exposure.
Something like that is what you’re going to be doing with the camera metering modes. Of course, on the camera you have more choices, and it can be a bit more complex. But in its essence, it’s something you already know how to do.
So now, let’s dive into it.
Types of Camera Metering Modes
Each brand and even each model of camera can have different metering models. Or, they have the same name but have a slightly different formula to how those metering modes work.
As such, I’m just going to give you an overview of the most common metering modes.
- Spot Metering Mode – This measures only a spot from the entire scene. Normally, this spot is the center.
- Center-Weighted Metering (aka Average Metering) – This mode also measures the center of the image, but covers a wider area. It then calculates an average between that and the rest of the image.
- Pattern/Matrix Metering (Nikon) / Evaluative Metering (Canon) – This metering mode divides the image and evaluates each portion. It then calculates an average from all the information compiled.
Some Canon cameras also offer ‘Partial Metering’ which is a form of Spot Metering, but with a slightly larger coverage of the viewfinder (approximately 12% vs 2%)
You may also come across the term ‘Multi-Zone Metering’, which is another name for Matrix/Evaluative Metering.
Then there’s ‘Highlight-Weighted Metering’, which exists on some newer Nikon cameras, which is similar to Spot Metering and helps prevent the whites in your photo from ‘blowing-out’.
Let’s have a closer look at the above three common camera metering modes.
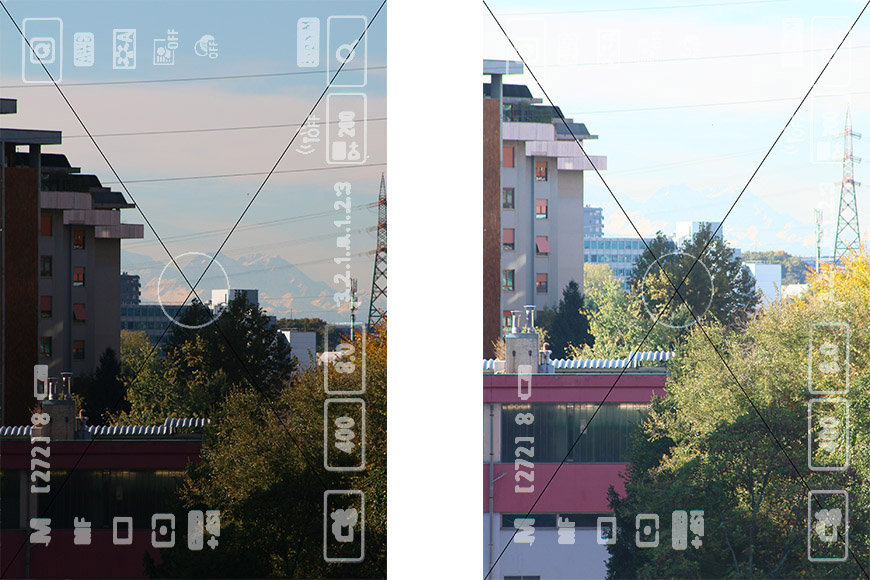
Credit: Ana Mireles
In the example above, I used spot metering and framed the scene so that the center of it, which is the metering spot, would have light pixels in one shot and dark in the other. Look how big the difference is between both exposures.
Spot metering takes the reading from a small part of the image – normally in the center. This is the most accurate way of measuring light.
As I mentioned before, each brand and each camera has a different way of working. Because of this, the size of the spot can be different, but it ranges from 3% to 7% and it’s usually in the center of the photo.
Some cameras, especially professional DSLRs, allow you to choose where to place the spot. Instead of having it in the center, you can choose to have it together with the focus point.
This type of metering is useful when your subject is back-lit, for example in outdoor portraits. Another common use is when you photograph the moon.
Also, this is useful when you have a small subject in a contrasted scene. If this is the case but your subject isn’t in the center and your camera doesn’t allow you to change the position of the metering spot, here’s what you can do.
Make sure your camera is in manual mode. Then, compose the image with the subject in the middle and adjust the settings according to what the metering mode considers a correct exposure.
Then you can move the composition and you’ll know that your subject will still be correctly exposed – even if the exposure meter says it’s wrong now that it’s not in the center.
-
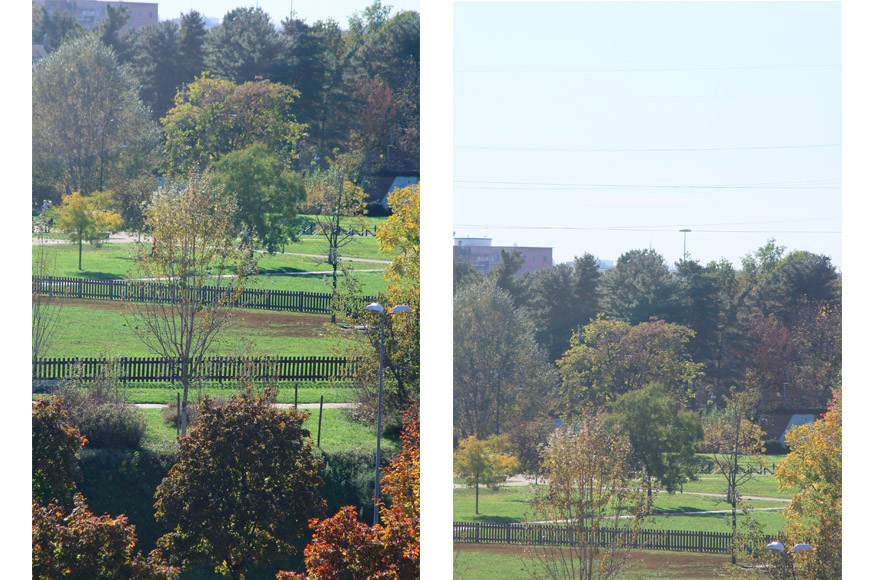
Center-Weighted Metering (aka Average)

Credit: Ana Mireles
This metering mode is called Average because the camera evaluates most of the image to find the right exposure. However, it takes special consideration to the area in the center, hence the other name for it: Center-Weighted Metering.
In this case, the center taken into account is bigger than the one used in spot metering. Most of the time this is accurate when your subject is either centered or it covers most of the frame.
Center-Weighted Metering is used for outdoor portraits and pet photography, as you can see from the adorable cat in the example image. It can also work with still-life and any other center-based composition.
If the scene has a lot of contrast, Center-Weighted Metering can be a bit unpredictable, so always check the result on the screen after you take the photo.
If it’s not right, one thing that you can do is zoom into your subject, or move closer to it if you’re using a prime lens. This way it will fill the entire frame.
Get the correct exposure for it and adjust the settings. Then move back or zoom out to compose the scene as you want.
Continue to use the settings you chose before. This will result in a properly exposed photo even if the light meter is no longer saying it’s correct.
Matrix Metering (aka Pattern / Evaluative)
Credit: Ana Mireles
Here, you’ll find different names depending on the camera because the formulas and algorithms that make this metering mode work are proprietary to the brand.
Canon calls it Evaluative metering, while Matrix metering is the name used by Nikon. Whatever name it goes under, this is the method most commonly used for scenes that don’t have any high contrast.
As you can see in the example above, the image on the left was taken with evaluative metering but the scene was mostly even. When I changed the composition to leave a good part of the bright sky inside the frame, the metering was a bit off.
In simple words (although I’m sure it’s not a simple process!), the camera reads the scene and decides what exposure is best.
Evaluative/Matrix metering normally works well enough but it can be easily thrown off by a very dark object or a bright reflection.
Review your photo before moving on, checking that the exposure is correct. If it’s not right, use what you’ve got as a starting point and adjust the settings accordingly without looking at the light meter.
If it’s too dark, let in more light either by choosing a slower shutter speed, widening the aperture, or raising the ISO. If it’s overexposed, do the opposite.
This is the metering mode used by default in any type of automatic mode of your camera – from full auto to any of the scene modes such as landscape, portrait, or sports mode.
How to Change Camera Metering Modes
The way to change the camera metering modes is different on every camera. Even within brands, it can change from model to model.
That’s why it’s impossible for me to give an explanation that would cover all the cameras out there.
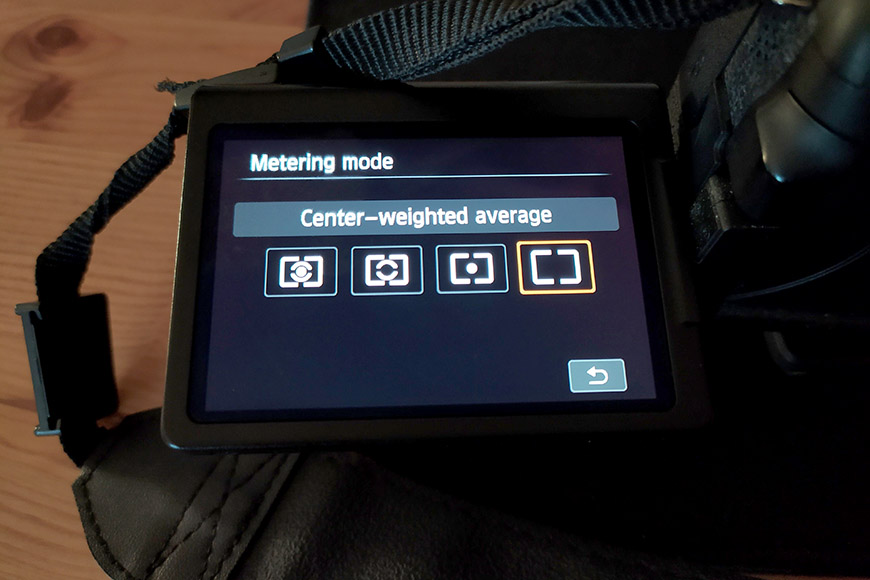
You’ll usually find the metering modes either in the menu or on the camera body if it has a designated button. You can recognize it from its symbol: a dot surrounded by two halves of a circle inside a rectangle.
If you can’t find it, maybe it needs a key combination or it’s inside some sub-menu. If this is your case, try reviewing the handbook of your camera or calling online support for the official information.
Otherwise, you can search online for instructions or for help from other users. Usually, there are dedicated forums and even YouTube videos explaining how to access the metering modes on different camera models.
Which Metering Mode Should You Use?
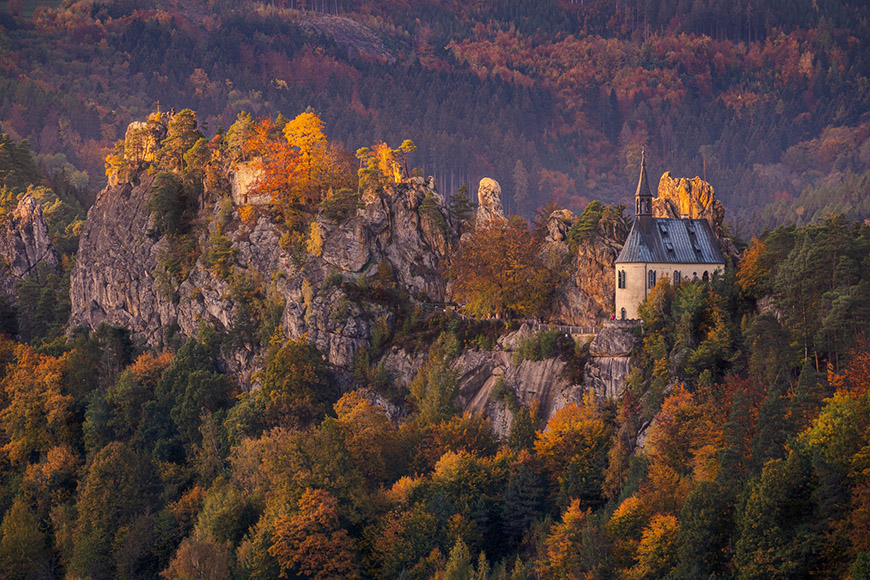
Credit: Petr Slovacek
If the image doesn’t have deep shadows or strong highlights then the Matrix (Evaluative) mode should do a pretty good job. That’s why it’s the default metering mode for most DSLR cameras.
For example, in landscape photography, it would be useful for a scene like the above example because the light is quite even. However, it wouldn’t work if you had a dark foreground and a bright sky.
Remember that it measures the light and not the colours, so another example where this metering mode is useful could be the following still life:

Credit: Mick Haupt
However, if you have a contrasting scene and you use this metering mode, you would get an over or underexposed image.
For example, imagine the light is coming from behind the subject. In this situation, you’d end up with a very dark subject.
This can work out very well if you’re trying to make a silhouette shot like the one below. You can learn more about silhouette photography in this guide.
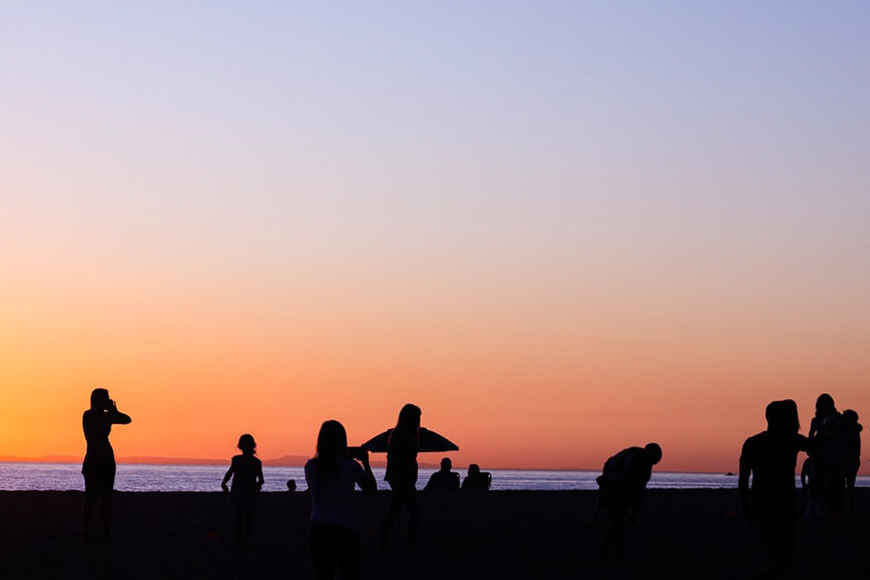
Credit: Reed Naliboff
However, if you want your subject to have details, for example, if you’re doing an outdoor portrait, you need to tell the camera what gets priority.
If the portrait is a headshot where the face of the person is in the center and covers most of the photo, then you can use the center-weighted mode.
If instead, you want to place your subject towards one side (such as in the example below), you have to use the spot metering mode. This is of course assuming that you can set your camera’s spot to follow the focus point.

Credit: Alex Vans Colina
If your camera doesn’t allow you to customize the spot metering area, you can frame the subject in the center, take the metering and adjust the settings. Then recompose and take the photo.
This is, of course, if you’re comfortable using the manual mode. If this isn’t the case don’t worry, you can make use of the exposure compensation.
This is a setting that can be used with any of the semi-automatic modes such as aperture priority or shutter speed priority.
It allows you to overwrite the original exposure reading from the light meter. As you’ve seen throughout this article, it’s not always perfect and you may need to lighten or darken a little.
For example, if you have a very bright scene such as in the snowy landscape below, the camera might underexpose your subject because it’s calculating the exposure for the majority of the white.
To have a correctly exposed subject under these circumstances, you can tell your camera to add a step. Using the exposure compensation in manual mode, you would set it to +1 EV or +2 EV (EV is the Exposure Value in photography.)

Credit: Fabian Mardi
It works the same way for the opposite problem. If you have a mostly dark background, the camera will overexpose it causing bleached blacks and an overly bright subject.
For a perfectly deep black and a well-exposed subject, you should set the exposure compensation to -1 EV or -2 EV.

Credit: Dominik Lange
As you can see, which metering mode you use depends on the scene you’re shooting and what sort of light you’re dealing with.
A good way to learn is simply to practice. Take several shots of the same scene – one with spot metering, one center-weighted, and so on. That way you can see how each mode changes the exposure.
I hope this article has made using the light meter and metering modes more clear to you. Leave us your questions in the comments section below, and let us know how it all goes for you!

Check out these 8 essential tools to help you succeed as a professional photographer.
Includes limited-time discounts.

Ana Mireles is a Mexican researcher that specializes in photography and communications for the arts and culture sector.
3 Comments
Leave a Comment

👋 WELCOME TO SHOTKIT!
🔥 Popular NOW:

Very informative article….
Very good lesson, I was confused at first but now I think I have learned a lot more. Thanks a million
Thanks for reading my article – let me know if you have any questions.