


Master Low Exposure Photos for a Moody Aesthetic
Unlock the art of low exposure photography to create moody, atmospheric images with this comprehensive guide to mastering the technique.
Learn | By Ana Mireles
Shotkit may earn a commission on affiliate links. Learn more.
Have you noticed that some of your favorite influencers are ‘dimming’ the light on their photos?
That’s because they’re using low-exposure photos.
This trend is here to stay! So, if you want to master it, keep on reading.
I’ll explain what low-exposure photography is and how it differs from low-light and low-key photography.
Then, I’ll show you how to master this aesthetic with your camera and smartphone.
Of course, I’ll also explain how you can edit this type of photo.
Lastly, I’ll show you some examples so you can get your creativity going.
What Is a Low Exposure Picture?
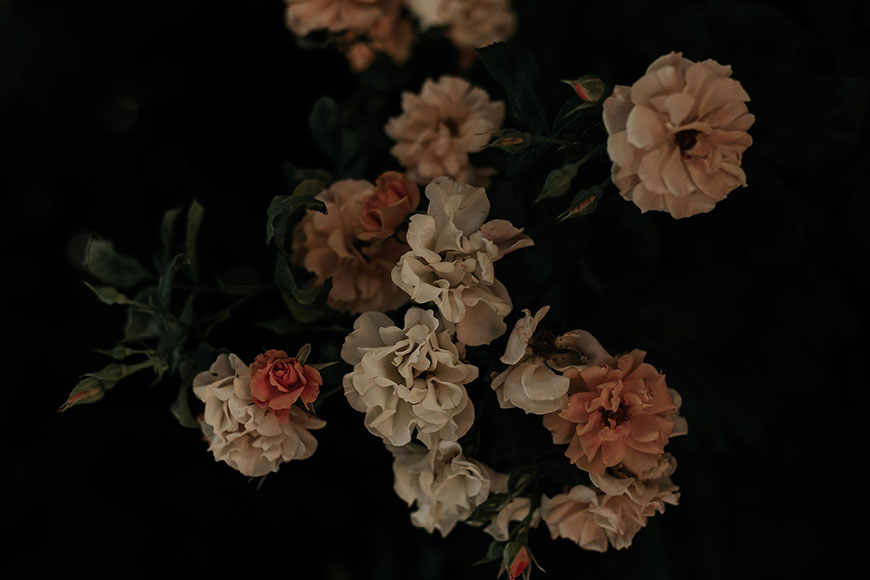
Credit: Amine
Exposure in photography refers to the amount of light used to create a photograph.
The light is controlled by how much light passes through the aperture and how long the sensor or film is exposed. If you combine those two factors with the ISO – you get your exposure.
Typically, you’ll want to adjust the exposure settings to achieve a perfectly exposed photograph. However, to create a low-exposure picture, you need to underexpose it intentionally.
(Make sure you understand the difference between underexposure and overexposure.)
You can achieve this by adjusting the settings in the camera, dimming the light, or in post-production.
It may be easy to confuse low-exposure photography with low-light photography. While they are related – they’re not the same thing.
In low-light photography, there isn’t a lot of light available – this may be after sunset or in a poorly lit room.
Also, you’re not aiming to underexpose the picture. Instead, you want to get the correct exposure under low light conditions.
You might raise the ISO even to create noise or use a long exposure technique to achieve this.
Instead, you can make low-exposure photos even in the middle of the day. The idea is to darken the photo to achieve a specific aesthetic purposely.
- Related: Dark photography tips
What Is the Low Exposure Aesthetic?
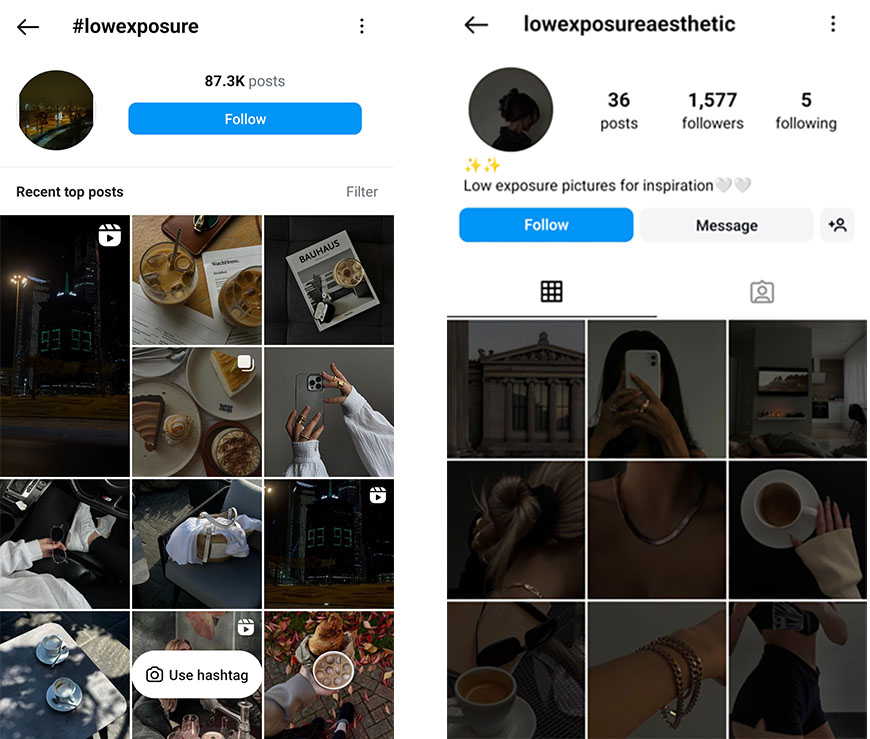
Credit: Instagram #lowexposure on the left and @lowexposureaesthetic on the right
The low-exposure aesthetic is a social media trend where many contributors publish low-exposure pictures in their feeds, reels, and stories.
You can see how creators on TikTok and Instagram are all embracing the low exposure aesthetic in photos and videos and using it on posts, reels, and stories.
It’s also taking over X and Pinterest. While the aesthetic isn’t new – the boom on social media has less than a couple of years. This is so much so that you’ll find a Low Exposure filter on TikTok.
Ane Onibada researched the topic for a Buzzfeed article back when the low exposure aesthetic was starting to grow. She talked to photographers, influencers, and social media specialists to understand why this trend was happening and how long will it last.
I can tell you one thing – it’s still a big hit today. As for the why, there was a mixture of things. According to Jessica Whitaker, it could’ve reflected the darker times we were living in due to the COVID-19 pandemic.
Instead, Christine Yurie from Later told Onibada that it was part of an overall minimalist trend happening at the time.
Lastly, it could’ve been a snowball effect – the bigger the trend, the more people jump on it. So, more and more creators started to use the low-exposure aesthetic on their feeds.
Whatever the reason, people seem to keep enjoying it. It’s been almost two years since that article and you can still search #lowexposure or #lowexposureaesthetic today on Instagram and find many recent top posts.
So, let’s see how you can take pictures with low exposure. Plus, to get you started, I’ll leave you the names of a few Instagram accounts you can follow for inspiration.
- Blvk Decor @blvkdecor
- Iselin | Lifestyle and fashion @Iselin_haaland
- Alekzandra Dzieza @dancerinn
- Sara Avans | Minimal fashion @saraavans
- Naby Shiam @nabyshiam
You’ll notice that a lot of the above photographers’ work also include dreamy and ethereal photography techniques.
How to Take Low Exposure Photos
If you want to take low-exposure photos, just follow these steps.
Choose the exposure mode
If you know how to use your camera in Manual mode, that’s great. However, you can also take low-exposure photos in any mode except for Auto mode.
This means you can use Shutter priority, Aperture priority, Program, or any preset modes, such as portrait or landscape.
Find the correct exposure
If you’re using Manual mode, you’ll need to set the ISO, aperture, and shutter speed values. You can use the camera’s exposure meter or use an external one.
To use one of the semi-automatic modes, you’ll only need to set the aperture, the shutter speed, or the ISO, depending on which one you’re using.
If you’re using a preset ‘scene’ mode, you can skip this step because the camera will set the automatic combination for you depending on what you’re shooting.
Underexpose your image
Now that you know the right exposure, you need to reduce it. I recommend starting with one stop and adjusting in half a stop intervals until it looks like you want.
Manual shooters can decide which one of the exposure settings to use. You can close the aperture, increase the speed of the shutter, or lower the ISO.
On any of the other modes, it’s useless to adjust any of the settings because the camera will compensate for it. So, you’ll need to use the exposure compensation.
Some cameras have a dedicated button, while others have it inside the menu. If you can’t find it, do a quick Google search or look for it in your user manual. The icon is characterized by a plus and a minus sign.
Once you find it, move the setting towards the -EV. Usually, you can adjust up to three stops with intervals of a third or half a stop.
When you take a picture, the camera will automatically lower the exposure.
3 Tips for Taking Low Exposure Pictures on iPhone/Android
Many content creators use their phones to take photos and videos to upload to their feeds. This is why learning how to take low-exposure photos on iPhone and Android is important.
Here are some tips for creating a low-exposure aesthetic regardless of which device you own.
Tip 1 – Use the AE/AF Lock
The default camera app on your phone most likely has a way to set the focus and exposure manually. This feature is called AE/AF Lock.
You don’t need to use this feature in the Pro or Manual mode. Simply launch the camera and frame your picture.
Then, tap and hold on to your main subject. The edges of a frame appear and a sun icon – this is the AE/AF Lock.
When you do this, the camera will set the focus point where you tapped, calculating the exposure to the amount of light in that spot.
Now, tap again and swipe down to lower the exposure.
When you’re satisfied with how it looks, tap the shutter button.
Remember that this is only a temporary setting – you’ll need to adjust it for every photo or video you take.
Tip 2 – Use the exposure compensation
Not all camera apps have an exposure compensation feature. If your default camera app doesn’t have it, download a third-party app that does.
Next, find the exposure compensation tool and slide it until you find the right setting. It may be -.5, -1, or -1.5 – depending on the subject, the amount of light, and the look you’re going for.
Remember that this setting will remain active after you close the camera app. So, you’ll need to turn back the exposure compensation to zero when you want your images exposed usually.
Tip 3 – Use the Pro mode
Another way to take low-exposure pictures on your phone is by using the Pro mode. It might have a different name depending on the camera app you use – the important thing is that it allows you to adjust the settings.
Once you have the exposure settings available, choose a faster shutter speed or a lower ISO value to underexpose your pictures.
The settings you choose will remain by default in Pro mode. However, unlike the exposure compensation feature, they depend on how much light is available. So you’ll need to adjust them every time.
Photo Editing Tips: How to Edit Low Exposure Photos


This is how you can create low-exposure photos in post-processing. I’ll explain how to do it on your computer using Photoshop and on your phone using Snapseed. However, the process is very similar to any editing software and app – so you can follow along easily.
Instruction 1 – Exposure

Credit: Matheus Bertelli
This is the main edit you have to do to create low-exposure photos. You’re going to lower the exposure in post-production.
To do this in a non-destructive way, you have to add a New Adjustment Layer > Exposure.
Then, move the slider to the left until you’re satisfied. Notice how the value is now negative.
You can leave the edit just at this point if you like the way it looks. Otherwise, you can use any of the following tools.
Instruction 2 – Brightness
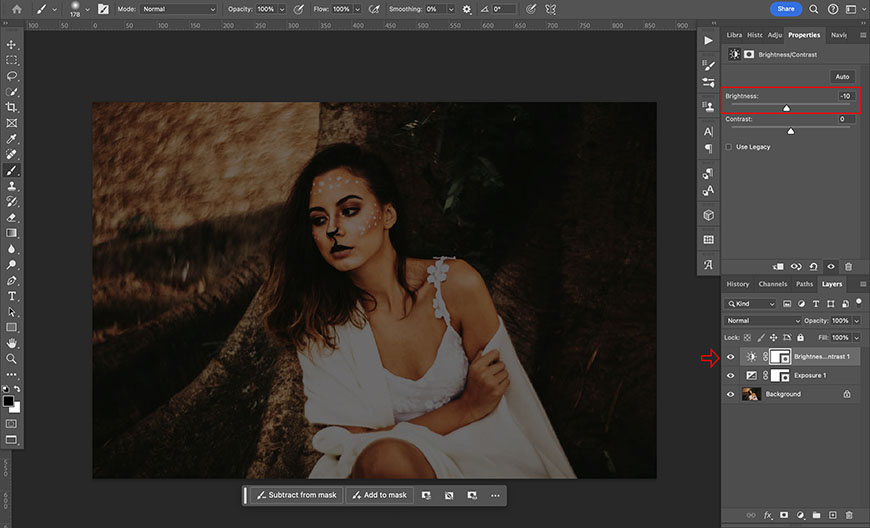
You can use the Brightness/Contrast tool or on top of the Exposure edit you just did.
Simply add another Adjustment Layer and choose Brightness/Contrast.
Then, move the Brightness slider to the left. Again, the value will become negative.
Just keep going until you’re satisfied.
Instruction 3 – Curves
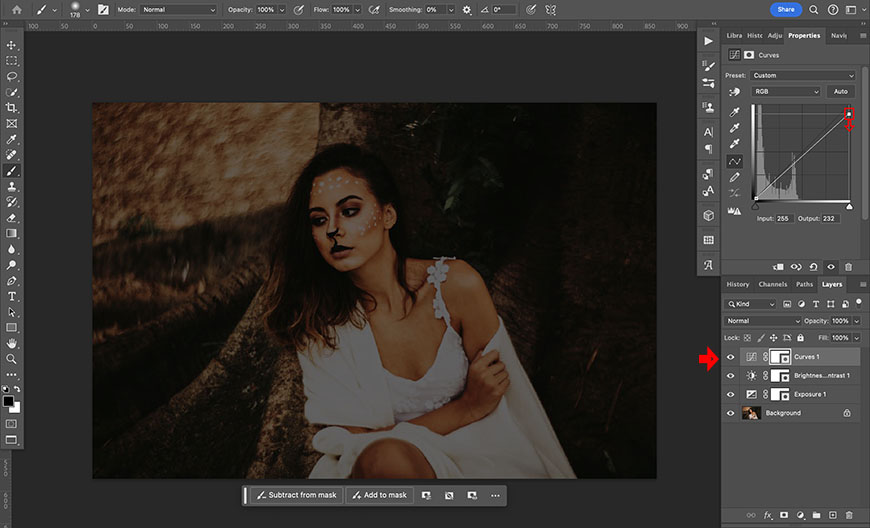
If the overall image is already to your liking but the highlights are still too bright for your taste, you can use the Curves tool.
For this, create another Adjustment Layer and choose Curves.
Then, click on the upper right side of the graphic and pull it down until you like the result.
Instruction 4 – Levels
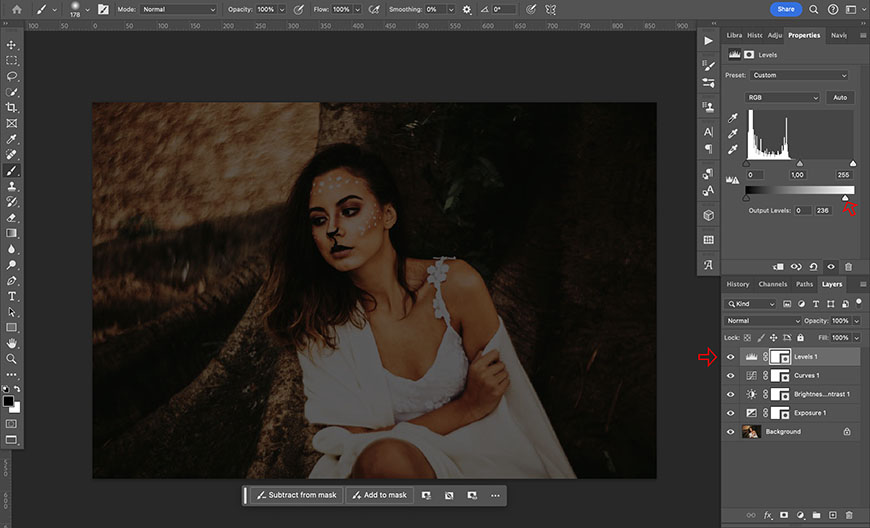
Another way to lower the highlights is by using Levels. You can do this on top of Curves or instead.
Just create a Levels Adjustment Layer. Then, drag the slider on the right side of the gradient – not the one on the graph!
This will lower the brightness of the highlights.
How to edit low exposure photos on iPhone / Android
This tip is helpful for turning correctly exposed photos into low-exposure photos. So, you can take a picture especially to use with this aesthetic, or you can choose an old one from your gallery that you think will look nice.
Any photo editing app allows you to brighten or darken your pictures, so you can choose the app you like most. I recommend Snapseed because it’s free and available for Android and iPhone.
Simply open your photo in Snapseed and go to Tools > Tune Image.
By default, it will launch the Brightness slider if it doesn’t, tap on the Tools icon and choose Brightness.
Tap on the slider and slide it to the left – this will lower the exposure of the entire picture. Tap the check icon on the bottom right corner when you like it.
Then, tap Export to save or share the low-exposure version of your picture.
5 Low Exposure Photo Ideas
Now that you know how to take low-exposure photos, let’s see what you can do with this technique.
Check out these low-exposure photo ideas.
Dramatic landscapes

Credit: Ray Bilcliff
You can use landscape low-exposure photos to emphasize a dramatic sky or to shoot mysterious blue-hour scenes.
Intimate interiors

Credit: Alleksana
If you want to give the idea of intimacy – you can use low-exposure photos. This may be for a romantic restaurant or a candlelight dinner at home.
Moody portraits
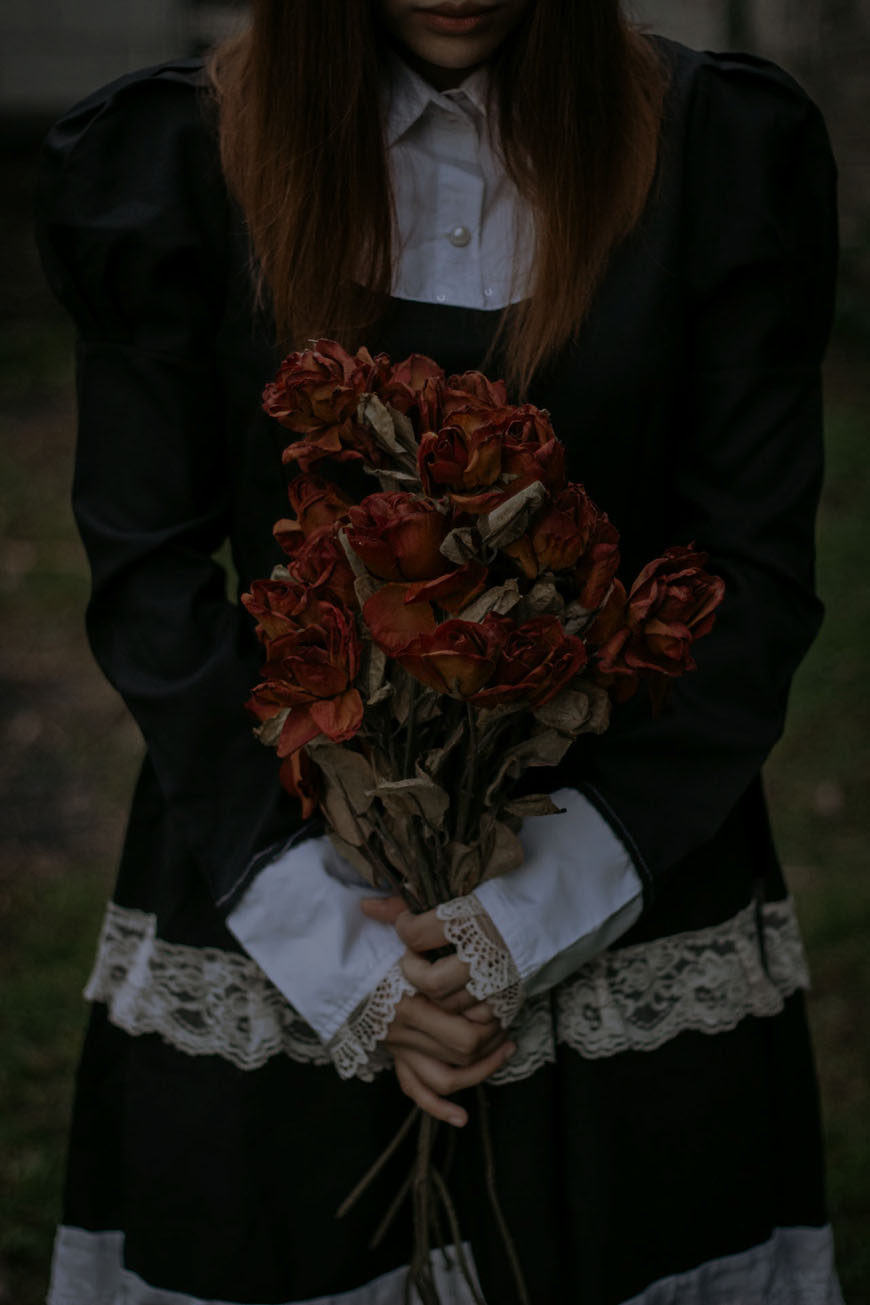
Credit: Patrick Porto
You can use low-exposure photography to create moody portraits. It’s perfect for conceptual faceless portraits like this one.
Lifestyle pictures

Credit: Laura James
Lifestyle photography is one of the most popular on Instagram for its low-exposure aesthetic.
Try lighting your scenes with candles or fairy lights to complete the look.
Boudoir photos
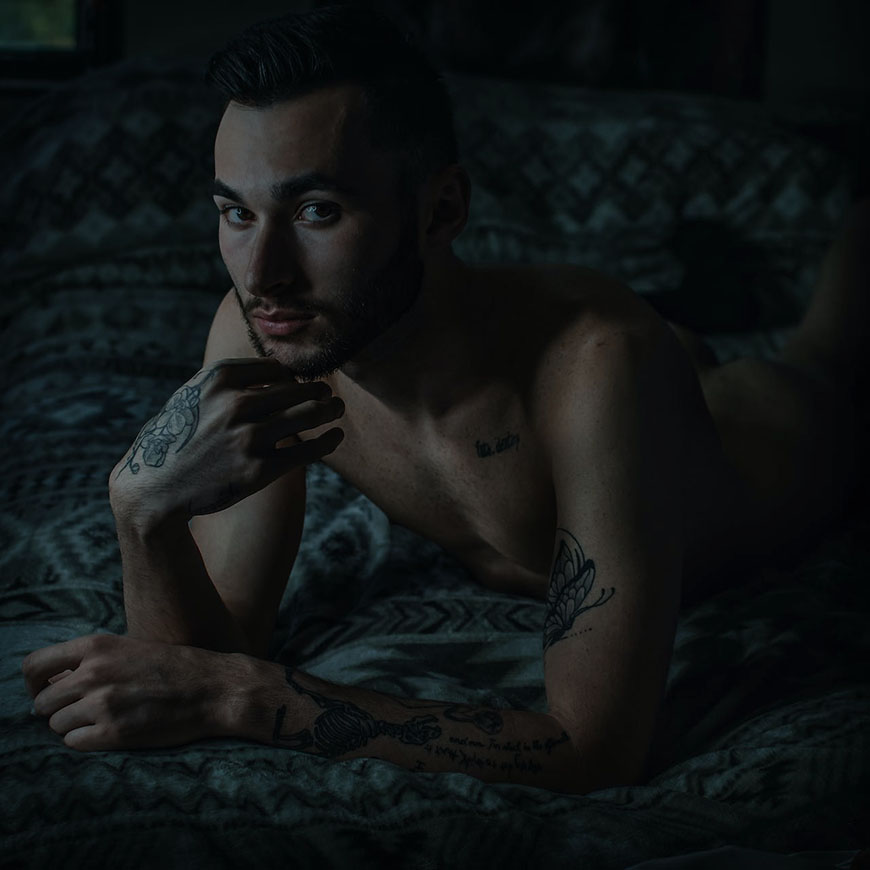
Credit: Tazz Vaughn
Low-exposure photography is great when you want to leave some things to the imagination – use it in your boudoir photography to entice the viewer.
FAQs About Low Exposure Photos
What does low exposure mean?
Low exposure means a photo has been intentionally underexposed to achieve a specific effect.
How do I lower the exposure of a photo?
To lower the exposure, you can use any settings from the exposure triangle – ISO, aperture, and shutter speed. If you choose the ISO, lower the value. If you use the aperture, choose a narrower one. For the shutter speed, choose a faster one.
Do you need an app to take low exposure photos?
Any camera app has a feature that allows you to lower the exposure. You can use the AE/AF Lock, the exposure compensation, or the exposure settings.
What are the best low exposure filters?
The low exposure filter from VSCO and the one from TikTok are the most common. You can also use the Mayfair filter on Instagram or one of the dark filters on Snapseed or Lightroom.
Is there a low exposure photo app?
I haven’t come across any low-exposure photo app. However, some filter apps, such as VSCO, include low-exposure filters. Otherwise, you can use a photo editing app and lower the exposure manually.

Check out these 8 essential tools to help you succeed as a professional photographer.
Includes limited-time discounts.

Ana Mireles is a Mexican researcher that specializes in photography and communications for the arts and culture sector.

👋 WELCOME TO SHOTKIT!
🔥 Popular NOW:
