


What is ISO?
A simple guide to understanding ISO for photographers of all levels. What is ISO on your camera and how can it be used to your advantage?
Learn | Photography Guides | By Athol Hill | Last Updated: January 11, 2025
Shotkit may earn a commission on affiliate links. Learn more.
The shift from automatic to manual can be pretty daunting for many new photographers…
As you start to get your head around what is aperture and what is shutter speed, you have camera ISO to contend with… and things get confusing again!
There is a lot of misinformation on the internet about ISO. For the purposes of this article, I'm not going to going to get into debates about what is technically wrong or right.
(More often than not, all it does is give you bragging rights in a forum with people you don't know!)
Instead, I thought it would be better to focus on understanding what is ISO, how it impacts your photos, and how you can leverage it to make your photos better.
What is ISO in Digital Photography?
When we talk about digital cameras, ISO measures the sensitivity of the image sensor which sits inside your camera.
The lower the ISO number, the less sensitive your camera is to light. It also means there will be less noise (or ‘grain' if you're using a film camera) in your final image.
The higher the ISO number, the more sensitive your camera is to light. However, the trade off is that the higher the ISO you use, the more noise there will be in your image.
(Check out our Topaz DeNoise AI review for a smart way to recover a noisy image, or our guide on how to fix grainy photos.)
“The term ‘ISO' is used across various industries, products, and processes. However, when you hear it in the context of an ISO camera, it's specifically indicating its photographic function.”
ISO refers to an industry-standard organization from the International organization for Standardization. In the case of camera ISO in photography, it is ISO12232:2019.
Camera ISO first appeared in 1974, an output of combining two film standards into one. Back in the day, the realm of ISO photography centered around film. Camera ISO's started as a reference to the exposure sensitivity of a piece of film.
At the time, ASA and DIN were both international standards for film, so they were combined into a single standard to avoid confusion with users.

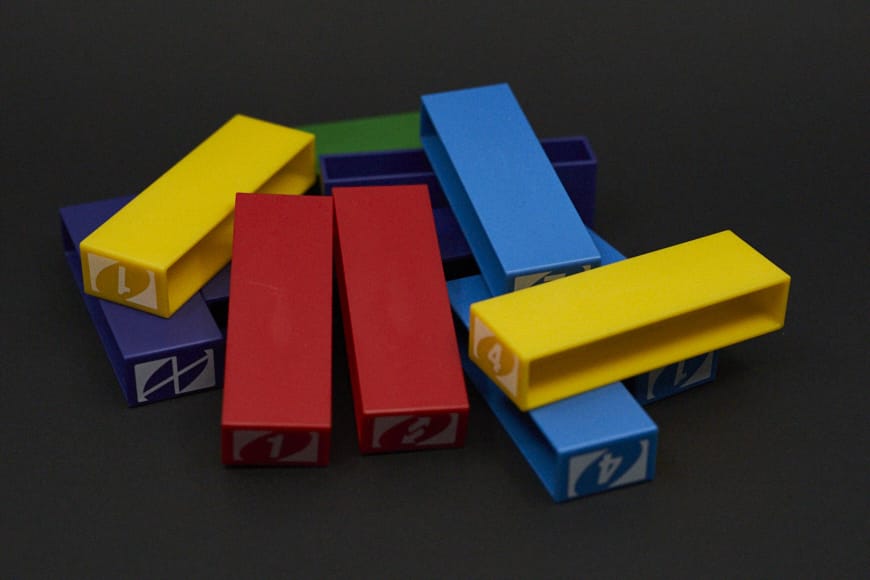
A sample photo taken at ISO100 on a Sony A7iii that will be used throughout this article to demonstrate the impact of ISO on photographic quality.
Camera ISO's started as a reference to the exposure sensitivity of a piece of film. What this meant for the photographers at the time, is when the photographer used a higher ISO film, the photograph would be brighter.
This gave them an added dimension of flexibility for their photographs.
Although things have changed in the digital world, the basic concept of what ISO does to an image has not changed.
“In the film world, what is ISO in photography refers to the sensitivity of the film. Similarly, in the digital world, ISO reflects the “sensitivity” of a digital camera sensor, although that's not technically how sensors work.”
“Although technology has evolved, the fundamental concept of ISO in camera settings and its impact on an image has remained consistent.”
Like their film counterpart, when you have a higher digital ISO, the photo will appear brighter, so it's easy to think of ISO as a ‘brightness slider'.
As mentioned before, higher ISO's comes with a price and that price is in the quality of the photo. Higher ISO's are more grainy and have more digital noise.
Fortunately, modern digital cameras allow you to shoot ‘clean' images at much higher ISOs than before.
What ISO setting should you use?
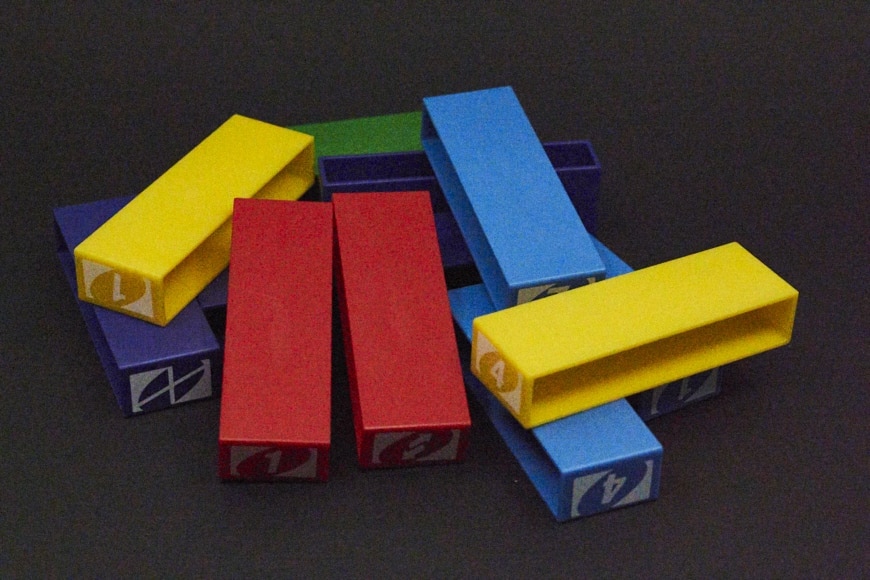
The same composition as above, this time at ISO12800. ISO12800 is commonly needed in low light for professional photography.
We now know that a higher ISO setting (number) makes the photograph brighter. That being the case, why do we need different ISO settings on our digital cameras, and what ISO setting should you use when photographing various subjects each day?
One thing to note – the amount of light in our everyday world changes depending on which country we are in, the time of year, the time of day, whether we are indoors, outdoors and whether we have any natural or artificial light available.
On top of that, we have to deal with aperture and shutter speed, all of which impact the amount of light available. This translates to a variety of possible settings to get a correctly exposed image.
As an example, if you were shooting a soccer game in a stadium at night, you would need a high shutter speed to freeze the action. If we were to use a slow shutter, it would blur the players.
On the other hand, setting a 1/1000 shutter speed to freeze the players' motion in a dark stadium or capture early morning details during sunrise would result in a black photo due to the low light – this is where using a higher ISO setting comes to the rescue.
High ISO settings aren't confined to sports. As an example, wedding photographers use higher ISO's to avoid flash (allowing them to still use fast shutter speeds), and astrophotographers use high ISO's because the earth moves (and using slower shutter speeds may blur their images).
That said, ISO is not a once size fits all. Landscape photographers like long exposures which often require very low ISO's. As you delve deeper into the nuances of your camera, understanding what is ISO photography empowers you to adapt to a multitude of lighting situations.
As you can see, there's no one single ‘perfect ISO' value to set your digitial camera at for all situations. It's better to think of it as this: What shutter speed and/or aperture value do I need for my images to appear as I intend?…. then add in your ISO setting to make the shot achievable.
Remember, a higher ISO setting can reduce the quality of the photo, introducing more grain or more digital noise.
Why use a high ISO setting if it's ‘worse'? Well, you can easily fix noise by applying noise reduction in Adobe Lightroom or other editing software. However, you can't fix motion blur.
What is high ISO noise and how do I deal with it?
This image was taken at ISO102400 with the Sony A7iii and has no noise reduction applied.
We mentioned that high ISO creates noise, and in most cases, we can deal with it but there are limits.
The below example shows an excessive level of high ISO noise, a photo taken at ISO10,2400 which well beyond the limits for most everyday photographers. Sometimes, in extreme conditions, photographers might attempt settings like ISO 51000. However, such high settings often come with considerable digital noise.
When you start shooting raw, dealing with noise reduction becomes part of image processing.
There are also third-party plugins like Nik Dfine that claim to offer improved noise reduction over in-app functions within Capture One or Lightroom.
However, there are of course limits to what noise reduction can do and it definitely can't perform miracles.
The below example is the same photo as above with noise reduction applied. It shows considerable improvement over the photo above, however, it is still not good enough for any form of print or social media usage.

Nik Dfine is a third party application for noise reduction, but can't produce miracles in this case.
If you are shooting jpg and haven't started raw, your noise reduction should be happening automatically in-camera using specific algorithms.
They won't be perfect but they should look a lot better than the raw file would look. (See also: RAW vs JPEG.)
What is Auto ISO?
Assuming you are reading this article to learn about ISO, you may already using something called Auto ISO.
Auto ISO is when the camera does all the work for you. It decides what a perfectly exposed picture looks like and adjusts the ISO whilst you can concentrate on the other settings like aperture and/or shutter speed.
The first thing to note here is that there is absolutely nothing wrong with using Auto ISO. The camera systems these days are incredibly complex and intelligent. As a result, Auto ISO is actually pretty accurate for most situations.
Many professionals shoot Auto ISO. I regularly shoot Auto ISO for sports when people are transitioning between very light and dark areas.
The key to learning ISO isn’t about transitioning to manual ISO permanently – rather, it’s about understanding enough about the various ISO settings to know when you should use manual.
When you work in situations where light is constantly changing, Auto ISO is often the best solution.
The great thing with Auto ISO on modern digital cameras is that it works with any combination of manual or automatic settings you define:
If you are working in aperture priority it will adjust both shutter speed and ISO settings in accordance with the light in your scene. If you are working in manual, it will only adjust ISO settings.
How to start using ISO for better digital images
You are already using ISO whether you want to or not – it's actually happening automatically, whether it's on your digital camera or mobile phone.
Manually adjusting ISO can be a little intimidating. Full manual mode is a topic in itself, but my recommendation would be the following:
- Get comfortable using manual mode with ‘auto ISO' and ensure you understand the impacts of aperture and shutter speed. Watch how the ISO changes with different environments. This is shown in the viewfinder.
- Try using the exposure compensation with auto ISO, then make minor adjustments to the auto ISO if you think the photo is a little under or overexposed. Watch how the ISO adjusts.
- Go out on an evening when the light is more consistent and take some photos in manual ISO. If you aren’t sure what ISO to start with, take one photo with auto ISO, make a mental note of that figure, then use that as a baseline when dialing in your manual ISO. As the light starts to fade, you’ll find yourself having to adjust the ISO to keep the photos exposed correctly.
All the above will be a little easier with a mirrorless camera for the simple reason that you can see the photo as it is exposed through the viewfinder.
DSLR users will have to chimp (view the photo after each shot) to see if it matches their expectation.
Final Words
ISO is intimidating but it's also one of the most powerful aspects of our modern-day cameras. We can shoot photographs in conditions photographers 20 years ago could only dream of.
It is also something you don't need to be scared of, particularly in the modern era of mirrorless where you can see what your photograph will look like.
At worse, you may get some grainy unusable photos, so if you plan on experimenting, don't do it at a once-in-a-lifetime occasion.
At best, you'll learn a powerful new skill and a way to improve your photographs moving forward.
Leave us a comment below to let me know if you found this tutorial on ISO easy to understand.

Check out these 8 essential tools to help you succeed as a professional photographer.
Includes limited-time discounts.
Athol Hill is a sports and portrait photographer based in Melbourne, Australia
2 Comments
Leave a Comment

👋 WELCOME TO SHOTKIT!
🔥 Popular NOW:

Great write up, thank you!
I won’t feel so guilty about using auto ISO anymore!
Great read Athol and highly informative. Well done and cheers.