


How to Photograph Water
How to photograph water and make your landscape photos shine. Learn about tools, techniques and post-production processes for shooting water.
Learn | Photography Guides | By Peter Eastway
Shotkit may earn a commission on affiliate links. Learn more.
Oceans, lakes, rivers, waterfalls – water can be a key ingredient in the landscape, so how do you maximise its impact and compositional strength?
The great thing about photography is that rules are made to be broken and there are many different ways to achieve superlative results.
In this post about how to photograph water, we present a few thoughts, techniques, tools and post-production processes that can help you get the most out of landscape photographs that include a body of water.
(Looking to add realistic water reflections to your images? Check out Luminar AI.)
Water in the Landscape – Frozen or Blurred?

A fast shutter speed is required to capture the texture on a storm-swept sea. A long exposure would feel completely different.
Do you freeze the motion of water with a fast shutter speed, or let it blur with a neutral density filter and a time exposure? Once you know how the exposure triangle works, it's an easy matter to make these incredibly important creative decisions.
For instance, using a super-fast shutter speed can freeze the movement of water so that every little droplet is accurately rendered.
But is this what we want to do?
Capturing a landscape photograph is just as much about the emotion of the scene as the clinical reality. Too fast a shutter speed and the water could be rendered like solid ice rather than a flowing liquid.
At the other extreme, a very long shutter speed can blur the water so much that it no longer looks like water. Some people love this effect, others don't understand it – so too much water blur in a photograph can alienate some of your audience.
Not that this necessarily matters…
We can't make everyone happy with our photography, so the best advice is to start with ourselves.
For every landscape with water, you should ask yourself how you want the water to be rendered. You're already making decisions about depth-of-field, but will this decision and ‘the exposure triangle‘ impact the way water is depicted?
For instance, we use a small aperture to maximise depth-of-field, but this in turn requires a longer shutter speed, during which time the water can move and blur. To keep your depth-of-field and freeze the water, you may need to increase your ISO setting, which will provide a faster shutter speed.
Fortunately, when photographing rivers, waterfalls, lakes and oceans, our subject is usually some distance from the camera and so maximising depth-of-field may not be required. Or you could think about focus-stacking techniques if you wanted the foreground to be sharp and clear.
In this way, you can set faster shutter speeds to freeze the water.

A shutter speed of 1/125 second will generally freeze the water, but it depends on how fast the water is moving. There would be no trouble for a languid river passing by, but even 1/1000 second might not be fast enough to freeze a wave crashing on the shore.
On the other hand, a one-second exposure of a completely still lake is going to look much the same as a 1/125 second shot.
In between these extremes you will find just a little blur to quite a lot. What do you like?
If you want to blur the water, you are best advised to be bold and make the blur obvious. Very slight blurring can look like you're just not sure of your camera technique or the lens wasn't focused.
There's no single camera setting that you can apply to get the right amount of blur every time, so here's a suggestion: take a series of photos at different shutter speeds and then choose which one you want to use during the post-production process.
You can use different apertures which in turn will change the shutter speed, assuming the ISO remains the same; but of course, different apertures also affect depth-of-field.
Another option is to set your desired aperture and then change the ISO. As the ISO increases, the shutter speed will increase as well, so start with the slowest shutter speed and lowest ISO.
Sometimes it's difficult to get a slow enough shutter speed and this is where neutral density filters help. (See: Lens filter guide.)
To Polarise Or Not?
A polarising filter can help you look below the water's surface, but do you want to? Could a strong reflection be a better compositional option?
Many filter effects can be reproduced in post-production, but there are two that cannot: the neutral density (because all it does is slow down the exposure) and the polariser.
A polarising filter does exactly that: it polarises light. So what does this mean?
In simplistic, non-scientific terms (to save the true scientists reading this from having apoplexy), light travels in waves which vibrate up and down, side to side and every other angle in between.
When we look around us, the light we generally see is not polarised. It vibrates in all directions.
Polarising the light means you only allow the light to vibrate in one direction – say up and down, not side to side. Now, a polarising filter doesn't actually change the light, but it does control what light can pass through and reach the sensor.
Think of a polarising filter as being a fence with lots of vertical bars closely spaced. Light rays that oscillate up and down (in the same orientation as the fence bars) can pass through the fence, but light rays that oscillate from side to side can't – because the rays are too big to pass through.
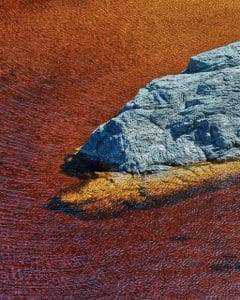
The red water is natural, but it is disguised by the specular reflections on the ripples created by the wind
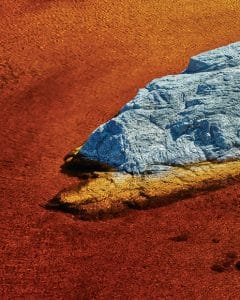
A polarising filter removes these reflections to a greater or lesser extent, depending on the angle of the light to the camera
Of course, all this is happening on a microscopic scale, but essentially this is what the polarising filter is doing: it's only allowing light rays that oscillate in a particular orientation to pass through.
So in the case of a lake, for instance, there's light being reflected off the surface, and light being reflected off the bottom of the lake. Interestingly, the light from these two sources usually oscillates in a different plane.
By turning the polarising filter around, we can either let through the reflected surface light or the light from the bottom of the lake.
Fortunately, you don't really need to understand all this to use a polarising filter – and that's probably a good thing because autofocus cameras use circular polarising filters, not linear polarisers as just described.
So what to do? Attach the polarising filter to the lens and turn the filter in one direction or the other until you like the effect. You'll notice that polarising filters are designed to be rotated when correctly attached to the lens, while other circular filters simply screw in and remain stationary.
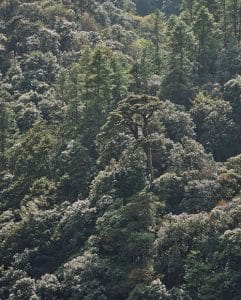
Water or moisture seen on leaves and foliage as specular highlights may or may not be required
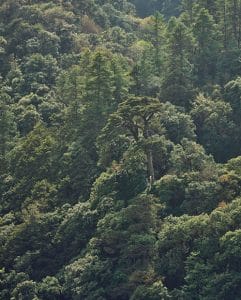
A polarising filter can reduce them as shown here
When using polarising filters to darken the sky, you get the strongest effect when the camera (and filter) is pointed 90 degrees to the light source. Keep turning the filter and the sky lightens back up.
When using polarising filters to control the reflections on a body of water like a lake, it's the same process: as you turn the filter you will observe the reflections become stronger, and then disappear to allow the bottom of the lake come into view.
How much of the polarising effect you want is up to you.
Water is also present when you photograph foliage, and in bright sunshine this can create bright specular highlights. You can deal with these in post-production, but it can be very difficult. Or you can use a polarising filter!
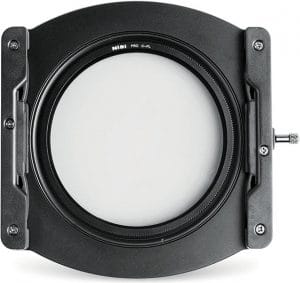
Polarising filters for lenses are generally circular because they need to be turned around, but you can find some square filter systems like NiSi that ingeniously incorporate the round filter into its square filter holder, giving you the best of both worlds.
Time Exposures On Water

Sometimes described as the ‘milky' effect, time exposures can create surreal and minimalist compositions.
As mentioned earlier, not everyone likes the effects created by really long exposures (from 30 seconds to 10 minutes) because of how the water is softened and blurred. And if there is any movement in the water, the turbulence can look quite white, not unlike mist or fog rolling over the landscape.
Nevertheless, it's a popular technique and many landscape photographers keep neutral density filters in their camera bag so they can set long exposures at any time of the day.
The technique is fairly straightforward. You need a long exposure: one second may be enough, ten seconds can be better and for a very minimalist view, several minutes might be called for. The longer the exposure, the more time the ripples and waves have to merge together into a homogenous tone.
This is the appeal of time exposures: the resulting blurs tend to simplify our compositions, allowing other objects to stand out in contrast.
To achieve long exposures, a small aperture and a low ISO setting are a good starting point, but they may not provide a time exposure (one second or longer) without a little help.
One option is to shoot very early or late in the day when light levels are low. In this case, you need a time exposure (long shutter speed) just to get the correct exposure.
However, this is rather limiting, so the second option is to use a neutral density filter. Are ND filters worth it? Definitely!
Neutral density filters shouldn't add any colour or contrast to your photograph. This isn't always the case and you may find some cheaper filters introduce a colour cast. Usually this can be corrected in post-production, but not always.

Neutral density filters come in different strengths and, just to complicate matters, different filter manufacturers can describe what is essentially the same strength in different ways.
However, the principle is the same and generally the strengths step up in Exposure Values (EV) just like shutter speeds and apertures. So, a 0.3X ND filter will slow your shutter speed by one stop or 1 EV, while a 0.9X ND is three stops.
These are the most common neutral density filters, but they are not strong enough for time exposures during the middle of the day.
A 3.0X ND filter provides ten stops density and some companies call this a ‘big stopper'. You can also get 15 stop and 20 stop ND filters, but if using the latter, you might need to travel to the polar regions in winter as they can require exposures of many hours!
For serious time exposure work, three filters will see you through: six, ten and fifteen stops (however they are described by your filter manufacturer of choice). If in doubt, NiSi comes recommended.
Time exposures require a good tripod set up correctly so the camera doesn't move at all during the exposure. Sometimes this can be challenging in windy conditions, so you may choose to take two exposures – one time exposure with an ND filter, and a second shot with no filter at a faster shutter speed, like 1/250 second, which ensures your subject is sharp and not suffering from camera shake.
You can then merge these two images during post-production – but it's much easier to use a good, sturdy tripod.
Using Reflections

Reflections add an extra dimension to your compositions, so how do you make the most of them?
One of the most powerful compositional devices is repetition. Humans are attracted to multiples of the same or similar objects – such as twins, rows of trees and mirror reflections.
And this is one of the attractions of shooting with water in the landscape because it has the potential to create great reflections.
The classic reflection is a still body of water mirroring the landscape behind it. The atmospheric requirement is no wind, so it is more usual to find these photos in the early mornings, or possibly in the late evenings when the wind dies away.
Some reflections may appear within a body of water (such as the small pool of water in the sand dunes featured at the top of this post), and so the challenge is to frame the subject in a way that incorporates both the body of water and its reflection.
Optionally, by getting in close to the water, you can fill the frame with a reflection. However, the angle of the camera to the water can change as you get closer and you can lose the reflection – or at least the interesting part of the reflection.
In the photograph above, taken while sitting in a zodiac in a large fjord, capturing the reflection was pretty straightforward – it was just a matter of cutting the engine and waiting for the water to become still.
Compositionally, it is easiest to put the horizon in the middle of the frame. But is this what you really want?
Sometimes it's not necessary to have all of the main subject repeated in the reflection – just a part of it would do. Or perhaps you move the horizon up a little, excluding the sky and making the foreground reflection the more important part of the composition?
A mirror image isn't the only type of reflection available. Water naturally reflects light, so a lake in the landscape, for instance, can become both a centre of interest and a highlight because it is lighter in tone than its surroundings. And if it isn't, you can use selective adjustments in post-production to make it lighter.
Water also reflects colour, so an early morning sunrise can be reflected in the colours of a blue ocean with breaking waves. With the colour occurring in both the sky and the foreground, it helps create a more cohesive composition.
The Colour of Water
Before

After
Water is generally thought of as clear or blue, but it can also be brown, red or grey. What colour would you like it to be?
Water generally reflects what is around it, so a blue sea reflects a blue sky, while a grey sea reflects overcast clouds.
Of course, this doesn't always hold true. Sometimes minerals or plant life can colour water, creating what at first appears as something quite unbelievable. However, because everything else around these colourful bodies of water is ‘natural' and expected, we accept the unusual hues for what they are.
However, there's no need to leave water exactly the colour you find it. Just as we lighten or darken water to stand out or recede into the background, so we can add or remove colour.
A quick look at a few travel websites will reveal startlingly pure and vibrant sea blues, under equally saturated skies.
Extra colour saturation or vibrance can enhance the water in your landscape, grabbing the viewer's attention and making a statement.
(See the Shotkit guide to Vibrance vs Saturation , and also in this helpful article by SLR Lounge.)
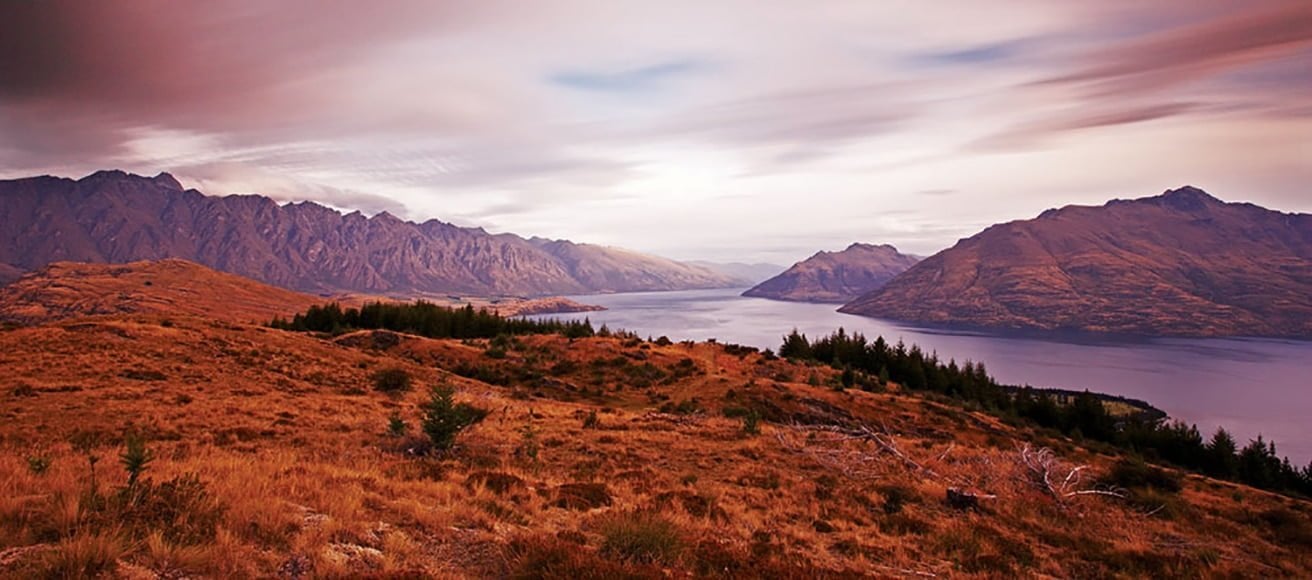
Or what about changing the colour altogether? A bright purple might be a little hard to believe, but changing a blue to a green could sit somewhere between fact and fiction.
The photograph at Queenstown above is a combination of a time exposure with a colour change during post-production. The long two-minute exposure has blurred the clouds and smoothed out the water, so it's already a step aside from reality. Then, by tweaking the colour of lake waters using a hue/saturation adjustment layer, the trip into fantasy is taken a step further.
Why change the colour? The answer can be simple: because you wanted to!
Changing the colour of water can require a precise mask. You don't want the different colouration bleeding onto the surrounding land as this gives the game away.
When your body of water is already quite colourful or distinct from its surroundings, Lightroom workers can try an adjustment brush with the Auto Mask tick box selected.
You'll need to use the white balance (Temp and Tint) sliders to adjust the colour in the adjustment dialog. However, to get a really precise mask in Lightroom is quite challenging.
Photoshop makes the process a little easier, providing some automatic selection tools (Quick Selection and Magic Wand) that can speed up the process. However you do it, a precise mask is essential.
Time Shifting Water
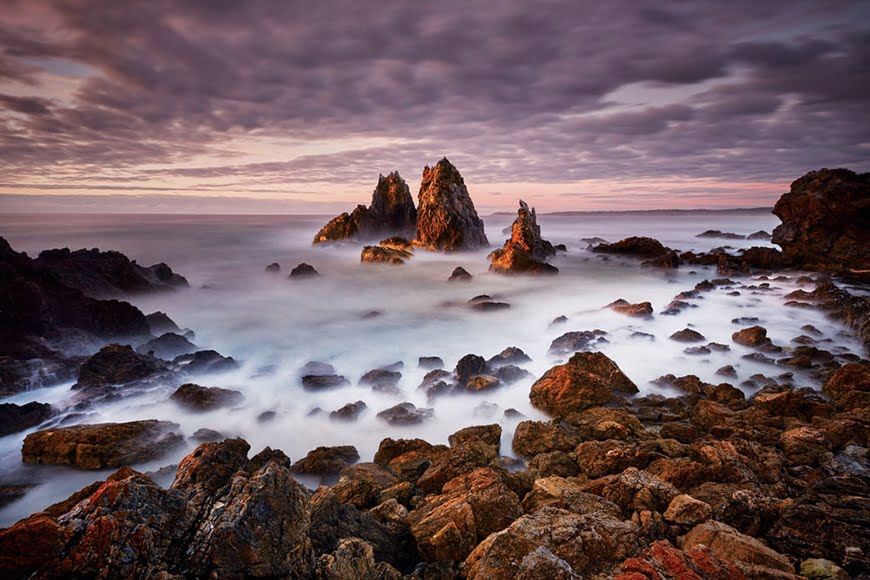
Composite of three images (see below)
How do you combine the best features of different exposures to create an even stronger composite image?
Photographing the sea can be marvellous – and marvellously frustrating. You can find that a wash of water is perfect on one side of your photograph, but another exposure has much better wave action on the other side!
Mother Nature doesn't always cooperate fully.
However, if you lock your camera off on a tripod and you're prepared to take just the one composition over a period of time, you can time shift the changes in the water. This can be especially useful for moving water, but it can also be applied to changing light in any landscape.
Take the photograph above of Camel Rocks. It's a combination of three exposures, beginning with a pre-dawn cloudscape displaying desirable mauve hues.

Pre-dawn with great sky
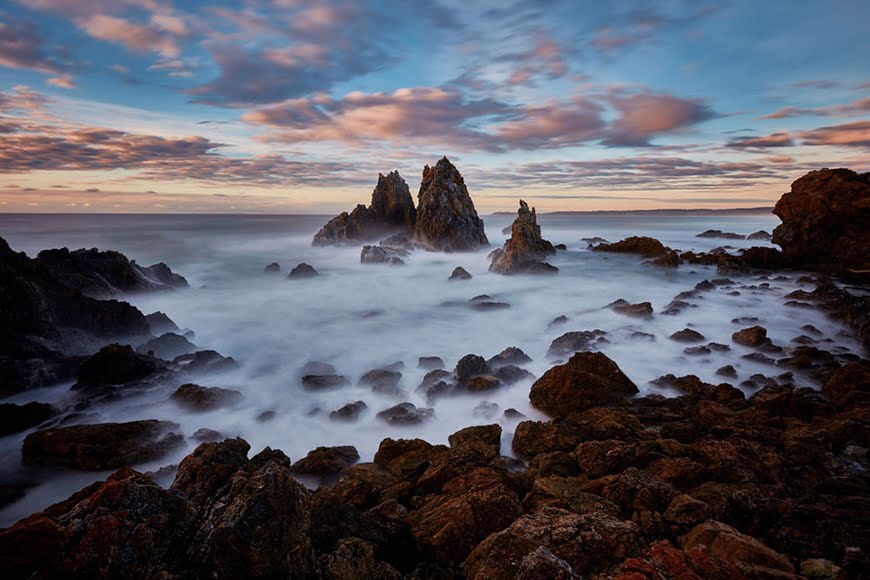
Stronger wave action

Sunlight on the rocks
As the light grew stronger, some larger waves washed through, creating a better ‘milky' effect over the foreground rocks. Then when the sun actually rose, it bathed the rocks in light, but by now the beautiful moody sky had been replaced with a more standard blue one.
As all three photographs were taken from exactly the same position, with the camera locked off on a tripod, they can be opened up in Photoshop on three separate layers and sit in perfect registration.
(Even if your tripod moves a few pixels between shots, you can use Photoshop to align the different layers, so all is not lost.)
Using masks on the top layers, the skies are blacked out to reveal the pre-dawn sky below, while the sunlit rocks and the milky wash are painted into the composition, giving the resulting image the best of three separate exposures taken at different times.
Of course, this technique can be applied to any landscape, not just those with water.
Using Contrast On Water
Whether Photoshop, Lightroom or Capture One, you can build drama and power in your water with the use of contrast during post-production.
Post-production is essential for all genres of photography, and one of the tools at our disposal for enhancing the feeling or mood of water in the landscape is contrast.
While a time exposure might create a softness in the image, contrast can build presence, enhancing the shines and reflections found on water surfaces.
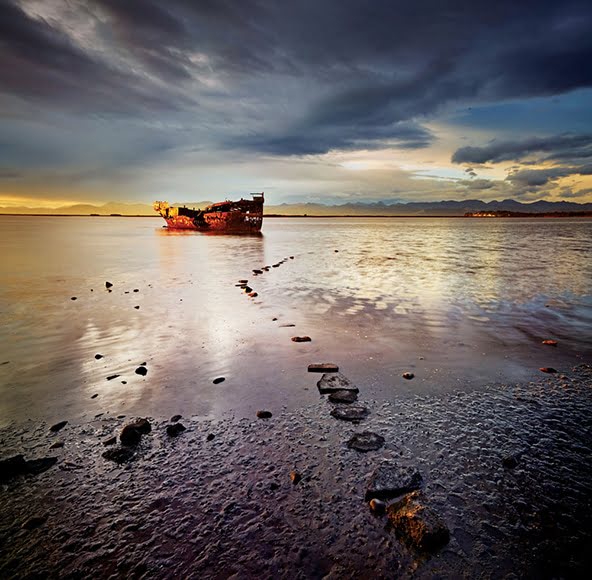
It works particularly well with reflections of light and colour, and with specular highlights found on the ripples of water. Or, as in the shipwreck photo above, a wet or damp foreground. It brings up the glistening!
There are a number of ways you can introduce contrast. The contrast/brightness adjustment in Photoshop and the contrast slider in Lightroom will do an admirable job.
More advanced workers may gravitate towards the curve and an adjustment layer, as this allows us to selectively adjust the contrast of the water, without increasing contrast in other areas of the image that might not benefit from such a change.
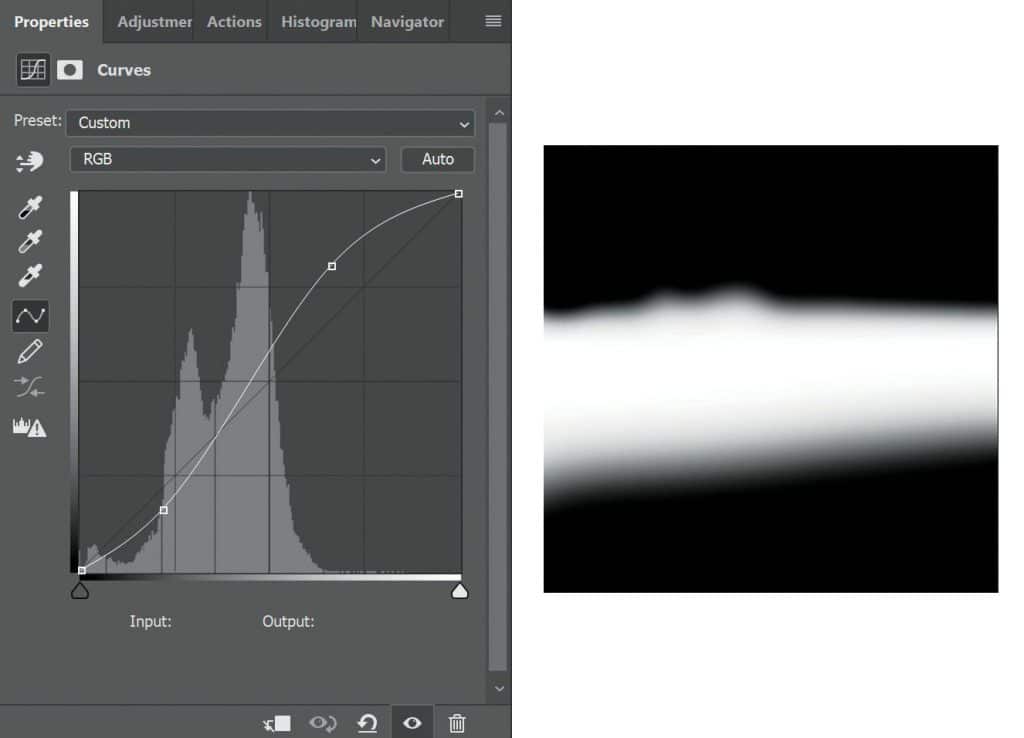
The curve and mask used to enhance the water in the middleground in the above image are shown here. Note how two points are attached to the curve and the line between them is steepened.
The second approach is to use local contrast with the clarity tool in Adobe Camera Raw, Lightroom and Capture One. Indeed this is the easiest approach, even if you're in Photoshop.

In Photoshop, copy up all your work into a new layer on top of the stack (Ctr/Cmd + Alt/Opt + Shift + E) and apply Filter > Camera Raw Filter. You will see the clarity slider – drag to the right to taste and press OK.
Now add a mask to the layer, invert the mask (so it's black) and, using a white brush, paint in the clarity where it works best.
If at the beginning you turn this layer into a smart layer (Filters > Convert for Smart Filters), you will be able to reopen the dialog and re-set the clarity strength. If you don't, you have to delete and repeat to change it.
How To Photograph Water | Final Words
Including water within our landscape images has the advantage of giving us another compositional element to work with.
Colour, contrast, reflections, length of exposure and whether to use a polarising filter are all things to consider and experiment with as you learn to photograph water in a way that fits with your own photography style.

Check out these 8 essential tools to help you succeed as a professional photographer.
Includes limited-time discounts.

Master of Photography Peter Eastway is a multi-award winning photographer and educator from Sydney, Australia.
4 Comments
Leave a Comment
👋 WELCOME TO SHOTKIT!
🔥 Popular NOW:

always good to hear from the Master — being listening for 25-30 years myself
Thanks Peter :)
Brillant Peter. Love your work & teaching.
Cheers Doris Thomas
Very thorough. Complimentary images visually explained the process. I would like to reproduce part of this in the American Society of Photographers Magazine. Please email contact information. Thank you. ASP Executive Director.
What a fantastic article. Written so I could understand and learn from. Thanks for this , I am going to keep it i my resources u til I have got the different techniques down pat.