


How to Use the Lasso tool in Photoshop (All 3 Versions)
In this Photoshop Tutorial, you will learn more about the three Lasso Tools and when to use each one when editing photos.
Photoshop | Software | By Judyth Satyn
Shotkit may earn a commission on affiliate links. Learn more.
The Lasso Tool is a Photoshop Selection Tool used to create a border around a subject.
In Photoshop there are three lasso tools to choose from: Magnetic, Polygonal, or Standard.
Each with its unique capacities for selection ranging from a simple selection to a complex selection.
In this Photoshop Tutorial, you will learn more about each Lasso Tool and when to use them when editing photos.

Download a free copy of Adobe Photoshop to follow along with this simple tutorial.
How to Use the Lasso Tool in Photoshop (3 Versions)
There are three lasso tools to choose from, with varying degrees of capacity for selecting simple to complex objects.
Here's an overview so you will know which one will work best for the job at hand.
1. Lasso Tool
The default Lasso Tool is the simplest most basic tool of the bunch, useful for making quick uncomplicated selections in Photoshop.
Unless you have a hand as steady as a rock, you will find it near impossible to make a complex selection with one drag of your cursor.
The standard Lasso Tool is handy when you want a quick view of how an object will look on a background, without putting the extra time in to cut away all the excess background.
2. Polygonal Lasso Tool
The Polygonal Lasso Tool is useful for selecting objects which are made up of straight lines, such as a box or building.
To use the Polygonal Lasso Tool click with your mouse on the points along the edges of the object.
The Polygonal Tool will create a straight line between each point clicked on the canvas.
The Polygonal Tool is limited to creating straight lines and can not create a circular line.
Do not choose the Polygonal Lasso tool if there are curves in the selection you wish to make.
3. Magnetic Lasso Tool
The Magnetic Lasso Tool is capable of creating a complex selection.
(It's particularly useful when you need to photoshop wheels on a car!)
Not only can the Magnetic Lasso Tool create a complex selection but it will select the edges of the selection automatically as you move your cursor along the edge of the subject.
The Magnetic Lasso Tool works by creating a Lasso Path, automatically determining the edges.
This makes the Magnetic Tool the best Lasso Tool for selecting complex shapes.
Follow the steps below to create a selection using the Magnetic Lasso Tool.
Step 1 – Open
Open your image in Photoshop.
Navigate to the Top Menu bar and select File > New.
From your computer locate the image you wish to edit.
Step 2 – Select Tool
Head to the Toolbar to the left of your canvas window and select the Lasso Tool of your choice, or to use the Keyboard shortcut Press L.
![]()
If you can't find the Lasso Tool you are looking for, click on the Lasso Tool underneath the Marquee Tool and in the Tool Menu Bar you will find the three Lasso Tools displayed.
Step 3 – Set Tool's Settings
When the Lasso Tool is active a Tool Options Bar will open above your canvas window.
![]()
This is where you can set the properties of the Lasso Tool before using it.
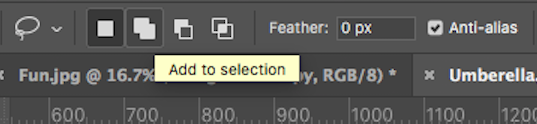
Selection
The row of four squares gives you a choice of selection options, New Selection, Add to Selection, Subtract from Selection, or Intersect with Selection.
To create a New Selection click the first Square Icon.
Feather
Feathering will refine and blend the cut edges of the selected area, leaving a translucent edge overlap between the selected area and the background it is set upon.
Feathering will remove the harsh obvious line that can occur if the selection edge contrasts the background layer.
To blend your selection's edges successfully, enter a Value in the box beside Feather.
The value number you need to enter will vary depending on the size of your image and the size of the selection.
Anti-Alias
Tick the box beside Anti-Alias and Photoshop will smooth the jagged edges that can occur between the edges of your selected area when cut.
Photoshop will soften the edge by combining colors from the selected area and the unselected area.
If you do not want smoothing, untick the Anti-Alias box.
Use the Zoom Tool while editing if you need to enlarge the area for a closer look.
Step 4 – Create a Selection
This is where each Lasso tool is unique.
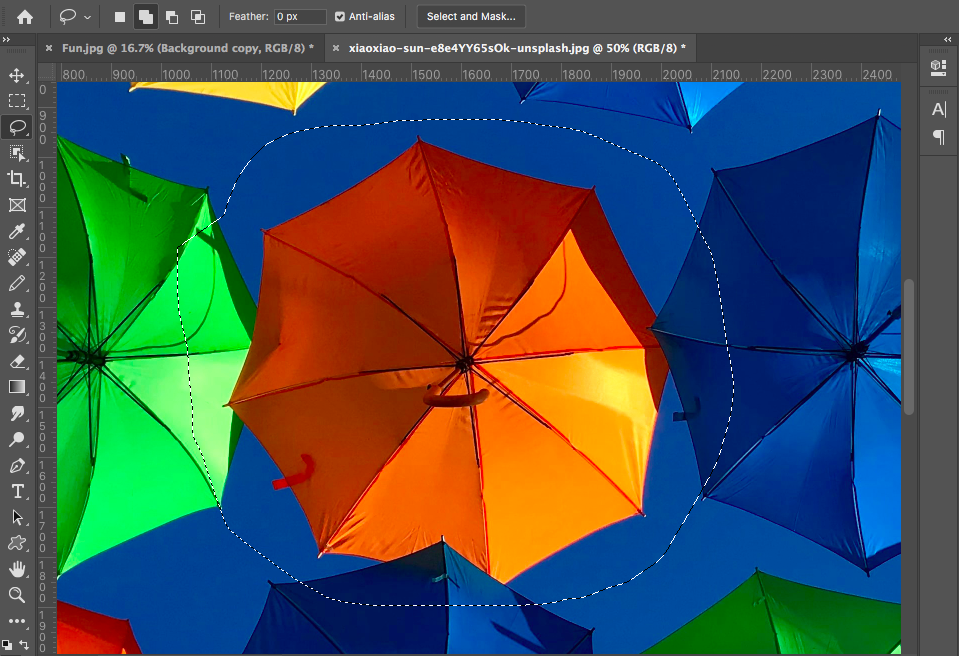
Standard Lasso Tool – Click on the image and drag your cursor around the object to create the Lasso Path.
Release the cursor when you have created the selection and your object will be surrounded by marching ants.
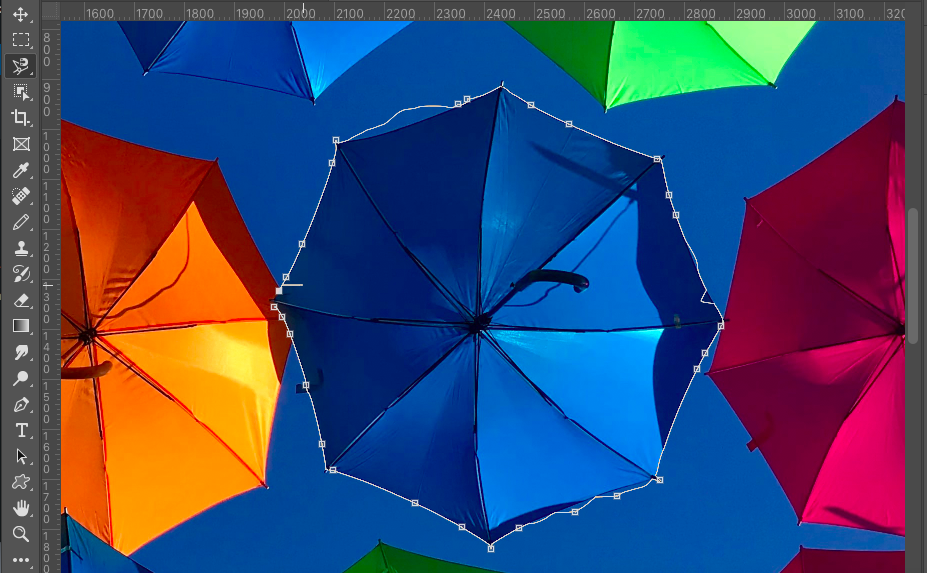
Polygonal Lasso Tool – Click on the canvas to create the first anchor point of the Lasso Path.
Release and click on another point; between each point clicked a straight line will appear.
Click near the first anchor point of the Lasso Path or Press Enter, to close the Lasso Path.

When the Lasso Path is complete, your subject will be surrounded by marching ants.
Magnetic Lasso Tool – Click near the edge of your selection area.
Release the cursor and follow the edge with your cursor, as you move the cursor the Magnetic Lasso Tool will create anchor points automatically along the edge.
When you have completed the selection area, Press Enter and the area will be surrounded by marching ants.
Learn how to fill a lasso selection you have made with a color or pattern using the Paint Bucket Tool.
How to use Lasso Tool in Photoshop to Remove Background
Now you know how to use the lasso Tool in Photoshop, why not put your skills to the test and use it to remove a background?
Here's how to follow the steps above and make a selection around the subject in the foreground of your image.
Remember: only the Magnetic Lasso Tool is capable of selecting complex shapes.
When you have selected the subject and it is surrounded by marching ants you are ready to remove the background.
Navigate to the Top Menu Bar and in the drop-down menu under Select choose Inverse.
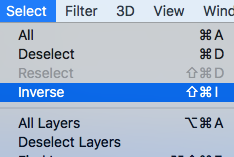
When you hit Inverse, the selection will switch from surrounding the subject in the foreground to surrounding the background layer.
Navigate to Edit in the Top Menu bar and from the drop-down menu select Cut.
The background area will be removed.
If you want to learn more useful Photoshop tricks try this tutorial – How to Make a Gif in Photoshop.
Adobe MAX Update 2024
Photoshop is the ultimate tool for photographers, graphic designers, and visual creatives looking to take complete creative control of their workflow.
The Adobe MAX Update 2024 introduces several enhancements and new features to simplify core tasks.
With the assistance of Generative AI, these tasks include the ability to remove distracting elements from an image and streamlined processes for placing 3D elements in a 2D design.
Removal Tool – The key updates include an enhanced Remove Tool to effectively remove unwanted or distracting objects from an image without deteriorating the overall composition.
Distraction Removal – The automated Distraction Removal feature identifies people, objects, and overhead wires that may distract from the image.
Generative Fill – Powered by Adobe Firefly AI, Generative Fill allows you to build a composition with photo-realistic 3D elements, including correctly placed shadows, highlights, and perspective.
Generative Expand – Photoshop’s Generative Expland allows you to resize the canvas and use Adobe Firefly Image Mode to fill in photorealistic elements.
The Adobe MAX 2024 Updates are now live, and there's never been a better time to optimize your creative output with the Adobe Creative Cloud suite of applications.

Judyth is an experienced studio photographer and glass artist. When she isn’t Photoshopping comedians into the bellies of sharks, you can find her cooking delicious treats for her guests.
👋 WELCOME TO SHOTKIT!
🔥 Popular NOW:
