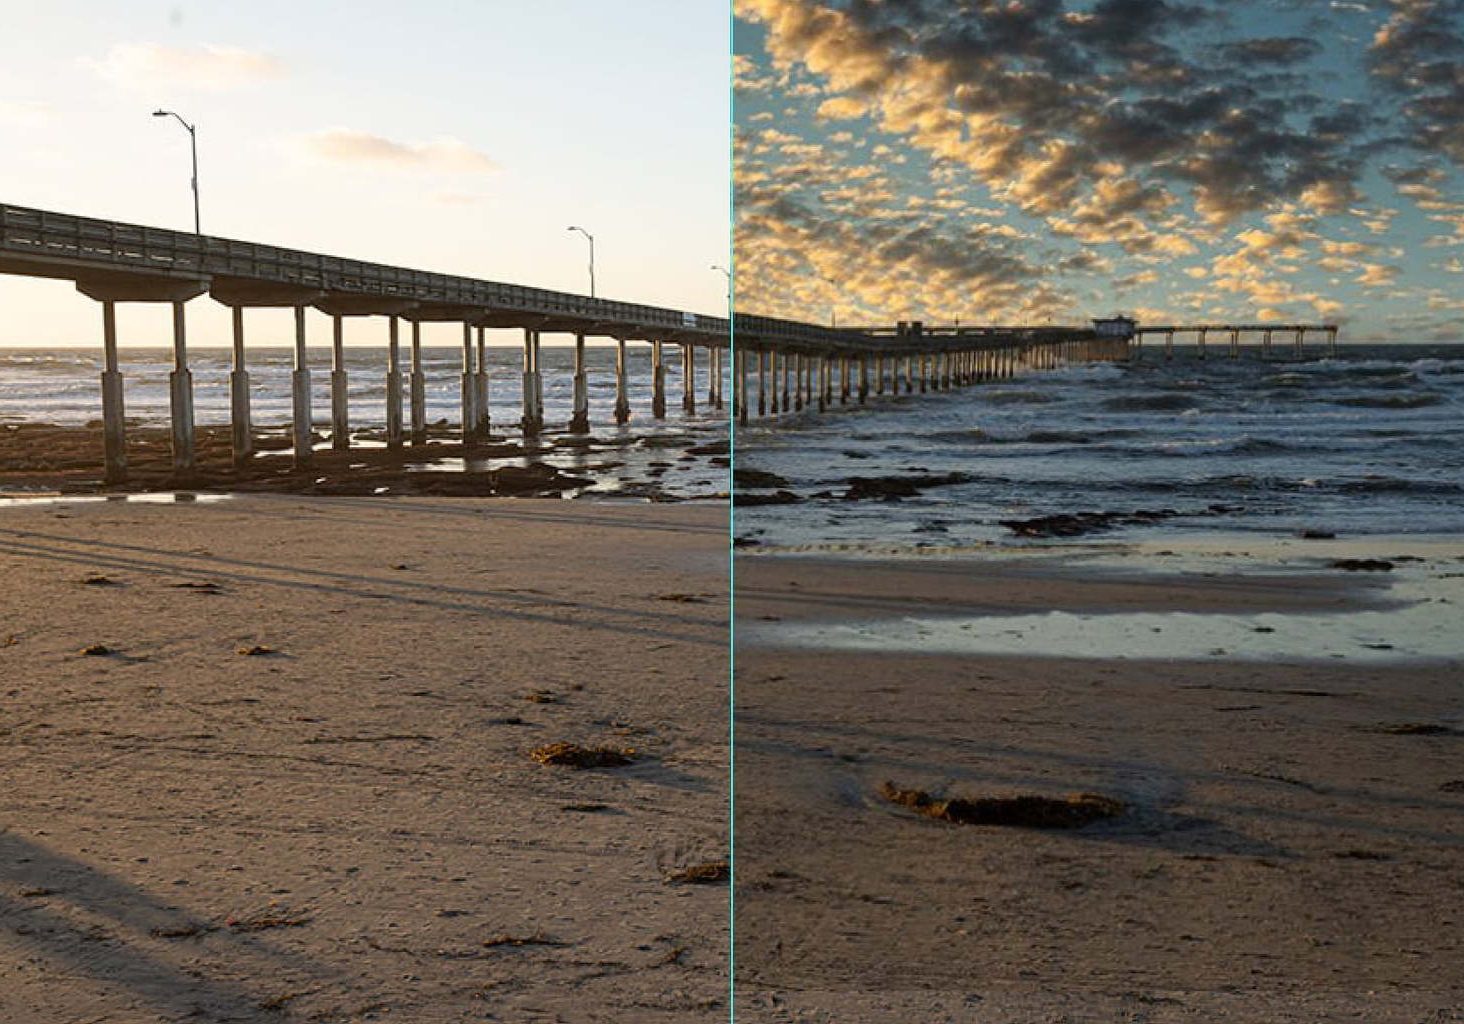
Luminar 4 Sky Replacement – How to Use AI to Change skies
Learn how to use Luminar 4 AI Sky Replacement tool to seamlessly create dramatic images! Includes tutorial plus tips and troubleshooting.
Luminar | Software | By Usnea Lebendig
It’s no exaggeration to say that Luminar 4 AI Sky Replacement is the most impressive image manipulation effect of the year.
In fact, this one tool has been a huge reason so many amateur and professional photographers around the world have invested in Luminar 4.
Sure, Luminar was already a powerful image editing software, but the AI Sky Replacement tool has made it invaluable to certain creatives.
Not only is it a jaw-dropping party trick, but being able to realistically and accurately insert a new sky to an image is a massive time saver when used purposefully.
The process itself is essentially one-click, but it’s in the fine-tuning that you can really set your images apart.
Let’s first discuss why it’s such an exciting tool, and how you can benefit from it.
Who can benefit from an AI Sky Replacement Software Tool?
There are plenty of reasons why you’d want to swap the sky out of a photo.
Perhaps the wedding image you captured was perfect… except that it was an overcast day.
Perhaps the only time you could take a photo on holiday was when the sky was blown out (too bright and cloudless).
Or maybe you’re a real estate photographer, who outsources sky replacement to an image retoucher, but now you want to save time and money by doing it yourself.
Whatever the reason, using existing photo editors to add a new sky image to your photo would take hours of frustrating editing, not to mention the skill required to do it.
Thankfully, Luminar can help with realistic sky replacement, and it’s really very simple.
(Aside from this impressive party trick, it’s also a fully-fledged image editor, with tons of artificial intelligence enhanced editing features – read more in our full review.)
How to Use the Luminar Sky Replacement Tool
Before explaining how to use the AI Sky Replacement tool, I assume you already have an up to date copy of Luminar – if not, click here to download it now.
(You can save 15% by using code SHOTKIT15 at checkout.)
When you have it installed, follow this guide to swapping your existing sky with a different sky image.
1. Choose an Image

The AI tools in Luminar 4 work well for landscape photography where a blue sky is pale or washed out.
If this is your first time using Luminar’s AI Sky Replacement, it might be easiest to start with a fairly straightforward image. For example, make sure the light is only coming from one direction and not from behind where the camera is shooting from.
Most skies that come with Luminar will either have the light coming from the background or one of the sides. An image like the one below can be hard to match a sky to because the light is coming from the front.

While this image looks like a great candidate, it can be challenging to find a sky that has light coming from the direction that matches the foreground.
For this tutorial, I’ve chosen a pretty straightforward scene from some recent beach photography I did. The light is clearly coming from the left of the frame.
2. Open AI Sky

Go to the Edit tab and then into the Creative section of Luminar 4.
Once you have an image selected and loaded into Luminar, it’s time to open the AI Sky Replacement filter.
To do this, go to the Edit tab and then into the Creative section of editing tools. From there, choose AI Sky Replacement.
3. Choose a Sky
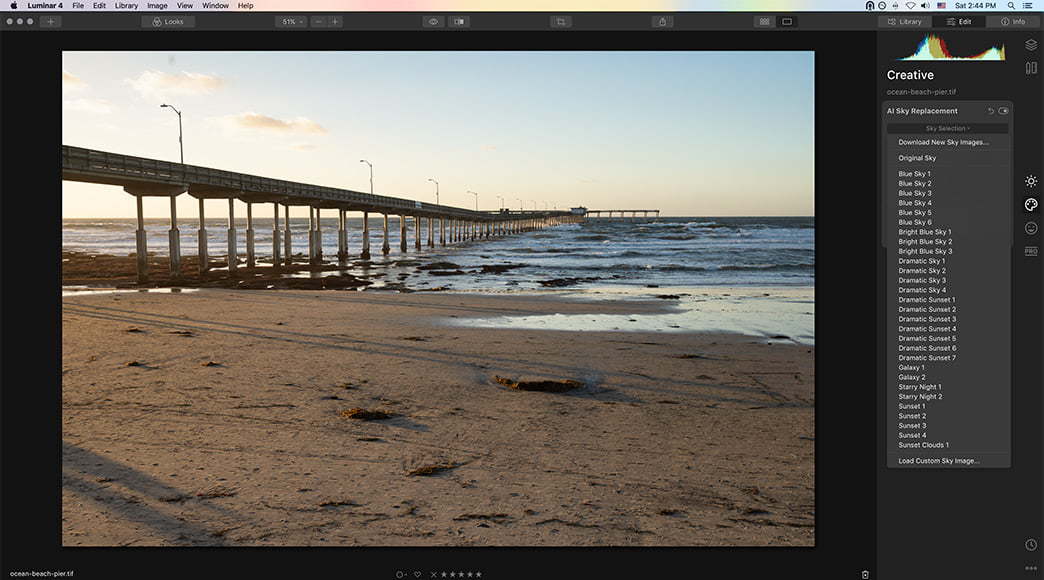
Skylum Luminar 4 comes with a range of inbuilt sky examples.
Now comes the fun part.
Luminar comes with a number of skies you can try out or you can load your own. In fact, if you end up really loving this tool, don’t be surprised if you find yourself a bit addicted to photographing skies to use with it for a while.
The caveat here is that not all skies will match the foreground of your original image. Pay special attention to the direction of the light and the quality of the colour in your foreground and try to choose a sky that will match it.
Fine Tuning the Sky Replacement
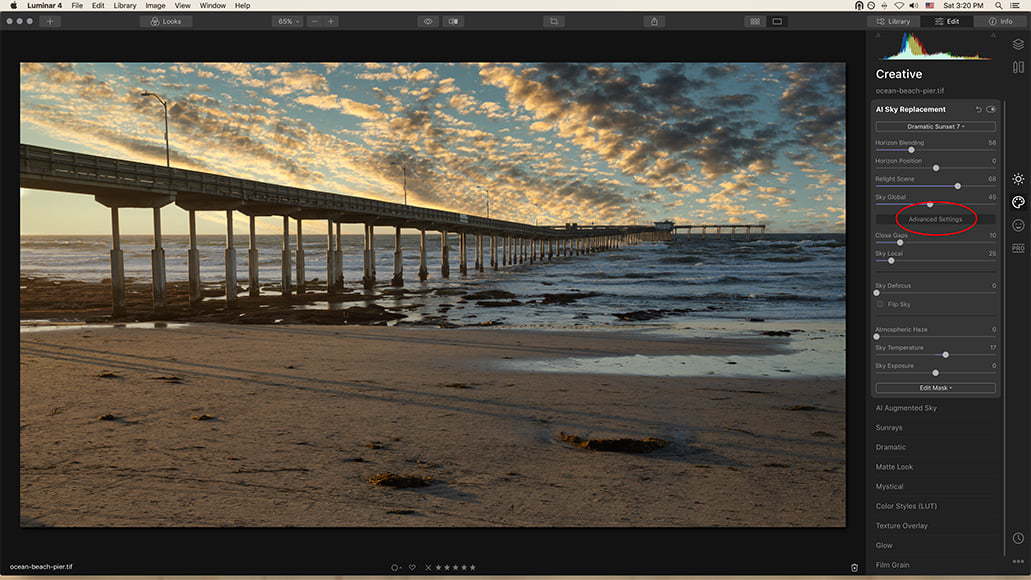
Use the Luminar advanced sky enhancer options to fine tune your results.
Once you’ve loaded your new sky image into the scene, you’re probably going to need to make some adjustments to make it look like it belongs there. Luminar 4 provides both Standard and Advanced Controls for this. Let’s take a look at what they do.
Standard Controls
- Sky Selection. As mentioned before, Luminar 4 comes with a selection of sample skies to get you started. Once you get familiar replacing skies, however, you’re probably going to want to load your own via the “Load Custom Sky Image” option. Otherwise, you run the risk of having your skies look like everyone else’s.
- Horizon Blending. This smooths the transition between the horizon line and the sky. The default value is set at 20, but pushing it up higher will often give you a more photo-realistic image.
- Horizon Position. The AI in Luminar 4 generally does a great job of aligning the new sky’s horizon with the horizon of the scene, but if you’d like to override that you can do so with this slider. (This is particularly helpful if you want to adjust the position of the sun or other elements in your new sky.)
- Relight Scene. This slider tries to match the lighting of the foreground with the lighting of the sky you introduced.
- Sky Global. An adjustment that controls how much the new sky will blend with the original sky.
Advanced Controls
- Close Gaps. This slider fixes small details where there might be holes that were not filled. This is particularly useful if your foreground has trees, architecture, or other complex foreground elements that reach into the sky.
- Sky Local. If you like the clouds in your original sky, this slider controls how much of the original clouds show through.
- Sky Defocus. If your image was taken with a shallow depth of field, it can be useful to defocus the sky a little. This will help you keep the original depth of field.
- Flip Sky. This option will flip the new sky texture to change the direction of the image. This option is useful when the photo has shadows in the scene that you are trying to match.
- Atmospheric Haze. Use this slider to add a soft haze to the sky. Haze is useful to match the sky to the original photo, especially if there is moisture in the sky or environmental pollutants.
- Sky Temperature. This slider warms or cools the new sky. What’s cool about this is that it relights your whole scene as you adjust the sky so that your foreground will match the background.
- Sky Exposure. If your sky is looking too bright or too dark, use this slider to change the exposure.
AI Sky Replacement Tips & Troubleshooting
While Luminar 4’s AI sky replacement is quite amazing, it’s still just AI, and that means it’s making some smart guesses – guesses that work well most of the time. Still, it’s far from perfect.
That’s where these tips come in:
- Make sure your replacement sky matches your scene. Pay special attention to the direction the light is coming from, the colour tones, the saturation, etc.
- Build your own replacement sky library. Not only will you soon crave a bit of variety, but using your own skies ensures that your image is truly uniquely your own. Also, once you build a library of skies it’ll be easier to find ones that match your style. You can also buy extra sky options from Skylum’s marketplace.
- Try using a Luminar Look with your image. Adding an adjustment layer and then applying a Look can sometimes be the difference between the new sky not quite working and it really coming together.
- Add a vignette. If you’re adding a dark sky to a bright foreground, it can be a bit challenging to balance the brightness. If you apply a vignette, the edge-darkening effect can help bring everything together in your photo.
- Blend with a gradient Normally skies are lighter near the horizon. If your replacement sky doesn’t have that, use the Edit Mask option to add a gradient mask. Use it to help the replacement sky blend more gradually.
- Why are the Sky Replacement sliders greyed out? – Perhaps skies aren’t visible enough in your image, or you’re trying to add the effect to an adjustment layer instead of the original image.
- Trying to reflect the sky in the water? You’ll have to use Luminar for that.
- Don’t be afraid to use more than one editing program. If you can’t get things perfect with Luminar, it’s ok to use Photoshop or any other editing program you think will work.
Final Words
One of the things that Luminar does best is making complex post-processing techniques super easy to do. It certainly hit the ball out of the park with the AI Sky Replacement tool.
It definitely adds a whole new dimension to landscape photography.
Just be aware: if you’re intending to enter photography contests with images that you’ve replaced the sky in, read the rules carefully. Sky replacement turns your photo into a composite image and that will often fall into the realm of digital art in most contests, not photography.
Still, it’s an amazingly fun tool and can transform a mediocre photo into something truly stunning.
What do you think? How does this amazing tool work for you? Have any other tips or tricks to share?








Are the sky replacements royalty free. If they are printed in a illustrated book. The image is mine 70% and the sky replacement from Luminar is 30% (Sky is altered and stretched.) Do I owe royalties if I sell this book with your sky?
What is the best format for replacement skies. I would like to use my own!
Hey Eric, I’d say the bigger the image the better! This will reduce pixellation.
Hi, why does my sky replacement look pixelated when i zoom in a little.
thanks
Perhaps the original photo lacked resolution, Dan. Can you try one that’s bigger?