


How to Take Photos During Golden Hour (+ Editing Tips)
Learn how to make the most of the photographer's secret weapon - Golden Hour! Discover 15 shooting and editing tips for getting the most out of every image.
Learn | Photography Guides | By Greg Cromie
Shotkit may earn a commission on affiliate links. Learn more.
Whether you're a seasoned photographer or just starting your journey, I'm sure you've heard about the magic of the golden hour.
This time of day is well-liked among photographers because it provides soft, warm, directional light that's flattering for most subjects.
What time is golden hour for photos? Well, it depends on when and where you are. What I can tell you is that it happens twice a day – the first hour before sunrise and the last hour of light before sunset.
You'll also need to consider the weather, because you might not get this beautiful atmosphere on an overcast day.
Golden hour photography is not difficult, but you do need to consider a few details.
In this article, you'll find out why it's the best time of day to take photos outdoors, but also how to use it for indoor shoots.
You'll also learn some tricks for mastering lighting and camera settings, editing tips, and more.
So let's dive right in!
How Do You Take Golden Hour Photos?
Whether you're interested in portrait or landscape photos, I'm sure you've seen plenty of advice telling you to shoot during the golden hour for all your outdoor photography.
In light of that advice (pun intended), you're probably wondering how to take photos during the golden hour. The truth is that photographing during the golden hour isn't that different from shooting at any other time.
What changes is the quality of light, which will be soft and warm – unlike the light you'll find the rest of the day.
Having said this, I'll give you the best tips I've learned in my years as a photographer to help you make the most out of this magic hour and its lighting conditions.
1. Best Camera Settings For Golden Hour Photos

Credit: Dogukan Benli
While a photographer doesn't need any special camera to shoot during the golden hour, many of you might still be at a point where you're deciding which camera to buy.
When choosing your gear, you shouldn't focus on which camera is best for the golden hour, but on what you're trying to photograph. Photographing wildlife animals requires different settings and features than portraits or landscapes.
Instead, a good starting point in capturing the golden hour is to learn the Exposure Triangle. It's a photography term describing how to control the ‘stops' of light to expose a photo correctly.
It's called the Exposure Triangle because it's formed of three elements that need to work together: Shutter Speed, ISO, and Aperture.
- Shutter Speed
First on the list of golden-hour camera settings is the shutter speed. This setting controls how long the light is exposed to the camera sensor. Most modern cameras have a shutter speed range of 1/4000 of a second to 30 seconds.
You can extend the shutter speed using the Bulb mode, or you can get a camera with a faster shooting speed, up to 1/32000. However, these cameras will have a higher price tag.
To shoot moving subjects, you'd need a relatively fast shutter speed of around 1/500. However, faster subjects, such as certain wildlife, may require a minimum shutter speed of 1/4000.
When shooting a landscape during golden hour, there's little chance of objects moving in your composition. In this case, you don't need to worry so much about the fastest setting.
For landscapes, a slower shutter speed, such as 1/30 or 1/60, gives the sensor time to capture the incoming light. However, to use a slow shutter speed, you'll need a tripod to prevent camera shake.
Whichever shutter speed you choose, you'll need to compensate with ISO and aperture to achieve the correct exposure.
- Aperture
Aperture is another important element of the Exposure Triangle. It controls how much light passes through the lens before hitting the sensor.
You'll find the aperture marked with ‘f-stops' – each f-number doubles or cuts in half the amount of light passing to the sensor. Most cameras offer half-stops or even thirds to give you more control.
The easiest way to understand f-stops is by knowing how the aperture works. Inside the lens, rotating metal blades open and close as you turn the aperture dial, making the circular hole wider and narrower.
Each lens has a maximum aperture at which the hole inside the lens opens to its widest – indicated by the lowest number on the aperture ring.
A wide aperture is f/1.4 or f/2 and serves two purposes: letting in more light and creating a shallow depth of field (the foreground is in focus, and the background is blurry)
A narrow or minimum aperture has the largest f-stop on the aperture ring, and the opening is at its smallest. It's represented by f/16 or f/22 and restricts the amount of light passing through the lens. Plus, it ensures that everything the lens sees is in focus.
For golden hour landscapes, it's best to find the sweet spot of your lens. This is usually between f/8 and f/11. Compensate with the ISO and shutter speed to achieve the correct exposure.
Taking portraits during golden hour is also a popular choice because it creates golden skin tones. Unlike landscapes, portraits benefit from a wide aperture, so your model is in focus while the background is blurry.
Remember – a wide aperture has a small f-number and a narrow aperture has a large f-number.
- ISO
ISO controls how the camera sensor handles incoming light. ISO values range from a low setting (usually 100) to their highest, around 12,800; some cameras reach 102,400.
ISO 100 is best for bright situations where there's enough light for the sensor to read the scene. High ISO values like 3200 or 6400 are suitable for conditions such as shooting at night or in a dark room.
For golden hour photos, keep your ISO at 100 to maintain the highest image quality and compensate with the aperture and shutter speed. Only raise the ISO if you need a fast shutter speed for moving subjects or a small aperture for depth of field.
- Bringing It All Together
The best settings for golden hour photography depend on what you're photographing and the real-time lighting conditions. However, take these as a starting point:
- For golden-hour landscape photography, set ISO to 100, a narrow aperture like f/11, and a shutter speed as slow as necessary, perhaps 1/30 or 1/60.
- For golden hour portrait photography, use ISO 100, a wide aperture like f/2, and a shutter speed of 1/250 – 1/500 to prevent overexposure.
2. Use Smartphone Apps To Predict Golden Hour
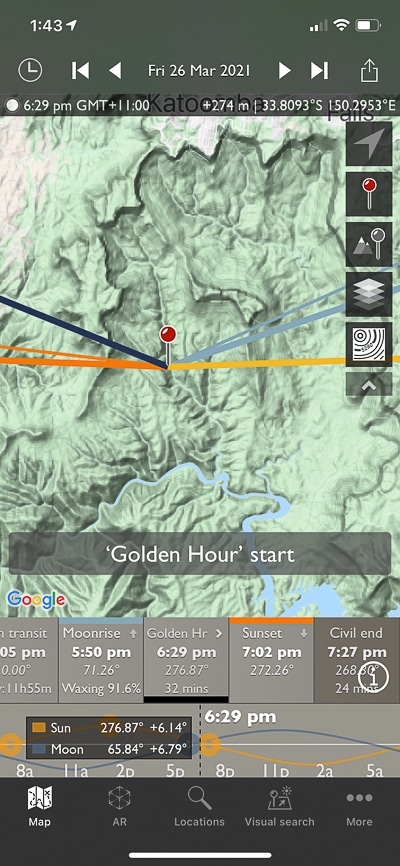
The golden hour happens twice a day, but the exact time depends on where you are and the time of the year.
To be sure, you can use smartphone apps to predict and plan for golden hour. PhotoPills and The Photographer's Ephemeris (TPE) are the most popular.
I prefer TPE, which combines your phone's compass, Google Maps and scientific tables (ephemeris) of celestial events.
This golden-hour time app uses Google Maps and overlays coloured lines to indicate sunrise and sunset, as well as moonrise and moonset.
Plus, it provides accurate predictions for any future date, time and location. Using TPE is also a great way to access star charts, the length of the shadow, and when to expect the next supermoon. It features Augmented Reality to view the scene via your camera with information overlays showing celestial activity.
See our review of The Photographer's Ephemeris app here.
3. Fake It Until You Make It

If you're not able to be on location during the golden hour, you can fake it – but how do you fake golden hour lighting?
There are ways to mimic the golden-hour look with camera features, accessories, and software. Here's a list of popular ways to fake golden hour images:
- Some camera or photo-editing apps let you apply filters to change the image's look, including golden-hour lighting effects.
- White balance (WB) controls on cameras change the color palette of the photo. Adjust the WB white balance to make the photo cooler (shifting WB to blue) or warmer (shifting WB to yellow) for that gorgeous golden-hour colour.
- Adjust WB in editing software such as Lightroom or Photoshop.
- Apply filters in desktop editing software to add a golden hour look.
- Luminar Neo (photo editing software) features a Golden Hour filter with AI to add a warm, soft glow.
- Apply a CTO gel or filter to the front of your lens. You can choose different strengths to achieve a subtle, partial or full warming effect.
4. Bounce The Light With A Gold Reflector

You can use reflectors to bounce light back to your subject. You can buy these accessories in different sizes, and they often have reflective material on each side – silver on one side for cooler and gold on the other for warmer.
There are ways to DIY reflectors by using cardboard and metallic papers you can get at any stationery or craft store. Whether it's store-bought or made by you, the trick here is to find the right angle.
5. Experiment with Lens Flare
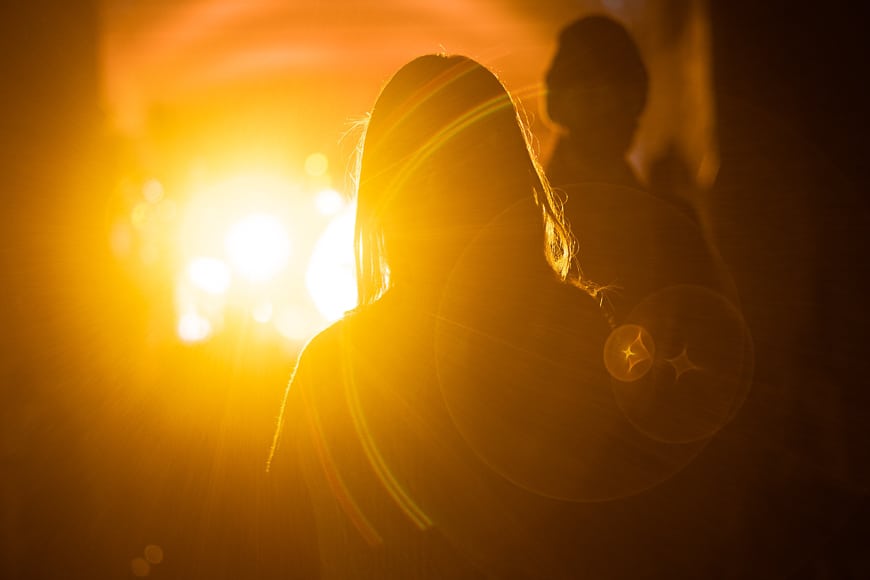
Lens flare occurs when the sun hits the lens at specific angles, scattering light across your photos. When you use it intentionally, you can create appealing looks.
During golden hour, the sun sits low in the sky, making lens flares easy to create. Look through the viewfinder towards the sun to create flare effects.
With your subject partially blocking the sun, you'll achieve flares like beams streaming from the tip of the subject's silhouette.
Pro tip: Older lenses tend to produce more exaggerated lens flare since they lack specific coatings designed to reduce it.
6. Should You Use Filters During Golden Hour?

Lens filters aren't a must for golden hour photography.
However, a Neutral Density (ND) filter can help if it's too bright, or a gradual ND filter if there's too much contrast between the sky and the subject or foreground.
An ND filter allows for even slower shutter speeds with a wide aperture to achieve correct exposure – best used in landscape photography.
7. Use Golden Hour For Portraits

Credit: Galina Kolonitskaia
The golden hour is ideal for portrait photography – it delivers excellent definition in skin tones.
Position your model with the sun behind them or to the side so they don't squint. If this causes the face to be in shadow, adjust your camera settings and the Exposure Triangle to expose for the face rather than the background.
Alternatively, use a reflector to bounce the twilight sun's glow onto the face or use a fill flash to push back facial shadows.
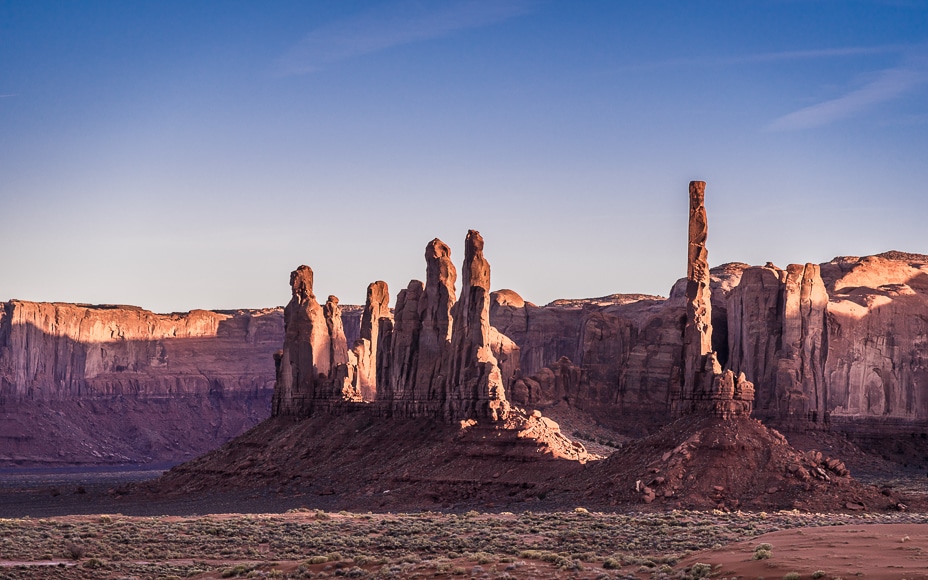
8. Capture Stunning Landscapes With Golden Light

Credit: Tom Fisk
Photographing landscapes around twilight yields stunning photos with a warm, golden glow across the scene, bringing any landscape to life.
Position yourself so the sun rises or sets behind you, so the landscape in front of you is perfectly lit. Or have the sun face you and control exposure correctly.
Use light planning apps to discover the right time to photograph your desired landscape. Make sure you arrive in advance so you have time to set up.
During the summertime, in particular, the sky will be full of spectacular colours around sunset, so use them to your advantage.
9. Use Shadows For Dramatic Scenes

Credit: Tato Villanova
Since the sun is low during the golden hour, it creates nice contrast and long shadows. If you use those characteristics creatively, you can achieve amazing compositions.
Remember to avoid essential details of your composition falling into dark shadows.
10. Use Golden Side Lighting
A good way to use golden-hour lighting is to position yourself with the sun on your side.
This will create more shadows than having it in the back, but it will be less challenging than having the sun right in front.
If you have an interesting foreground element, you can still play with the shadows in the composition as suggested in the previous point.
Use it to photograph a range of subjects, including portraits with half the face in half-lit golden light. Or photograph a large rock formation in the desert with the light falling to one side, while the other side falls into darkness.
11. Backlighting and Rim Lighting For Perfect Silhouettes

Credit: Mohammad Husaini
A silhouette features a foreground subject in a dark shadow cast by a bright light directly behind it.
It's a popular cinematic effect often created with artificial lighting. But you can also take advantage of the golden hour's low position to achieve it naturally.
Fur, hair and other elements help you create a beautiful rim around the subject, which is why this is ideal for portraits and pet photography.
12. Starbursts At Golden Hour

Credit: Johannes Plenio
Starbursts occur when an object partially blocks the rising or setting sun as seen by the camera. It doesn't matter if it's a person, a tree, or a large boulder on a hill.
While looking through the viewfinder, move the camera slightly until a tiny edge of the sun peeks from behind the subject.
When this occurs, you'll see the sunlight burst into a star pattern, with points of light radiating outward across the entire scene.
13. Timing is Everything

Credit: Asad Photo Maldives
In golden hour photography, timing is everything – the color palette changes within minutes.
That's why I can't emphasize enough the importance of using an app like The Photographer's Ephemeris to plan your photoshoot.
You don't want to arrive when the golden hour is starting. Arrive there with enough time to scout the location and find the best angle for your composition.
If you're shooting at the morning golden hour, this also gives you an advantage to set up with fewer people around (if you're at a popular location).
This advice is also key when taking photos at a beach because many people go there to chill at the end of the day. Better aim for the morning.
14. Stick Around For More

Credit: Grafixart Photo
While golden hour photos are great, you can also get some amazing shots during the blue hour, all in the same session.
If you're out in the morning, the blue hour happens before the golden hour. So, arrive there early, as it's anyway advisable, and take advantage of this light.
On the other hand, the one in the afternoon only requires you to stick around a bit longer so you can capture your location in an entirely different mood.
So, next time you're out, make use of both sunrise and sunset.
15. Shoot Golden Hour Indoors

Credit: Thought Catalog
The definition of golden hour photography suggests it's an outdoor thing, but it's great for shooting indoors too.
Using the golden hour for indoor portraits or food photography is an excellent way to take advantage of natural window light in your pictures.
Using this sunlight for indoor work also casts deep shadows and shafts of light, making for a dramatic scene. If you prefer softer shadows, you can use a gold reflector.
Remember to use spot metering (or a light meter if you own one) to get an accurate reading of the scene to correctly expose your subject.
How Do You Edit Golden Hour Photos?
Ideally, you should shoot your golden hour photography in RAW; this way, you can get the most details out of it with editing software.
Here's how to enhance the beautiful golden sunlight in two popular software apps:
Editing Golden Hour Photography in Luminar Neo

Luminar Neo makes adding or enhancing golden hour light incredibly easy. Here's how to do it:
- Select your image
- Click Edit in the top menu
- Click the Landscape menu
- Adjust the ‘Golden Hour' slider to your tastes.
You can also use the Color Transfer tool, where you can use a golden hour photo as a reference and transfer the color palette into your new photo.
An additional benefit of Luminar Neo is that you can also completely replace the sky in your scene and have the lighting reflect the changes.
Editing Golden Hour Photography in Lightroom

Adobe Lightroom Classic or Mobile, also allows you to edit your golden hour pictures, but it involves a more hands-on approach.
Here's the general process:
- Adjust the exposure and contrast of your image
- Raise the temperature by adjusting the white balance
- Adjust the tone curve to add some contrast
- Adjust the colour grading to add some warmth to highlights and shadows
- Optional – use the HSL adjustment to enhance any golden colours
Don't be afraid to experiment until you nail down this technique. Check out these Lightroom tutorials for some more editing tips.
Golden Hour Photography FAQs
What time is golden hour for selfies?
You can take golden hour selfies twice a day – approximately one hour after sunrise and one hour before sunset.
What causes golden hour?
The low angle of the sun during the golden hour causes its rays to travel through more of the atmosphere, which filters out blue tones. Then other factors, such as dust, pollution, and humidity, can amplify the effect.
Why do photographers like golden hour?
Photographers like the warm, soft light of the golden hour because it makes landscapes, cityscapes, and skin tones pop.
What is blue hour photography?
Contrary to golden hour photos, blue hour photography is characterized by cool tones. Blue hour also happens twice a day – one hour before sunrise and one hour after sunset. The blue hour is also known as twilight.
How do you tell if there will be a good sunset?
If the day has been clear and there are no heavy clouds in the sky, chances are you'll get a good sunset.
A great sunset needs scattering clouds that are higher than the horizon line – as the sun sets, these illuminate in oranges and pinks. A brilliant sunset occurs when unique cloud patterns streak across the sky as the sun sets.
Final Words
To sum up, to take golden hour photos, plan your photoshoot for the first hour after sunrise or the hour before sunset. It's best to use weather apps to understand the weather and photo apps like The Photographer's Ephemeris to know the exact time.
You don't need special gear or filters; you just need to master the exposure triangle to solve the lighting challenges you might face. Sometimes, however, a gold reflector or an ND filter can be helpful.
Golden hour pictures benefit all sorts of subjects. What's most important is choosing where to position them relative to the sun, as this can drastically change the lighting.
Once you have your images, use photo editing software to enhance the beautiful golden hour colors. Luminar Neo lets you do this with simple slider controls. Others, like Lightroom, give you more control, but you need some photo-editing training to make the most of them.
Most of all, to take good golden hour photos, you need to go out, experiment, and have fun!

Check out these 8 essential tools to help you succeed as a professional photographer.
Includes limited-time discounts.

I’m a Melbourne-based street photographer and blogger. I love to travel to Japan to photograph and document its dynamic people and culture.
1 Comment
Leave a Comment
👋 WELCOME TO SHOTKIT!
🔥 Popular NOW:

Hi and thanks for checking out my guide to Golden Hour photography. If you have any comments or questions, please leave them here and I will get back to you. Cheers. G