


How to Master Auto ISO on All Cameras
Unlock the secrets of Auto ISO across all camera models, enhancing your photography by understanding its nuances and optimizing exposure effortlessly.
Learn | By Judyth Satyn
Shotkit may earn a commission on affiliate links. Learn more.
This guide will teach you everything there is to know about Auto ISO in photography.
Many photographers shoot in full manual mode before they realise the benefits of auto ISO.
Once I discovered Auto ISO, I never went back. When Auto ISO, there is no fumbling with controls and no bad exposures.
Read on to learn how to use Auto ISO, what it is, and how your photography can benefit.
What is Auto ISO?
Auto ISO is a camera setting that adjusts the ISO automatically for the photographer to achieve the correct exposure.
Digital cameras have an internal light sensor to calculate the necessary ISO.
ISO is calculated using light conditions, shutter speed and aperture setting – read our guide to understanding ISO.
The camera automatically adjusts the ISO to ensure the image is neither under or over-exposed.
Auto ISO will be increased in low light conditions to make the camera sensor more sensitive to light.
In low light conditions, ISO will be decreased. This makes the camera sensor less sensitive to light.
When the camera is set to Auto ISO, other settings, such as shutter speed and aperture, can be manual.
Thus, the photographer can choose their preference of shutter speed and aperture settings.
Auto ISO is only possible on digital cameras. The ISO of analogue SLR cameras is determined by the ISO of the film used.
The difference between manual ISO and Auto ISO settings.
The photographer must calculate the ISO for each exposure when using Manual ISO.
This means ISO will remain the same for each snap unless manually changed.
This gives the photographer complete control over the ISO rate.
Manual ISO is a useful setting to use when the ISO sensitivity is important to the final piece.
What are the benefits of using Auto ISO?
Speed of Use
Auto ISO is convenient, especially when you don't have time to check camera settings.
In some situations, you won’t have a chance to change ISO before the subject has vanished.
Photographing sports events, photojournalism, and action shots requires fast response rates.
The photographer could struggle to change ISO, shutter speed and aperture settings.
I have found auto ISO convenient when taking shots on travels.
It thinks and acts quicker than I could when the light changes suddenly.
A little bit of high ISO noise can be tolerated when you snap an incredible wildlife photo.
Changing Light
An automatic ISO will give you a faster response rate to changing light conditions.
Light levels change rapidly when shooting during the “golden hours”, twilight or dawn.
The light on a cloudy day can also rapidly change, adversely affecting the image’s exposure.
When set to Auto ISO, the camera will change the ISO quickly to accommodate light changes.
It allows photographers to concentrate on other factors, like shutter speed and composition.
Priorities: Aperture and Shutter Speed
Automatic ISO is priceless when you wish to maintain a desired shutter speed or aperture.
When using shutter priority, ISO sensitivity is adjusted as the light conditions change.
An automatic ISO keeps the exposure consistent without changing the shutter speed.
A similar thing happens when using aperture priority, with the ISO fluctuating automatically based on your camera's exposure meter.
Does the thinking for You
If you are new to Photography, auto ISO will help counterbalance some difficulties.
Photograpy is less intimidating when auto ISO is balancing exposures.
You will be free to experiment with camera settings, while ISO will ensure proper exposure.
Learners will be less overwhelmed knowing the shots will be correctly exposed.
Reduces the Risk of Camera Shake and Motion Blur
I set a minimum shutter speed when shooting moving subjects to reduce camera shake and blur.
The Auto ISO will change to allow for more light rather than decrease the shutter speed.
This reduces the likelihood that my photos will have camera shake or motion blur.
What are the Potential Drawbacks of Using Auto ISO?
Noise and Grain
Auto ISO compensates for an under-exposed image by increasing the ISO value.
The drawback is as ISO increases, there will be an unavoidable increase in noise and grain.
Less Control
Less control will always be an issue when using any auto setting.
You will have limited control over the choice of ISO. This can lead to unpredictable results in certain situations.
Relax Too Much
There is such a thing as over-relaxing, sad to say.
If you don’t check the camera’s choice of ISO, you could find it is not on track with your creative vision.
One drawback is when the ISO sensitivity becomes too high without you realising it. This will result in grainy images.
The other problem is relying on auto mode without noticing it has maxed out.
This can happen when it’s a bright day, and the auto ISO reaches 100 and has nowhere left to go.
You keep shooting, unaware that all your photos are being overexposed.
Exposure Compensation
The camera can sometimes choose the wrong exposure when auto ISO and manual modes are used in tandem.
A solution for this is to use exposure compensation. This will override the camera's exposure settings.
Backing Up a Bit with the Basics of ISO
WClarke and Samsara, CC BY-SA 4.0, via Wikimedia Common
1. Basics of ISO
ISO is one of the three camera elements used to control exposure.
The other two settings are f-stop (aperture) and shutter speed (exposure).
When cameras were first invented, ISO rated the roll of film's sensitivity to light.
Photographers had to plan ahead and buy a roll of film with the correct ISO rating.
ISO 200 is used for shooting in bright light, and ISO 800 is used for photographing in low light.
ISO stands for International Standards Organisation. Which is the international standard for a film's sensitivity to light.
Today, ISO also rates the value of the light sensitivity of a camera’s digital sensor.
Traditionally, film ISO ranged from 200 to 1600. Today, ISO can vary from 50 to 3 million depending on the camera model.
The lower the ISO rating, the less light the camera sensor can capture.
The higher the ISO rating, the more light a camera sensor will capture.
ISO values have an impact on the final image quality.
There are trade-offs when photographing in dark conditions using a high ISO rating.
The higher the ISO, the more noise and grain will creep into the image.
Low ISO values produce the best quality images with little to no noise.
Photographers strive for a balance between the light captured and image quality.
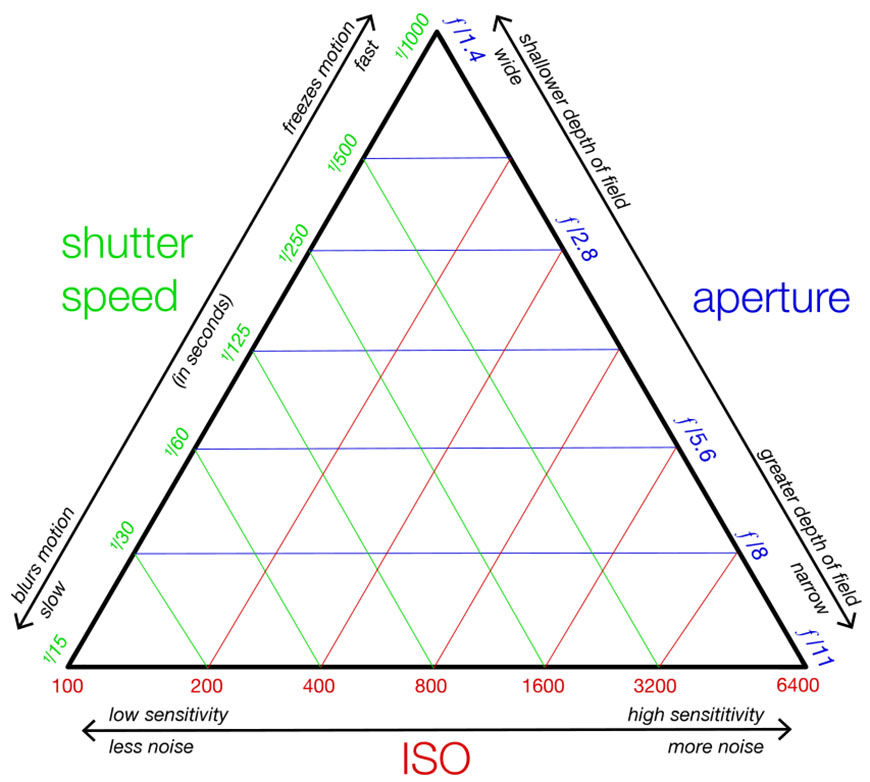
2. ISO and its Relationship with Shutter Speed and Aperture
The exposure triangle: ISO, aperture and shutter speed.
ISO interacts with the aperture and shutter speed to balance the exposure.
ISO
The ISO is the sensor or film's receptivity to light.
The higher the ISO, the more sensitive the sensor or film is to light. It is used to collect more light from a dimly lit scene.
The lower the ISO rating, the less sensitive the sensor or film is to light. A low ISO is ideally used in brightly lit locations.
Shutter Speed (Exposure Time)
Shutter speed is the length of time the film or sensor is exposed to light. It is set to determine how long the shutter is open.
A fast shutter speed is around 1/250th of a second and upwards. A faster shutter speed is ideal for action photography.
When using a fast shutter speed, less light will enter the camera. This can lead to under-exposed images.
Use a higher ISO and the camera's light sensitivity will be increased to compensate for the lack of light.
A slow shutter speed ranges from 1/50th of a second to anything over one second.
A slower shutter speed is used for astrophotography, landscape photography and creative photography.
The longer the shutter is open, the more light will enter the camera, which can lead to overexpose.
A low ISO value will compensate for a long shutter speed.
Aperture (F/Stop)
The aperture is the size of the opening through which the light enters the camera's sensor.
As you can see in the image below, the aperture comprises thin blades that move in or outwards.
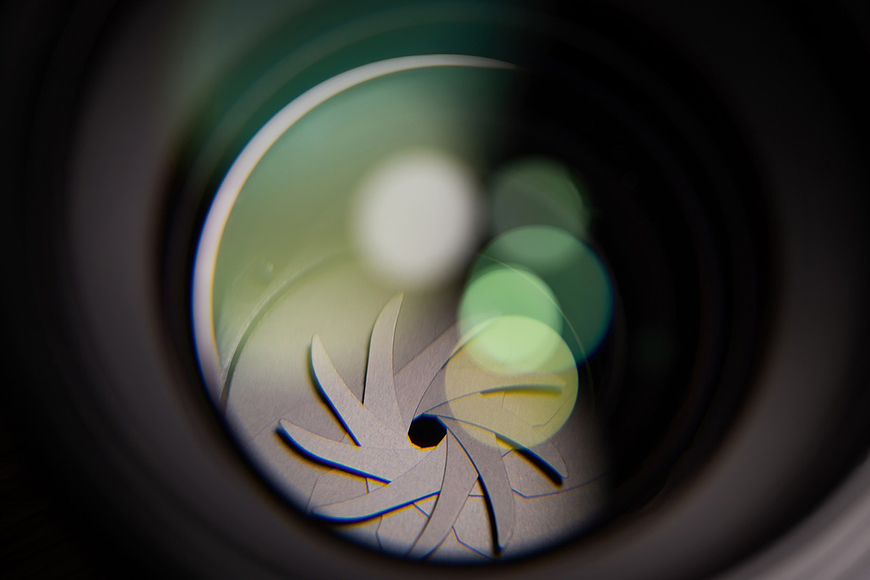
Altering the aperture increases or decreases the amount of light entering the camera.
The aperture affects the photo's depth of field. A wide aperture such as f/stop 1.8 results in a shallow depth of field.
A narrow aperture such as f/stop 22 will give a deep depth of field, but less light will enter the exposure.
Auto ISO will compensate for over or under-exposures caused by the aperture setting.
How to Set up Auto ISO on Different Camera Brands
Setting the ISO is similar for each brand. Here’s how to do it.
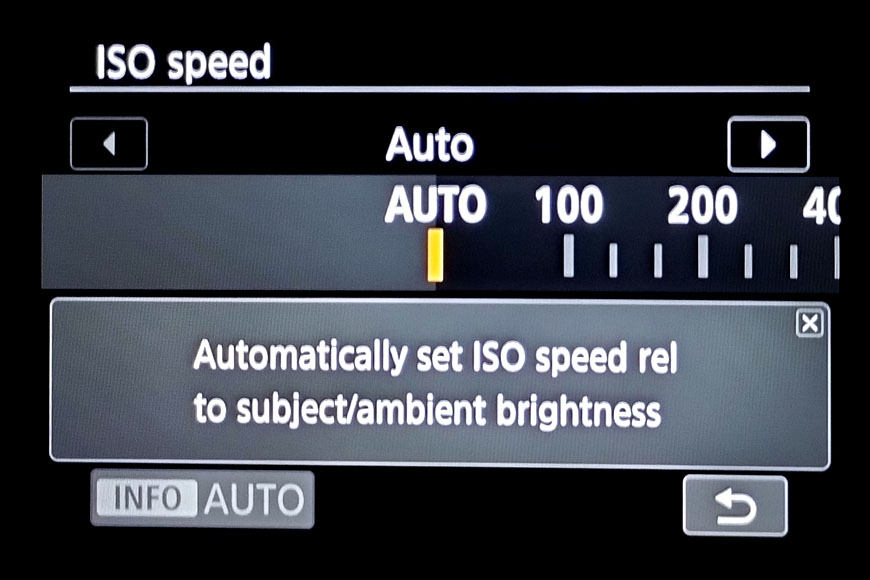
Auto ISO on Canon cameras
Step 1. Turn on the Canon camera, then press the “menu” button.
Step 2. Use the navigation button to locate the “ISO’ or “ISO speed setting” option.
Step 3. Press the ‘ISO’ button to enter the ISO camera preferences.
Step 4. Click “Auto ISO”. Depending on the camera, you might have the option to set the minimum and maximum ISO values.
Step 5. Ensure Auto ISO is activated and exit the menu.
Auto ISO on Nikon cameras
Step 1. Turn on the Nikon camera and press the “menu” button.
Step 2. Use the navigation key to find “ISO sensitivity settings” or “ISO speed setting”.
Step 3. You will find the “Auto ISO” option within the ISO settings.
Step 4. If your Nixon model has the opportunity, you can adjust the minimum and maximum ISO settings.
Step 5. Exit the menu.
Auto ISO on Sony cameras
Step 1. Turn on the Sony camera and press the “menu” button.
Step 2. Use the navigation key to locate the “ISO ” or “ISO auto”.
Step 3. You will find the “Auto ISO” option within the ISO settings.
Step 4. Adjust the minimum and maximum ISO settings if the camera model permits.
Step 5. Exit the menu.
Image: Math
Auto ISO on Fujifilm cameras
If you’re using a Fujifilm camera, enabling Auto ISO involves a few steps. First up, start by prepping your camera to ensure it’s set up to best use the feature.
To do that, you need to turn the ISO dial to A. It’s also a good idea to lock the dial by pushing the button that’s in the center.
Once that’s done, go into the menu and find the Button Dial Settings tab. Navigate the options until you find ISO Dial Setting (A).
Next, ensure that you set this option to Auto.
After that, go back to the main menu and locate the ISO Auto Settings tab. There, you’ll find three presets that you can customize to your preferences: Auto1, Auto2, Auto3.
With each one, you can adjust three parameters. These include:
- Default sensitivity
- Maximum sensitivity
- Minimum shutter speed
Using Auto ISO With Flash
You can use Auto ISO when shooting with a flash, but there are a few considerations you need to make.
For starters, your camera will ignore the minimum shutter speed parameter. Instead, it’ll rely on the flash sync speed.
This applies to both built-in pop-up flashes on your camera and an accessory Speedlight.
Although, in some cases, the speed will be incredibly low. That’ll result in overexposed images.
The only way to overcome this issue is to use the Slow Sync Flash option on your camera. This will allow you to use the minimum shutter speed you chose in the Auto ISO menu.
Remember to Set the Parameters of Auto ISO
Set the parameter of Auto ISO for more control over the exposure and quality of your photos.
Here are a few auto ISO configurations for you to consider:
Minimum and maximum ISO values – This configuration allows you to set a limit for ISO sensitivity.
A low ISO will ensure high image quality.
Avoid high ISO values, which will result in excessive noise.
Minimum shutter speed – This setting specifies a minimum shutter speed at which auto ISO can adjust.
When below the minimum shutter speed, the ISO will adjust to achieve the correct exposure.
Use this setting to help prevent motion blur in your photos.
ISO range – This setting allows you to specify a set range in which the Auto ISO can operate.
This will ensure that the ISO level doesn’t go higher or lower than the defined range.
Exposure Compensation – Each camera has an exposure setting.
Exposure compensation allows you to override the camera’s exposure setting.
This will enable you to set a preference for a higher or lower exposure setting.
Auto ISO Priority – Set the camera to prioritise the lowest ISO value. This is useful when image quality is a priority.
Custom Function Buttons – Some cameras have the option to create a custom button.
Use this configuration to set a custom button to quit or enable auto ISO.
This setting is particularly handy for on-the-go photography.
Common Auto ISO Applications
Now that you understand how the feature works, we can take a look at how you can use it. You may think that it’s as simple as clicking a button or checking a box.
Yet, there’s a little more to it than that. That’s because Auto ISO behaves differently in each camera mode.
In this section, I’ll show you how the feature affects your images in every mode.
1. Auto ISO in Aperture Mode (Aperture Priority)

Credit: Matheus Bertelli
With this mode, you get to select the aperture you work with. This will determine the depth of field in your images.
That way, you can ensure that certain elements in your pictures are always in focus and sharp.
Then, your camera will decide on an appropriate ISO value and shutter speed. It’ll start off by using the lowest ISO value possible.
Next, based on that, your camera will determine the shutter speed. If the appropriate speed is out of the camera’s range, then the ISO will automatically increase.
Aperture priority is ideal for taking landscape shots. It’ll reduce blurriness and hopefully eliminate camera shake.
2. Auto ISO in Shutter Speed Mode (Shutter Priority)

Credit: Prime Cinematics
In this mode, you decide the shutter speed and the camera figures out the aperture and ISO. This allows you to determine how you want to record motion.
For example, if you’re trying to capture a moving object, you want a fast shutter speed. That’ll help you freeze the action while maintaining the quality of the image.
In contrast, if you use a slow shutter speed, you can create a sense of motion.
Just like with the previous mode, this one kicks off using the lowest ISO value possible. Then, if the aperture is too narrow to let enough light through, the ISO will increase.
That makes this mode ideal for capturing objects in motion, like flying birds or bustling waterfalls.
3. Auto ISO in Manual Mode
With the manual mode, you’ll have more control over the exposure of your images. That’s because you set the aperture and shutter speed values yourself.
Then, the camera will automatically select the most suitable ISO value. That way, if you want to experiment with photographing shadows, you won’t have to fiddle with the ISO.
So, you’ll have full creative freedom over the depth of field and recorded motion.
This can help you maintain the sharpness of your images, even with constantly changing lighting conditions.
While this mode gives you more control, it’s a bit tough to master. You may find that you end up with overexposed or underexposed images frequently.
4. Auto ISO in Program Mode
Program mode is the opposite of manual mode. This time, you get to select an ISO value that works for you.
Then, your camera will figure out the best shutter speed and aperture for your shots.
Generally, this mode will keep the ISO value constant. Yet, if the appropriate speed and aperture are outside your camera’s range, then the ISO will change.
Because of that, you won’t have much control over the exposure with this mode.
When Should You Use (and Avoid) Auto ISO?
When to Use Auto ISO:
Changing Light
Use auto ISO when photographing in changing light, like twilight or moving in and out of shadows.
Minimum shutter speed
Use automatic ISO and the minimum shutter speed setting together.
This will ensure the image has the correct exposure.
Action Photography
Use auto ISO when shooting action photography and using a fast shutter speed.
Such as for a fast-paced event or candid when the subject can move quickly.
It is advantageous to use auto ISO for travel photography and photojournalism.
Image: Colin Lloyd
Low Lighting
Auto ISO is handy when shooting in low-light situations without a tripod.
The ISO will adjust the camera's light sensitivity for the correct exposure.
Mixed Lighting
It pays to use auto ISO when the lighting is unpredictable, such as a mix of natural and artificial.
It might be a cloudy day with intermittent sun rays or an outdoor event with spotlights.
In these situations, auto ISO is a photographer's best friend.
When NOT to use Auto ISO:
Controlled Studio Settings
You won't need to use auto ISO when you have a controlled environment, such as a studio.
The lighting won't change, so you can take an ISO reading and set the ISO value manually for the entire shoot.
Auto ISO could not work in your favour if it selects a high ISO, resulting in grain-ridden photos.
Creative effects
When you want creative effects that rely on specific camera settings, it is not wise to use auto ISO.
A precise creative vision requires the use of manual mode for ISO, aperture, and shutter speed.
Long Exposure Shots
When taking photos with a tripod or long exposures, setting the ISO sensitivity low is better.
A low ISO will achieve the highest quality image with the least noise.
Using ISO in manual mode will stop auto ISO from unnecessarily changing to a high ISO.
Image: Trevor Mckinnon
Noise Reduction
Use the manual mode ISO function when grain or noise needs to be avoided.
Manual mode stops the auto setting from increasing the value of the ISO.
Noise Production
Likewise, if you want to produce noise and grain, set the ISO to manual mode.
This way, you can keep the ISO value low, and all your photographs will have lots of noise.
My Pro Tips for Using Auto ISO
1. Pairing Auto ISO with Manual Mode
There is a lot to be said for pairing auto ISO with manual mode.
You will have full creative control over the choice of shutter speed and aperture.
While enjoying the ease of automation for perfect exposures.
2. Using Auto ISO for Video
Auto ISO cuts out the need to constantly change and adapt settings when filming.
It will quickly change to correct the exposure when light conditions change. This streamlines the filming process.
The clips shot will have a consistent and even exposure throughout the film.
One drawback is grain can wriggle into your clips without you realising it.
3. Noise Reduction Techniques for High ISO Images
There are a few ways to minimise the potential for noise in your photos.
Shoot using a tripod, fast lenses and with image stabilisation. This will reduce the need for a high ISO.
Or shoot multiple images of the same scene and stack the images when post-processing.
If you can't avoid noise, use Photoshop's Noise filter to reduce noise in your images.
4. Custom Button
If your camera has the option to set a custom button, do it.
Customise the button so you can easily quit or start auto ISO without fiddling with settings.
This makes fast-paced photo sessions easier to handle, and you won’t miss a shot.
4. Check Your Photos
Don’t go the whole shoot without checking over your photos.
Auto ISO can make some wacky decisions, resulting in grainy or overexposed images.
5. Test Auto ISO
Don’t head out to a professional shoot without testing auto ISO first.
It is an amazing setting and sounds like the answer to your photography prayers.
But it is worth familiarising yourself with it first to avoid errors.
6. Consider Using Auto ISO with Manual Mode
In this setting, you determine the aperture and shutter speed, while the camera adjusts the ISO based on the required light for the desired exposure.
Out of the exposure triangle components, only ISO doesn't influence the artistic quality of a photo, except for the potential graininess it might introduce – ISO doesn't alter the depth of field, bokeh, or motion capture in the image.
As long as the ISO remains at a level where my image retains its quality, I'm content with the camera making the judgment of what is the ‘correct' ISO value.
7. Set a Minimum Shutter Speed Based on your Subject
The slower the minimum shutter speed you set, the less need your camera has to rely on high ISO values to get a correct exposure.
If you're photographing static subjects and have steady hands, a tripod, or a camera with in built image stabilisation, you can set a minimum shutter speed of 1/100 or lower.
Auto ISO Limitations
While Auto ISO can be exceptionally useful, it has a few limitations. For instance, the feature can result in overexposed or underexposed images.
That’s because higher ISO values can introduce noise and reduce image quality. This is a common occurrence in aperture priority mode and shutter speed mode.
Besides that, Auto ISO requires careful consideration. You’ll need to pay close attention to many variables to ensure you get the best pictures possible.
Moving on, if you’re shooting indoors with controlled lighting, then Auto ISO won’t affect your images significantly.
Lastly, if you’re using a tripod, Auto ISO can hinder the quality of your images.

Check out these 8 essential tools to help you succeed as a professional photographer.
Includes limited-time discounts.

Judyth is an experienced studio photographer and glass artist. When she isn’t Photoshopping comedians into the bellies of sharks, you can find her cooking delicious treats for her guests.

👋 WELCOME TO SHOTKIT!
🔥 Popular NOW:
